This tutorial will show how you can install and use the Ubisoft Connect client on a Steam Deck.

While Ubisoft’s games are available within the Steam client, you will likely run into issues if you attempt to run them straight from Steam itself.
This is because all of Ubisoft’s video games rely on its client called Ubisoft Connect and don’t directly run through Steam itself.
Don’t worry; getting this client running on your Steam Deck is entirely possible thanks to Valve’s Proton compatibility layer.
Over the following steps, we will show you how to install the Ubisoft Connect client to your Steam Deck.
Before we delve into this tutorial, there are several other game launcher you can install as well, this includes Battle.net and the Epic Games Store.
Running Ubisoft Connect on the Steam Deck
This section will cover everything you need to get the Ubisoft Connect client running on the Steam Deck.
These steps range from installing the client, configuring it to run on the Steam Deck, and creating a directory to store your Ubisoft games on your Steam Deck.
Below we have embedded a video that will walk you through all the steps needed to get Ubisoft Connect running on your Steam Deck. If you prefer to go at your own pace, you can skip the video and follow our written instructions intead.
Changing to Desktop Mode
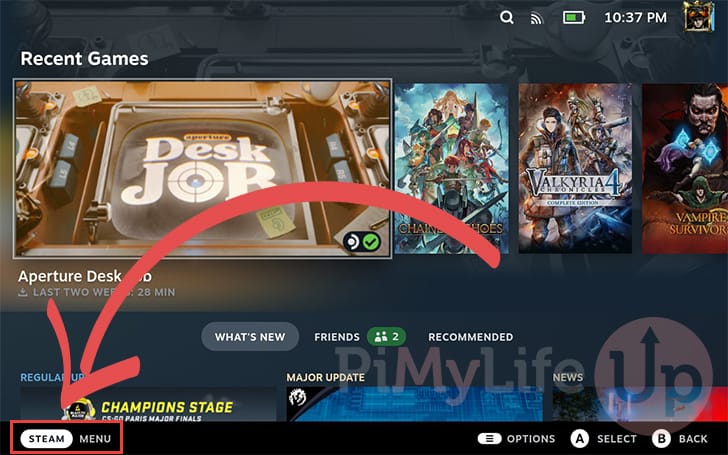
1. To install the Ubisoft Connect client to your Steam Deck, we must first change from the gaming mode to the device’s desktop mode. To change to the desktop mode on your Steam Deck, you must first open the Steam menu.
You can open this menu by either tapping “STEAM Menu” on the screen by pressing the STEAM button on your Steam Deck
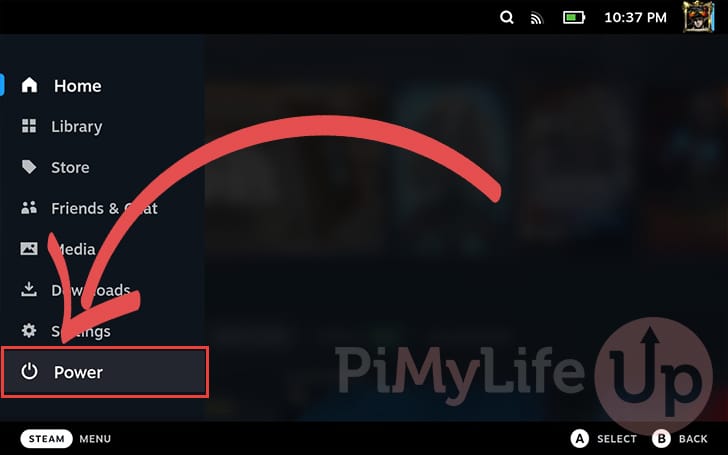
2. Once you have opened the Steam menu, select the “Power” option at the bottom of the list.
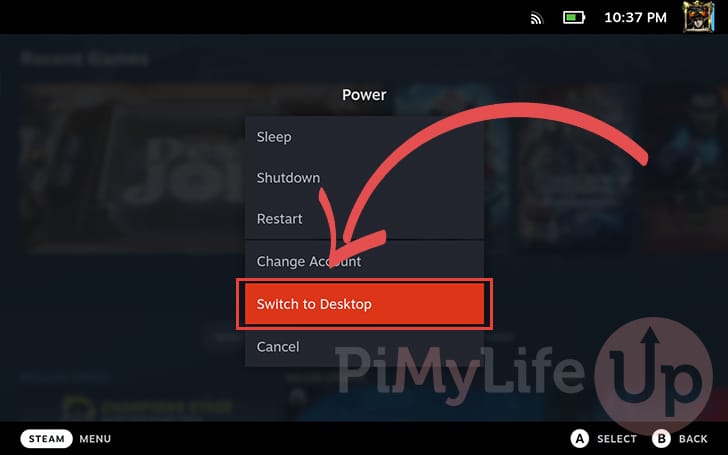
3. Now change to the desktop mode on your Steam Deck by selecting the “Switch to Desktop” button.
Downloading Ubisoft Connect to the Steam Deck
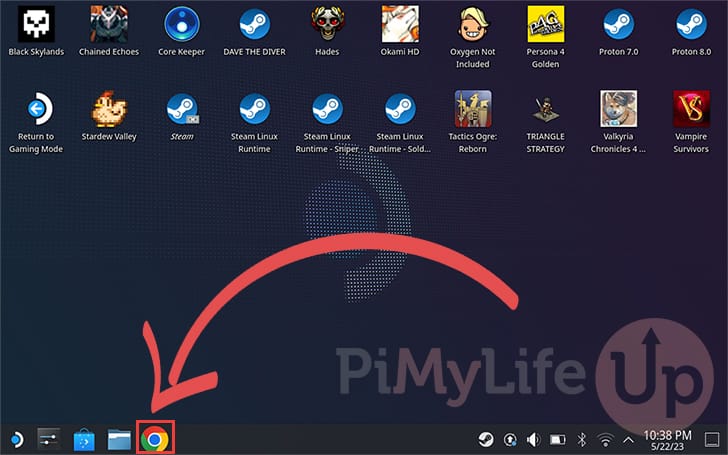
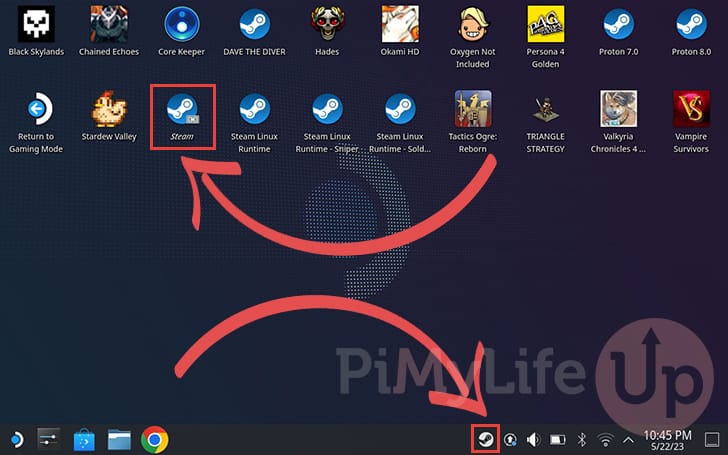
4. Once you are in desktop mode, we can move on to downloading the Ubisoft Connect client to your Steam Deck.
To download this software, you will need to open a web browser. In our case, we will be using the Chrome browser, but any will work.
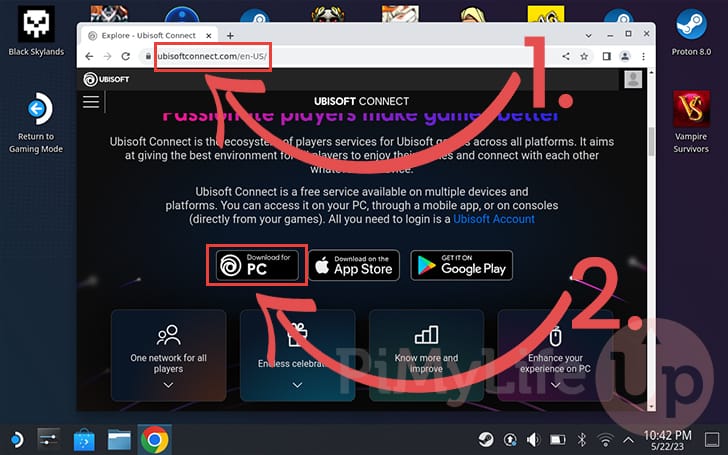
5. With your browser open, go to the Ubisoft Connect website. You can do this by going to the following URL: “https://ubisoftconnect.com” (1.).
Once the website is open, scroll down and click the “Download for PC” button (2.).
Adding the Ubisoft Installer as a Non-Steam Game
6. With the Ubisoft Installer downloaded to your Steam Deck, we are now required to add it as a non-steam game.
To add a game as a non-steam game, we will need to open the desktop Steam client.
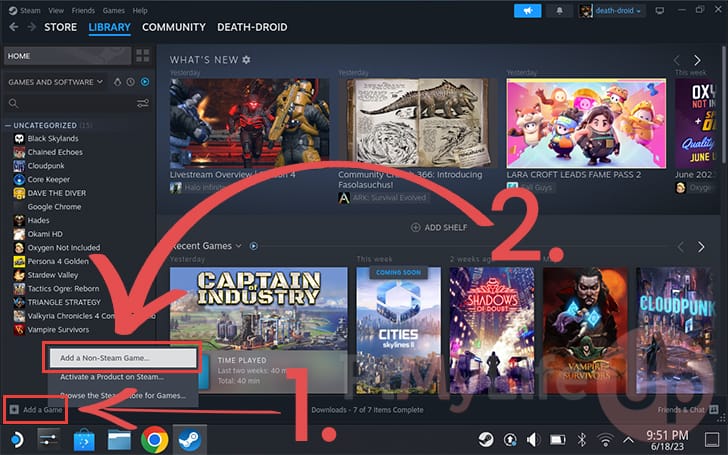
7. With the Steam client now open, click the “ADD A GAME” button on the bottom-left side of the screen (1.).
In the pop-up menu, click the “Add a Non-Steam Game...” button (2.).
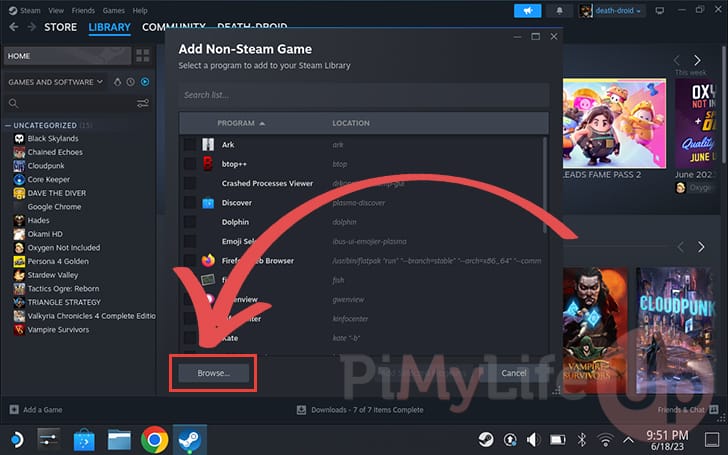
8. In the “Add a Game” box that pops up, you will now need to click the “Browse” button.
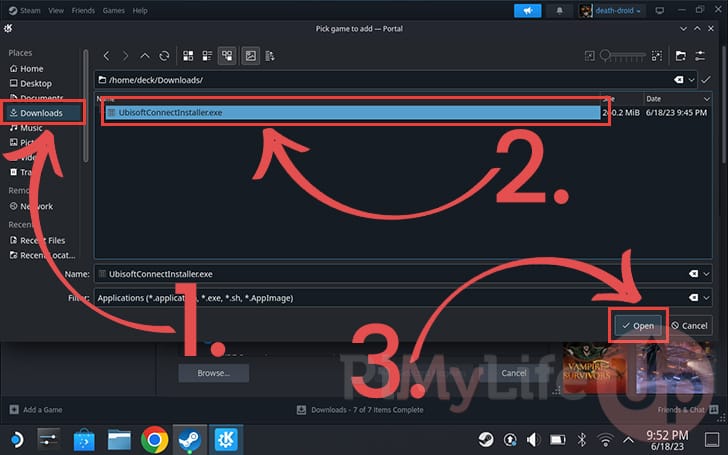
9. In the browser file box, click the “Downloads” option in the sidebar (1.) to change to the “Downloads” folder.
Within this folder, locate the Ubisoft Connect Installer on your Steam Deck and click it (2.).
Once you have the installer selected, click the “Open” button (3.) to continue.
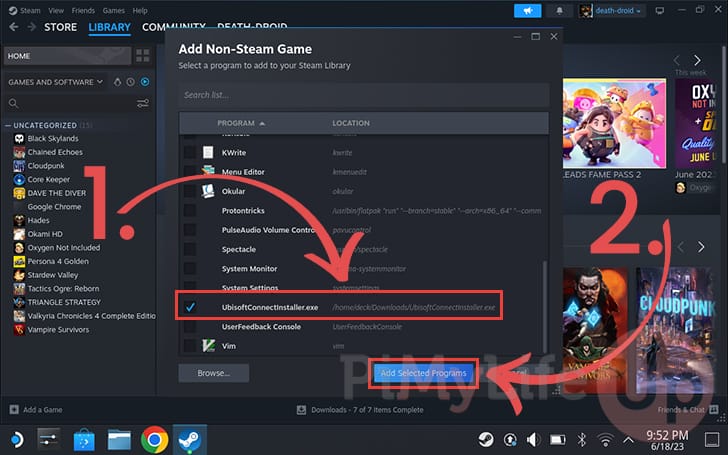
10. You should now see the Ubisoft Connect installer within the provided list with a ticked box next to it (1.).
Once you have selected the installer, click the “ADD SELECTED PROGRAMS” button (2.).
Setting The Steam Deck Proton Compatibility on the Ubisoft Connect Client
11. Before we can install the Ubisoft Connect client on our Steam Deck, we must ensure it uses the experimental version of Proton.
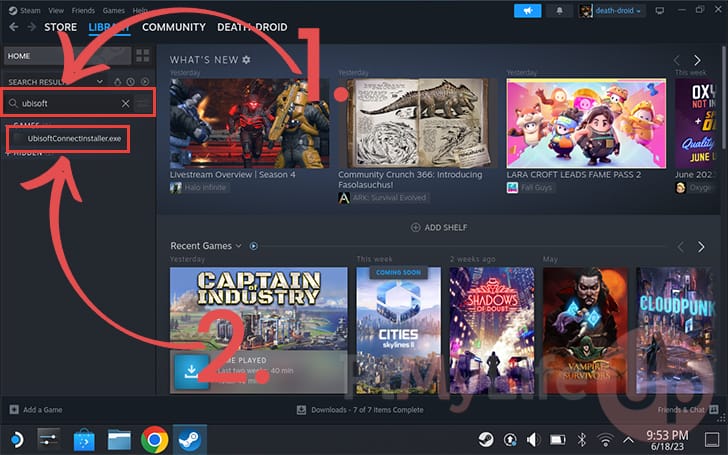
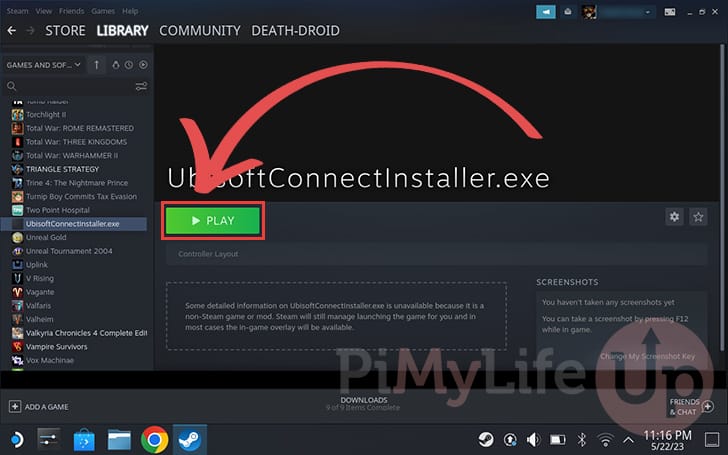
To change the compatibility mode, we must search for and select the Ubisoft Connect installer. If you have an extensive library, you can use the search box (1.) to locate it.
Once you see the “UbisoftConnectInstaller.exe” option in your list, click it to open its page (2.).
12. We now need to open the properties for this particular game entry. Start by clicking the “cog” icon (1.) as shown in the screenshot below.
Next, click the “Properties” option (2.) to bring up the properties page.

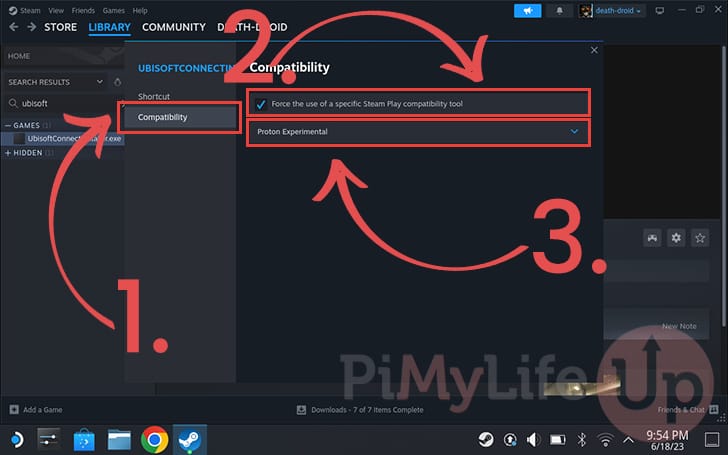
13. With the properties page now open on your Steam Deck, change to the “Compatibility” tab (1.)
Once on this page, ensure that the “Force the use of a specific Steam Play compatibility tool” option is ticked (2.).
Finally, we must set the compatibility option to “Proton Experimental” (3.).
As the Ubisoft Connect client often breaks on the Steam Deck, you will want access to the latest fixes as they are made available. The experimental branch of Proton is the best way to achieve this.
Installing the Ubisoft Connect Client onto the Steam Deck
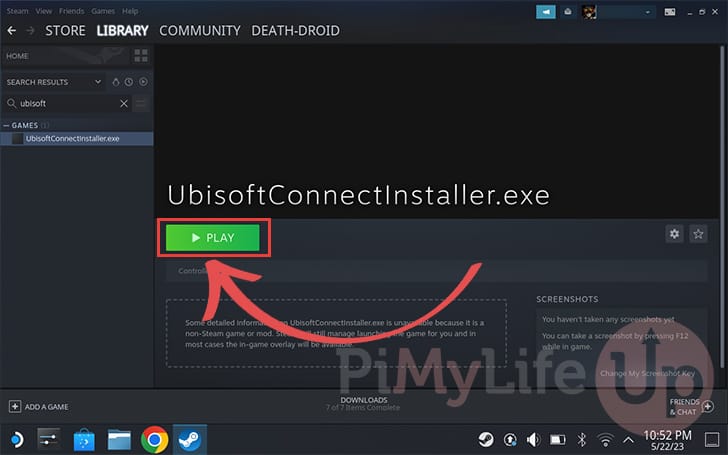
14. Back on the Steam library page for the Ubisoft Connect installer, you will need to click the “PLAY” button.
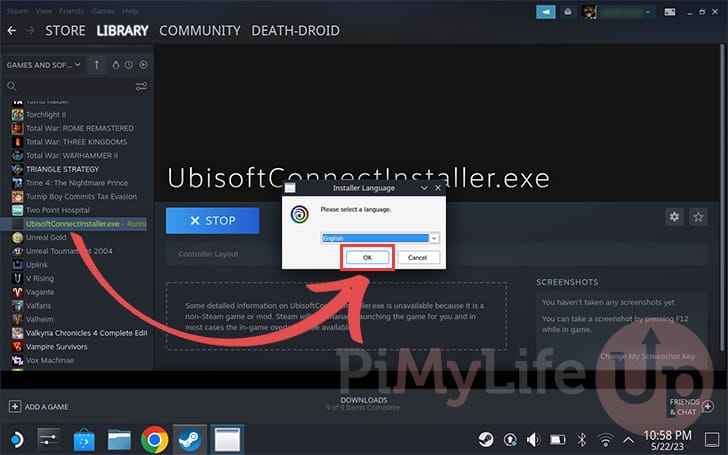
15. You will now have the Ubisoft Connect Installer running on the Steam Deck. To proceed with the installation, click the “OK” button.
Please note that you may have to hold down the STEAM button on your Deck to use the touchpad while the app is open.
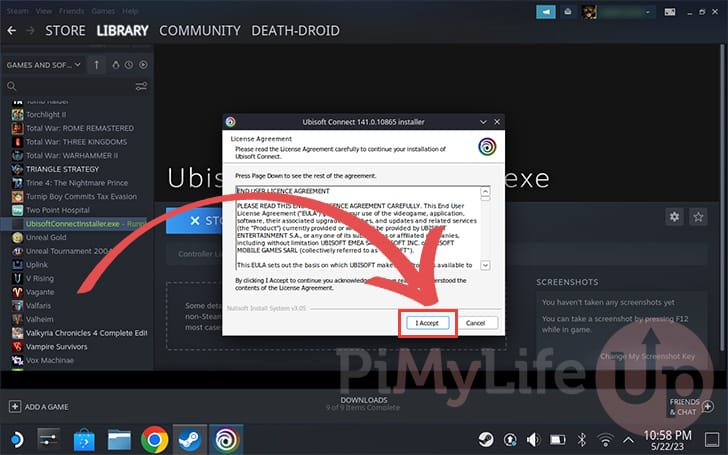
16. You will now be greeted with a license agreement you must agree to before proceeding.
To continue installing the game client, click the “I Accept” button.
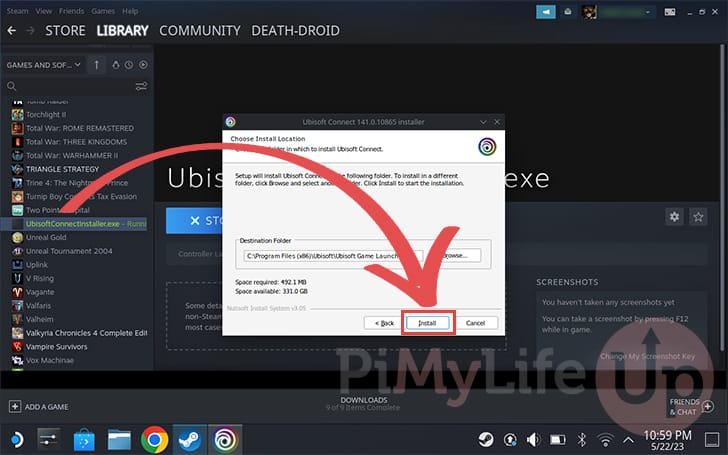
17. You will now have the chance to change the installation location. However, as games using Proton work within their own directory, you will want to stick with the default value.
You will want to click the “Install” button to install the client.
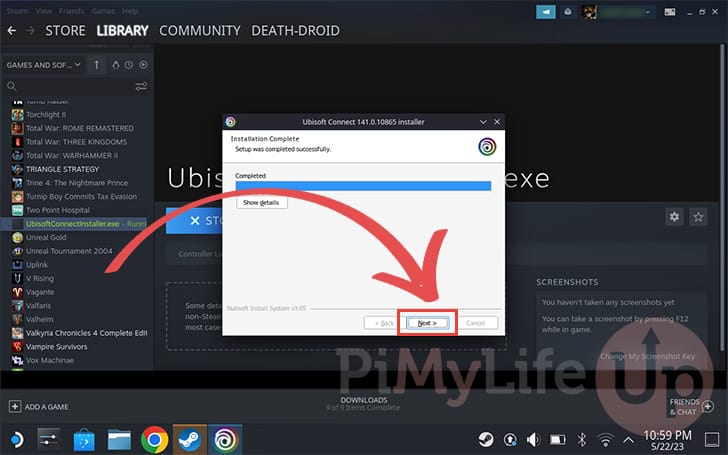
18. Once the installation is completed, you will again want to click the “Next >>” button.
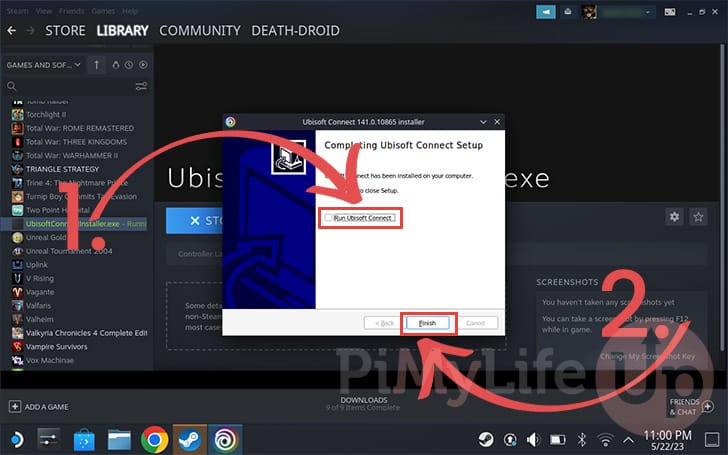
19. Now that you are on the final screen, ensure you have the “Run Ubisoft Connect” checkbox unticked (1.).
Once you are sure the box is unticked, click the “Finish” button (2.) to complete the installation of the Ubisoft Connect client to your Steam Deck.
Changing the Steam Target and Start In Folder to Ubisoft Connect
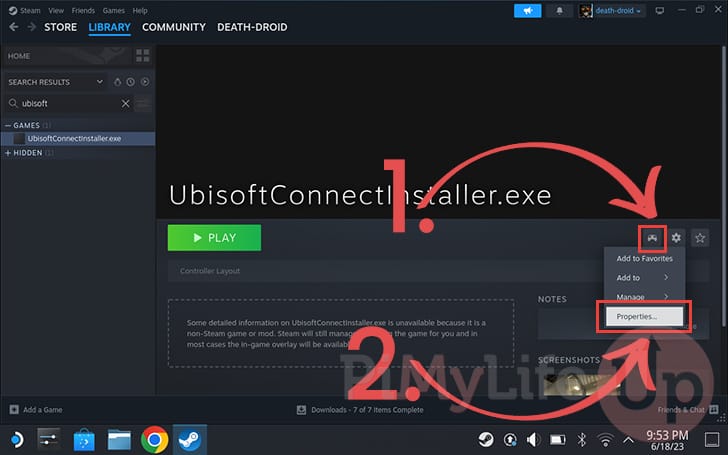
20. Back on the Steam page for the Ubisoft Connect Installer you will now want to reopen the properties page. You must open this page as we need to change the target from the installer to the actual Ubisoft Connect client.
To begin this process, click the “Cog” icon (1.) located to the right of the Steam client.
Next, click the “Properties” button (2.) to get us to the settings to change the launch target.
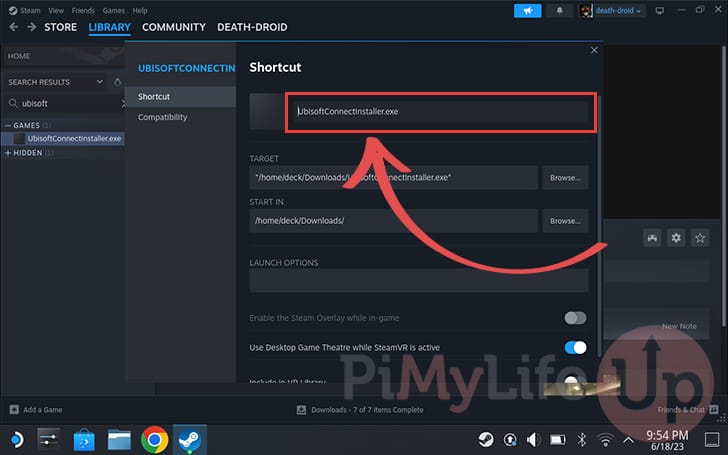
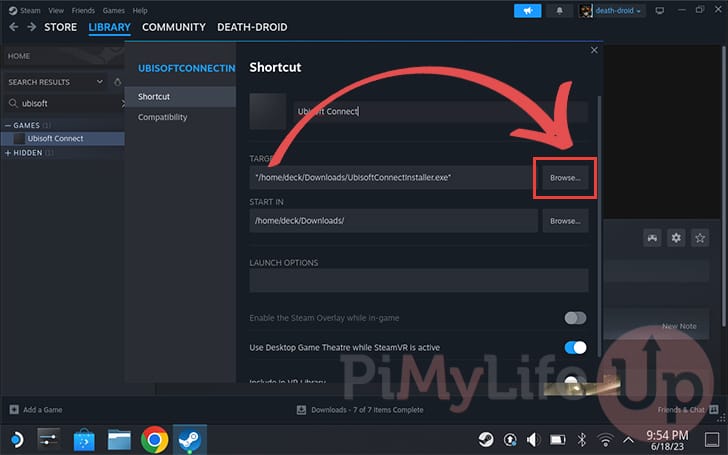
21. Your first step is to change the shortcut name to something more fitting. To find the launcher easier we changed it on our Steam Deck to “Ubisoft Connect“.
You can bring up the virtual keyboard on your device by pressing the STEAM and X buttons.
Changing the Steam Deck Launch Target for Ubisoft Connect
22. With the properties page open, you will want to click the “Browse” button under the “Target” heading.
23. We can now begin finding and selecting the Ubisoft Connect client we installed earlier in this guide.
First ensure that you are back in your home directory. You can do this by clicking “Home” in the sidebar.
Once in your home, open up the settings panel by clicking the icon in the top-right corner (1.) of the dialog.
Next, click the “Show Hidden Files” option (2.) to enable hidden files within the file browser.
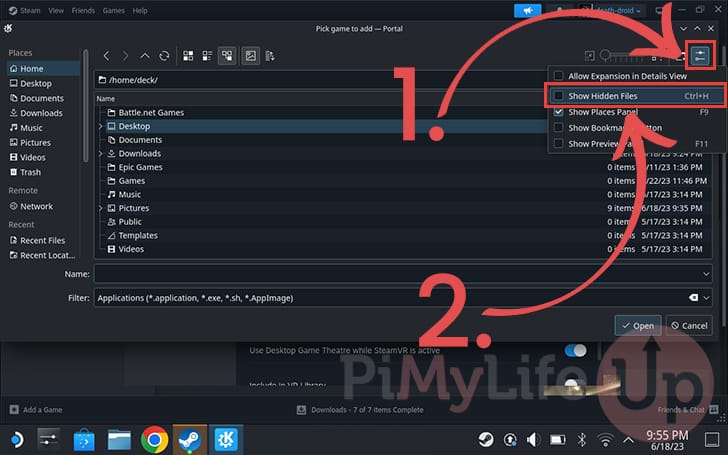
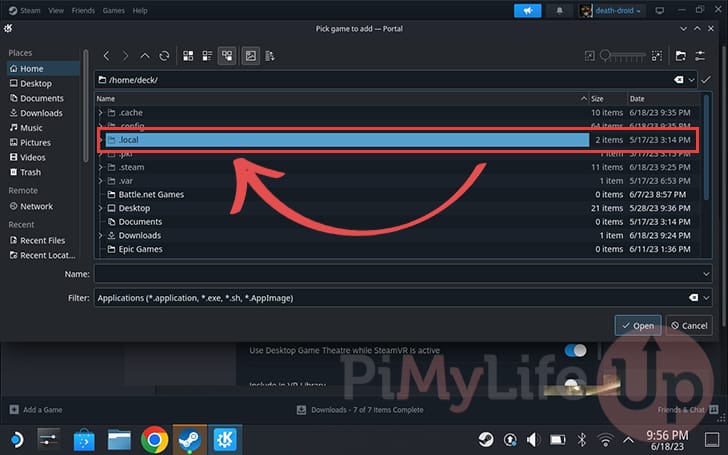
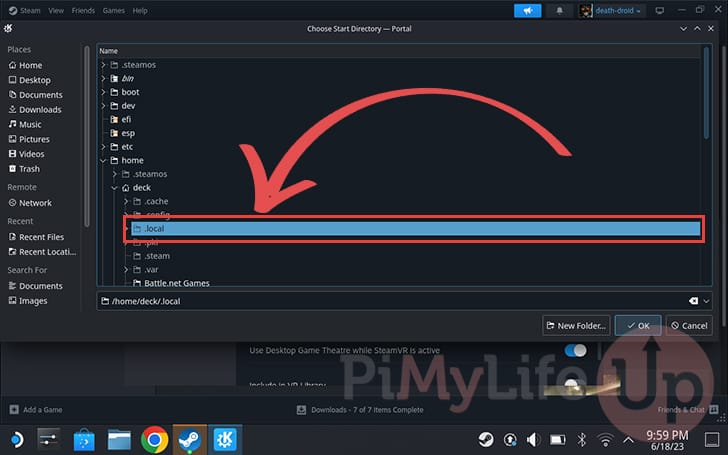
24. With hidden files now enabled, you should see a few more directories. We will need to navigate through these to get to where Ubisoft Connect has been installed on your Steam Deck.
- The first directory you will want to change to is “
.local“. - Next, move to the “
share” folder. - After navigating to the “
share” folder, you will want to scroll down and open the “Steam” directory. - We now need to move into the “
steamapps” directory.
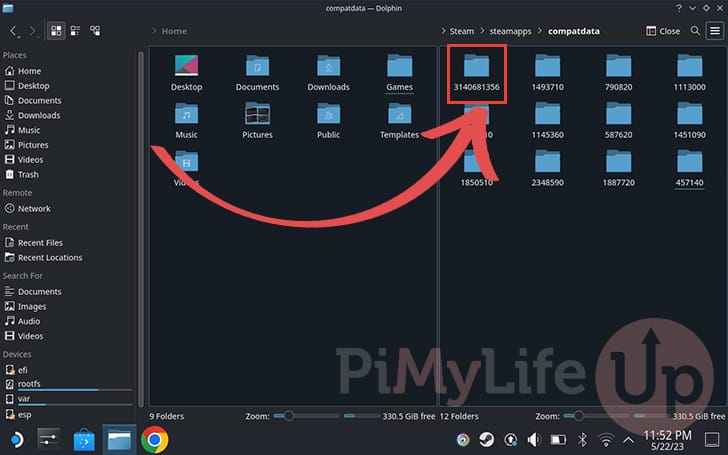
This is the main folder where games will be saved to on your Steam Deck. - Now we are in the “
steamapps” directory, we must change to the “compatdata” directory.
This directory is where Steam keeps all its applications, including the ones you install through the Proton compatibility layer, including the Ubisoft Client.
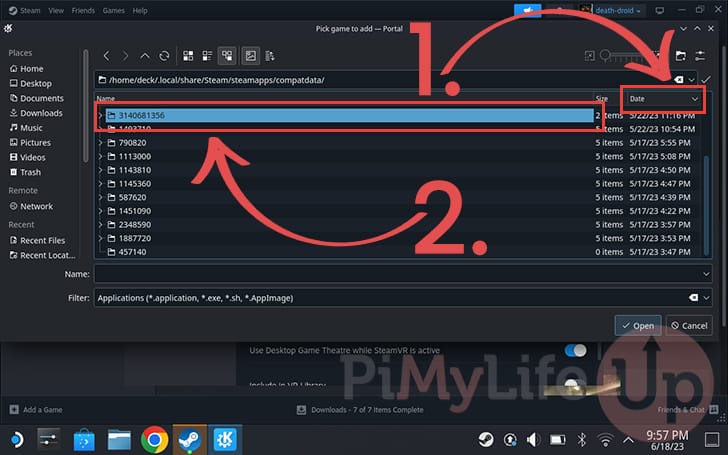
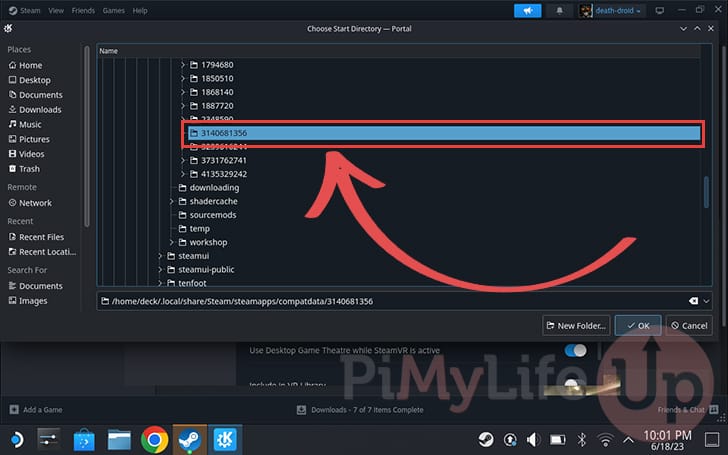
25. In this directory, you will want to sort the files from newest to oldest by clicking the “Date” header (1.) and ensuring its arrow is pointing up.
The folder you want to open should now be at the top of the list (2.).
Make a note of the name for this directory as you will need to know it later on in this guide.
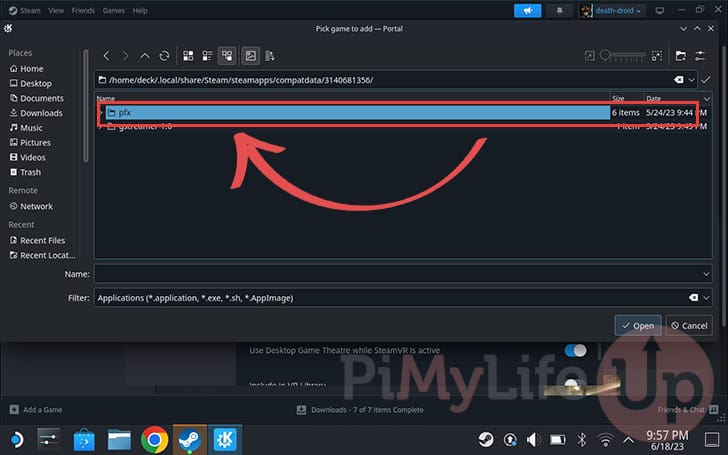
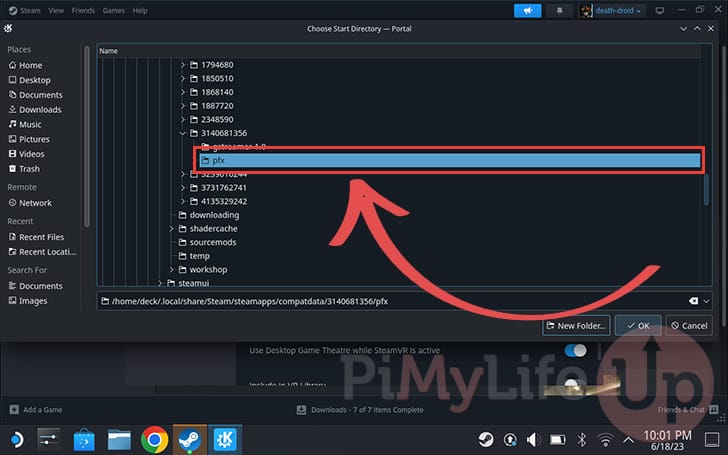
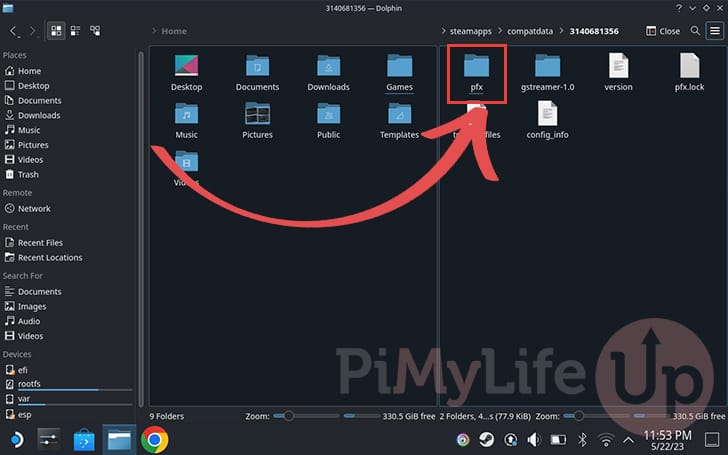
26. After changing to the directory where your Steam Deck is storing Ubisoft Connect, you will need to browse a little bit further.
- You will next want to move into the “
pfx” directory. - To find where the Ubisoft Connect client has been installed on the Steam Deck, you will now need to open the “
drive_c” directory.
The directory we are changing to is where the Windows filesystem is simulated on your Deck. - Open the “
Program Files (x86)” directory next. This directory is where the Ubisoft Connect client would have been installed. - You will now see a small list of directories, find the one called “
Ubisoft” and open it. - Now open the “
Ubisoft Game Launcher” directory.
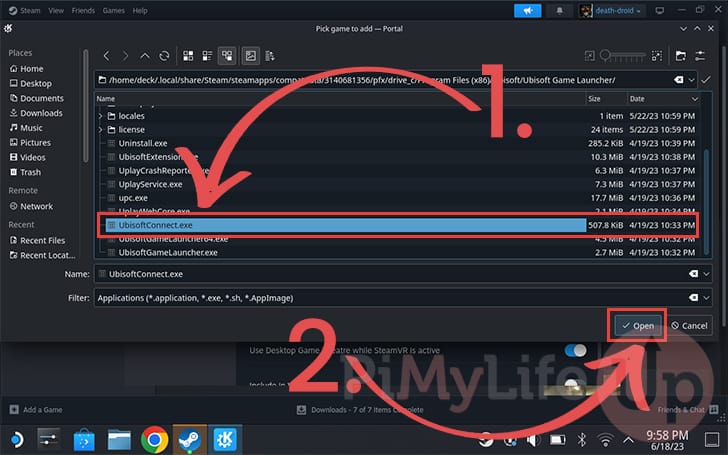
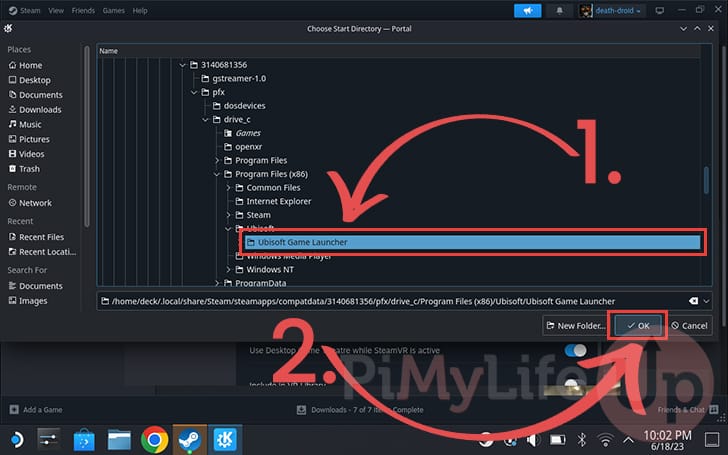
27. We are finally in the correct directory where the Ubisoft Connect launcher was installed on our Steam Deck.
Scroll until you find the executable with the name “UbisoftConnect.exe” and click it (1.).
Once done, you will want to click the “OPEN” button (2.).
Change the Start In Directory to Ubisoft Connect on your Steam Deck
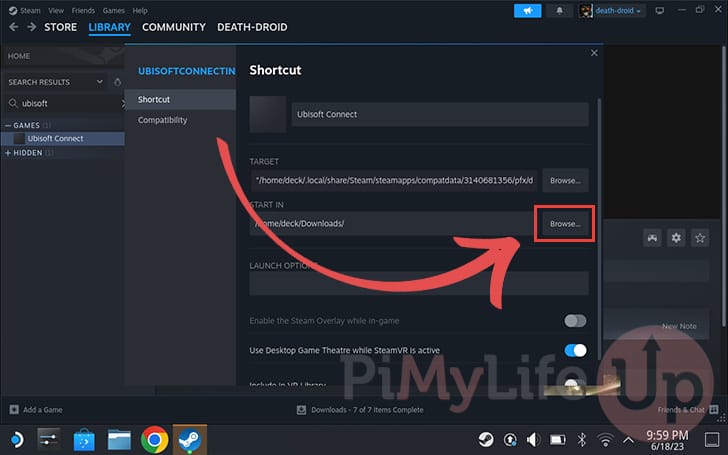
28. If the “Start In” directory is still set to the default value, you will need to set the folder by clicking the “Browse” button.
If it looks like it has been automatically updated, you can skip to the next section.
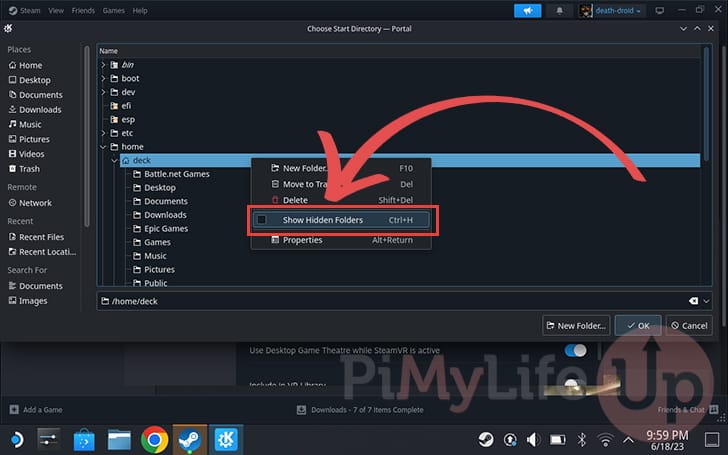
29. Before we can select the Ubisoft Connect directory on our Steam Deck, we must first enable hidden folders.
Bring up the context menu by right-clicking into the screen. You can right-click using the Steam Deck by pressing the L2 trigger.
30. You can now navigate to the Ubisoft Connect directory on your Steam Deck. This is the same directory we went to in the previous section.
- Start by changing into the “
.local” folder. - Next, change into the “
share” folder. - You will now want to change to the folder labeled “
Steam“. - Now open the directory named “
steamapps“. - Navigate to the “
compatdata” folder. This is the folder where your Steam Deck is storing the Ubisoft Connect client.
31. Now, select the Proton directory where Ubisoft Connect was installed to on your Steam Deck.
You should know this folder name from earlier on in this guide when you set the target path.
32. Once you have identified and changed into the correct proton directory we need to navigate a little further.
- The next folder you want to navigate to is named “
pfx“. - Once in the “
pfx” folder you will want to change to the directory labeled “drive_c“. - Now change to the “
Program Files (x86)” directory. - The second last directory you need to open is the one named “
Ubisoft“.
33. Finally, you should see a directory labeled “Ubisoft Game Launcher“, click it to select it (1.).
Once you have the folder selected, click the “OK” button (2.). Essentially this is just telling Steam that this is the directory it should run in when launching Ubisoft Connect.
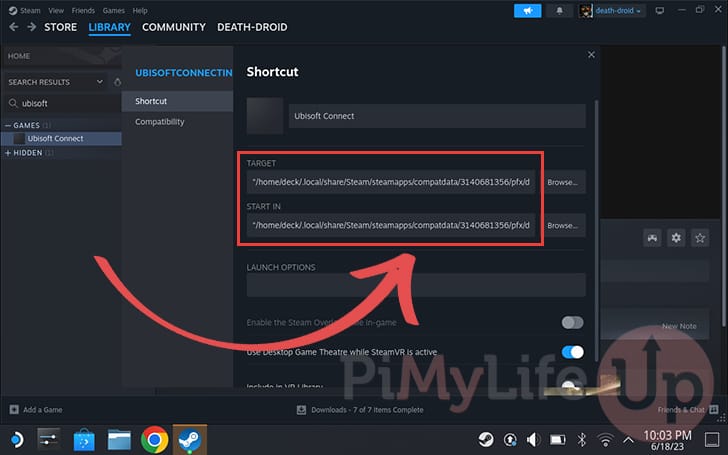
Ensure Fields Have Double Quotes
34. The last thing you need to do is ensure that both the “TARGET” and “START IN” text boxes have a double quote (") at the start and end.
If the double quotes are not there, then you will need to manually add them by tapping into the field and using the keyboard.
Some versions of Steam don’t automatically add these which will cause the Ubisoft Connect client not to load.
Creating a Directory to store your Ubisoft Connect games on the Steam Deck
35. Game clients like Ubisoft Connect that run under the Proton compatibility layer have their own file directory structure.
While you can still easily install the game directly to a MicroSD card, installing the games to an easily accessible location on your Steam Deck requires you to make a directory elsewhere and create a symbolic link into the Proton directory.
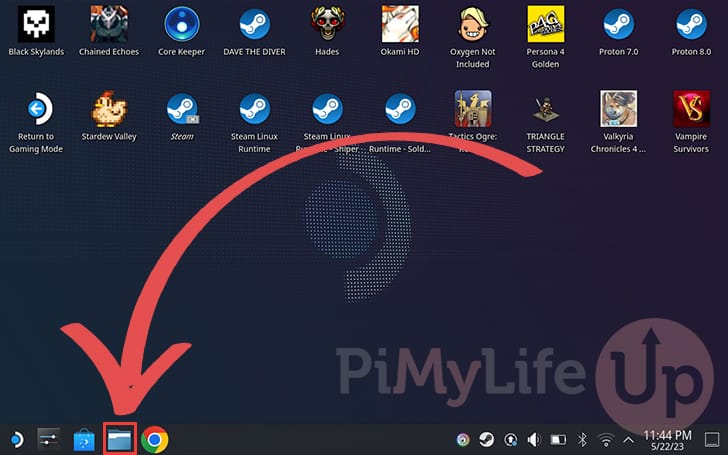
To start this process, open the Dolphin file explorer on your Steam Deck.
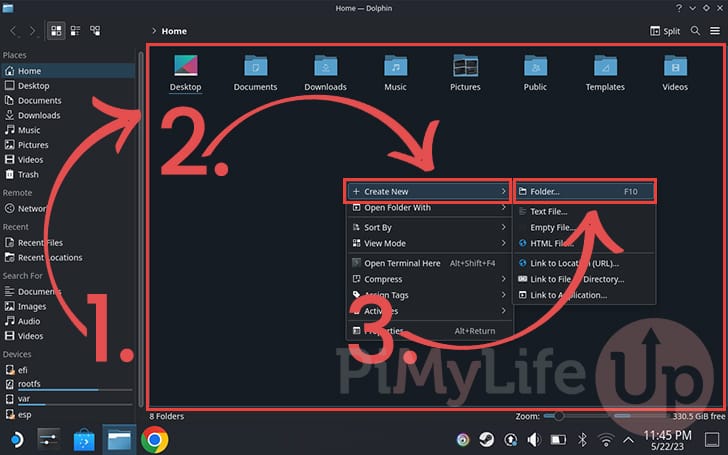
36. With the Dolphin file explorer open, right-click in the main window (1.) by pressing the L2 trigger on your device.
Next, hover over the “Create New” option (2.), then click the “Folder” button (3.).
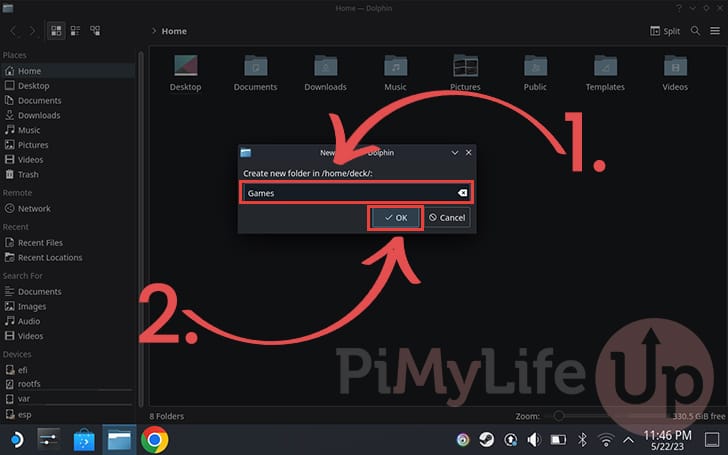
37. You can now give this new folder a name (1.). For this tutorial on installing Ubisoft Connect on your Steam Deck, we will be calling this directory “Games“.
Remember, you can bring up the keyboard by pressing the STEAM and X buttons on your Steam Deck.
Once you have typed a name, click the “OK” button (2.).
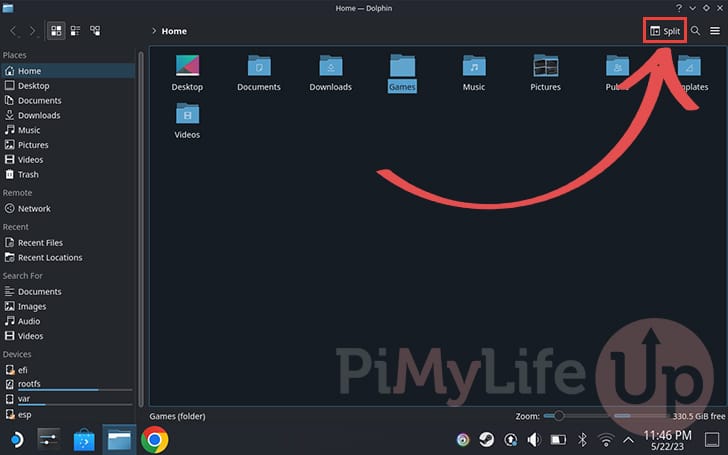
38. With the directory created, let us split the Dolphin file explorer in two by clicking the “Split” button in the top-right corner.
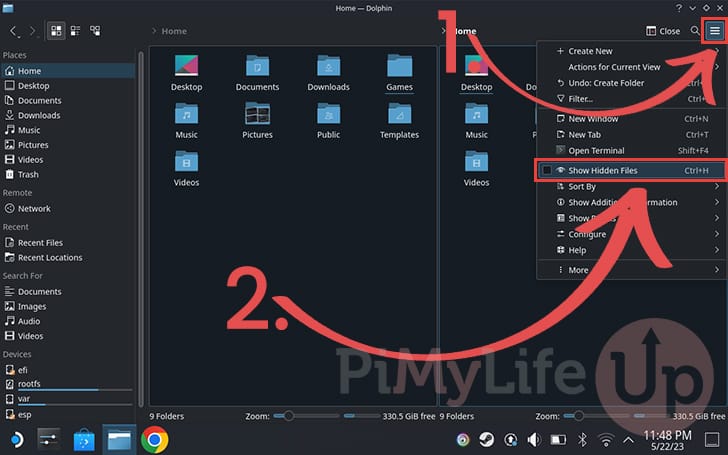
39. With the explorer split in two, click the hamburger icon in the top-left corner (1.).
With the open menu, click the “Show Hidden Files” option (2.). Setting this option will allow us to see the directory where we installed Ubisoft Connect earlier in the guide.
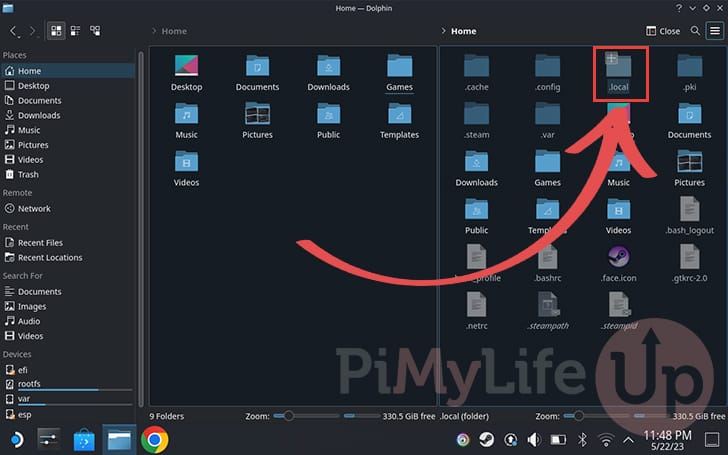
40. After enabling the “Show Hidden Files” option, you should see numerous more folders within the right-hand side of Dolphin.
- The first folder we are changing to is the one called “
.local“. - Next, we need to move into the “
share” directory by tapping it. - After the share directory, you must swap to the “
Steam” folder. - Within this folder, you should see a directory named “
steamapps“, enter this directory to continue. - We must now open the “
compatdata” directory. This is where any application running under Proton are installed by default, including Ubisoft Connect.
You will know you are in the right folder when you see a bunch of folders with random numbers.
41. With the “compatdata” directory open, you will want first to click the hamburger icon (1.).
Next, hover over the “Sort By” option (2.) and then click “Modified” (3.).
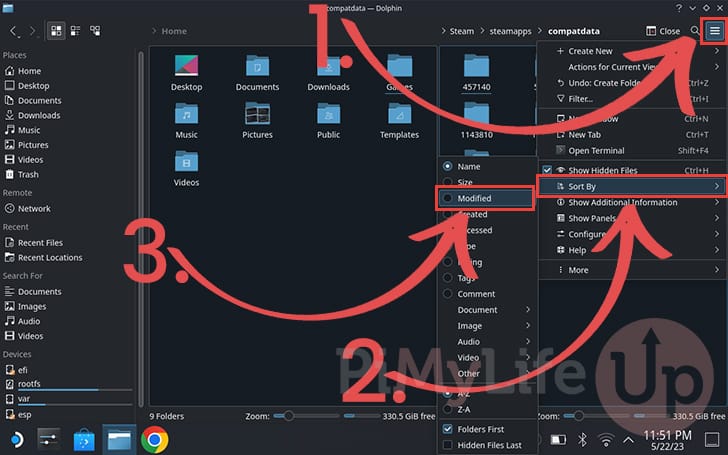
42. Now, if your modified order is set to Newest to Oldest, the directory you want to open should be at the top of the list.
This directory will have the same name as the one you browsed to in the “Changing the Steam Client Target to Ubisoft Connect” directory.
43. Once you are finally in the place where Ubisoft Connect has been installed, you will only need to go through a couple more directories.
- First, you will want to change to the “
pfx” folder. - Finally, change into the “
drive_c” directory. This is where the “C” drive is simulated for Ubisoft Connect on your Steam Deck.
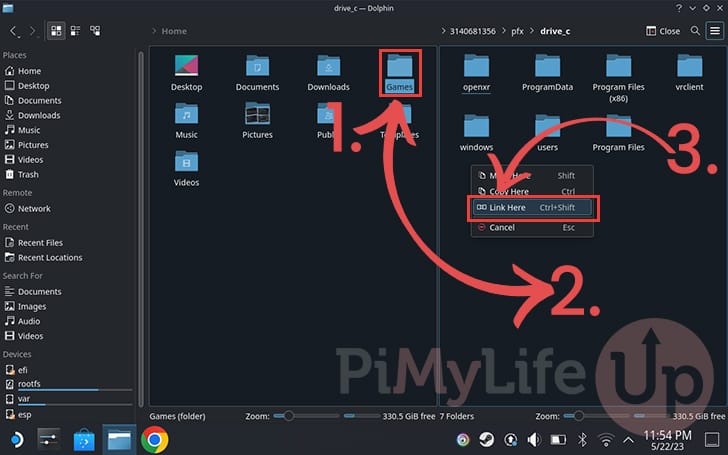
44. You will now want to drag the “Games” directory from the left side (1.) of Dolphin to the right side (2.).
Dragging this folder will open a prompt with four options. You will want to click the “Link Here” (3.) option to create a symbolic link.
A symbolic link means that the files will all remain within the home folder on your Steam Deck but will act as if it is available through a “Games” directory on the C drive that Ubisoft Connect sees.
Logging in and Configuring Ubisoft Connect on your Steam Deck
45. With the directory created to store your Ubisoft Connect games, we can proceed with a few more configuration steps.
Start by opening up the Ubisoft Connect client by clicking the “Play” within the Steam library.
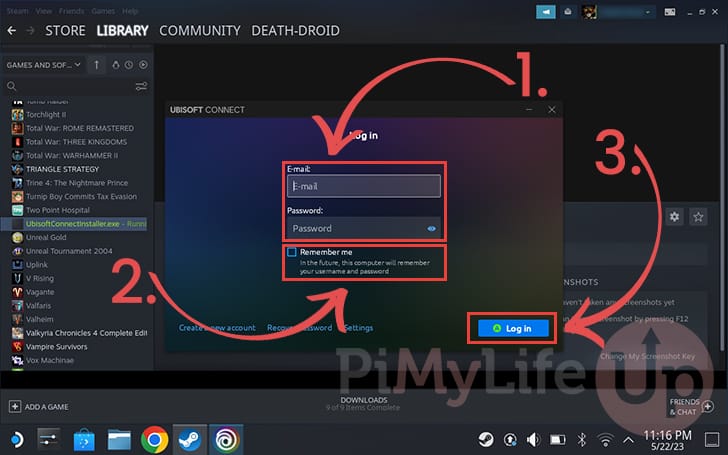
46. After a brief self-update, you can now log in to Ubisoft Connect on your Steam Deck.
First, enter your email and password within the provided text boxes (1.). You can bring the keyboard up by pressing the STEAM and X buttons.
Next, you will likely want to tick the “Remember me” checkbox (2.) so you don’t have to continually login.
Finally, click the “Log in” button to continue (3.).
47. Now that you are logged into the client, click the hamburger icon in the top-left corner of the client.
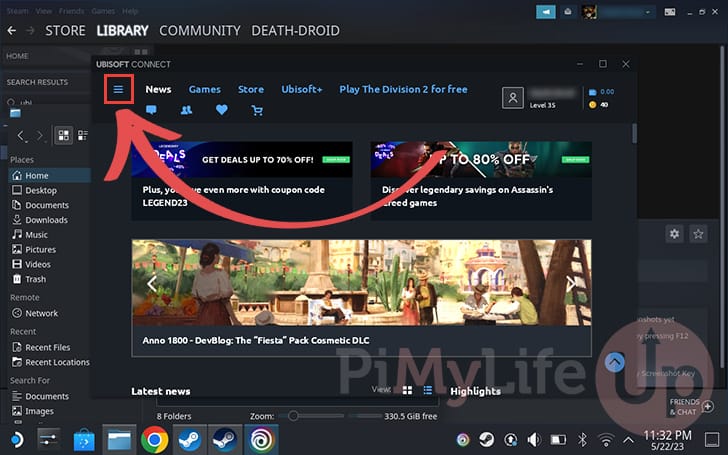
48. Within the menu that appears, click the “Settings” page to continue.

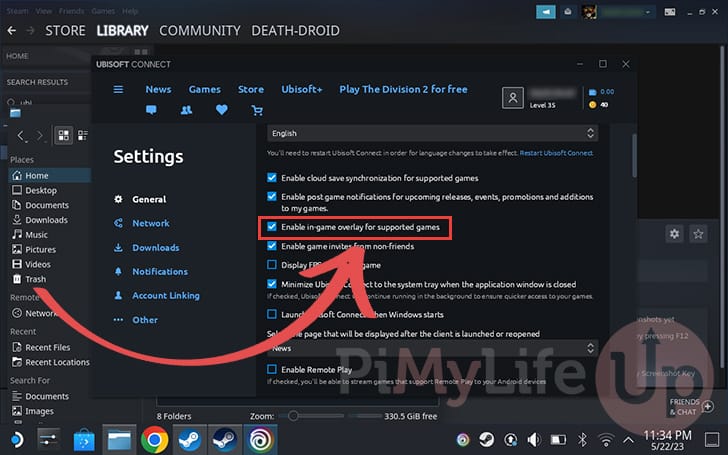
49. Within the “General” page, you will want to find the option labelled “Enable in-game overlay for supported games” and ensure it is unticked.
The in-game overlay can cause issues while running Ubisoft games on your Steam Deck.
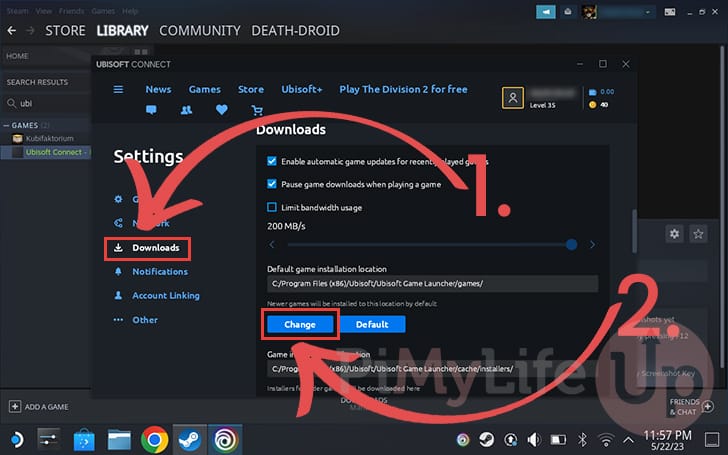
50. You will want to change to the “Downloads” settings page (1.).
Then on here, you can change the default game installation directory by clicking the “Change” button (2.).
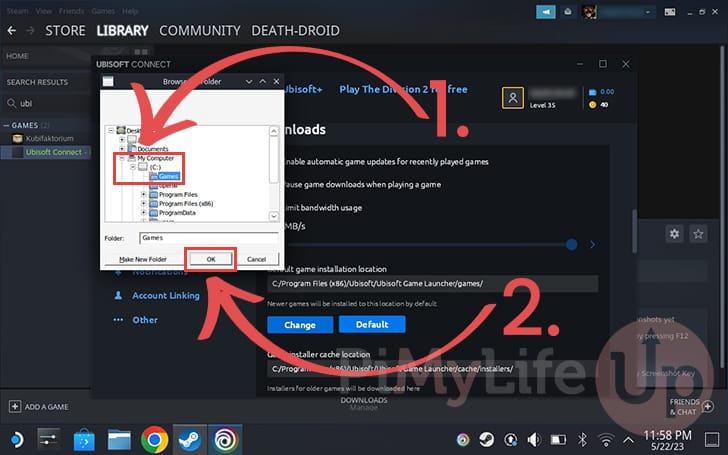
51. A little window will now open on your screen that will allow you to choose where you want your games installed to.
Start by clicking the “My Computer” option to reveal more details. Then, click the “C:” option to install the game on your Steam Deck or “z:” to install it to your MicroSD Card.
If you choose to go with the “C:” drive, you will see the “Games” directory we created at the top of the list (1.).
Once a directory is selected, click the “OK” button (2.) to confirm the change.
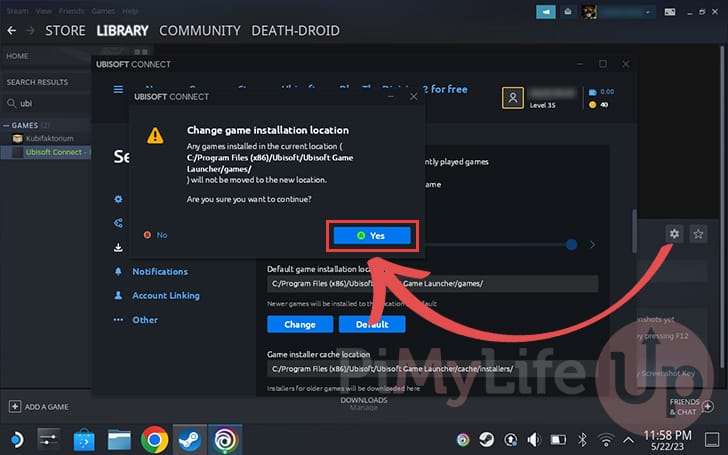
52. After changing the game installation location, you will get a warning that any existing games will not be moved to your new location.
To proceed with the directory change, click the “Yes” button.
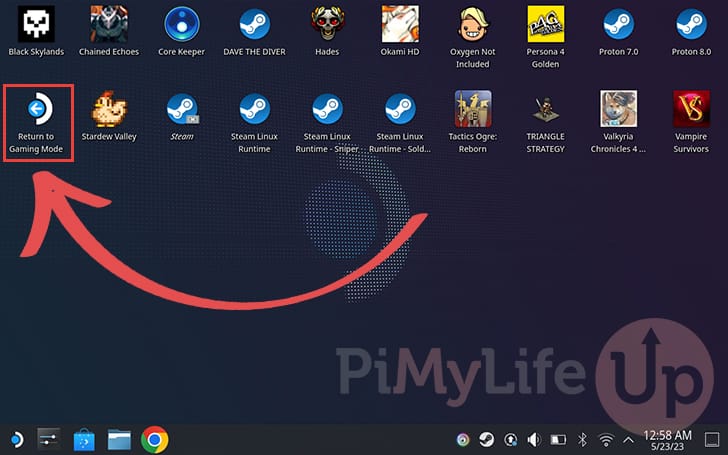
53. Back on the desktop you can now return to the Steam Deck gaming mode.
To change to the gaming mode, you only need to double-tap the “Return to Gaming Mode” icon.
Opening Ubisoft Connect within Steam Deck Gaming Mode
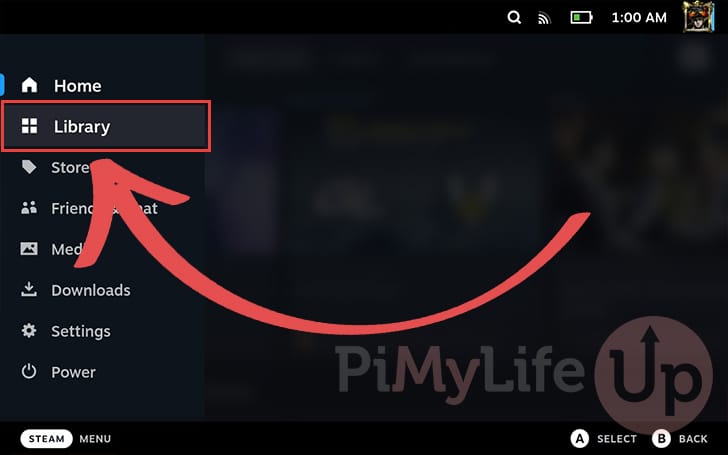
54. Now that you are back in the Steam Deck Gaming mode, you will want to change to your game library.
To get to your game library, tap the “STEAM Menu” icon or press the STEAM button on your Steam Deck.
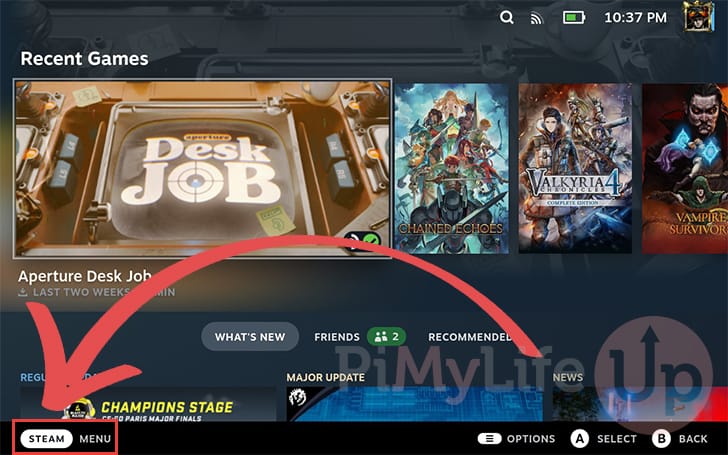
55. With the Steam menu open, tap the “Library” option.
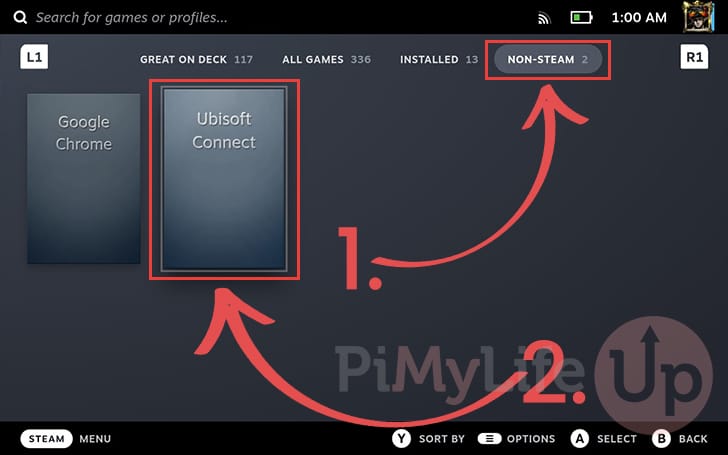
56. Now that you are within your Steam Deck game library, you will want to change to the “NON-STEAM” tab (1.).
Once on that tab, you should see “Ubisoft Connect” (2.) as an available option. Select it to continue.
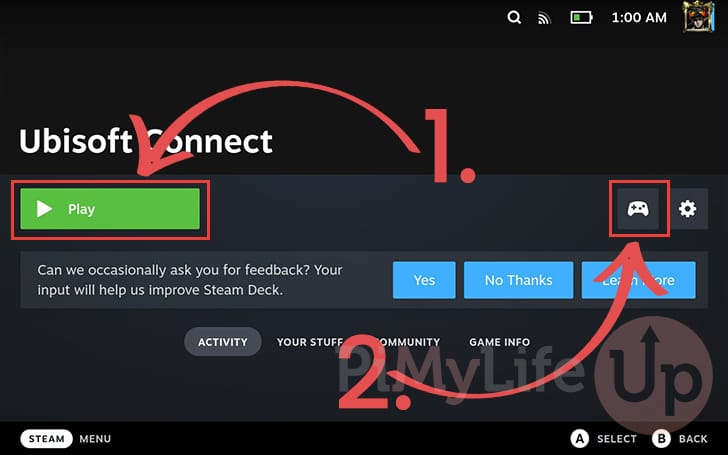
57. You can now easily launch the Ubisoft Connect client from your Steam Deck. To launch it, you only need to tap the “Play” button (1.).
You can reconfigure the controls within the game client by tapping the controller icon (2.).
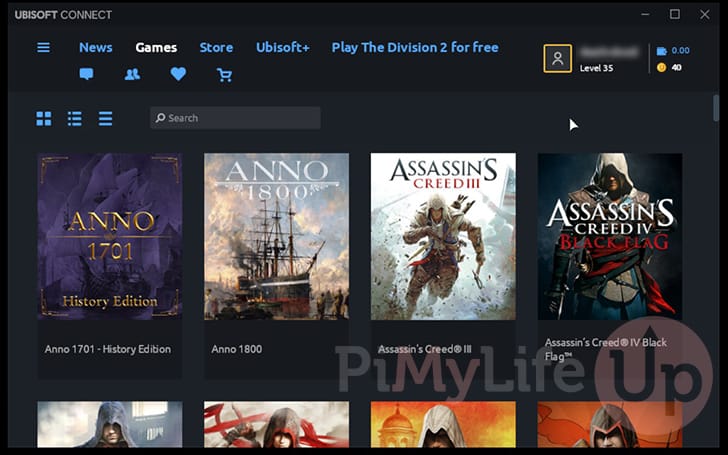
58. You now successfully have the Ubisoft Connect client installed on your Steam Deck.
If you haven’t changed the controls from the defaults, you may have to hold down the STEAM button on your controller to utilize the mouse.
Troubleshooting Issues with Ubisoft Connect on the Steam Deck
This section will cover tips on improving your experience with the Ubisoft Connect client on your Steam Deck. If you don’t see a particular issue you are facing mentioned here, please try commenting below.
Ubisoft Connect: Connection Lost on the Steam Deck
One of the most common issues you will encounter when using the Ubisoft Connect client is the “Connection Lost” error.
From various users’ experiences, this seems to be caused by an MTU black hole, meaning the connection can never be completed. To work around this, we can either enable MTU probing or manually lowing the MTU value.
Enabling MTU Probing on the Steam Deck
The best way to fix this issue is to enable MTU probing. The network stack will automatically try lowering the MTU to get a working connection by enabling this option.
1. Before attempting this fix, you will need to ensure that you have set a password for the Deck user so that you can use the sudo command.
2. With a password set, you will now want to open the terminal on your Steam Deck.
The next couple of steps will be done within the command line.
3. With the terminal open, run the following command within the terminal.
This command adds the “net.ipv4.tcp_mtu_probing” line into a new config file. This config file will be automatically read when the system starts up, enabling MTU probing.
echo net.ipv4.tcp_mtu_probing=1 | sudo tee /etc/sysctl.d/custom-mtu-probing.confCopy4. For this change to take effect, you must restart your Steam Deck completely.
You can use the following command since we have the terminal open already.
sudo rebootCopyLowering the MTU Value
An alternative way to fix the Ubisoft Connect “Connection Lost” error message on your Steam Deck is to lower the MTU value manually.
Only follow these steps if enabling MTU probing doesn’t fix the issue for you.
1. Before you begin, you will want to open the Konsole application on your Steam Deck. This application allows you to type in commands while using your device.
2. With the terminal open, begin listing your current connections using the following command.
This command uses the network manager CLI to show connections.
nmcli connection showCopy3. After running the above command, you should see something like what we have shown below. The value you are after here is the name under the “NAME” column.
In our case, we will use “HOME_LINK” for the next step.
NAME       UUID                        TYPE  DEVICE
HOME_LINK  ******-***-***-***-*******  wifi  wlan0
4. Now that you know the name of your connection, we will want to modify it and lower the MTU value.
Lowering the MTU value to 1452 from 1500, should hopefully fix the issues with connecting to Ubisoft Connect from your Steam Deck.
With the command below, ensure you replace “NAME” with the value you found in the previous step.
nmcli connection modify 'NAME' 802-11-wireless-mtu 1452Copy5. The fastest way for these changes to take effect is to restart your Steam Deck.
Since you already have the terminal open, you can restart using the command below.
sudo rebootCopyUbisoft Connect Stuck on Looking For Patches
When using Ubisoft Connect on your Steam Deck, you may get stuck on the “Looking For Patches” screen.
To get the client unstuck, we will cover a couple of different ideas you may want to try.
Restarting Ubisoft Connect
One of the simplest ways to fix the “Looking for patches” screen is to restart the Ubisoft Connect client on your Steam Deck. This is what solved the issue for us and may potentially fix the problem for you.
All you need to do is hit the “X” at the top right of the Ubisoft Connect client and then try running the client again.
Disabling FSYNC and ESYNC
Another way people have solved being stuck on the looking for patches with the Ubisoft Connect client is by changing the launch parameters.
The two parameters turn off two features of the Proton translation layer. These two features are esync and fsync. These features are designed to improve performance but can come with issues.
1. To start, you will need to open the properties screen within Steam for the Ubisoft Connect client.
This is the same screen you used earlier in this guide when setting the launch “TARGET” and the “START IN” directory.
2. With the properties screen open, find the “Launch Options” as shown below.

Once you have found the right text box, you will want to type in the following.
PROTON_NO_ESYNC=1 PROTON_NO_FSYNC=1 %command%3. Now, attempt to relaunch the Ubisoft Connect client to see if the issue has been solved.
Conclusion
At this point in the tutorial, you should hopefully have the Ubisoft Connect client running on your Steam Deck.
This game client gives you access to any game developed and published by Ubisoft. This includes hits such as Far Cry and Assassins Creed.
Please comment below if you experienced issues with getting the game client installed on your Steam Deck.
If you found this tutorial helpful, be sure to check out our other Steam Deck tutorials.


Hey,
thank you for this wonderful guide. I followed everything up to step 46, and everything works fine. However, at this step, I can’t log into Ubisoft Connect (UC) because the keyboard doesn’t appear in the foreground of UC.
I tried enabling the Steam overlay in UC settings, but that didn’t work. Then, I tried minimizing and maximizing the UC window, but still no success.
Outside of UC, the STEAM+X shortcut works fine.
Do you have any ideas on how to fix this?
Best regards
Hi Caddi,
Some changes have seemed to have made the keyboard a lot more unreliable when in desktop mode. My immediate suggestion is to skip opening it up in desktop, proceed straight to gaming mode and then login through that interface instead. The keybaord seems to open much more reliably in gaming mode, I’m not sure if its a recent change to the Steam Decks desktop mode, but it definitely just sometimes doesn’t want to work within apps.
Kind regards,
Emmet
Thank you so much for this guide, incredibly well explained throughout.
Hey there o/
Firstly an enormous thank you for the guide .. took me a while to configure everything & now I have the feeling everything goes smooth.
Ubisoft is installed, and no crash on launch.
I installed Riders Republic, game installed correctly.
But when I want to launch the game it crashes within a few minutes (after showing game loading screen). Have I done anything wrong?
Regards,
Flo’
Hi Flo,
I’m sorry to hear that you are having issues with Riders Republic. Quickly looking it up it seems like this is an issue with the BattlEye anti-cheat that particular game uses. From the looks of it the team is attempting to fix this issue so I’ll keep my fingers crossed they will get to it sooner rather than later.
On the bright side it means there shouldn’t be anything wrong with your setup.
Cheers,
Emmet
Hi,
I have follow everything on this guide which is very great but i have a problem whenver i try to press play it will go to folder where i need to click the launcher again. The same thing happened on game mode.
Hi Cryo,
Can you please double check that your “Launch” target is set to the Ubisoft Connect launcher itself and not its folder.
Cheers,
Emmet
I thank you for your efforts, I am unable to launch ubisoft connect after step 65, both Start-in and Target do not have “
Hi Husain,
If the double quotes (
") are missing, then you must manually add them to the start and end of the lines. It will not launch Ubisoft Connect without them.Cheers,
Emmet
Hey Emmet,
When istart games with Easy Anti Cheat i will always get stuck in a Loop with the game trying to start Easy Anti Cheat. is there a way around this
Hi ArashiKun,
Sadly while Easy Anti Cheat itself will work with Proton, developers have to manually add support for it. May I ask what game you are attempting to run so I can look up if there is any specific workarounds?
Cheers,
Emmet
Hi Emmet,
I’m not sure if you got my last message. I did get past the last obstacle with your suggestion of the “. I can launch and login to Ubisoft Connect. However, when I try to change the Download folder to Games, it’s not there. If I go into Dolphin file manager, I see the Games folder there. Have you come across this before?
Thanks!
Jeff
Hi Jeff,
Sorry to hear that you are having issues, that is definitely not something I have experienced. When you see the “Games” folder in Dolphin does it have a little link on the folder?
Cheers,
Emmet
Yes there is a link on Games. In the properties, it says Points to: /home/deck/Games. Isn’t that the right setting?
Jeff
Ok, I finally got it configured. The only thing left is when I return to gaming mode, I double click AC Syndicate, I login to Ubisoft and then it crashes with “Uplay has detected an unrecoverable error and must shutdown.” Feel like I’m so close too. 🙂
Jeff
After following the guide to the Point where i have to start the launcher, nothing is Happening….
Hi ArashiKun,
This problem is to do with recent changes with the Steam client. I have finally got around to updating this tutorial to reflect the most recent changes.
Please ensure that both the “
TARGET” and “START IN” fields have a double quote (") at the start and end.Let me know if this solves your problem.
Cheers,
Emmet
Hi Emmet!
The ” was the issue after all. I’m on step 59 nearly done. I’m trying to change the Downloads location to the Games folder I created earlier, but I don’t see it under the C drive. I do see it on the Steam Deck under Home. Did I miss something? Awesome guide by the way. I appreciate all the work you put into it. 🙂
Jeff
Hello!
I am following your guide and everything was fine until step 53. When I click Play for Ubisoft Connect, the button changes back to Play after 1-2 seconds. I’ve restarted so not sure what is going wrong since everything up to this point went smoothly. I also changed the MTU value to 1450 even though I’m not getting any error messages.
Thanks!
Jeff
Hi Maravig,
Sorry to hear that you are having issues installing Ubisoft Connect. Are you running the latest version of Steam where there are now two browse buttons for both “START IN” and “TARGET”?
If so, can you please check whether the TARGET line starts with and ends with a double quote (“).
Please let me know if this solves your issue.
Cheers,
Emmet
*Update* when i doubleclicked AC Syndicate, it just downloaded. I see it never installed to the Games folder. How can I make sure it gets installed to that specific Games folder?
Thanks!
Jeff
Hi Baker!! I’m having an issue with installing Connect. When I copy and paste the Ubisoftconnect.exe path to target. It’s not wanting to open. My Steam Shortcut actually looks different than what you have in your video. Mine has browse boxes for both Target and Start In. I’d send a pic but can’t seem to be able to post a pic. It worked for me once before, but I had an issue and needed to reinstall and now it won’t work. Any suggestions? Please and thank you!
Hi Blake,
Not sure if you are confusing us with someone else since we don’t currently have a video that covers this. However, Steam very recently pushed an update that changes the dialog boxes. I will be looking into updating the screenshots to reflect these changes over the next couple of days.
You should only need to click the “Browse” button for the “Target” and not “Start in”.
Cheers,
Emmet
Thank you for the tutorial! Im still having problems however. Everytime I try and log in I get a “connection lost” error and prompts me to either try again or go offline. Both options dont work. Is there any way around this by chance?
Hi Mr Baker,
Sorry to hear that you are having issues with connecting when using the Ubisoft Connect client. While I didn’t personally run into the issue I have seen that other have experienced it and come up with a possible solution.
I have adjusted the tutorial to feature some additional steps to hopefully work around this issue. Please try following the new steps in the Troubleshooting section.
Please let me know if this solves the issue for you.
Cheers,
Emmet