This tutorial will show you how to install the Battle.net launcher on the Steam Deck.
The battle.net launcher is home to numerous games you may want to play on your Steam Deck. This includes hits such as Diablo 4, Starcraft and more.
Like with using Ubisoft Connect on your device, using Battle.net is not as straightforward as you would hope.
By the end of this tutorial, you should have the Battle.net client installed and running within Steam Deck’s gaming mode.
To make the setup of experience of Battle.net on your Steam Deck smoother, we recommend using a keyboard and/or mouse. However, it is fully installable using the Steam Deck’s controls and on-screen keyboard.
Using the Battle.net Launcher on the Steam Deck
Over the following sections, we will show you how to install and use the Battle.net launcher on the Steam Deck.
Swapping to Desktop Mode from Gaming Mode
1. To install the battle.net launcher to your Steam Deck, you must change to desktop mode. This mode allows you to interact with the operating system itself.
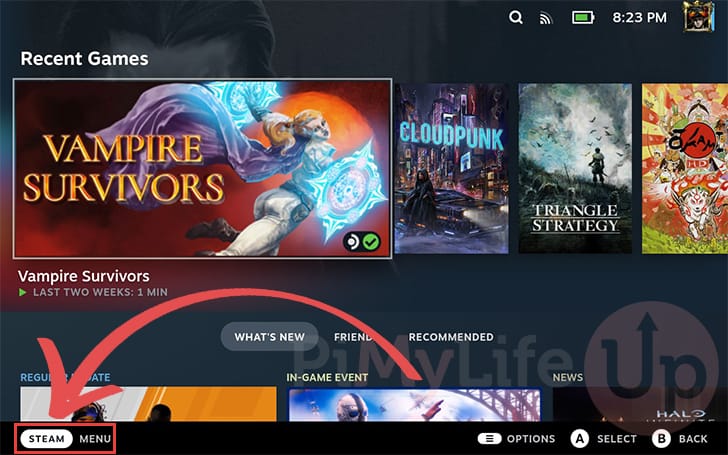
To get to desktop mode, open the Steam menu by pressing the STEAM button or tapping the “STEAM menu” in the bottom-left corner.
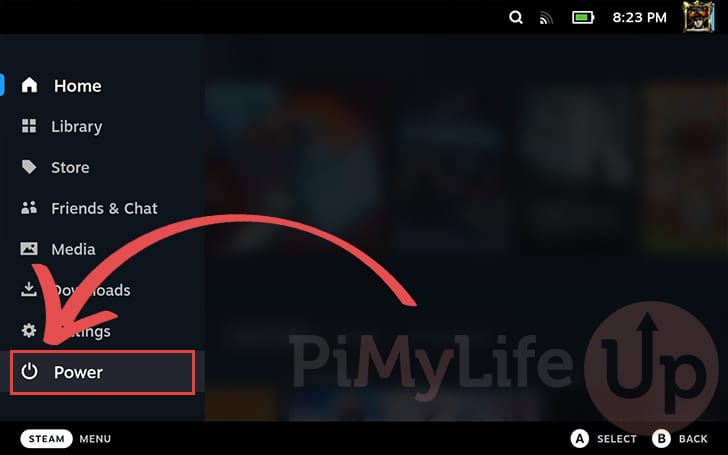
2. With the Steam menu open, you will now want to tap the “Power” option.
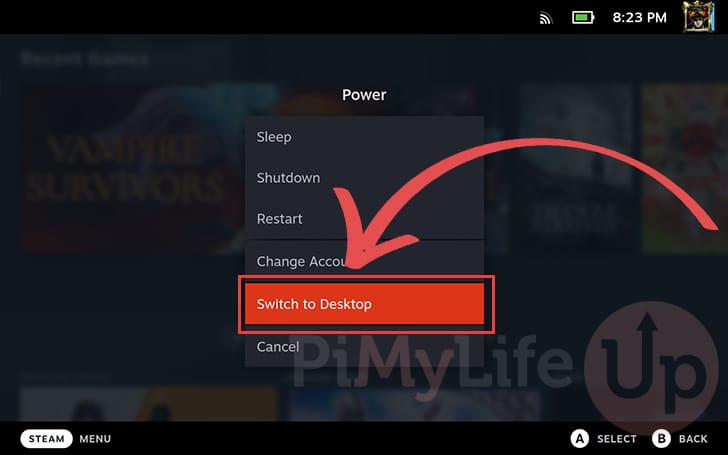
3. You will now be greeted with a variety of options.
Swap to the Steam Deck’s gaming mode by tapping the “Switch to Desktop” option.
Downloading the Battle.net Client on the Steam Deck
4. Now that we are in desktop mode, we can download the installer for the Battle.net client to your Steam Deck.
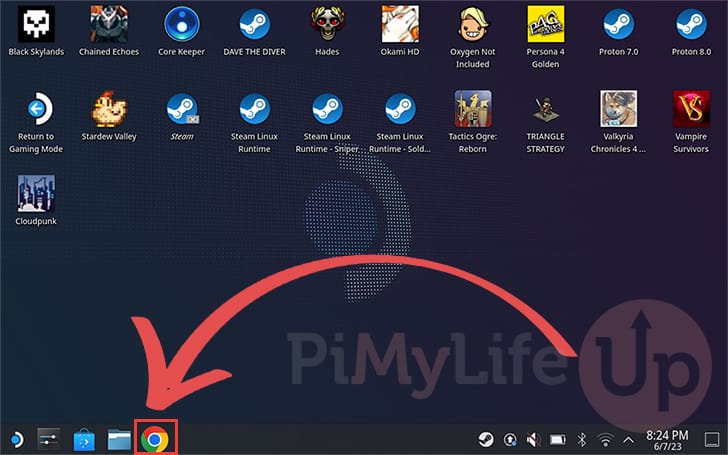
To do this, you will want to open your favourite web browser. In our screenshot below, we will be opening the Firefox browser.
5. With the browser open, you will want to go to the following URL in the web browser.
https://download.battle.net/?product=bnetdeskUpon opening this web page, the client will automatically begin to be downloaded to your device.

Adding the Battle.net Installer to your Steam Deck Library
6. To be able to install Battle.net to your Steam Deck you will need to add the installer we just downloaded to your Steam Library.
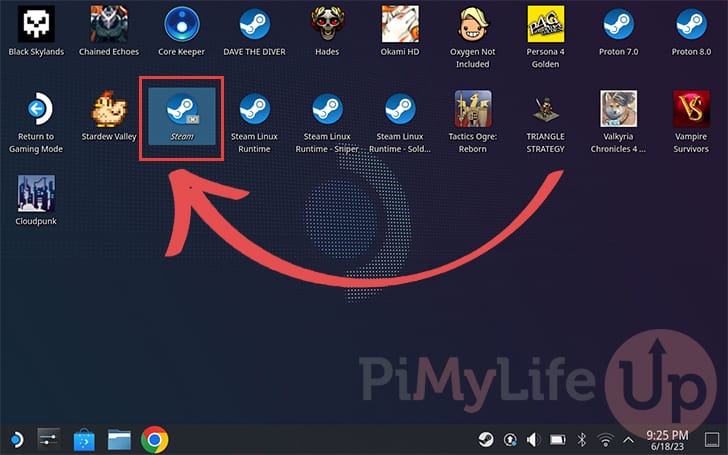
To begin this process, open the Steam desktop client by going to the desktop and clicking the “Steam” icon.
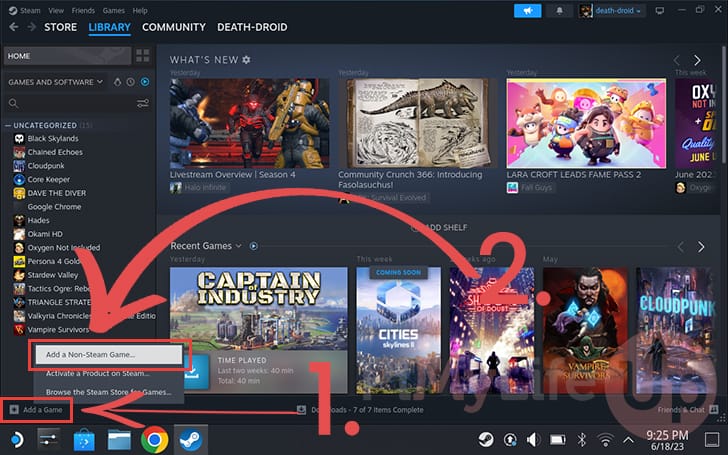
7. With the Steam desktop client now open, click the “Add a Game” button (1.) in the bottom left corner.
In the context menu that appears, click the “Add a Non-Steam Game...” (2.) button.
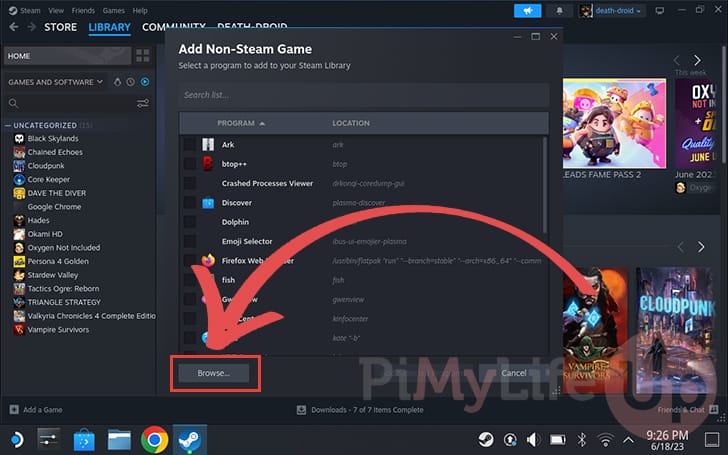
8. As the Battle.net installer isn’t automatically listed by Steam you will need to click the “Browse...” button to continue.
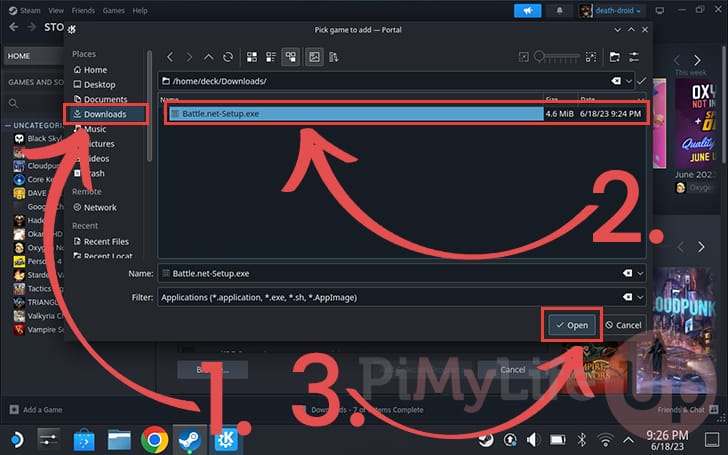
9. Within the browse dialog you will want to navigate to the “Downloads” folder by clicking “Downloads” in the sidebar (1.).
Next, you will want to select the Battle.net installer on your Steam Deck (2.).
Once selected, click the “Open” button to add the installer to your Steam library (3.).
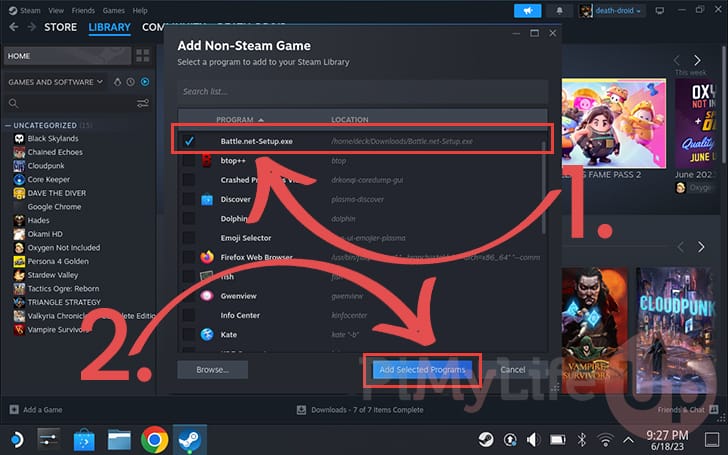
10. Before proceeding, verify that the “Battle.net-Setup.exe” installer is selected (1.).
Once you are sure its selected, click the “Add Selected Programs” button (2.).
Changing Battle.net on Steam Deck’s Compatibility Option
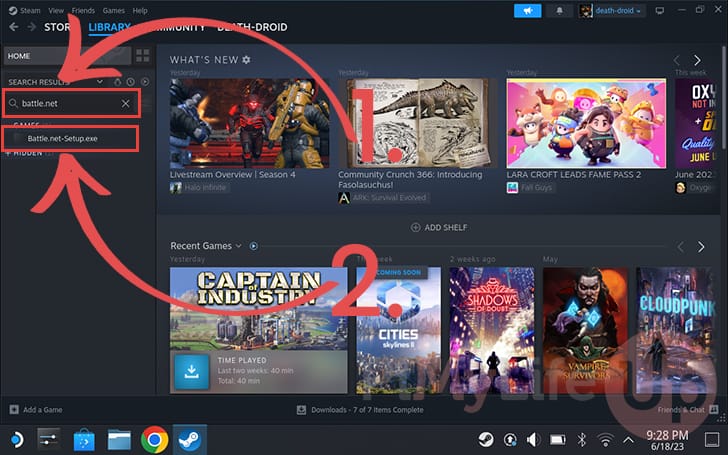
11. Now, with the Steam client open on your Steam Deck, navigate to the library and search for “battle.net” (1.) within the sidebar.
You should see an entry labeled “Battle.net-Setup.exe” (2.). Open the entry to continue.
12. With the Battle.net installer open on the Steam Deck, tap the cog icon (1.) on the right side of the screen.
In the pop-up menu, select the “Properties” option (2.).

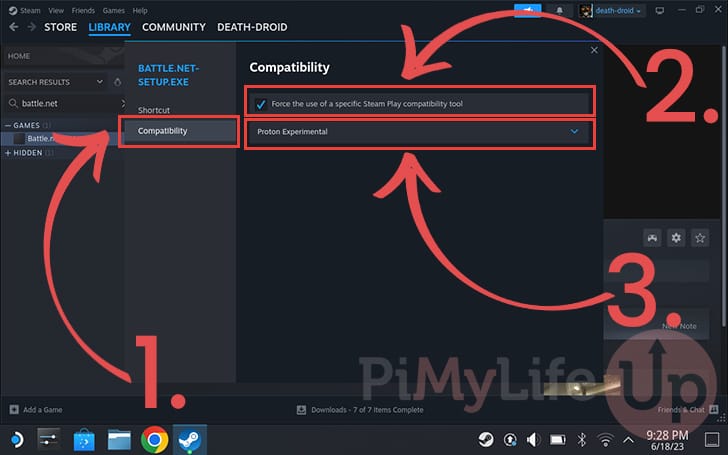
13. Now, with the properties screen open, navigate to the “Compatibility” menu using the sidebar (1.).
With the compatibility screen open, ensure the “Force the use of a specific Steam play compatibility tool” is ticked (2.).
Finally, ensure that the version of Proton is set to “Proton Experimental” (3.). Game clients like Battle.net are often broken on the Steam Deck. The experimental version ensures you gain access to the latest fixes.
Installing Battle.net on the Steam Deck
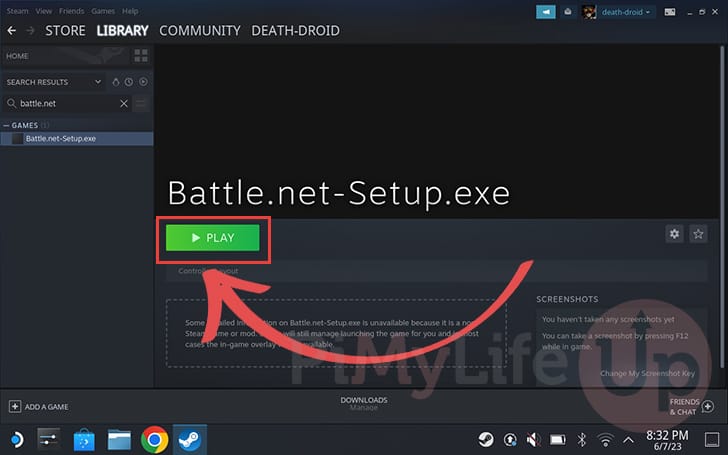
14. We are finally ready to install the Battle.net game client to our Steam Deck.
Tap the “PLAY” button within the Steam launcher to begin this process.
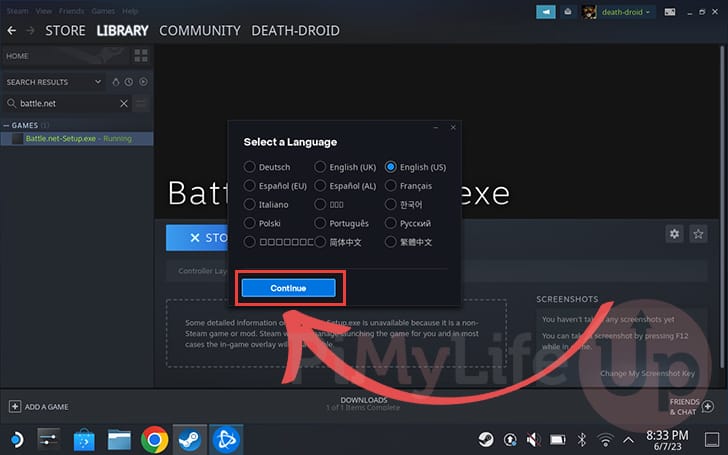
15. The first Battle.net prompt will ask you to select the language you want to use. To use the mouse within the Battle.net client you may have to hold the STEAM button.
Once you have selected your language, tap the “Continue” button.
16. You will now have the chance to change the default install location for Battle.net on your Steam Deck.
As this game client is installed within it’s own virtual directory, leave it with the default value and tap the “Continue” button.

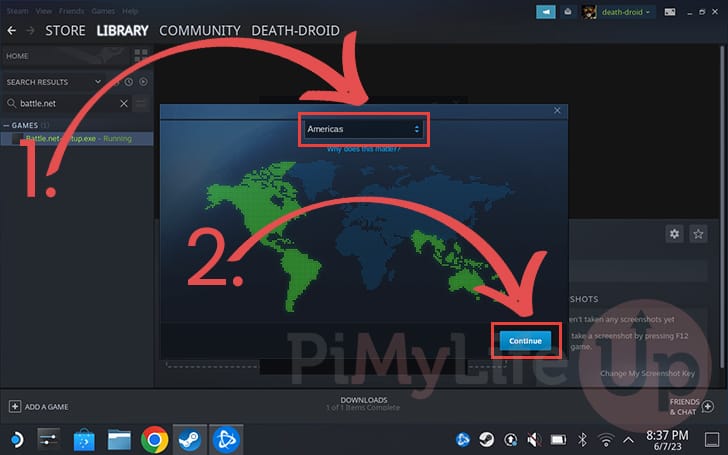
17. As Battle.net is split into various regions, you must now select your region using the select box at the top of the screen (1.).
Once your region is selected, tap the “Continue” button (2.).
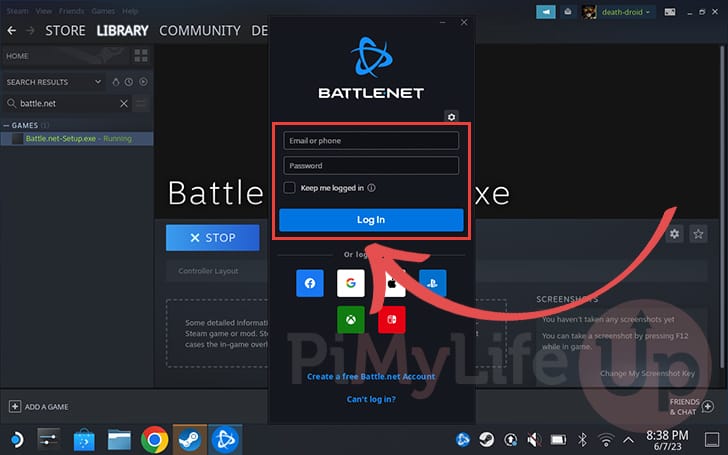
18. Once the installation completes, you can log your Steam Deck into the Battle.net Launcher.
Ensure that you tap the “Keep me logged in” option to stop you from having to type in your password every time you open the client.
Changing the Battle.net Launch Target
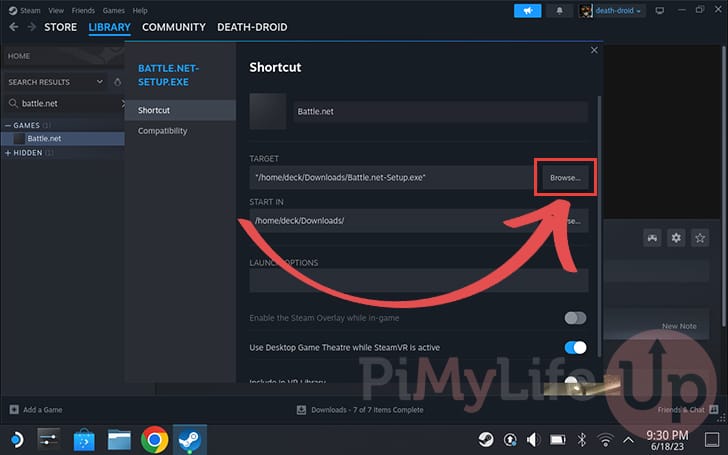
19. At this point the Battle.net launcher in our Steam Deck library is still pointed to the installer.
We must adjust this value before you can easily launch the client within gaming mode.
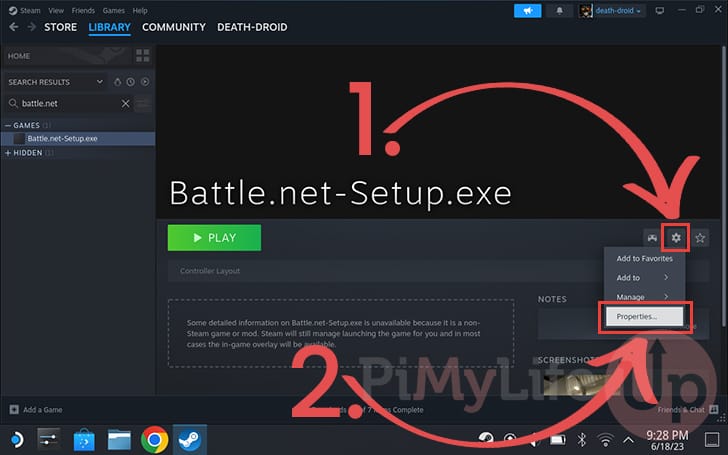
To do this, find the “Battle.net-Setup.exe” entry in Steam and open the preferences by tapping the “Cog” icon (1.).
In the pop-up menu, tap the “Properties” (2.) option to continue.
20. With the properties page open, you will first want to change the shortcut’s name.
At the top, tap the textbox and open the keyboard from within Steam Decks desktop mode. You can open this by pressing the STEAM and X buttons at the same time.

21. Next, we will want to change the target location by tapping the “Browse” button next to the “TARGET” textbox.
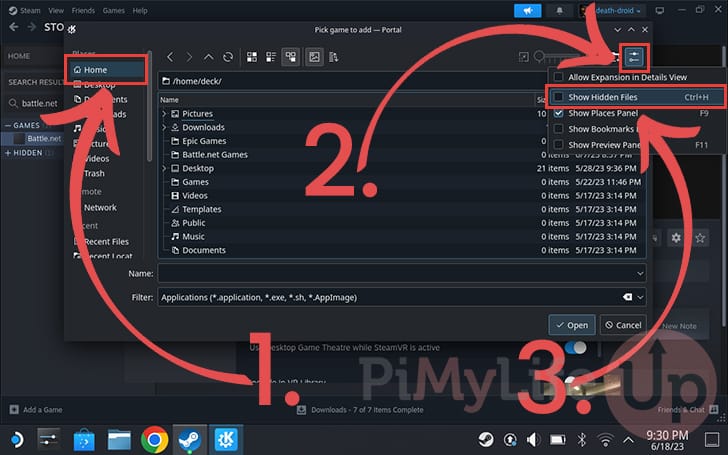
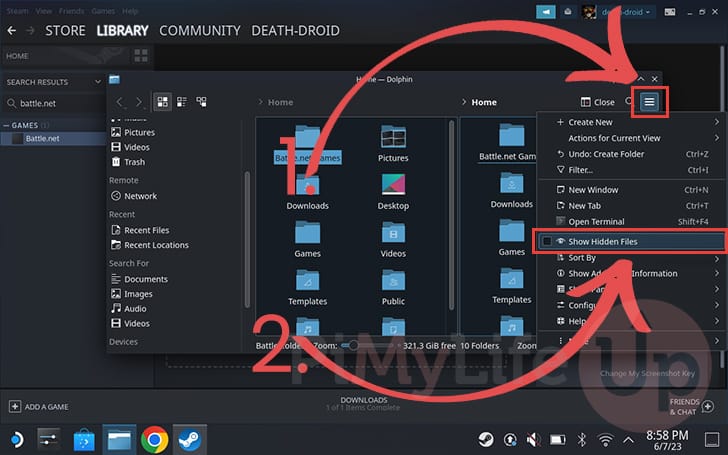
22. Start by clicking the “Home” (1.) option in the sidebar to ensure you are in your home directory.
Next, bring up the settings page by clicking the icon in the upper right corner (2.).
Finally, click the “Show Hidden Files” option (3.).
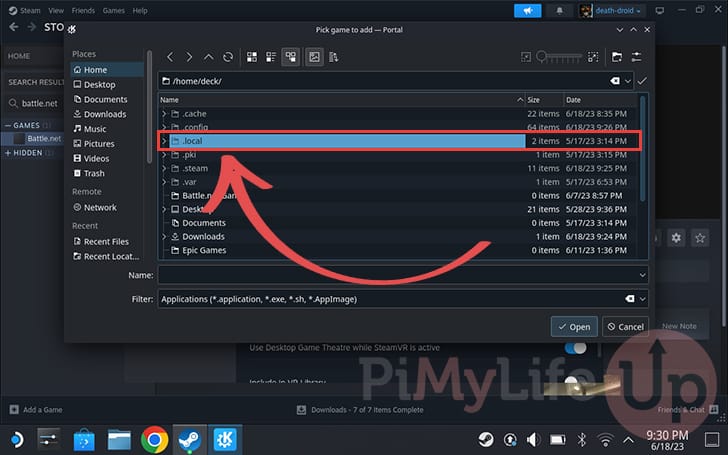
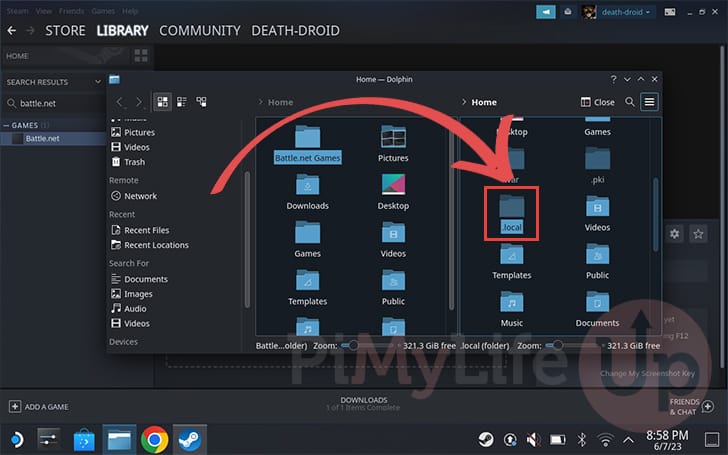
23. Now open the “.local” directory.
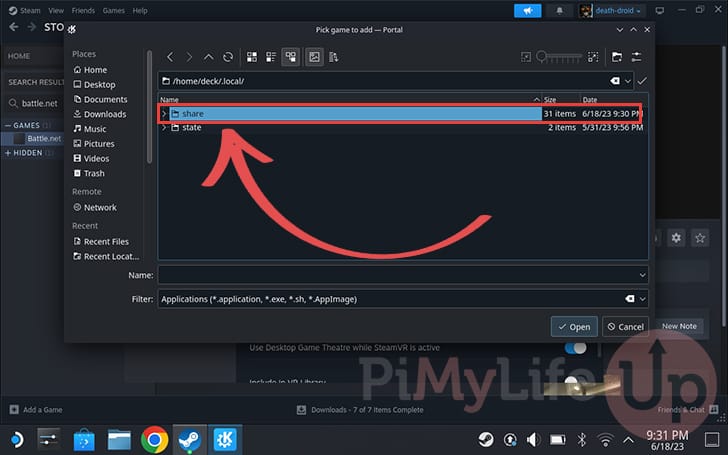
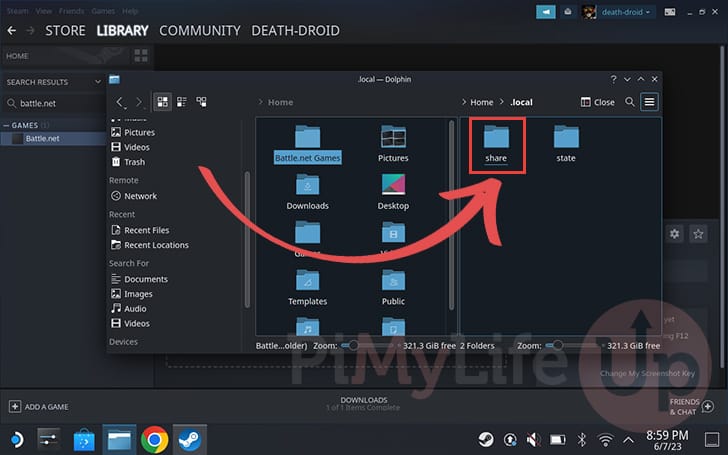
24. Next, navigate to the “share” directory.
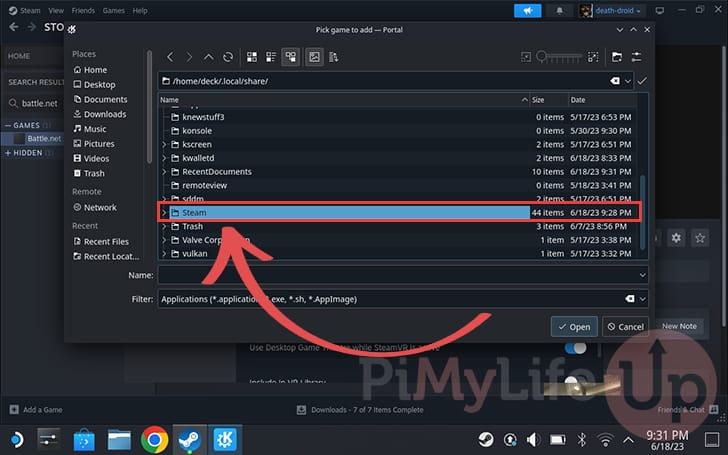
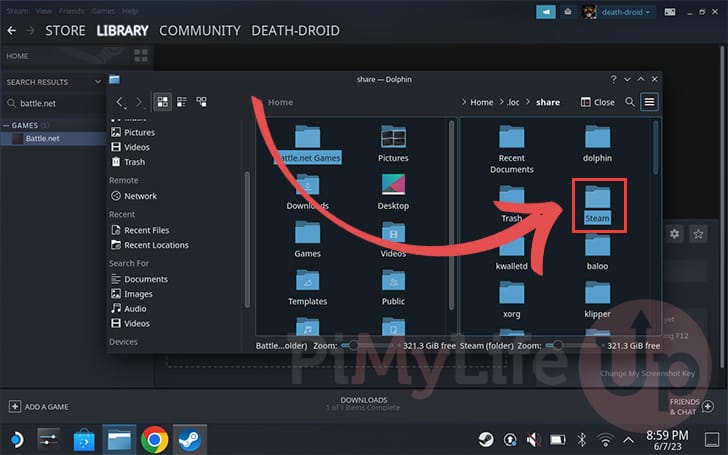
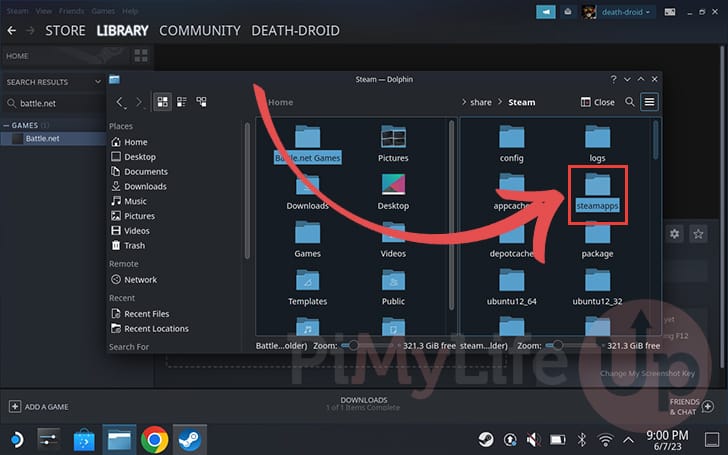
25. Within this folder, you will want to find the directory labeled “Steam” and select it.
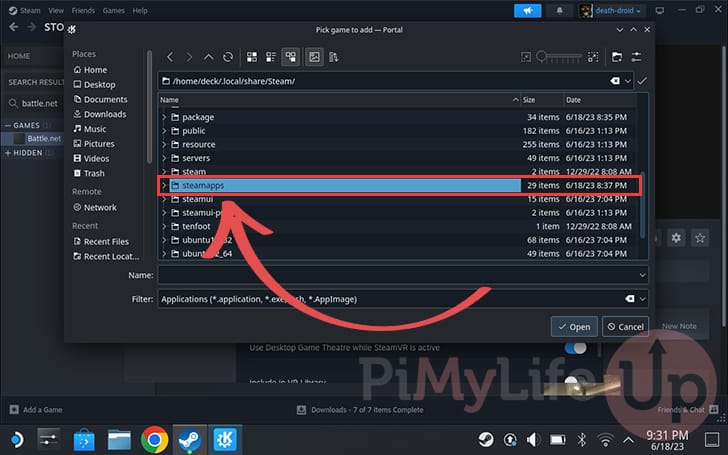
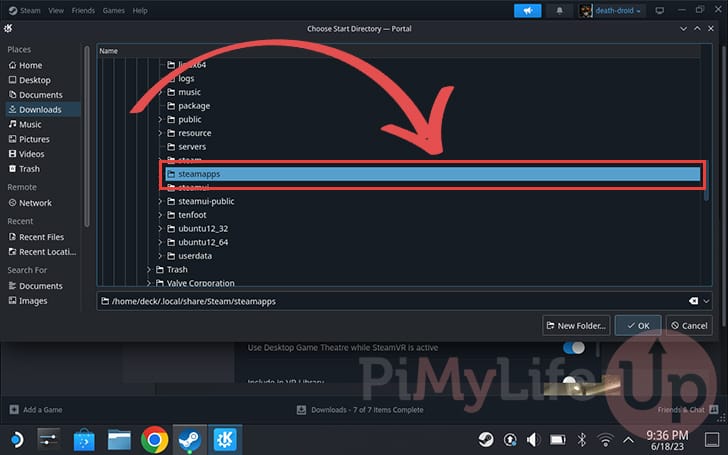
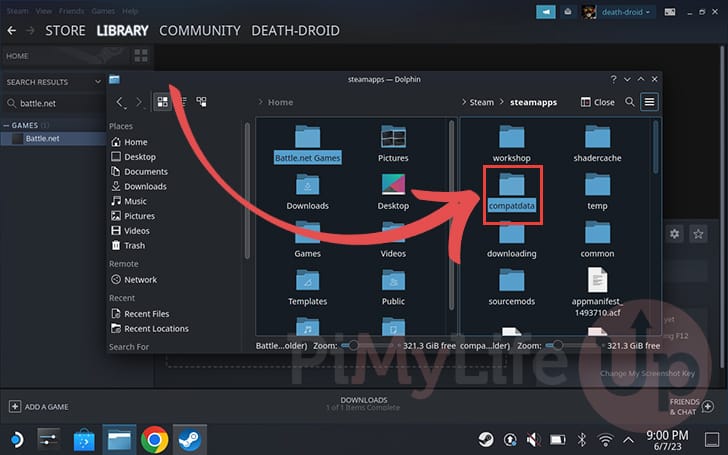
26. The next folder you will want to open is “steamapps“.
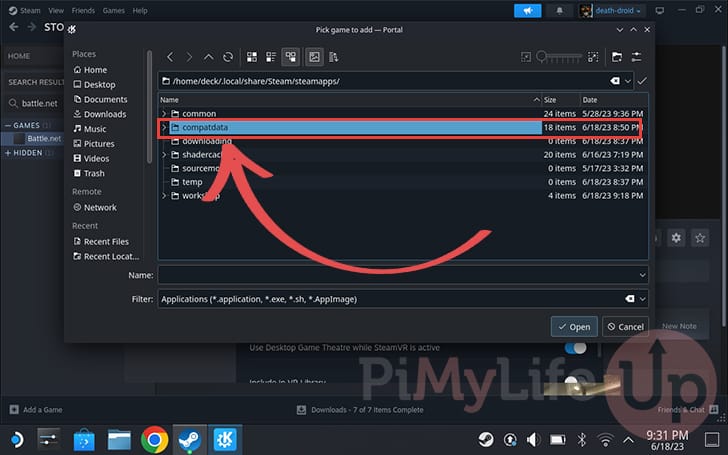
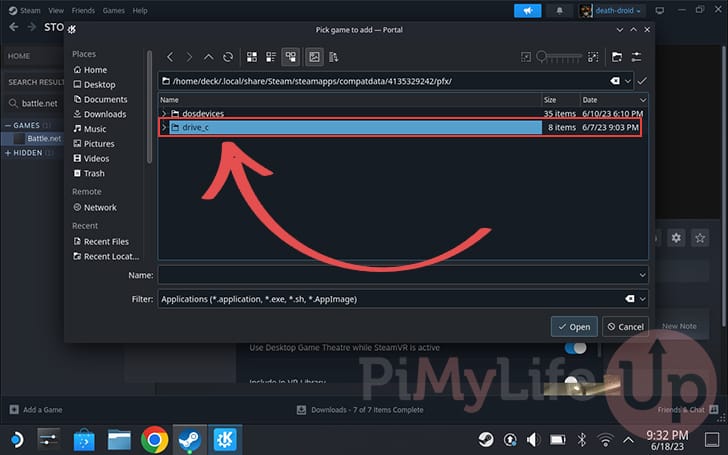
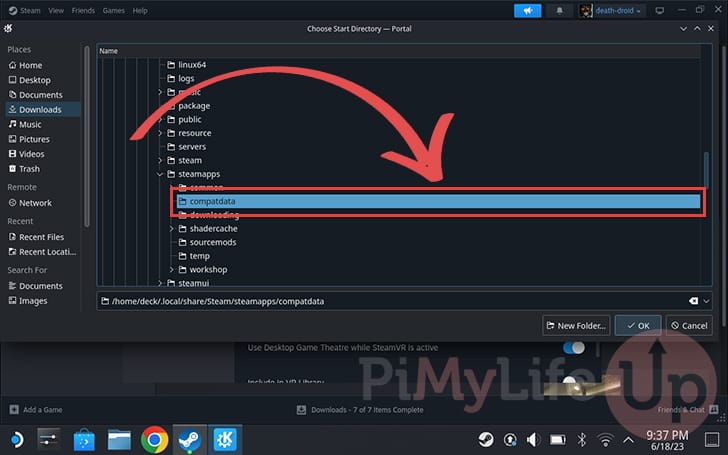
27. Finally, open the “compatdata” directory. This directory is where Steam installed the battle.net launcher earlier.
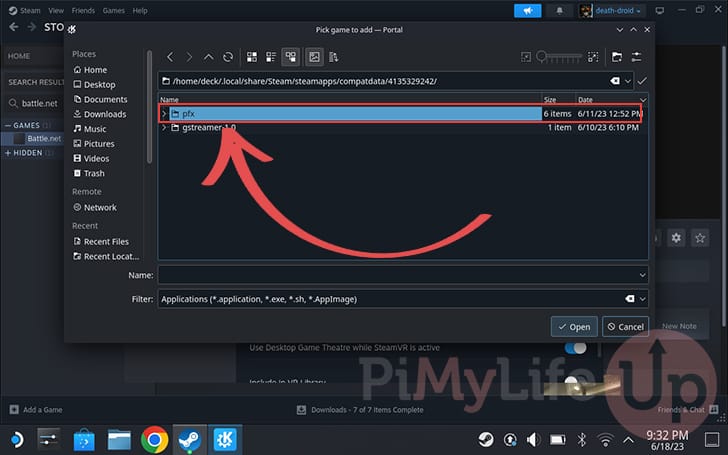
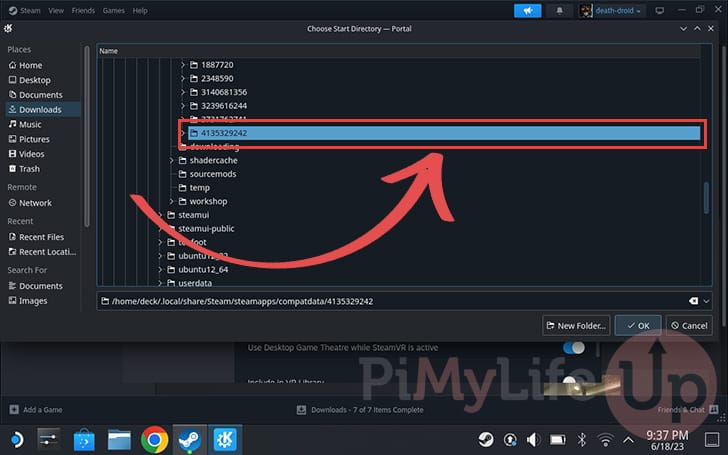
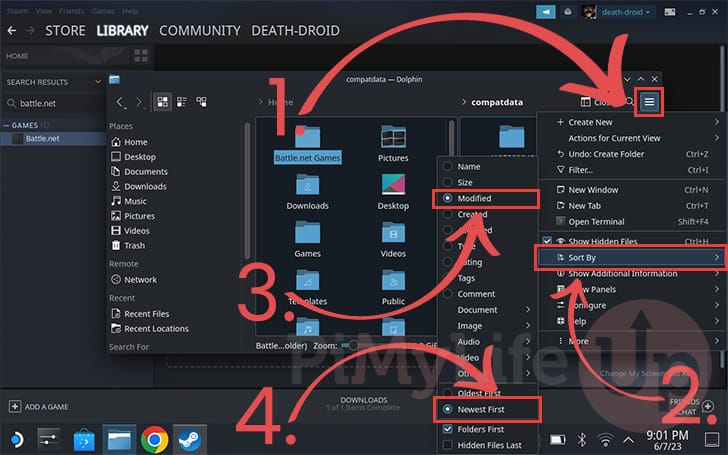
28. Now we are in the correct directory, make sure the list is ordered by the modified date. You can adjust this by tapping the “DATE” option in the top bar (1.)
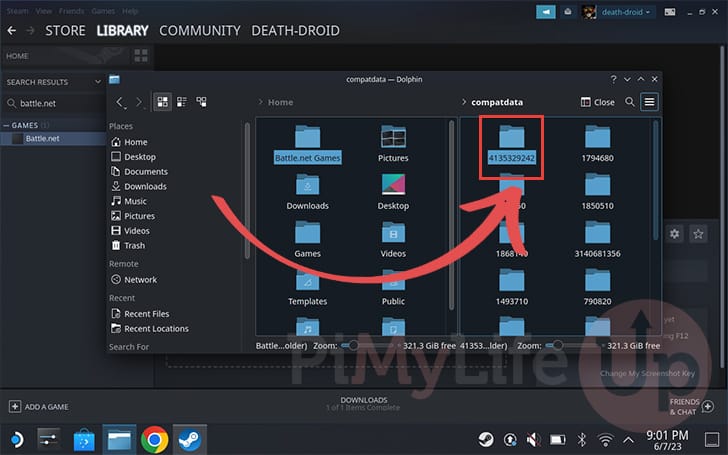
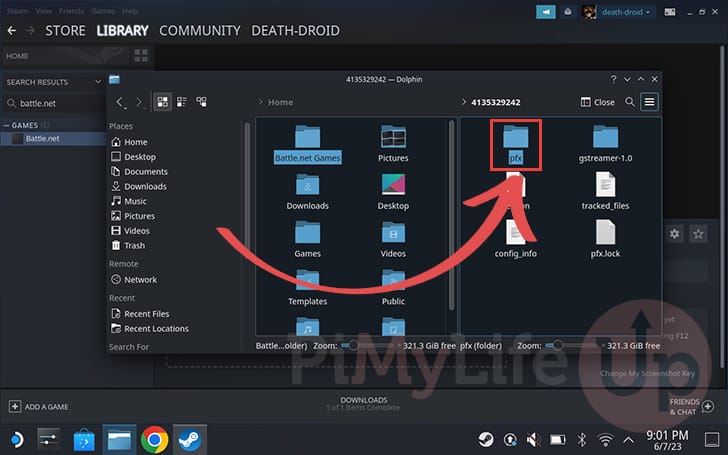
Next, open the directory that was last modified (2.). Note down the name of this directory as you will need to refer to it later.

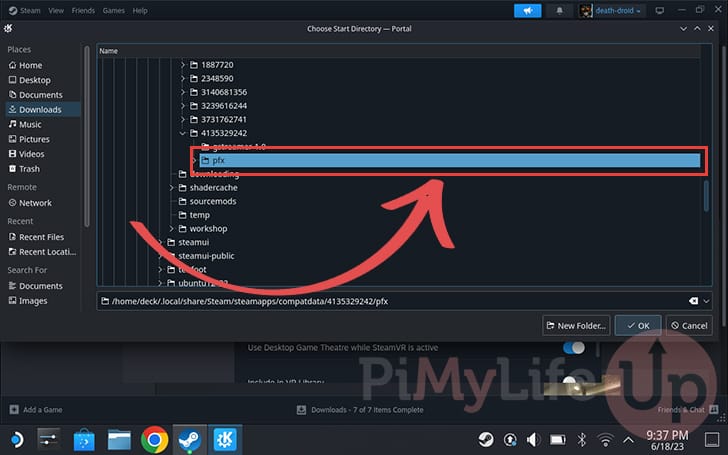
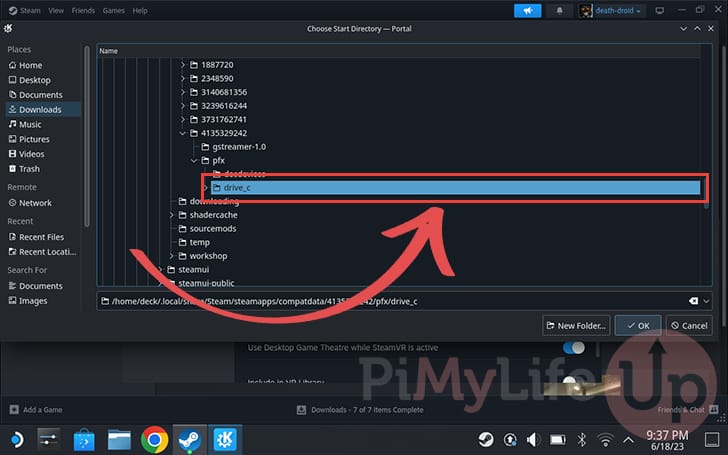
29. Now, move into the “pfx” directory
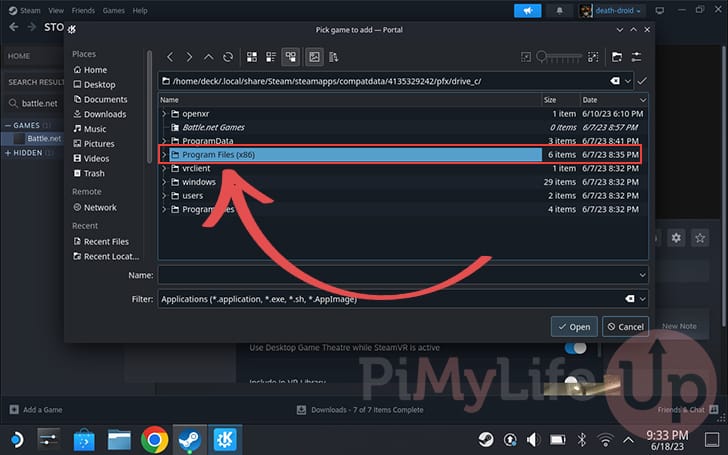
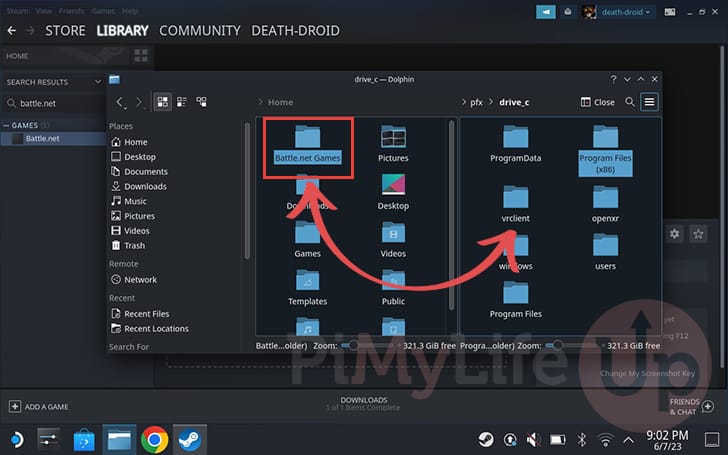
30. We next need to change to the “drive_c” folder. This folder is where the Steam Deck is simulating a Windows desktop for Battle.net.
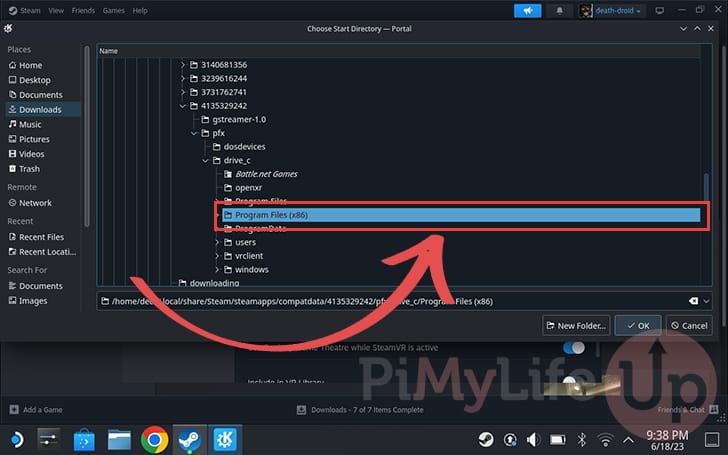
31. Next, change to the “Program Files (x86)” folder. This is where we installed the Battle.net client.
32. Within this directory, find the one called “Battle.net” and open it.
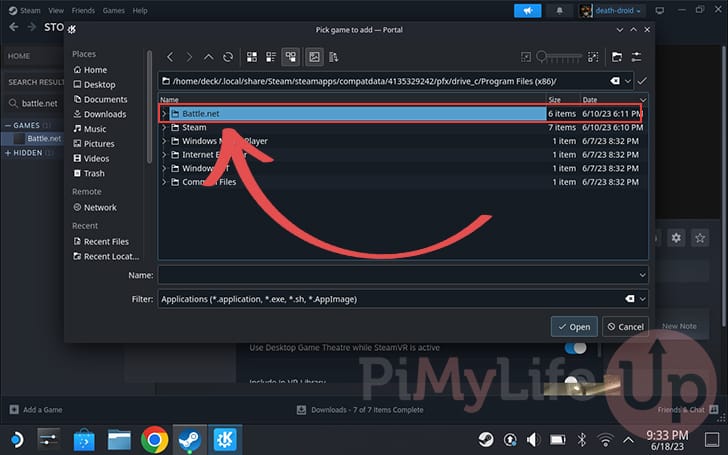
33. Finally, find the file called “Battle.net Launcher.exe” and tap it.
With the option selected, tap the “OPEN” button to select it as the launch target.

Updating the Battle.net Start In Target on the Steam Deck
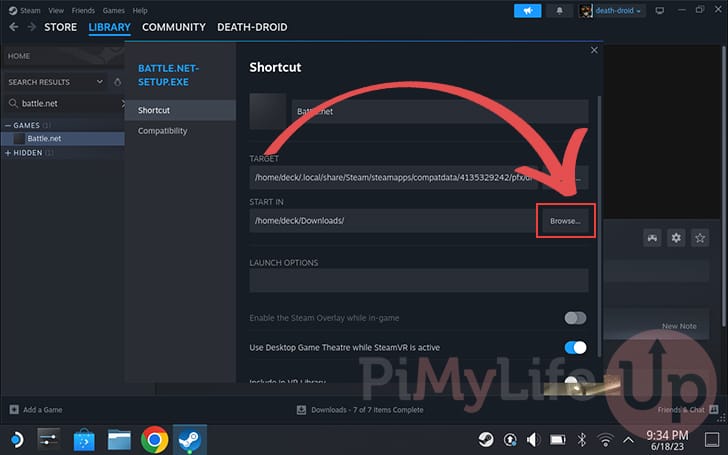
34. If the “START IN” textbox is still set to the default value, then you will need to update it. Steam typically will automatically set the correct value, but some releases break this behaviour. If it looks correct, skip to the next section.
To begin changing the “Start In” directory, click the “Browse” button.
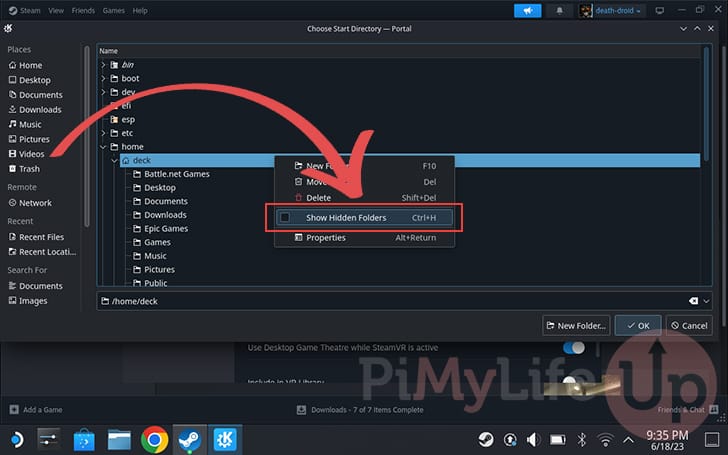
35. You will notice that this dialog looks a bit different to the previous one.
Once the dialog is open, right-click (R2 Trigger) within it and then select the “Show Hidden Folder” option.
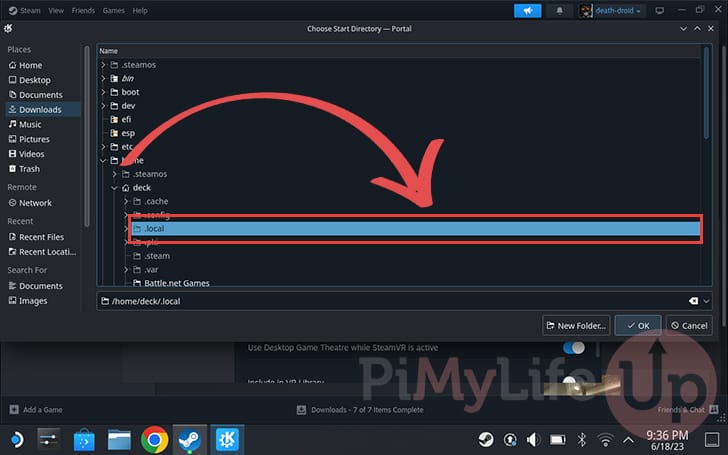
36. With hidden folders now showing, navigate to the “.local” directory.
Using your D-PAD on your Steam Deck makes browsing through these folders a breeze.
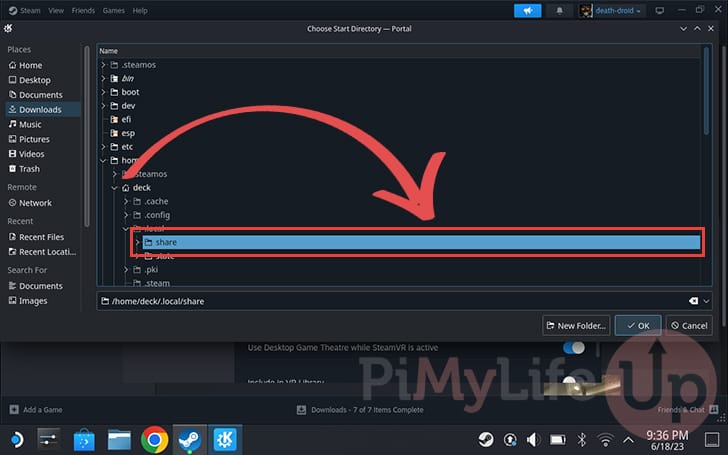
37. Now switch to the “share” directory.
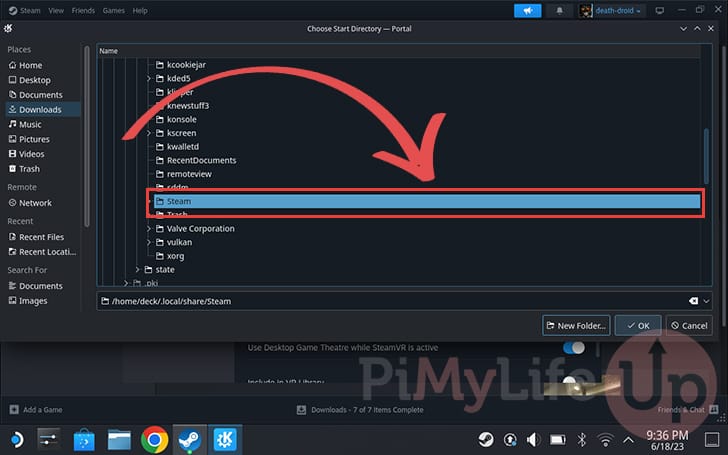
38. The next directory you want to change in to is named “Steam“.
39. Now navigate to the “steamapps” directory.
40. Once in the “steamapps” directory you will want to find and enter the “compatdata” folder.
41. You will now need to select the Proton directory where Battle.net was installed to on your Steam Deck.
This is the same folder you navigated into in the previous section.
42. Now move into the folder named “pfx“.
43. Look for and navigate into the directory labeled “drive_c“. This folder is where Proton simulates the “C” drive within Battle.net on your Steam Deck.
44. You will now need to swap to the “Program Files (x86)” folder.
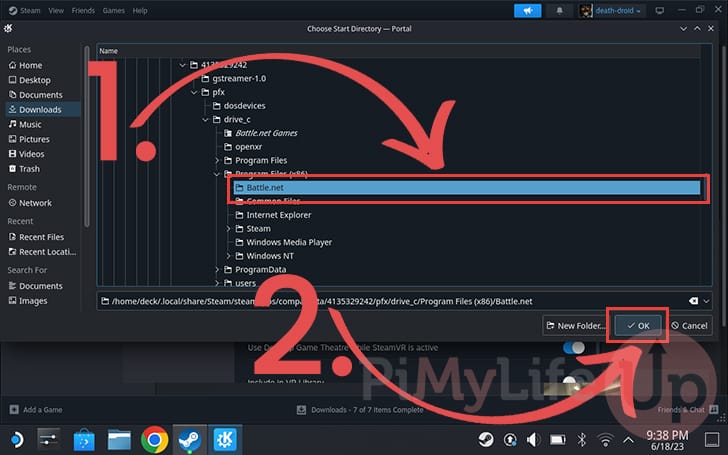
45. Now that we are in the right spot, click the folder named “Battle.net” (1.).
Once selected, click the “OK” button to continue (2.).
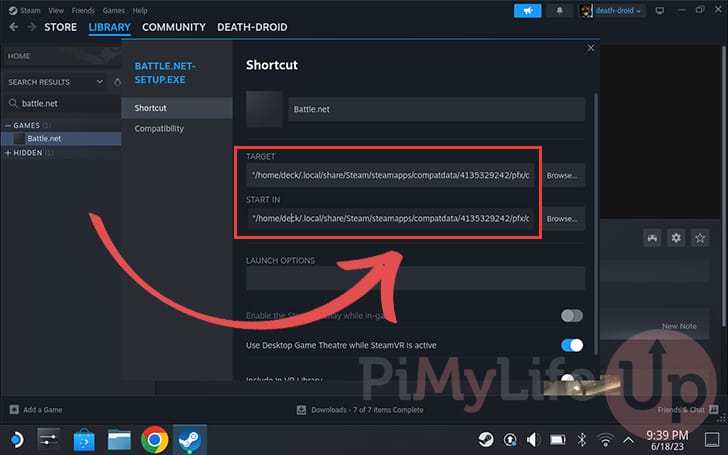
Ensure Target and Start In has Double Quotes
46. Both the “TARGET” and “START IN” fields require there to be a double quote (") at the beginning and end of the lines.
Make sure this double quote is there before proceeding. Steam is meant to automatically add this but this functionality it sometimes broken.
Adding a Directory to store Battle.net Games on the Steam Deck
47. To make storing your battle.net games on your Steam Deck easier, we will create a directory within your user’s home directory.
Once created, we will create a symbolic link between this folder and the simulated “drive_c“folder within which the Battle.net client is running.
If you are happy for your games to be stored within the proton directory, you can safely skip to the next section. However, these will be deleted whenever you uninstall the Battle.net client.
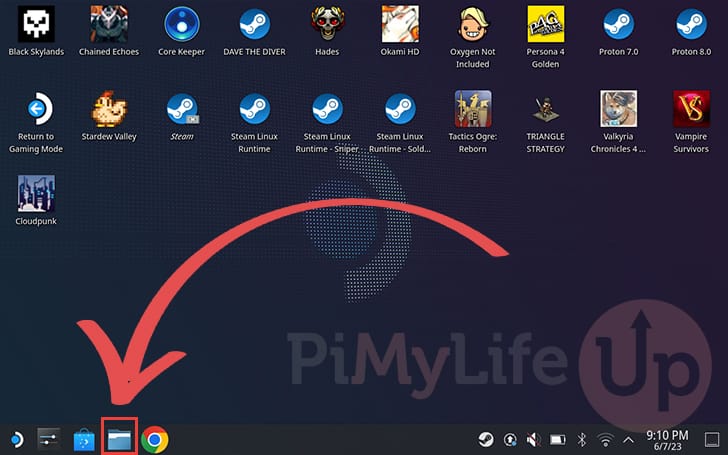
To begin this process, return to the desktop and open the Dolphin file explorer. This explorer is represented by the folder icon in the task bar.
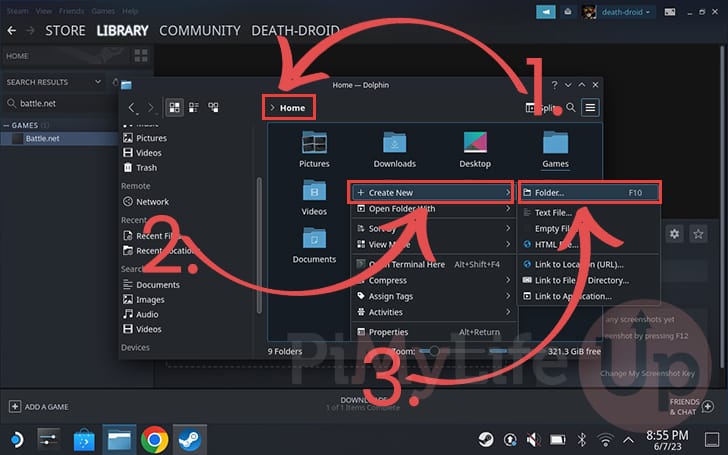
48. With the file explorer open, ensure that you are in the “Home” directory (1.).
Next, righ-click in this folder by pressing the left trigger (L1) to open the context menu.
With the context menu open, hover over the “Create New” option (2.).
Finally, create a new directory by tapping the “Folder” option (3.).
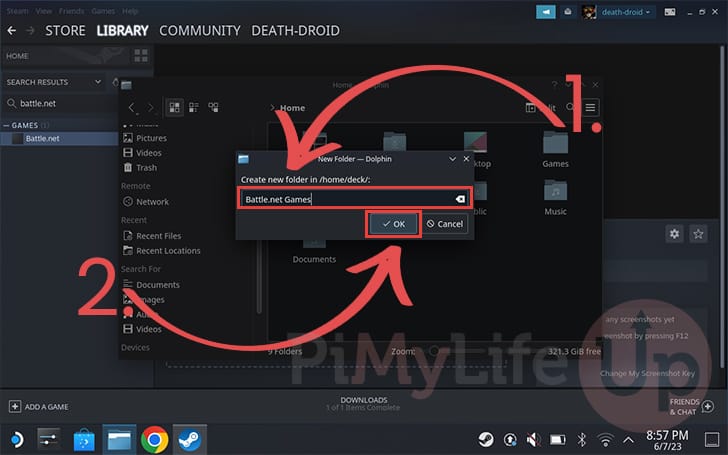
49. Give this new folder an easy name so you know what you store within it (1.). In our case, we will be naming the directory “Battle.net Games“.
Remember, to open the virtual keyboard by pressing the STEAM + X buttons.
Finally, tap the “OK” button to create the new folder (2.).
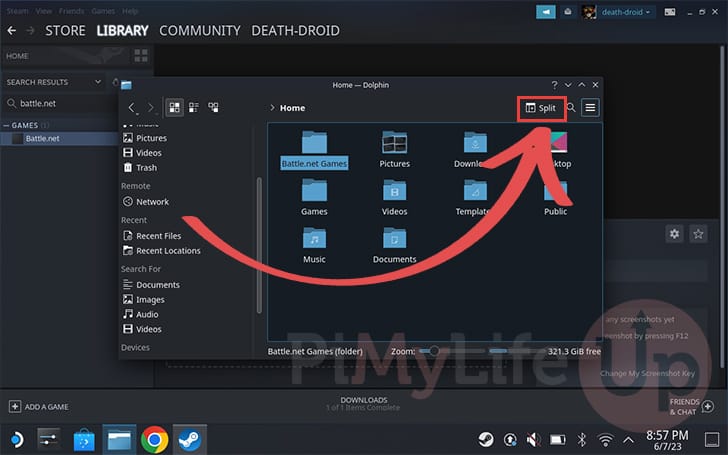
50. Now, split the Dolphin Explorer in two by tapping the “Split” option in the top-right corner.
Splitting the window will make it easier to create a symbolic link later.
51. The folder we are after is hidden by default. Bring up the explorer options by tapping the hamburger icon in the top-right corner (1.).
Within this menu, tap the “Show Hidden Files” (2.) option.
52. Next, move into the “.local” directory by double tapping it.
53. Now, navigate to the “share” folder.
54. Within the “share” directory, find the one labeled “Steam” and open it.
55. Next, look for the folder labeled “steamapps” and open it.
56. Now, look for and open the “compatdata” directory. This is where we installed the Battle.net client on your Steam Deck.
57. Now that we are in the right place, we need to reopen the options menu by tapping the hamburger icon (1.).
Next, highlight the “Sort By” option (2.)
Finally, ensure that the sort by is set to “Modified” (3.), and the order is set to “Newest First” (4.).
58. Next, open the folder listed at the top of this directory.
This folder will be the same one you opened earlier when selecting the launch target for Battle.net within Steam.
59. Within this folder, navigate to the “pfx” directory.
60. Finally, open the “drive_c” directory. This is our final destination.

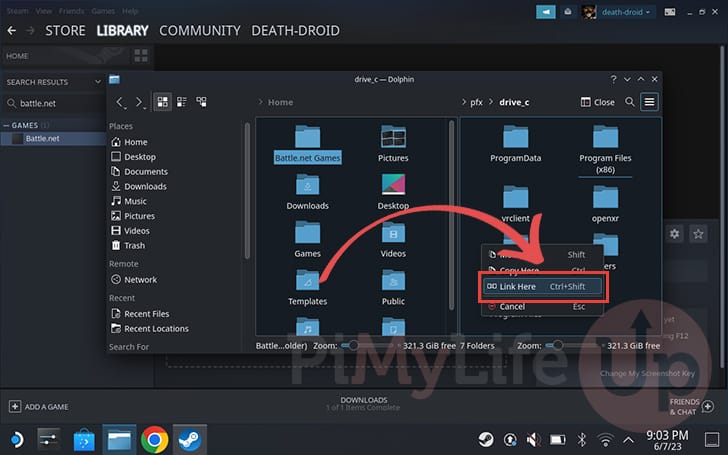
61. As we are now in the right directory, click the folder you created earlier by using the right trigger, and drag it to the right side of the screen.
62. With the context menu, you will now want to click the “Link Here” option.
This option will create a symbolic link between your created folder and the simulated “C” drive.
Change the Default Battle.net Installation Path
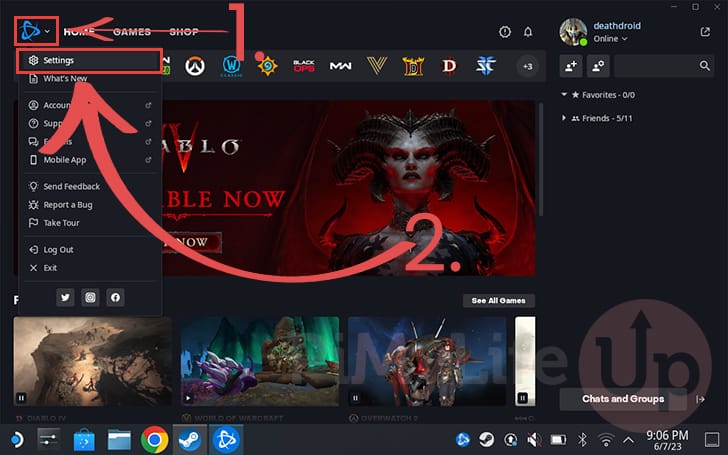
63. Now open the Battle.net client again to reconfigure the default installation path.
Open the pop-up menu by tapping the Battle.net icon (1.) on the top-left corner.
Within this menu, tap the “Settings” option (2.).
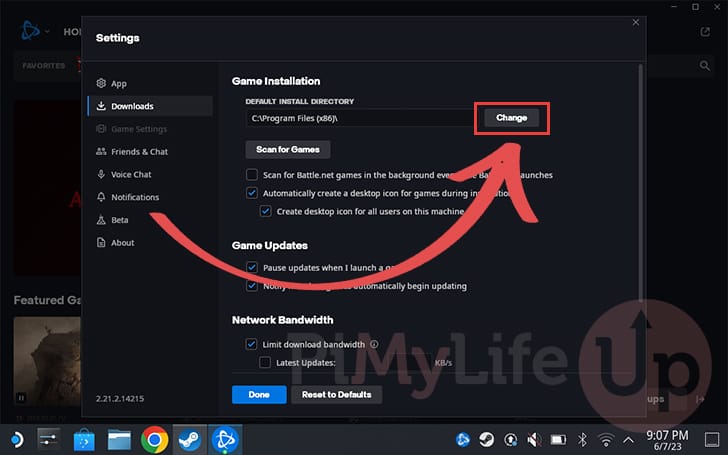
64. Once you are within the “Downloads” tab, you will want to tap the “Change” button next to the “DEFAULT INSTALL DIRECTORY” option.
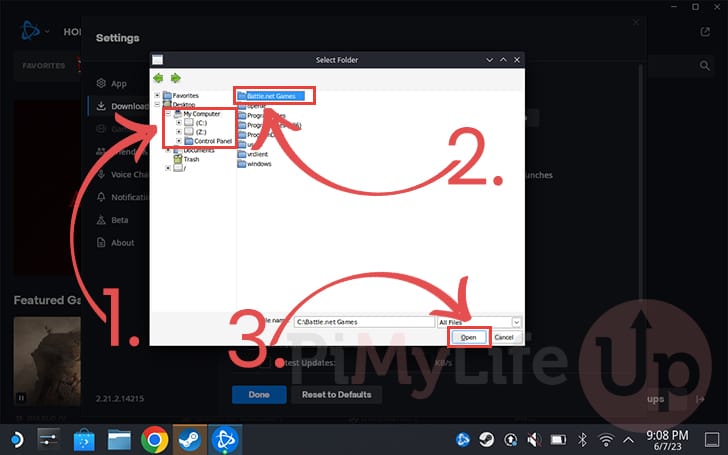
65. Within this dialog box, you can select where you want your Battle.net games installed on your Steam Deck.
You can easily access your drives using the sidebar and by looking under the “My Computer” option (1.). The “C” drive is the one that Proton is simulating.
Once you have selected a drive, browse to the directory on which you want to store the games and select it (2.).
With a folder selected, tap the “Open” button (3.).
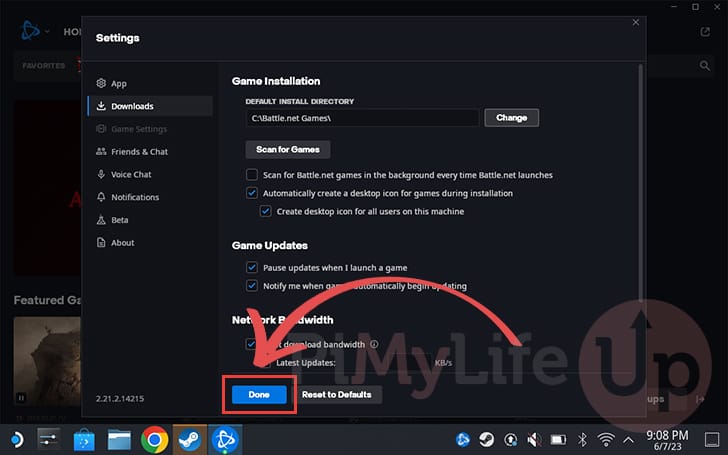
66. You can now confirm your changes by tapping the “Done” button.
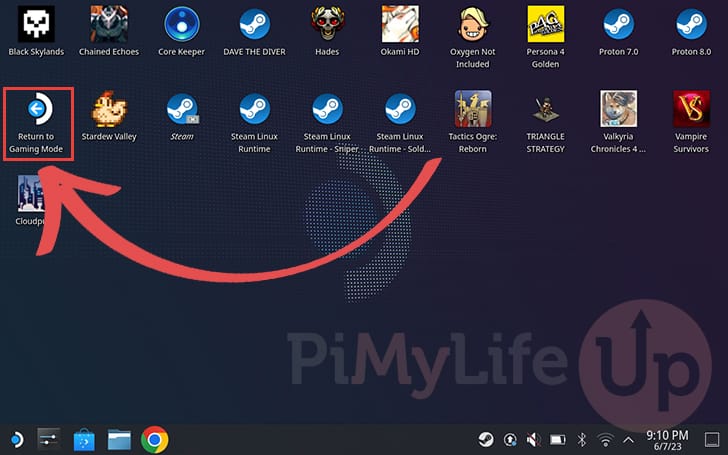
67. Back on the desktop, tap the “Return to Gaming Mode” to exit Steam Deck’s desktop mode.
Finding the Battle.net Client on your Steam Deck
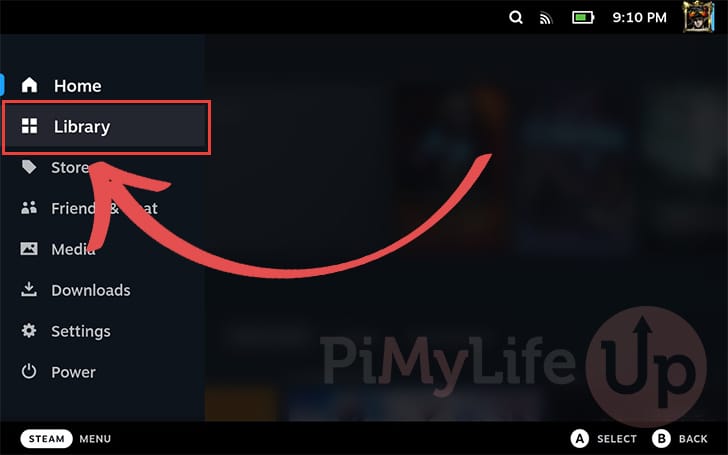
68. Back in gaming mode, change to your game library from within the Steam menu.
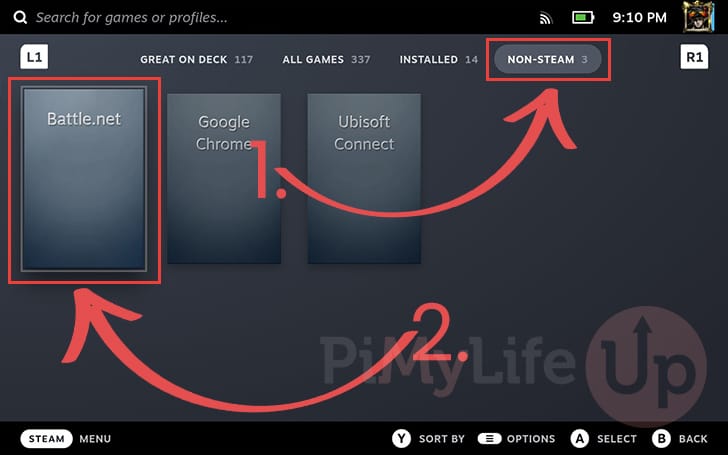
69. Next, change to the “NON-STEAM” (1.) tab.
Find the “Battle.net” entry within this tab and select (2.).
Changing the Default Input Settings for Battle.net
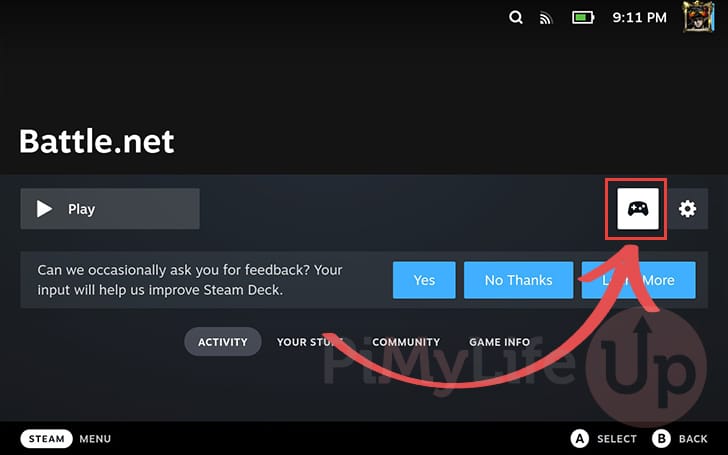
70. Now that we are on the Battle.net client’s Steam page, we can adjust the default controls.
The default settings won’t work well because the Battle.net client on your Steam Deck relies on the mouse for navigation.
To change input settings, highlight and select the controller icon.
71. Next, select the current control layout to adjust the control scheme.
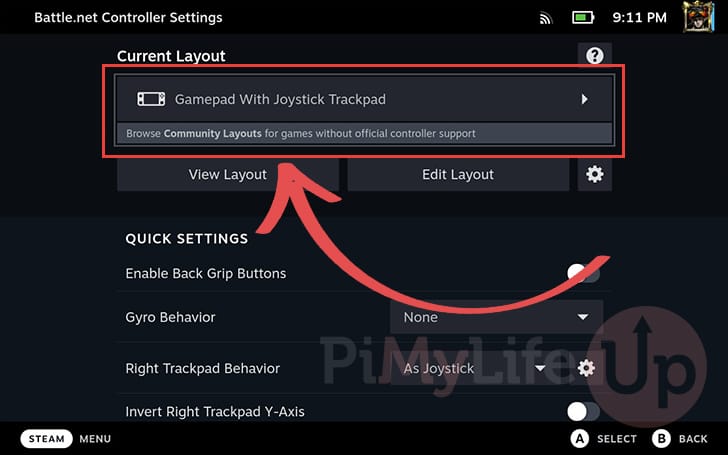
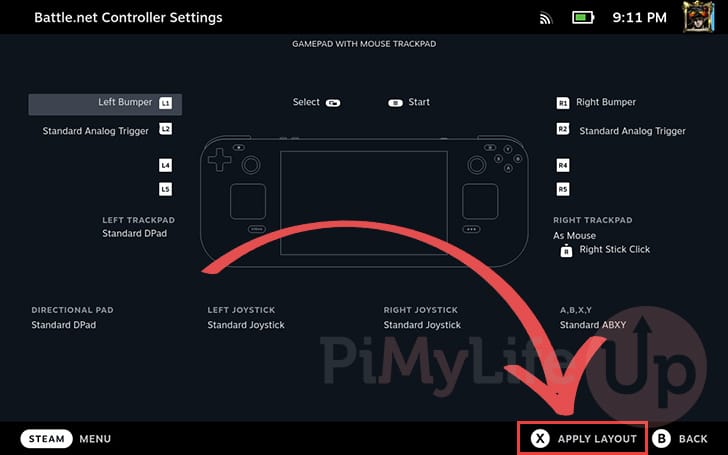
72. Scroll down until you find the “Gamepad with Mouse Trackpad” option and select it to change the layout.
73. You will now see an overview of the layout that is being set. Press the X button on your Steam Deck to apply this layout.
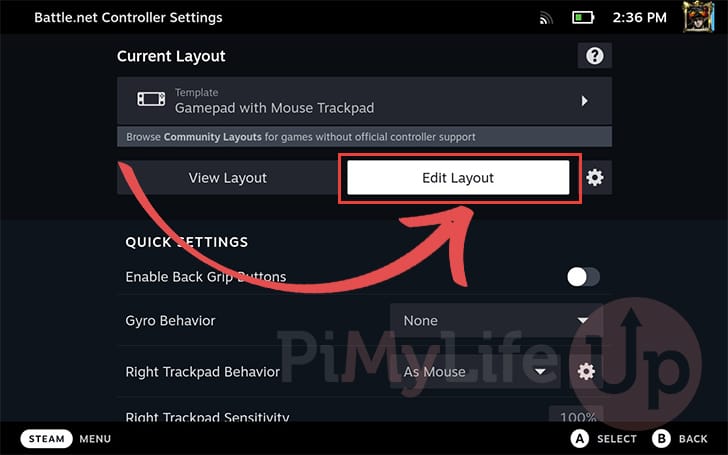
74. With the layout changed, we will want to edit it to adjust how clicks are performed.
To edit the new layout, select the “Edit Layout” option.
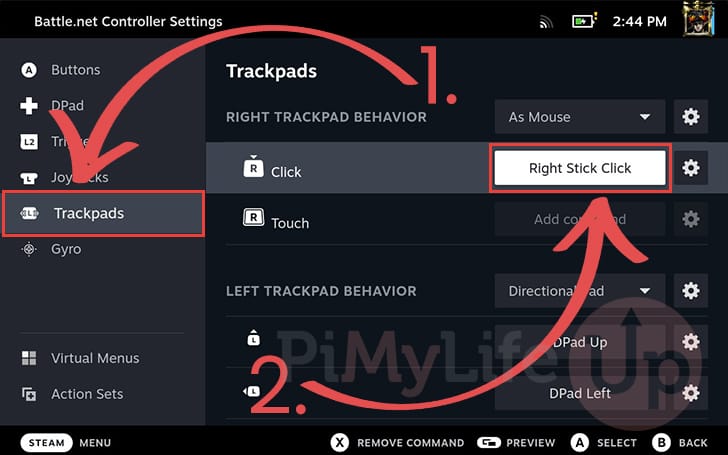
75. In the sidebar, choose the “Trackpads” option (1.).
Now underneath the “Right Trackpad Behavior” heading, select the option next to R “Click” to change its mapping (2.).
76. Using the top menu bar, change to the “MOUSE” tab (1.).
On this page, select the “Left Mouse Click” (2.) option. This will allow you to click with the trackpad when you click it.

Launching Battle.net on the Steam Deck
77. Back on the Steam page for the battle.net client, all you need to do to launch it is tap the “Play” button.
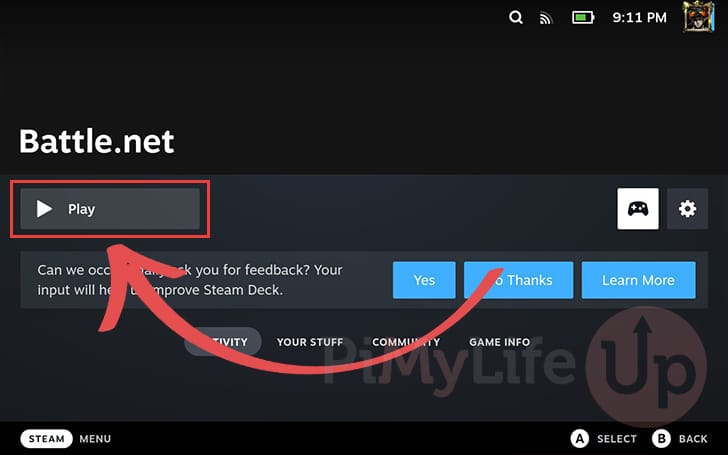
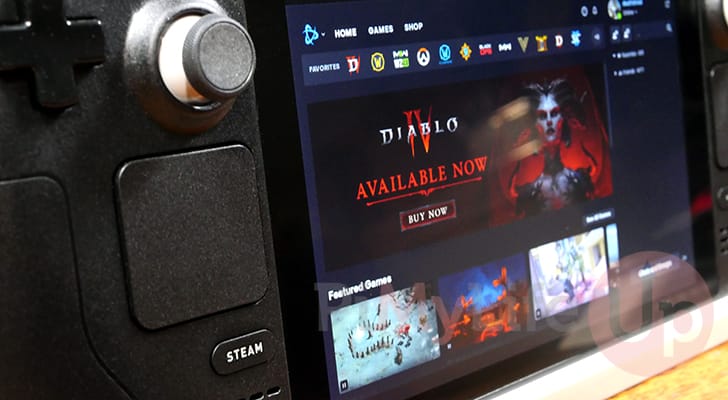
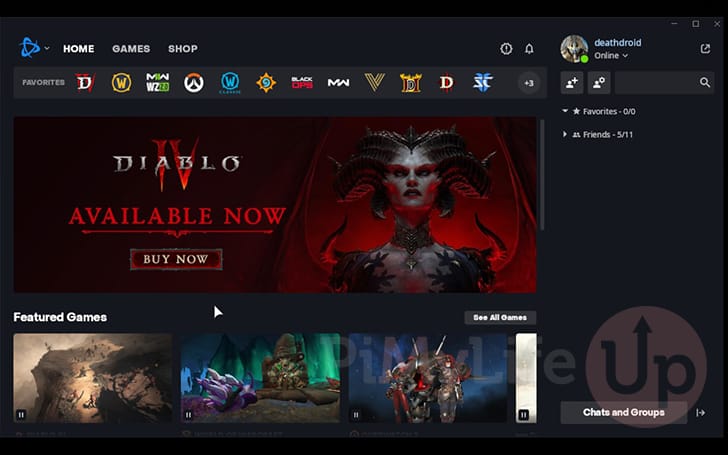
78. Below you can see we now have the Battle.net client running on your Steam Deck while in gaming mode.
You can now use this client to install any Battle.net exclusive games to your Steam Deck, such as hits like Diablo 4 and Starcraft 2.
Conclusion
At this point you should hopefully now have the Battle.net client running on your Steam Deck.
This client gives you access to numerous games that aren’t available through Steam itself. This list of games means you can run games such as Diablo 4 on your Steam Deck.
Please comment below if you have any issues running this client on your device.
If you found this tutorial useful, be sure to check out our many other Steam Deck tutorials.