This tutorial will show you how to install the GoG Galaxy client to your Steam Deck.
The GOG Galaxy store gives you access to numerous old games that will run perfectly on the Steam Deck’s hardware.
While the client doesn’t natively support Linux, we can get it to work thanks to Steam’s Proton compatibility layer.
The advantage of using Proton to run GOG is we can use the official client and not rely on a third-party one.
One big plus for games you buy from GOG is that they aren’t meant to contain any DRM. The lack of DRM makes the Steam Deck’s Proton compatibility layers job much easier as it doesn’t have to contend with the DRM functionality.
You can install this client on your Steam Deck alongside others such as Ubisoft Connect, EA App, Rockstar Games Launcher, and Battle.net.
By the end of the following section, you will have the GoG Galaxy client running on your Steam Deck in both desktop and gaming modes.
Installing and Setting up GOG Galaxy on the Steam Deck
Installing GOG Galaxy onto the Steam Deck isn’t complicated, but it takes several steps to complete.
Throughout these steps, we will show you how to change from gaming to desktop mode, download GOG, install it, and configure it to run.
You should give yourself a decent amount of time to complete these steps. While they aren’t difficult to follow, there are numerous steps.
Changing to Gaming Mode
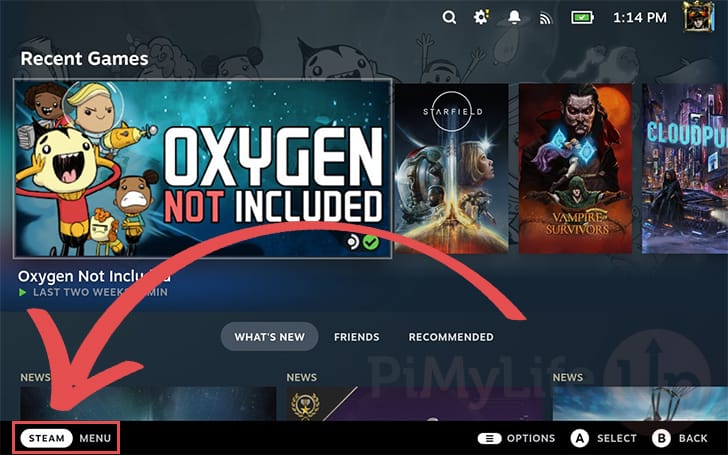
1. To install GOG, you must change your Steam Deck to gaming mode.
To get to gaming mode, you must first open the Steam menu. You can open this menu by pressing the STEAM button on your Deck or clicking “STEAM Menu” in the bottom-left corner.
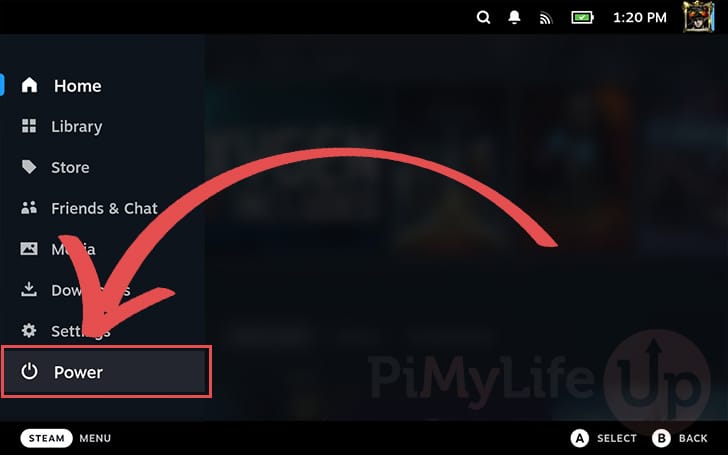
2. With the Steam Menu up, you now must change to the “Power” menu.
This menu is where we can tell the Steam Deck we want to change to the desktop mode.
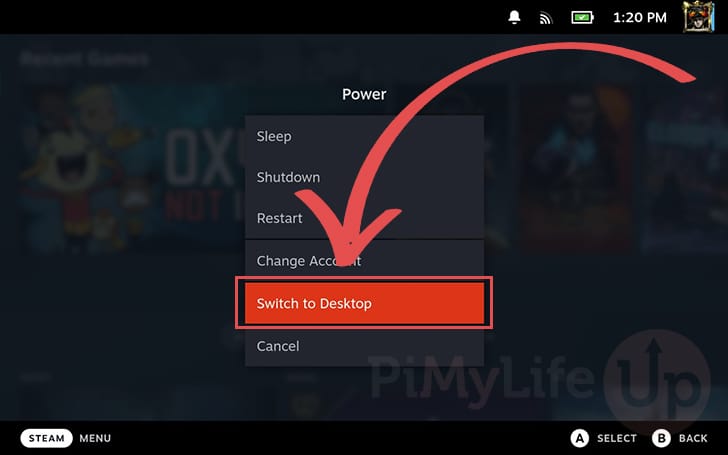
3. Now that you have the power menu up, click the “Switch to Desktop” option.
Downloading the GoG Galaxy Client to the Steam Deck
4. Once you are in the Steam Deck’s desktop mode, you must open your favourite web browser.
In our case, we will be using the Chrome web browser.
5. With the web browser open, we will need to use it to download the Gog Galaxy installer to our Steam Deck.
To download the client, go to the URL below. The installer should begin to download to your device immediately.
https://webinstallers.gog-statics.com/download/GOG_Galaxy_2.0.exe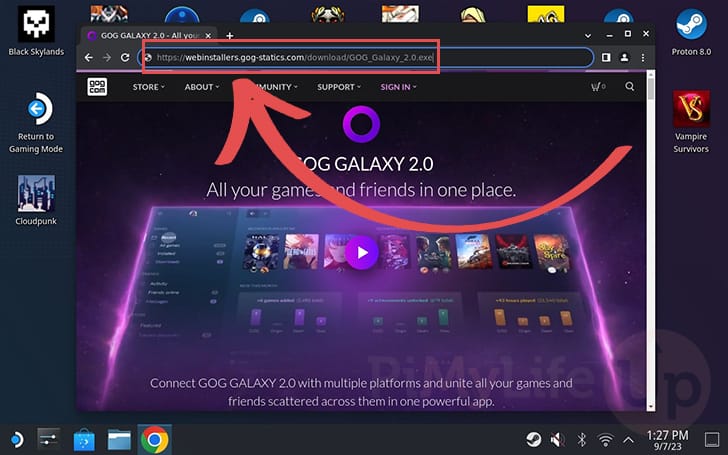
Adding the GoG Galaxy Installer to the Steam Deck Library
6. To run the GoG Galaxy Installer on the Steam Deck, add it to your game library.
Without adding it to the library, we won’t be able to use the Proton compatibility layer to run it.
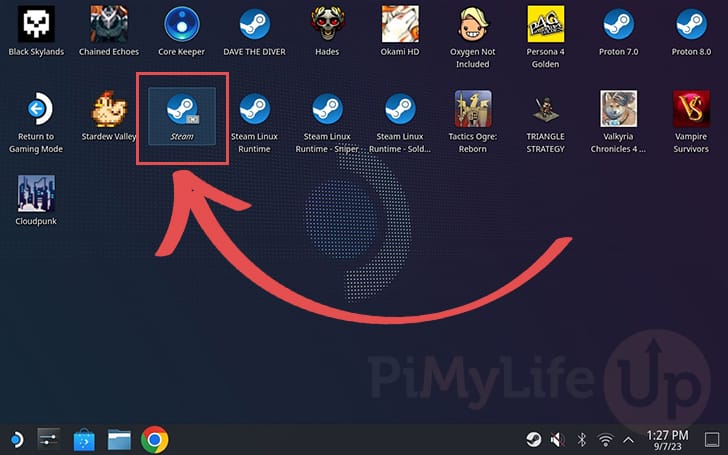
To start this process, you can open the Steam desktop client by double-clicking “Steam” on the desktop.
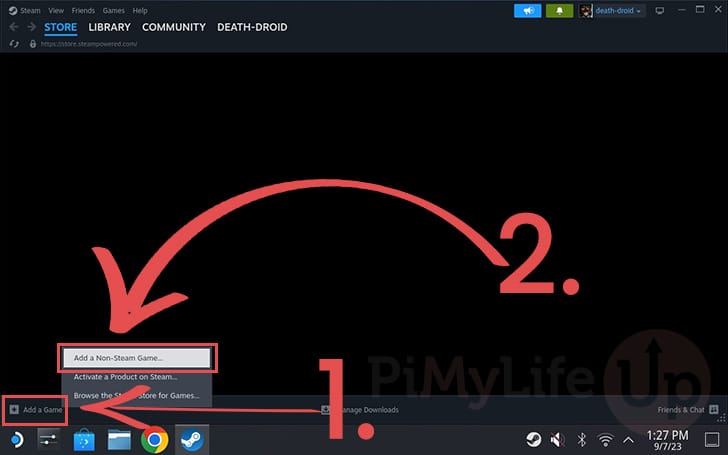
7. With the Steam desktop client open, click the “Add a game” button (1.) in the bottom-left corner.
In the pop-up that appears, click the “Add a non-steam game” option (2.).
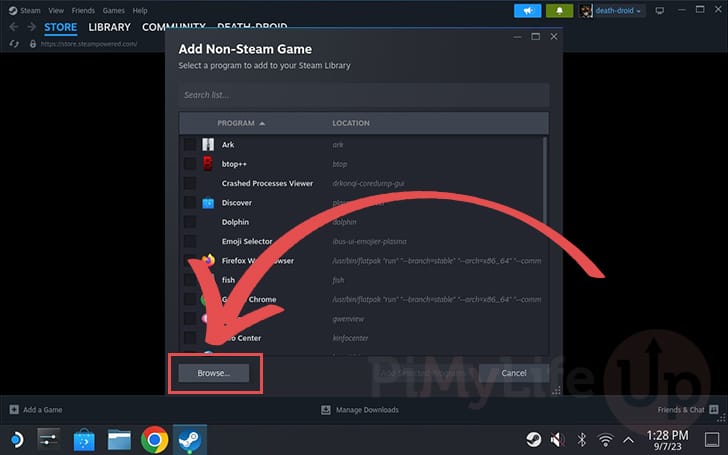
8. In the prompt that appears, click the “Browse...” button in the bottom-left corner.
9. Using the browse dialog, you must click the “Downloads” shortcut in the sidebar (1.).
You should now be in your download directory. Scroll and select the installer with the filename “GOG_Galaxy_2.0.exe” (2.).
With the installer selected, click the “Open” button (3.).
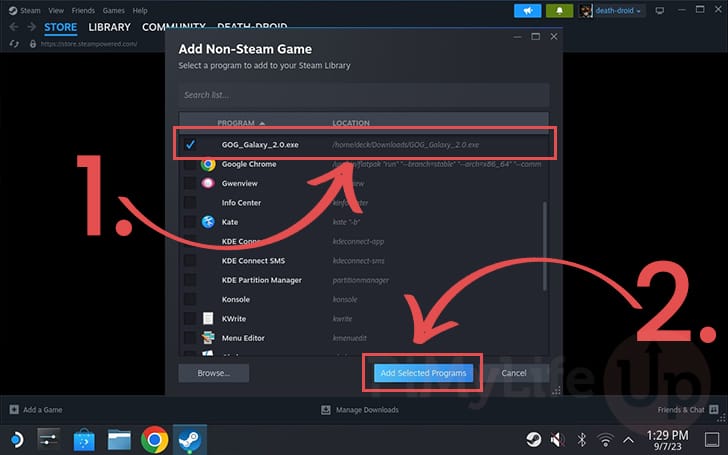
10. You should now have the “GOG_Galaxy_2.0.exe” installer selected within this dialog (1.).
Once the installer is selected, click the “Add Selected Programs” button (2.).
Forcing Proton Compatibility for GOG
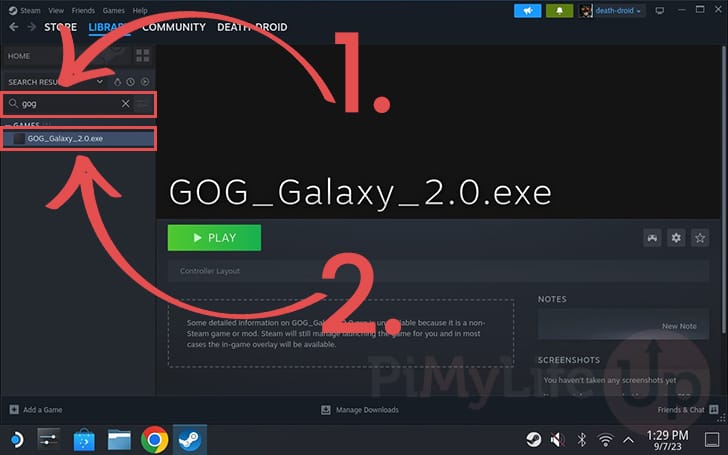
11. Within your Steam library, use the search box to look for “gog” (1.).
You should eventually see an entry labeled “GOG_Galaxy_2.0.exe“, select it to continue (2.).
12. Now that you have the GOG Galaxy entry open, click the “COG” icon (1.) on the left side of the screen.
Next, click the “Properties...” option (2.).

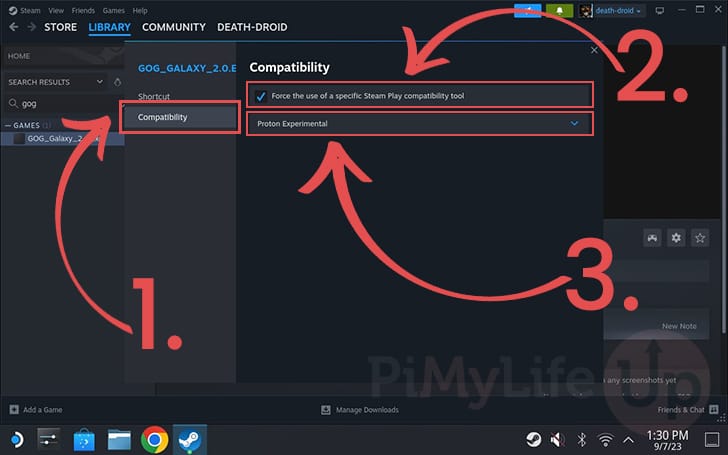
13. With the properties screen open, start by changing to the “Compatibility” tab (1.).
You will then want to tick the checkbox next to “Force the use of a specific Steam Play compatibility tool” (2.).
Once ticked, a select box should appear, which you will want to set to “Proton Experimental” (3.).
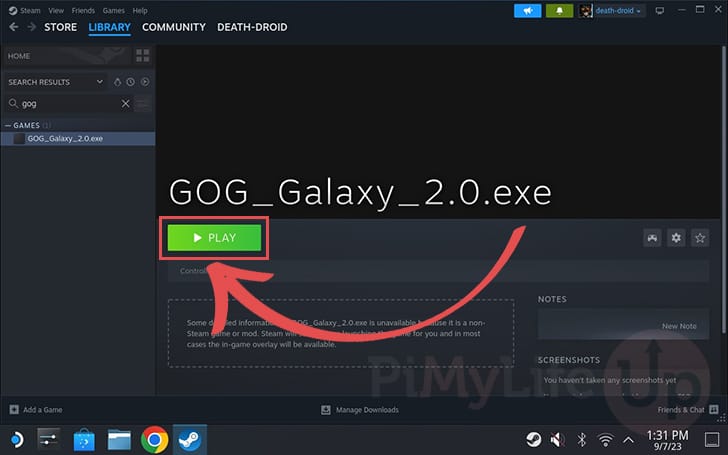
Installing the GOG Galaxy Client to the Steam Deck
14. You can now begin installing GOG Galaxy to your Steam Deck by clicking the “PLAY” button.
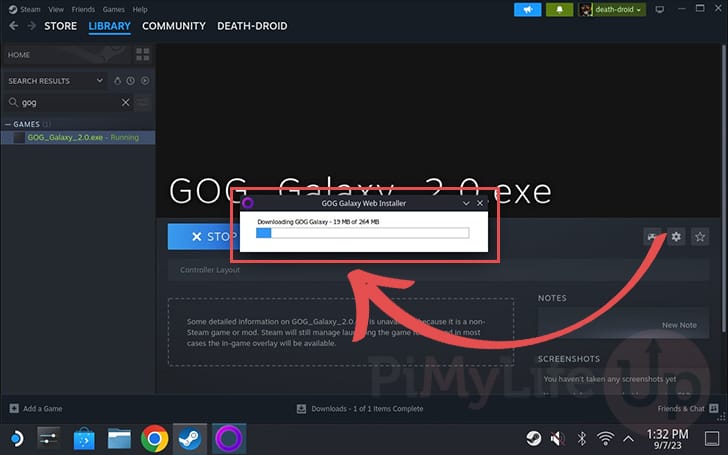
15. Since we only downloaded the web installer earlier, the installer will automatically download the full version of the GOG Galaxy client.
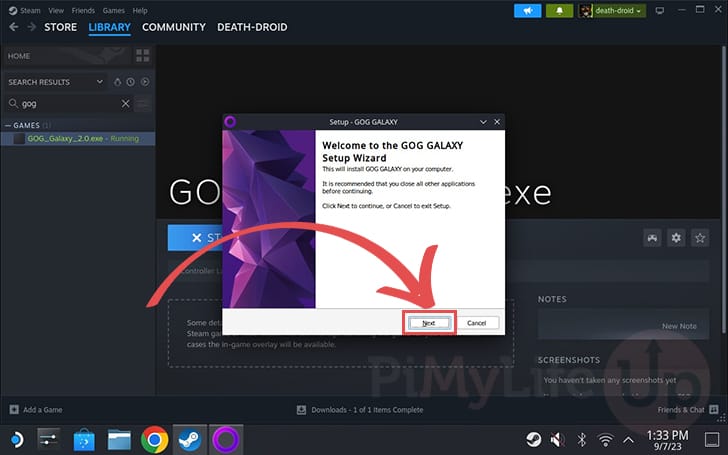
16. With the GOG Galaxy installer running on your Steam Deck, click the “Next” button to proceed with the installation.
If you find your mouse unresponsive during these installation steps, try holding down the STEAM Button as you move it.
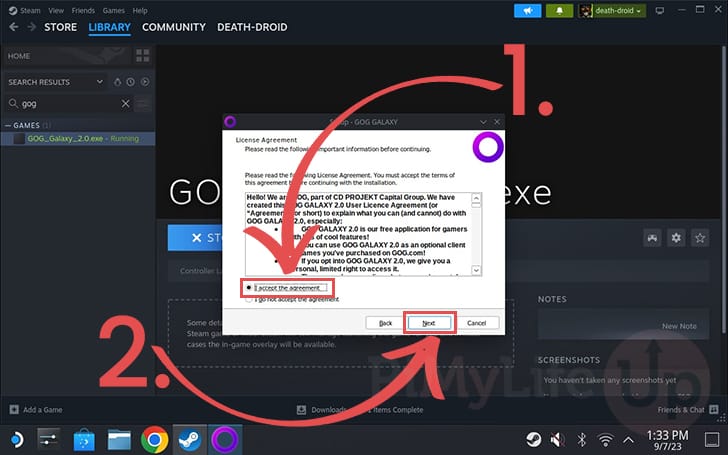
17. Before the installation proceeds, you must accept the license agreement (1.).
Once the license has been accepted, click the “Next” button (2.).
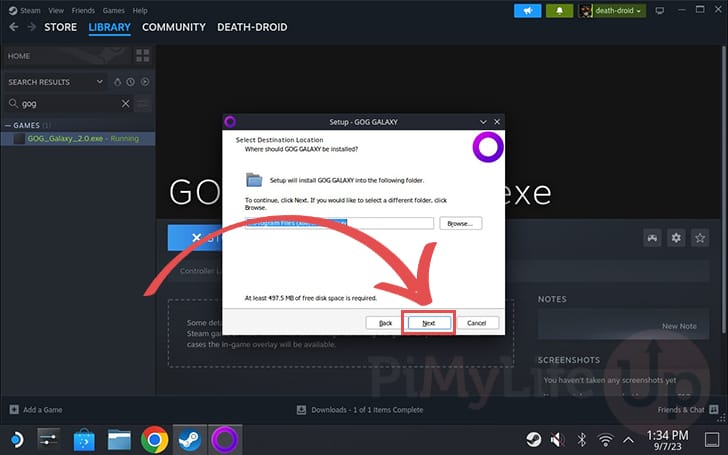
18. The next screen asks you where you want GOG Galaxy to be installed on your Steam Deck.
Since GOG is being installed within a Proton directory, you will want to keep this to the default.
Continue with the installation process, click the “Next” button.
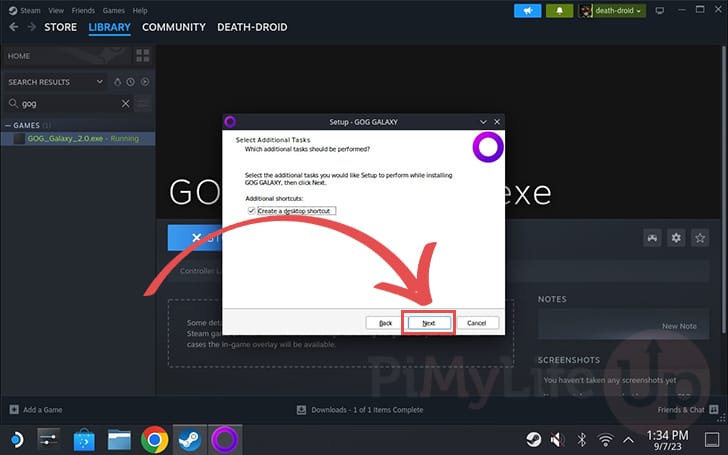
19. You will be asked whether you want to create a desktop shortcut.
To continue installing the GOG Galaxy client on your Steam Deck, click the “Next” button.
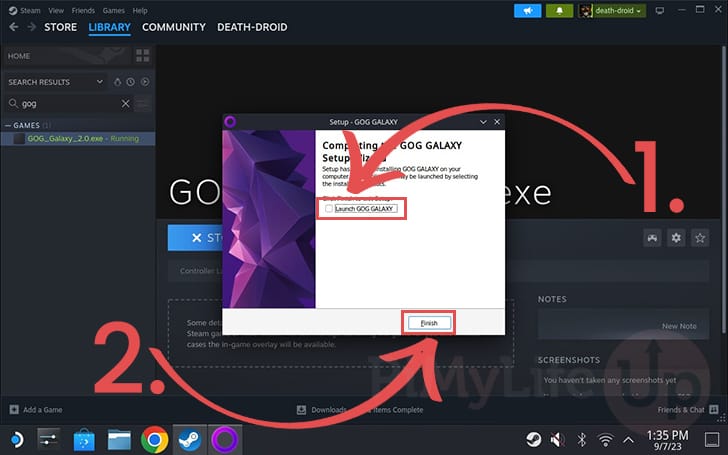
20. Next, you will be prompted whether you want to “Launch GOG Galaxy“. Untick this option for now (1.).
Once you have unticked the launch option, click the “Finish” button (2.) to complete the installation process.
Updating the GOG Galaxy Shortcut, Launch Target and Start in Directory
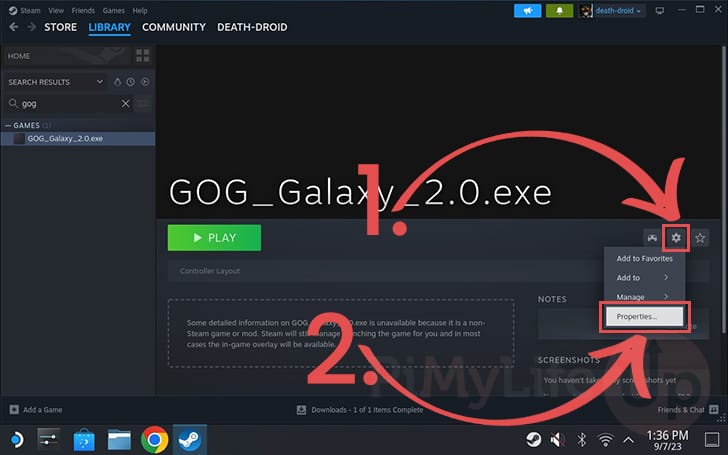
21. After installing GOG Galaxy to your Steam Deck, you must re-adjust its properties within Steam.
Click the cog icon on the left side (1.) of your Steam Library, then click the “Properties...” option (2.).
Changing the Shortcut
22. You will now want to change the shortcut name from “GOG_Galaxy_2.0.exe” to something like “GOG Galaxy“.
You can bring up the on-screen keyboard by pressing the STEAM and X buttons simultaneously.

Setting the Launch Target
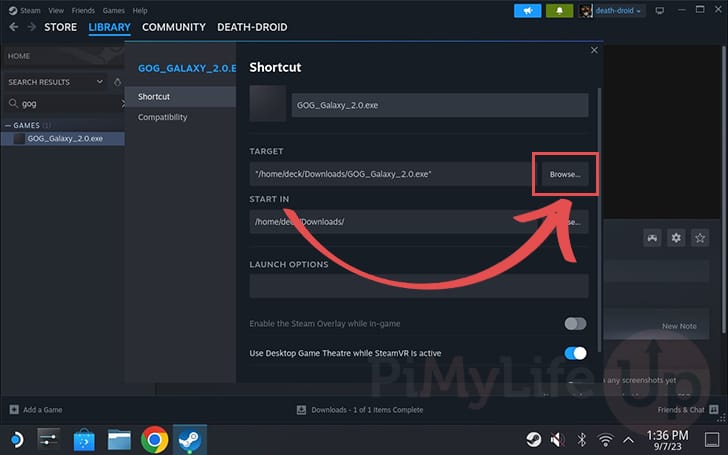
23. With the shortcut name set on your Steam Deck, you will now need to select the launch target for GOG Galaxy.
Click the “Browse...” button next to “TARGET” to begin this process.
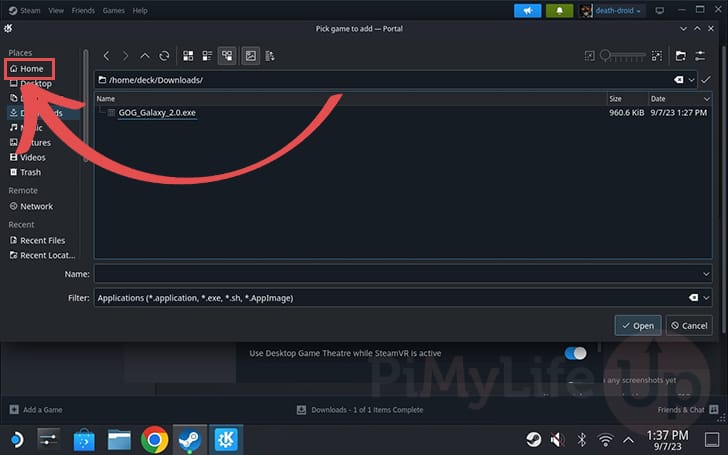
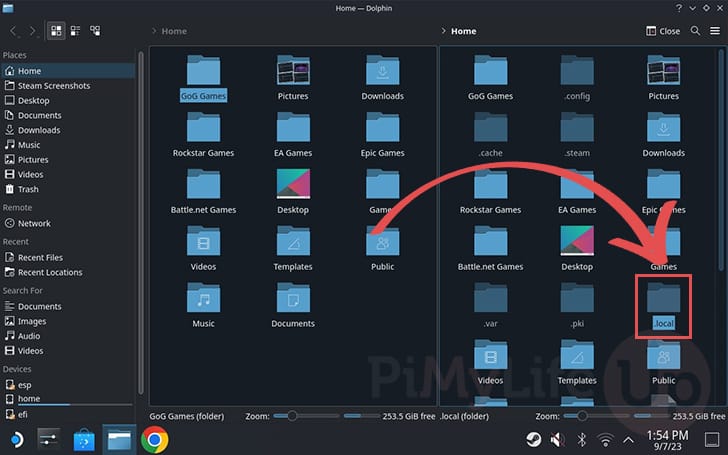
24. With the browse dialog open, click the “Home” option in the left-hand dialog to return to your user’s home directory.
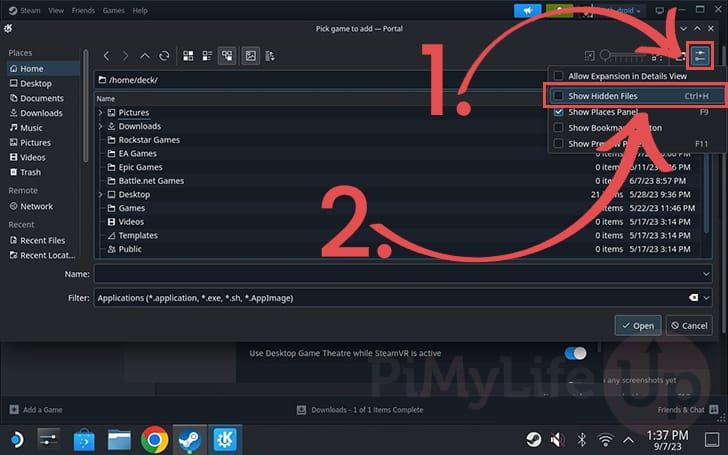
25. Now that you are back in the home directory, you must enable hidden files. To do this, click the option icon in the top right corner (1.).
In the context menu that appears, click the “Show Hidden Files” option (2.).
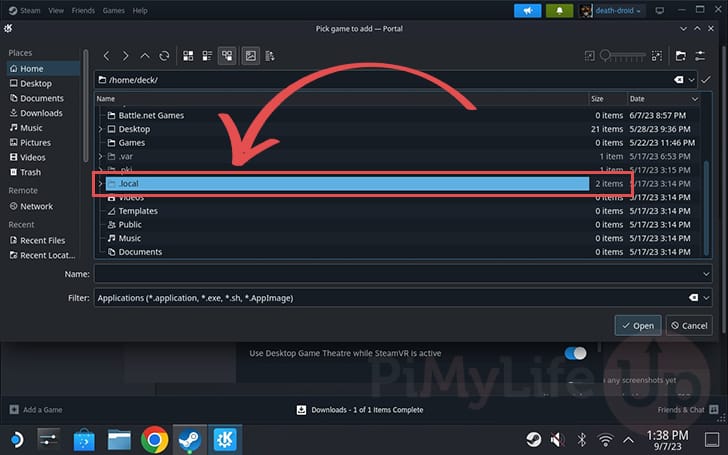
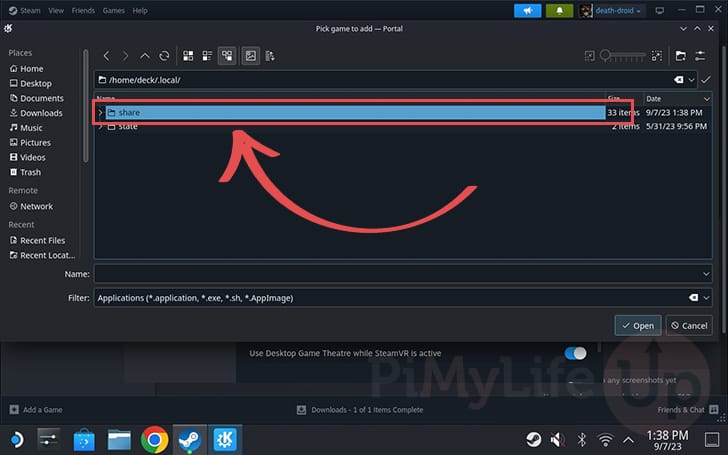
26. The first folder you will want to open is labeled “.local“.
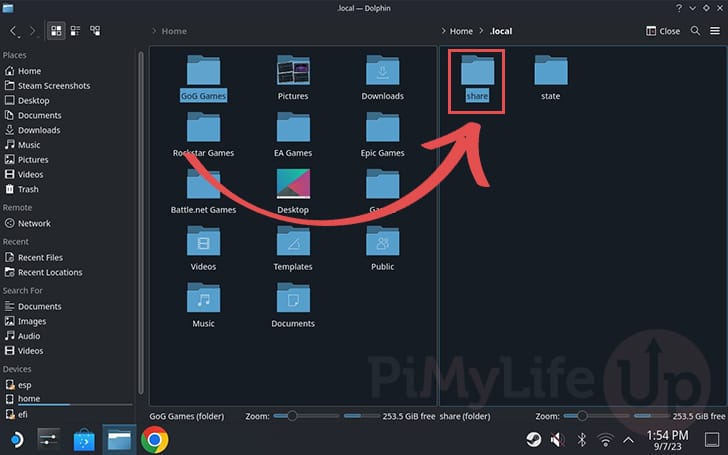
27. Next, browse to the “share” directory.
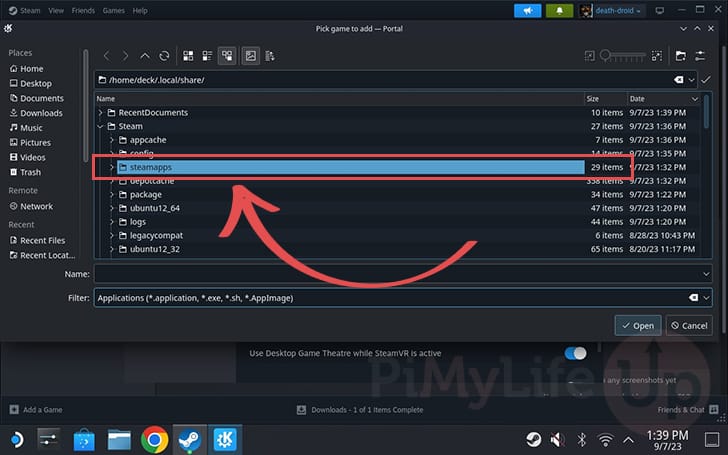
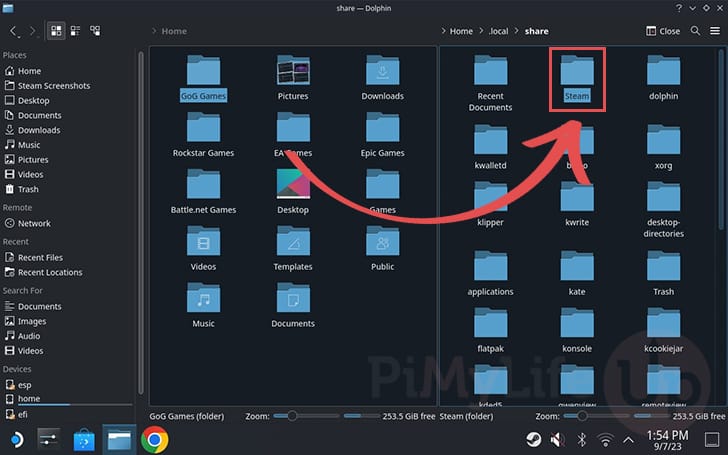
28. Within this folder, scroll through this directory till you see the folder labeled “Steam” and open it.

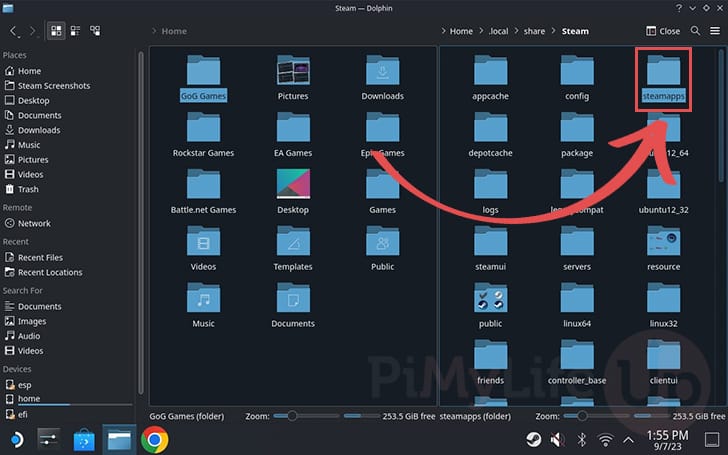
29. The next folder you are after will have the name “steamapps“.
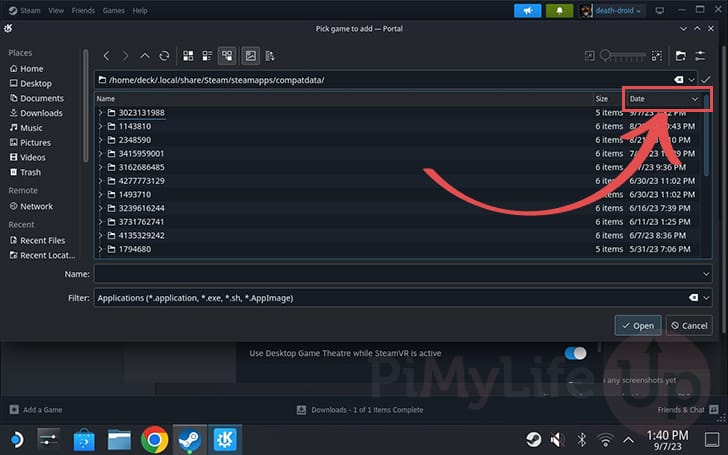
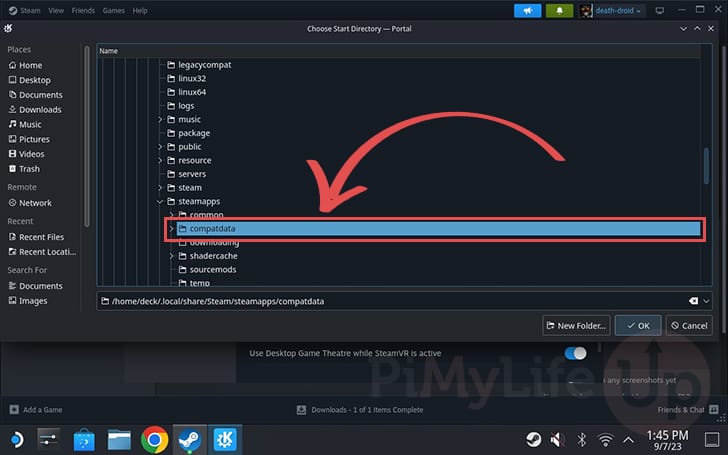
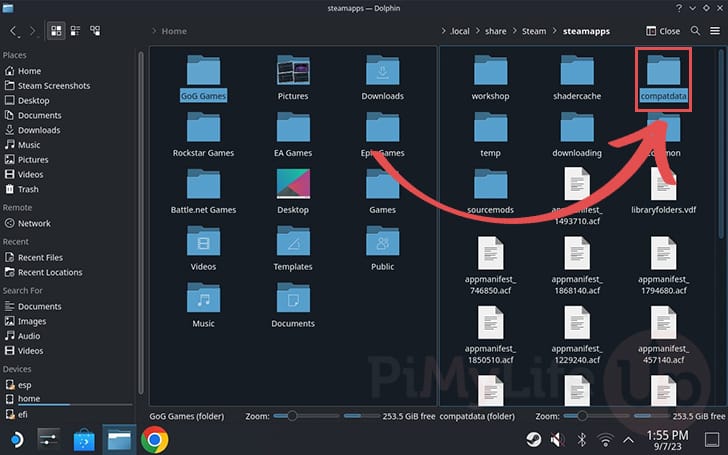
30. Finally, we can enter the directory where GOG Galaxy was installed on the Steam Deck.
Navigate into the “compatdata” directory. All applications being run under Proton are stored by default in this directory.

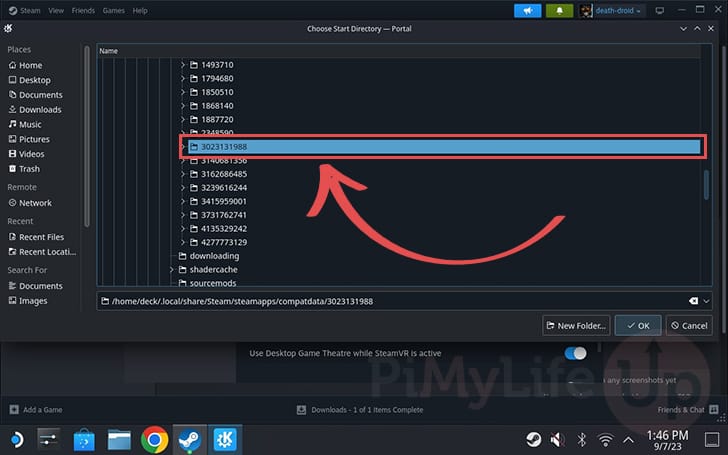
31. Before finding the directory GOG Galaxy is stored in, sort the folders by date by clicking the “Date” column.
After clicking the column header, the arrow should be pointing down. This indicates the list is sorted from newest to oldest.
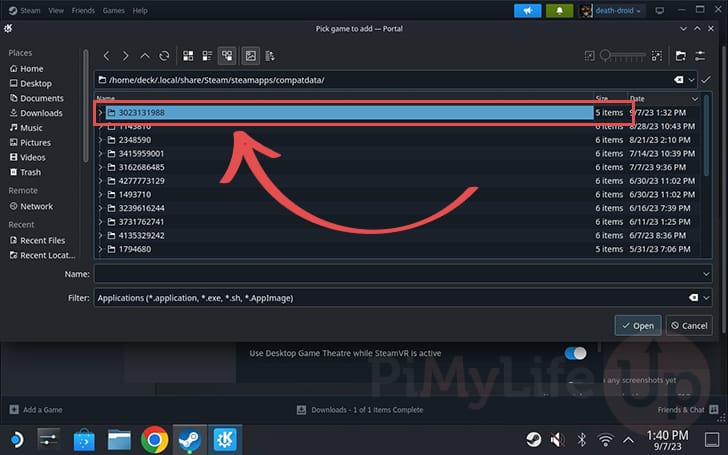
32. Once you have the list sorted, open the directory at the top of the list. This directory should be where GOG Galaxy is installed on your Steam Deck.
Make a note of the name of the folder as you will need it later.
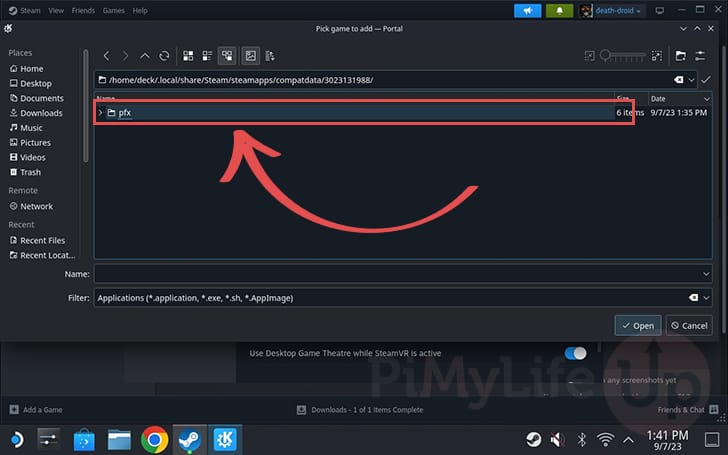
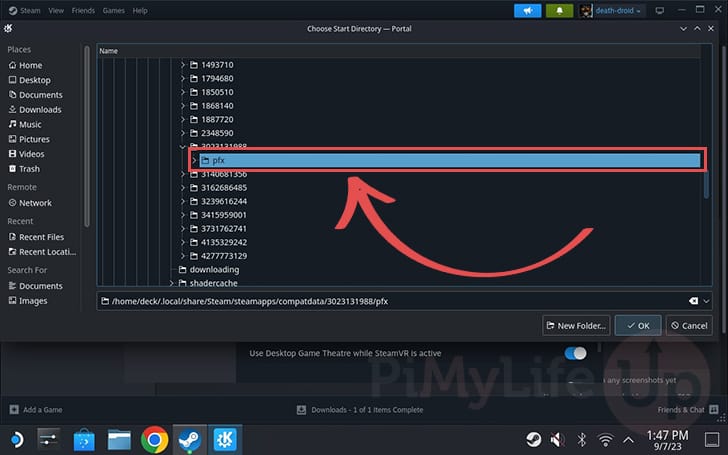
33. Next, navigate to the folder named “pfx“.
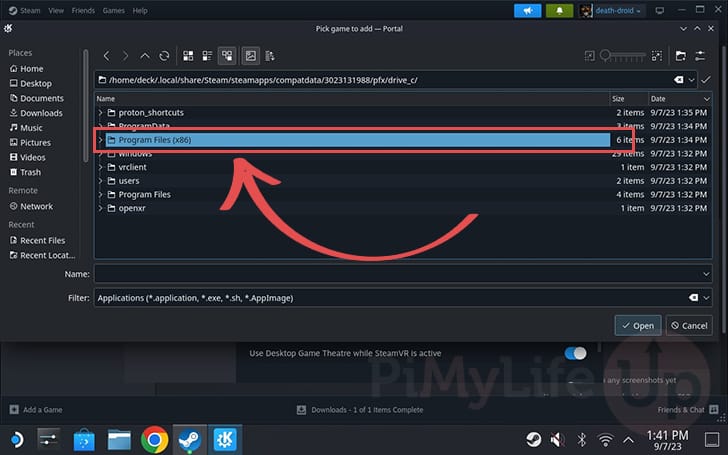
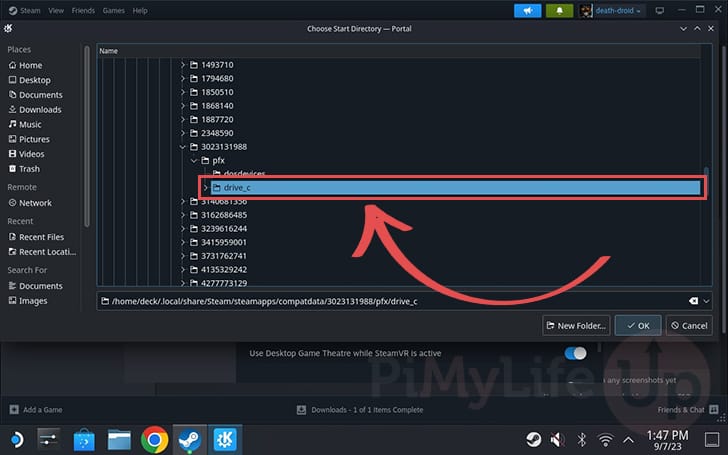
34. You will now want to swap to the “drive_c” directory. This folder represents Proton’s simulated C drive that the GOG Galaxy client will see.

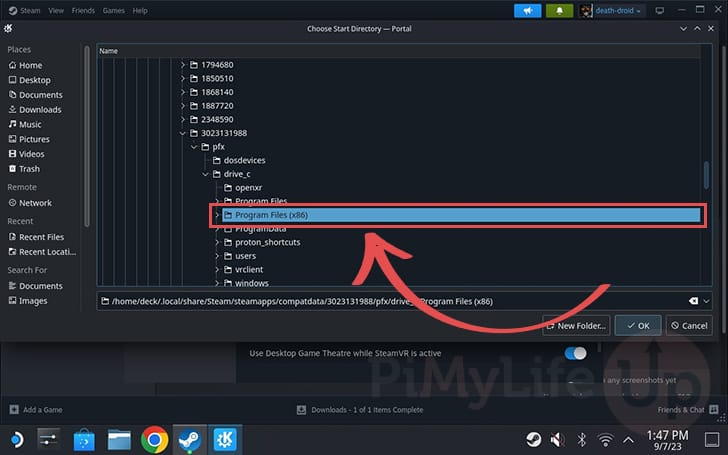
35. Now that you are within the simulated c drive, move to the “Program Files (x86)” folder.
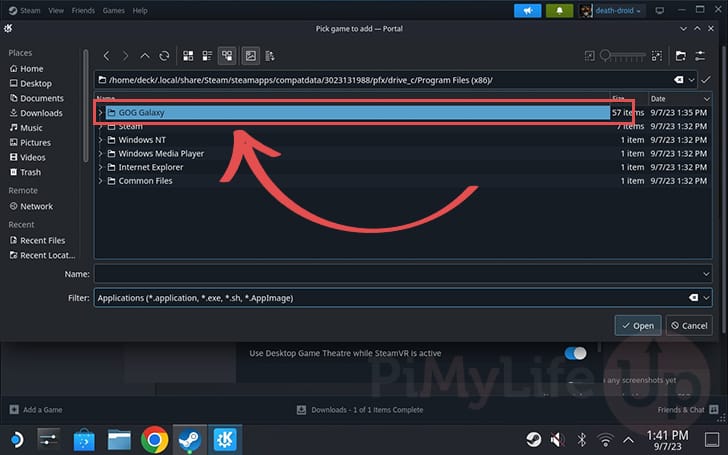
36. We are finally almost at the correct place. Now find and navigate into the directory labeled “GOG Galaxy“.
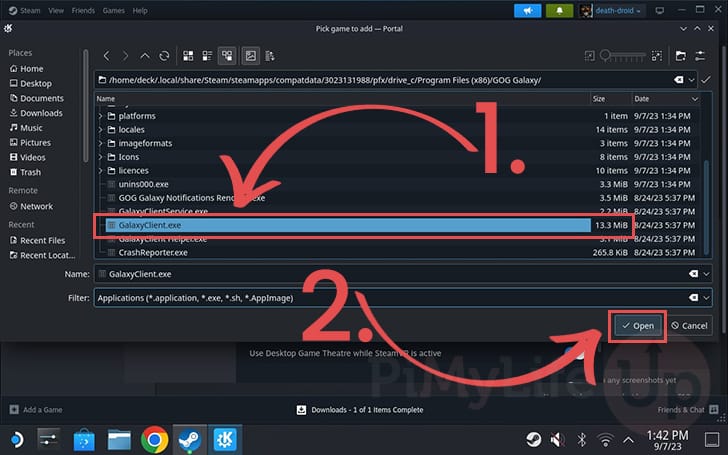
37. Now that we are in the right place, scroll down until you see the file called “GalaxyClient.exe” and click it to select it (1.).
Once the GOG client is selected, we can set the Steam Deck to launch it by clicking the “Open” (2.) button.
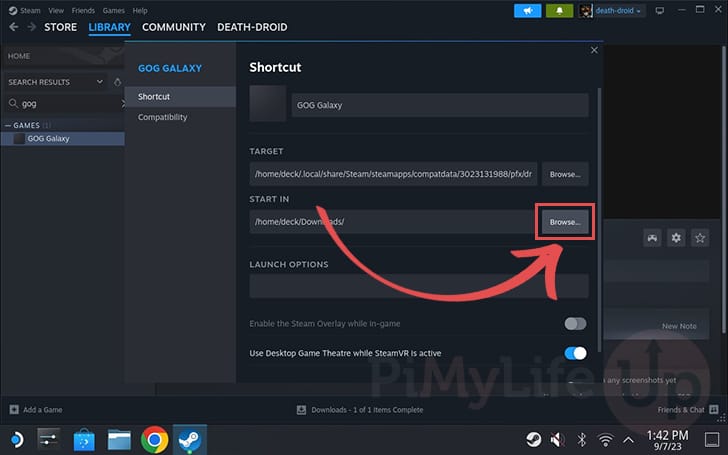
Setting the START IN Directory
38. Depending on the version of Steam you are running, you will also need to set the “START IN” directory.
Not setting this directory can cause issues with GOG Galaxy running on your Steam Deck.
This uses a slightly different dialog, so the steps will differ from the previous section. You can begin the process by clicking the “Browse...” button.
39. Before using this dialog to select the “start in” directory, you must enable hidden folders.
You can do this by right-clicking (L2 on your Steam Deck) and selecting the “Show Hidden Folders” option.
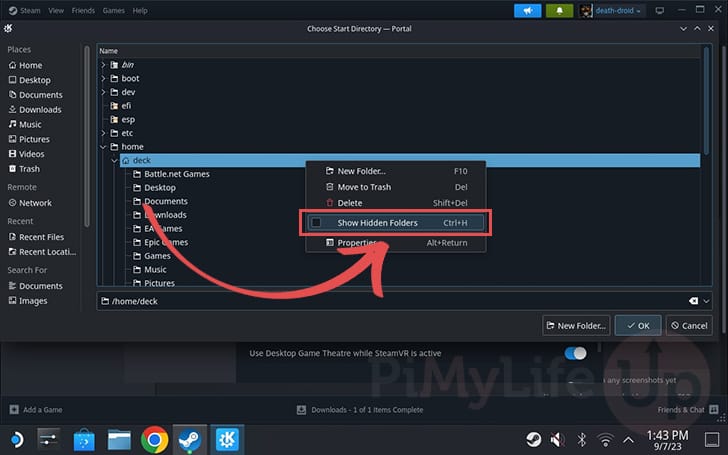
40. The first folder you will want to open while in this dialog is the “.local” directory.
Using the D-PAD can make navigating through these folders a very fast process.

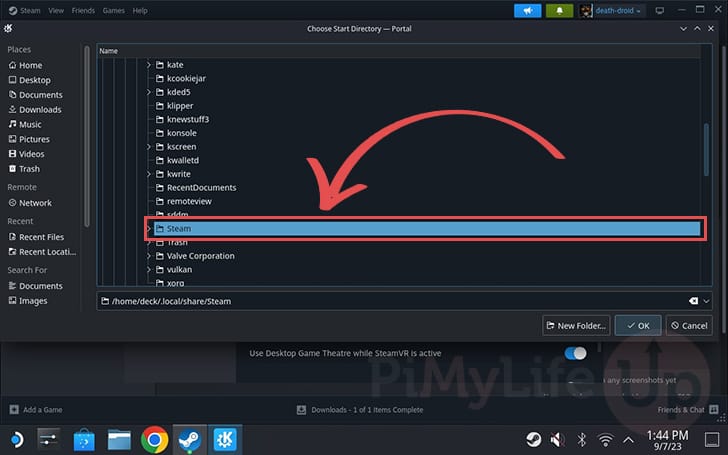
41. Next, you must change into the “share” folder.

42. Once in the “share” directory, scroll down and open the “Steam” folder.
43. The next directory you want to open is “steamapps“.
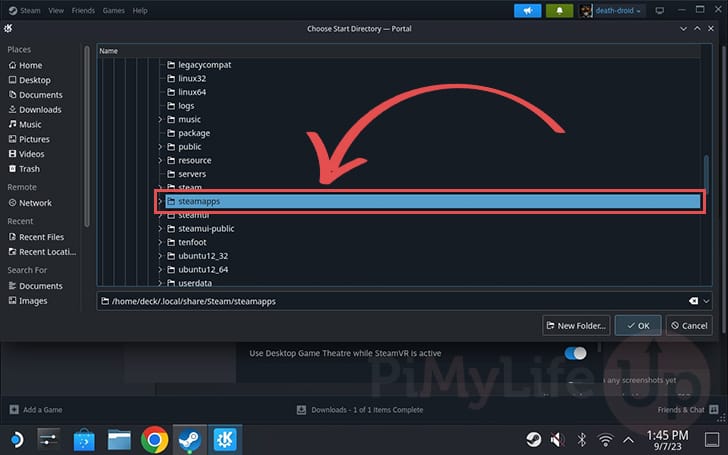
44. Our next step is to navigate to the “compatdata” folder.
45. At this point, you need to look for the Proton directory belonging to GOG Galaxy on your Steam Deck
You should know the name of this directory from setting the launch target.
46. Now open up the directory labeled “pfx“.
47. Swap to the directory named “drive_c“.
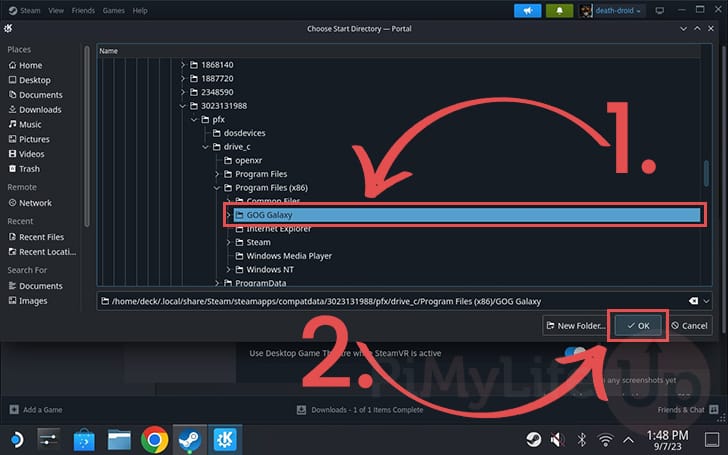
48. Change to the “Program Files (x86)” folder.
49. Now, you can select the “GOG Galaxy” directory (1.).
Once the directory is selected, you can click the “OK” button (2.).
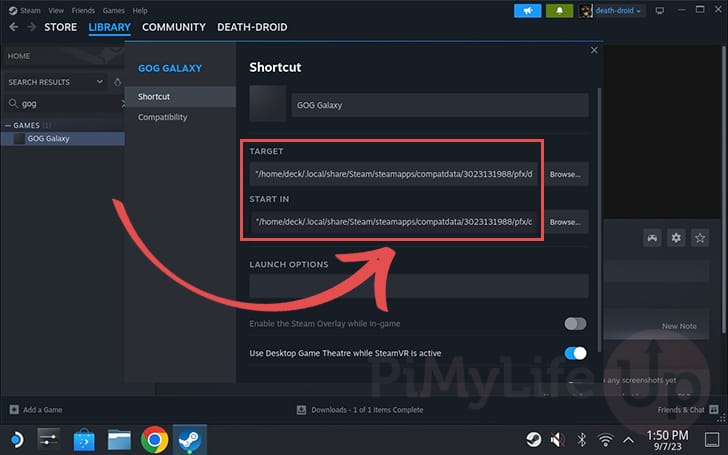
Ensure Target and Start In Directories has Double Quotes
50. Before you proceed any further, you must ensure that both the “TARGET” and “START IN” fields start and end with a double quote (").
If these are missing, the GOG Galaxy client may not launch on your Steam Deck.
Creating a Folder to Store your GOG Games on the Steam Deck
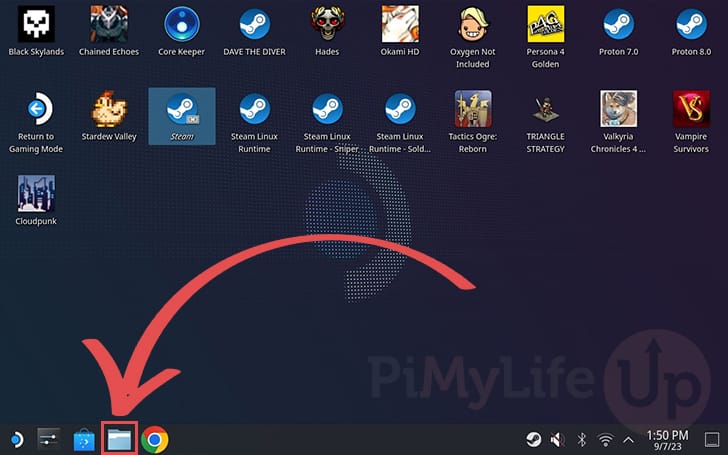
51. This section will use the Dolphin file explorer to create a directory to store your GOG Games on the Steam Deck.
While you could store your games in GOG’s Proton directory, this isn’t recommended, as if you delete GOG Galaxy, you will also lose your games.
To create this directory, open the Dolphin file explorer from the desktop.
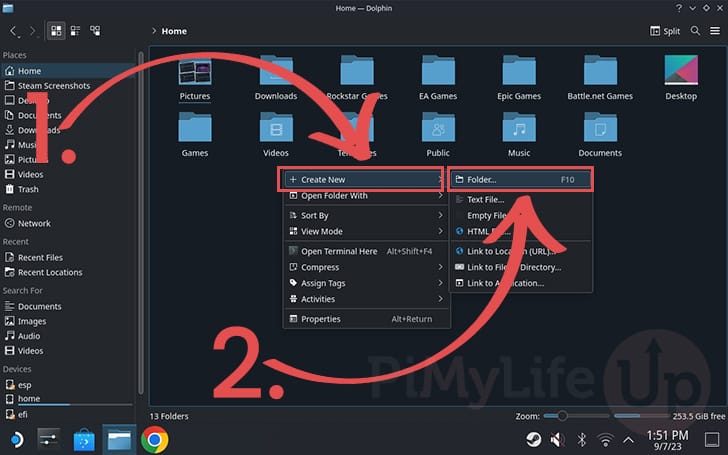
52. Once the file explorer is open, right-click using the L1 trigger and then hover over the “Create New” option (1.).
After hovering over this option, a list will appear. Click the “Folder...” option (2.) to begin creating a new folder.
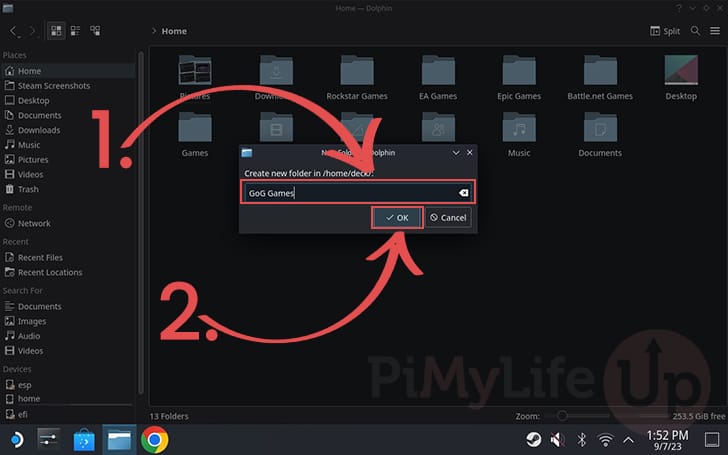
53. You can now name your new folder (1.). In our example, we will be calling the folder “GoG Games“.
Once you have named the folder, click the “OK” button (2.).
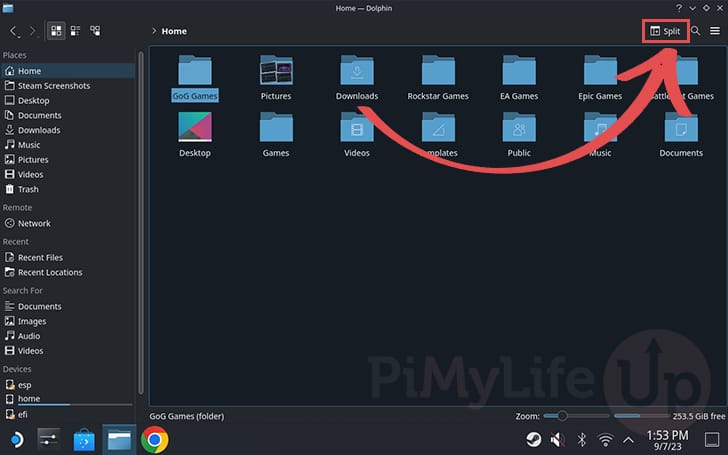
54. With the folder created, you will now want to split the Dolphin file explorer by clicking “Split” in the top-right corner.
Splitting the browser will make the next process simpler.
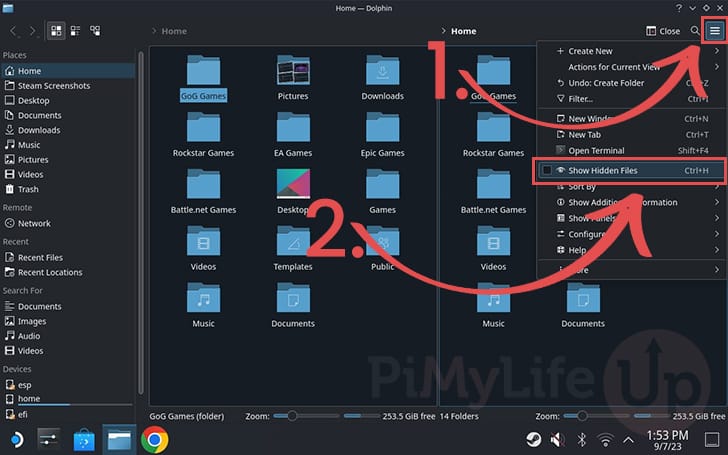
55. With the file explorer split, click the hamburger icon (Three lines) in the top-right corner (1.).
You will then want to ensure that the “Show Hidden Files” option is ticked (2.).
56. The first directory you want to locate and open is named “.local“.
57. Now open the folder named “share“.
58. The next directory you must open is the “Steam” directory.
59. Change into the folder named “steamapps“.
60. Swap into the “compatdata” folder.
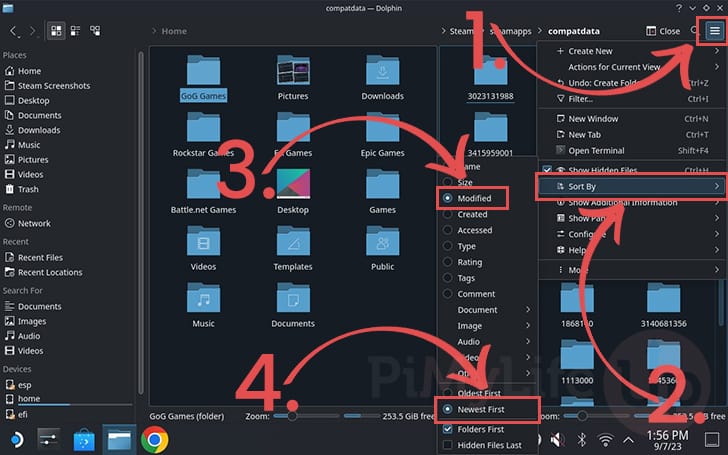
61. We now need to change Dolphin to sort by modified date. Start this process by clicking the hamburger icon (1.) in the top-left corner.
Next, hover over the “Sort By” option (2.).
You will want to ensure that the sort by method is set to “Modified” (3.), and also “Newest First” (4.).
With the folders sorted, select the one at the top of the list. This folder will have the same name as the one we dealt with earlier in this guide.
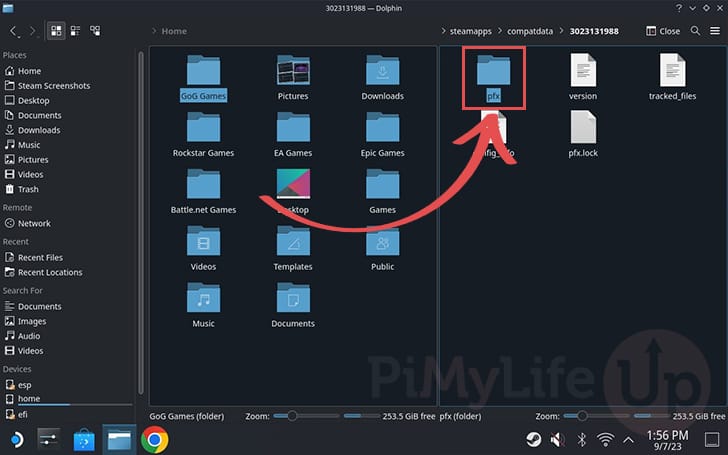
62. Now that you are in GoG Galaxy’s Steam Deck folder, swap into the “pfx” directory.
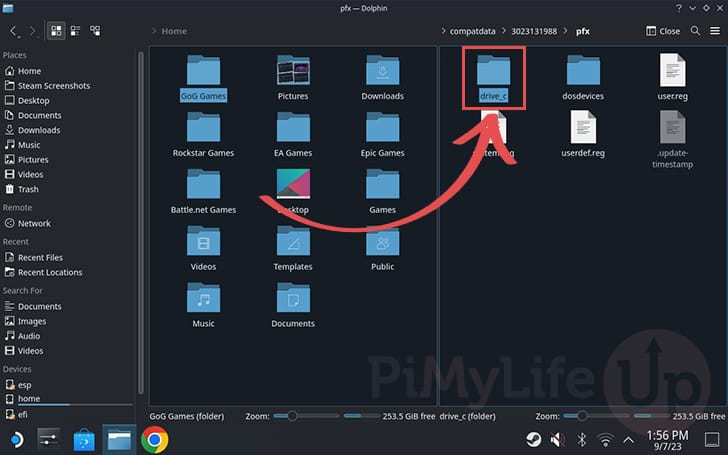
63. The next and final directory you want to open is named “drive_c“.
64. You will now want to click and drag the “GOG Games” folder (1.) we created earlier to the right side of the screen (2.).
In the dialog that pops up, you will want to click the “Link Here” option (3.).
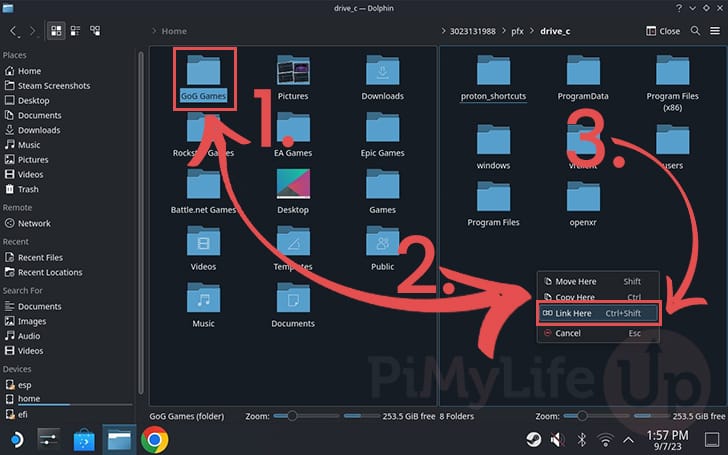
65. You should now see your directory on the right side with a little link icon on it.

Return to Gaming Mode
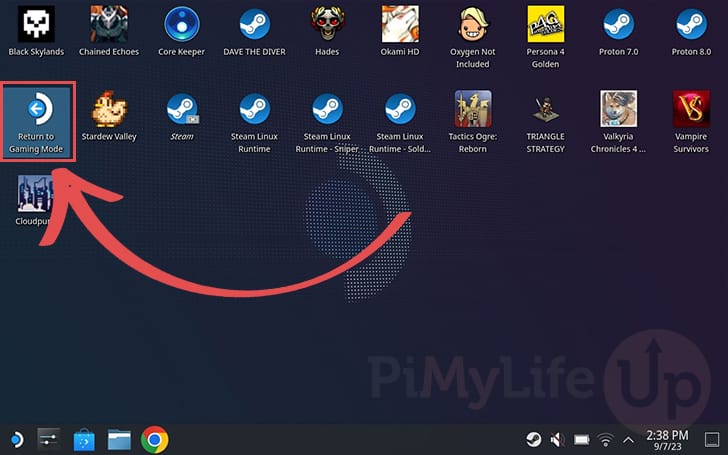
66. At this point, you can now return to gaming mode.
One of the easiest ways to do this is to swap to the desktop and double-click the “Return to Gaming Mode” shortcut.
Opening GOG Galaxy in Steam Deck Gaming Mode
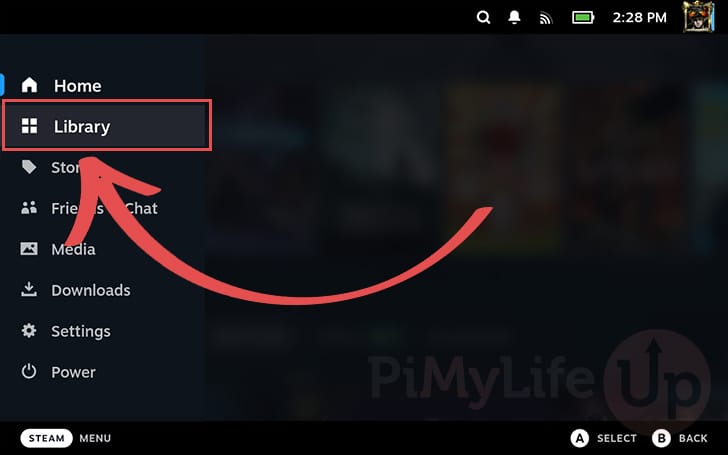
67. Now that you are back in gaming mode, change to your game library.
68. To find GOG Galaxy within your Steam Deck’s library, you must change to the “NON-STEAM” tab (1.).
Once you are in this tab, select the “GOG Galaxy” entry (2.).
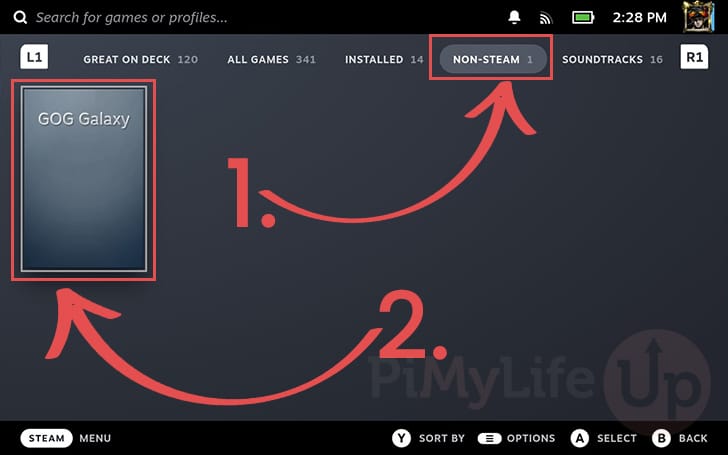
69. You can launch GOG Galaxy by clicking the “Play” button.
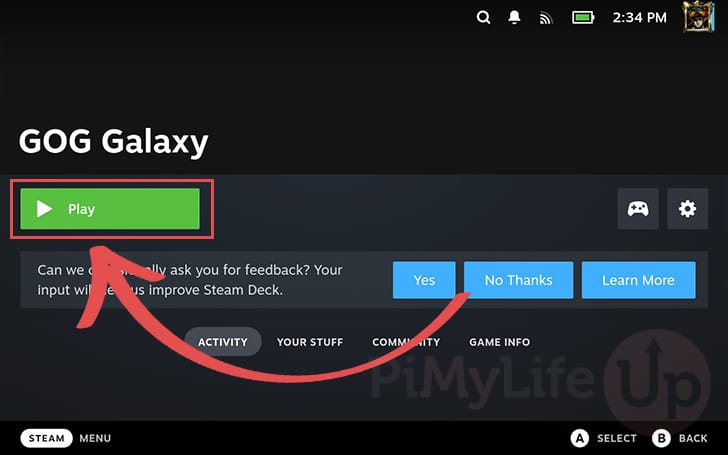
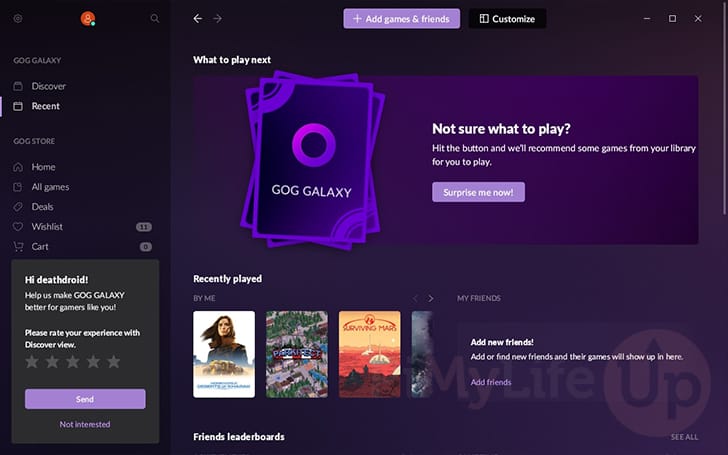
70. After logging in you should now have GOG Galaxy running on your Steam Deck.
Changing the Default Install Location for GOG Galaxy
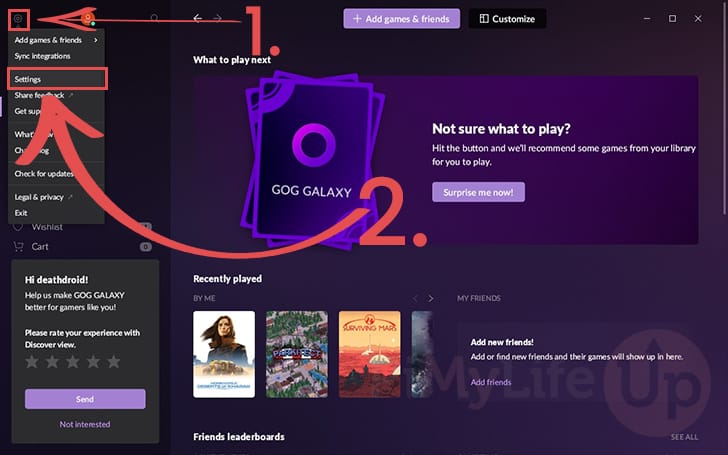
71. Now that GOG Galaxy is running, you will want to change its default install location.
To do this, you must first click the cog icon (1.) in the top-left corner.
In the pop-up menu, click the “Settings” option (2.).
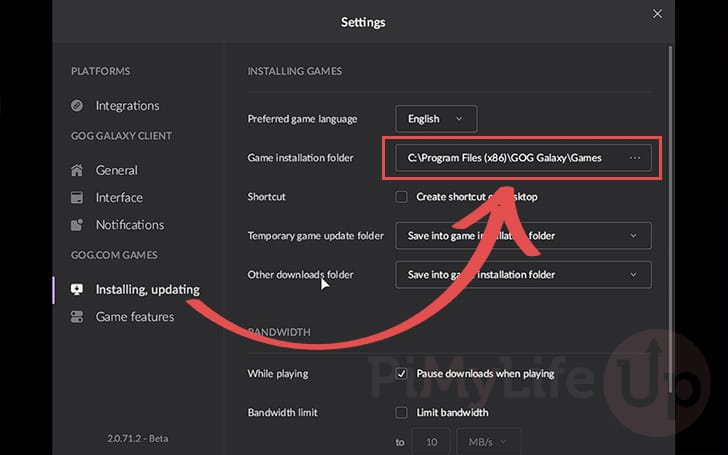
72. Within this menu, change to the “Installing, updating” menu using the sidebar.
Next, you will want to click the text box next to “Game installation folder“.
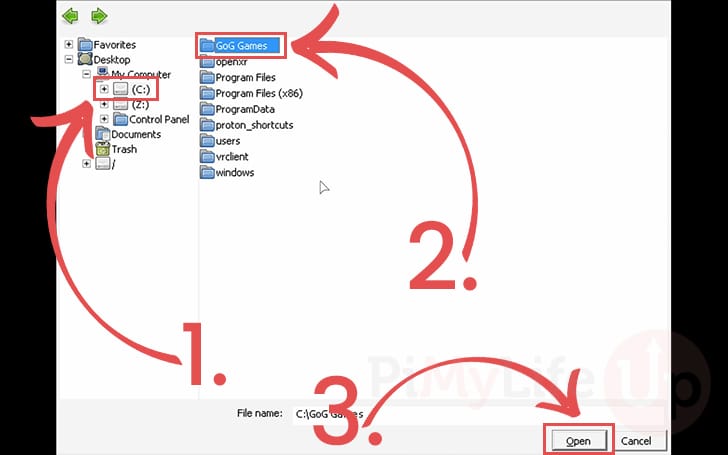
73. You will now get a dialogue you can use to browse and find the folder we created earlier.
In our case, we must first change to the “C:” drive (1.). We can then select the folder we created called “GOG Games” (2.).
Finally, click the “Open” button to select this directory as your new default installation directory.
Conclusion
Hopefully, at this point, you will now have the GOG Galaxy client running on your Steam Deck.
GOG gives you access to numerous games that are all free from DRM. The lack of DRM will make these games easier to run under the Steam Deck’s compatibility layer.
Please feel free to comment below if you have any questions about getting GOG to work on your device.
If you found this guide helpful, we recommend you checkout our many other Steam Deck tutorials.


START and END double quotes. Whoops, sorry about that.
This works, thanks!
This doesn’t work. GOG doesn’t launch. Double quotes were added at the end of the Target and Start In sections.
Clicking Play starts a launch then immediately quits back to the Steam library.
Helped alot! Thank you!
Thanks guys! It’s been really helpful 🙂
Thank you for this. I have challenges with the Heroic Games Launcher and also with Lutris. This is by far the best solution I feel for both GOG Galaxy and Battle.net. Interestingly the link here and the downloader/installer work better installing in Steam on Linux that the full offline versioned installer file. Will be trying to install and run a few games to see how they work.