In this tutorial, we will walk you through installing the Windows operating system on a Raspberry Pi.
With Windows pushing ARM and making heavy optimizations of the underlying operating system, it has become possible to actually run this operating system on a Raspberry Pi.
Despite the support of ARM within Windows, getting it to run on a Pi has been no easy task. A team of talented developers had to program a UEFI firmware for the Pi to even get the operating system to boot.
On top of this, with the introduction of the WoR flasher, installing this operating system has become incredibly easy. While you used to have to use several tools to grab and install the latest version of Windows 10 or 11, it can now all be done from one application.
Before we get started, there are a few things you should be aware of. First, while it is possible to get Windows running on a Raspberry Pi, you are likely going to run into a very rough experience just due to the lack of proper support for the Pi’s hardware. Third-party developers can only go so far, especially with some of the Pi’s chips being notoriously poorly documented and closed source.
Windows is not an operating system officially supported by the Raspberry Pi team, so don’t ask on their forums or through their support if you run into any issues.
The two most annoying parts missing from Windows support on a Raspberry Pi are support for the built-in ethernet or Wi-Fi modules. To get networking on Windows, you will need to use a USB to Ethernet cable.
Additionally, if you are running a Raspberry Pi 5 2GB or 16GB board, this guide will not work. Changes to the firmware on these devices broke the custom UEFI firmware that Windows on Raspberry relied on. Luckily, there is still support for the existing 4GB and 8GB models of the Raspberry Pi 5.
Please note we recommend that you follow our guide on setting up a Windows 11 VM on a Raspberry Pi instead. This has significantly fewer issues and allows you to use networking. It also means you don’t have to sacrifice the benefits of running Linux.


Equipment
Below, you will find a list of equipment we used when installing Windows onto our Raspberry Pi.
Recommended
- Raspberry Pi Amazon
- Micro SD Card Amazon
- Power Supply Amazon
- HDMI Cable Amazon
- Monitor Amazon
- 32GB or Larger USB Drive Amazon
- USB Keyboard Amazon
- USB Mouse Amazon
- USB to Ethernet Amazon
Optional
- Raspberry Pi Case Amazon
This tutorial was last tested using a Raspberry Pi 5.
Installing Windows on a Raspberry Pi
In the following sections, we will walk you through installing the Windows operating system on a Raspberry Pi. Be warned that this process takes considerable time to complete.
Before you begin this tutorial, you will want to have two key components ready.
- USB Drive or SD Card – You will need a spare SD card or USB hard drive that can be plugged into your Raspberry Pi. This is the storage device that the Windows operating system will be written to.
You will want this USB drive or SD Card to be at least 32GB big for the best experience. We personally used a 128GB USB drive.
If you are using a micro-SD Card, you will need it to be in a USB adapter at least until you follow the initial setup steps. - USB to Ethernet – Windows on the Raspberry Pi lacks support for any of the Raspberry Pi’s built-in networking functions. This means you must use a dongle to provide access to the internet.
In fact, Wi-Fi doesn’t work out of the box, even using a dongle.
Below we have embedded a video that will walk you through all the steps of installing Windows to your Raspberry Pi. If you prefer to go along at your own pace, you can always follow our written steps below.
Preparing Raspberry Pi OS to Install Windows
1. To install Windows on our Raspberry Pi, we will actually be starting this guide with Raspberry Pi OS Desktop installed on our Pi.
The tools we are using are significantly easier to run and use on a Linux-based operating system as they handle the full process of grabbing the latest release of Windows on ARM and then writing it to an attached drive.
If you need it, we have included a link to our guide on installing Raspberry Pi OS.
https://pimylifeup.com/raspberry-pi-os-install/2. Once you have installed Raspberry Pi OS, load up the terminal and run the following two commands. You can bring up the terminal easily by pressing CTRL + ALT + T on your keyboard.
These two commands that we are running will update the package list cache and upgrade any out-of-date packages.
sudo apt update
sudo apt upgrade -yCopy
3. Next we will want to install Git so that we can easily grab the latest version of the Windows on Raspberry flasher.
You can install the git package by using the command below in the terminal.
sudo apt install gitCopy4. With Git installed, you can now clone the latest version of Botspot’s Windows on Raspberry flasher by using the following command in the terminal.
This is the tool that will make installing Windows on your Raspberry Pi a super easy process. It handles a lot of tasks that used to be quite painful to perform in one simple GUI app.
git clone https://github.com/Botspot/wor-flasherCopy5. After cloning the tool, you can open it immediately on your system by running the following command within the terminal.
./wor-flasher/install-wor-gui.shCopyUsing the Windows on Raspberry Flasher
6. You should now have the Windows on Raspberry flasher up and running on your screen, and we can begin using it to install Windows on our Raspberry Pi.
At this point you will want to have the storage device that you want Windows installed to plugged into your Pi. In our case, this means we have our USB drive connected.
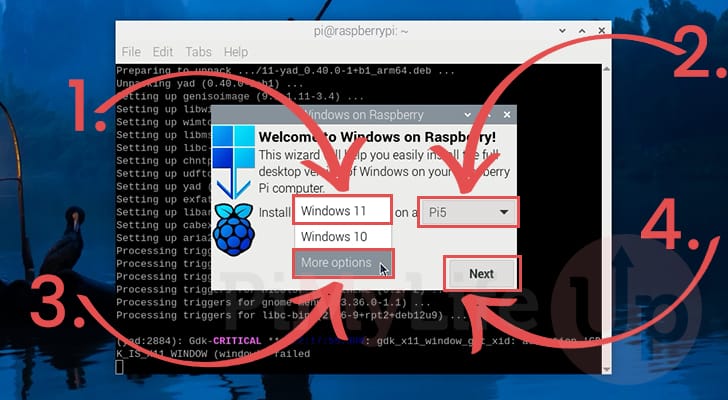
7. This first screen enables you to select the version of Windows you want to install and the Raspberry Pi you want to install it for. What you need to do here heavily depends on what Pi you are running
- If you are running a Raspberry Pi 5, you can simply keep the Windows selection to Windows 11 (1.), then select the “
Pi 5” (3.) option. - However, for those running a Pi 4 or older, you must select the OS option (1.) to “
More Options” (2.) and then select the Raspberry Pi you are running (3.).
Once everything is selected, click the “Next” (4.) button to proceed to the next step. If you didn’t select the “More Options” option, skip to step 10.
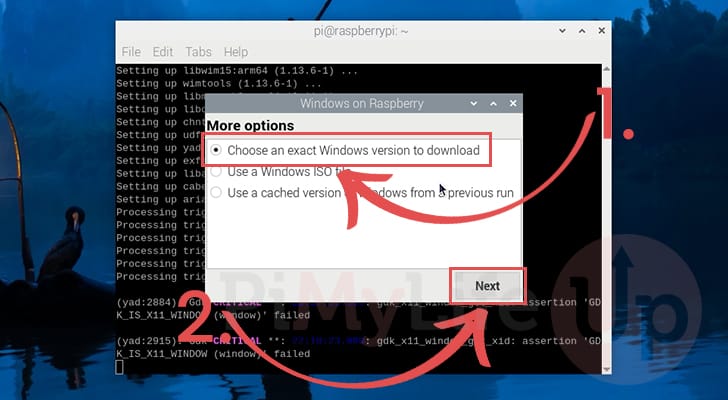
8. Going down the more options route, you will be presented with three different options.
The option you want to select is the one labeled “Choose an exact Windows version to download” (1.). Once selected, click the “Next” button (2.) to proceed with installing Windows 10 or 11 to your Raspberry Pi.
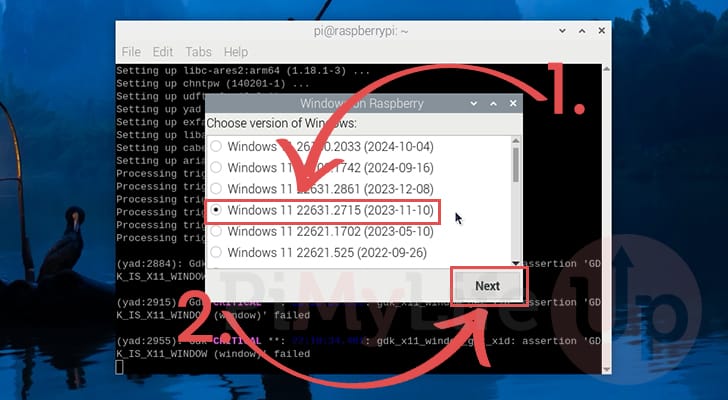
9. You will now be greeted with a huge list of different versions of the Windows operating system that you can install to your Raspberry Pi.
Scroll through this list until you see a version labeled as “Windows 11 22631.2715 (2023-11-10)” and select it (1.). Newer versions seem to break booting on the Raspberry Pi 4.
After selecting this version, click the “Next” button to continue (2.)
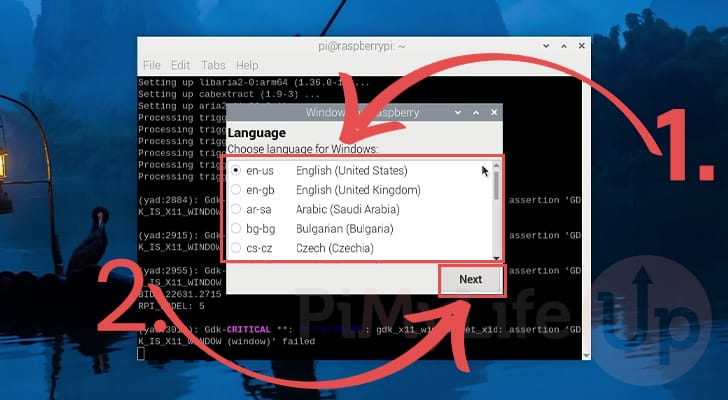
10. This next screen will prompt you to select the language that you want Windows to be using (1.). This mainly affects the installation experience as you can still adjust the language within the operating system.
Once the language has been selected, click the “Next” button (2.).
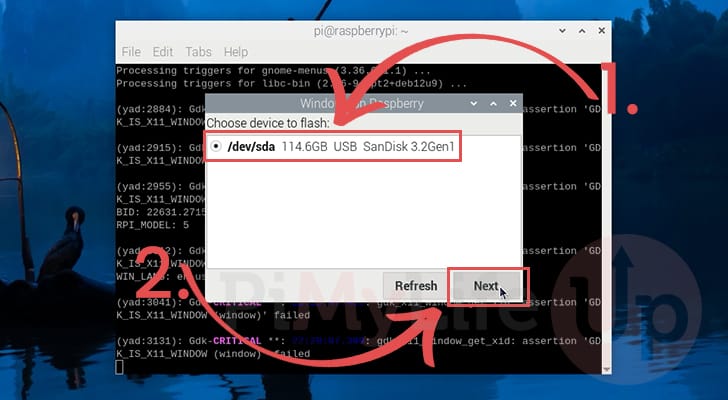
11. You will now be shown a list of devices to which this flasher can write the Windows image for your Raspberry Pi.
Select the device that you intend on using (1.) and then click the “Next” button (2.) to begin downloading Windows and flashing it to your chosen storage device.
In our example, you can see that we will be writing Windows to our 128GB USB drive.
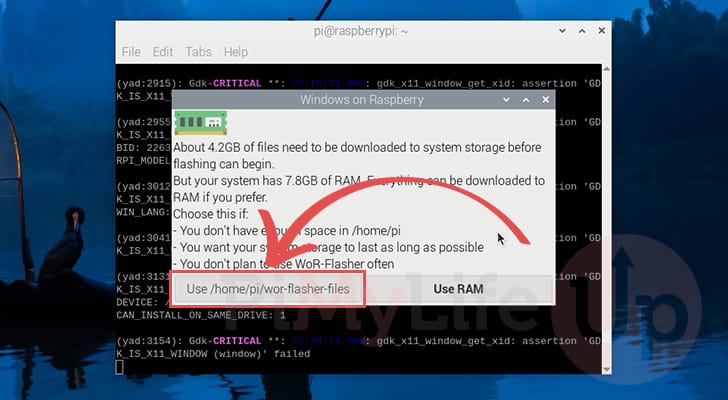
12. You will now be prompted as to whether the Windows on Raspberry flasher should keep all the files it uses in RAM or save them to your disk.
Unless you don’t have any room available on your SD card, we highly recommend selecting the first option that will save these files locally.
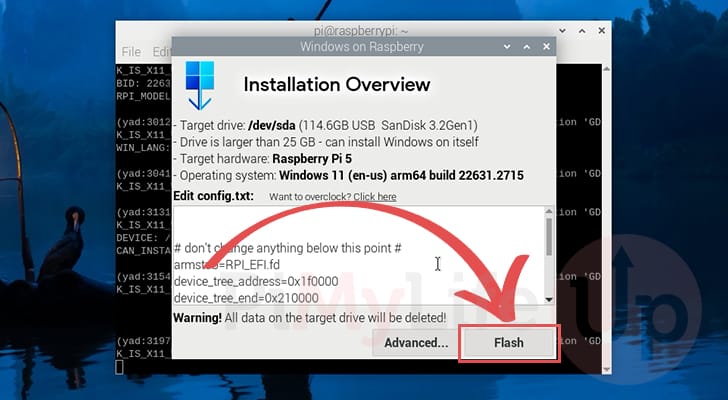
13. You will now be presented with an overview of what the flasher is about to do. This lists the drive you intend to flash the image to, the version of Windows you are installing, and the target hardware.
If everything looks correct, click the “Flash” button to begin flashing the Windows image to your chosen storage device.
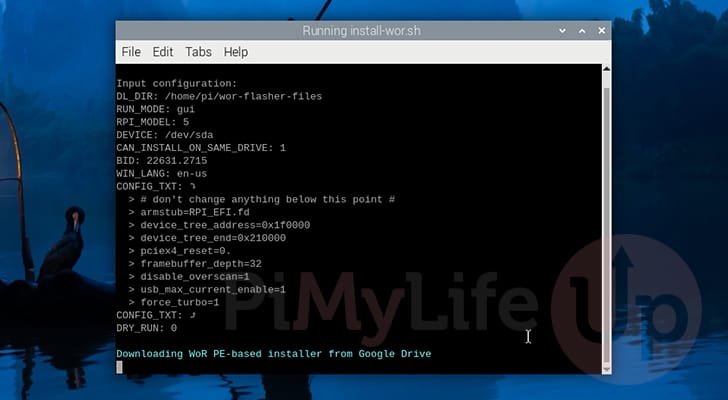
14. At this point, the Windows on Raspberry flasher will download everything it requires to get Windows 10 or 11 running on your Raspberry Pi. This includes various bits of software, including the custom UEFI firmware.
All of this data will then be written to your chosen storage device. This process can take a few minutes as it does need to download the full Windows on ARM image.
15. Once everything has been completed, you will see a screen explaining the next steps you must follow.
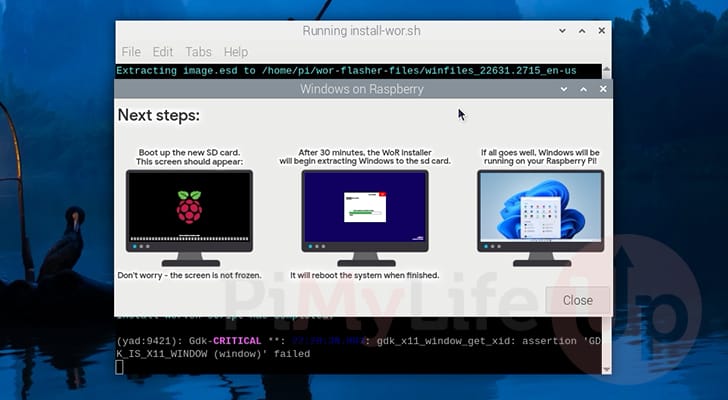
Booting to the Windows on Raspberry Pre-Installation Environment
16. At this point, power your Raspberry Pi off. Unplug the device that you had Raspberry Pi OS installed to (in our case, our SD Card) and then power your Raspberry Pi back on.
If you are using a newer version of the Raspberry Pi firmware, it should automatically detect a boot device and start it up without you needing to enable boot to USB or NVME mode manually.
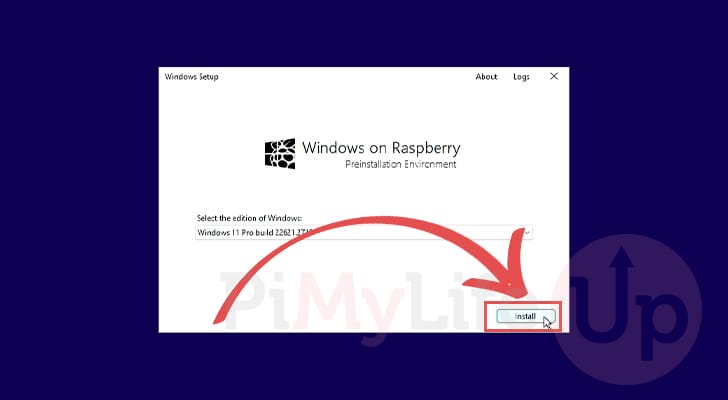
17. Once your Raspberry Pi boots up, you will be greeted by the Windows on Raspberry preinstallation environment. This final tool will install and set up Windows 10 or 11 on your Raspberry Pi.
To begin this installation process, click the Install” button. Please note that this installation takes considerable time. In fact, it can take over an hour, even on a Raspberry Pi 5. Our own installation took roughly 80 minutes to complete.
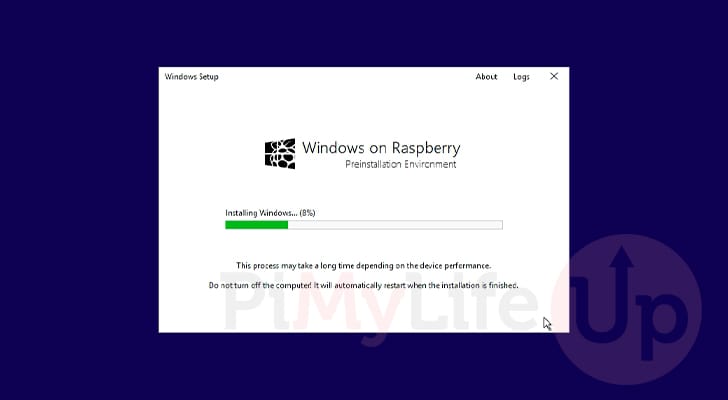
18. The installer will begin running on your Raspberry Pi and setting up the Windows environment.
Now is a great time to take a break and come back in an hour or so.
Disabling the Networking Requirement of the Windows OOBE
19. Once the installer has finished setting up Windows on your Raspberry Pi, you must go through the out-of-the-box experience.
Before we begin, however, we will want to disable the networking requirement of the installer. This does two things: one, it stops us from needing to sign in using a Microsoft account, and second, it will enable us to proceed with the installation even if networking isn’t available.
First, bring up the terminal within the set-up experience by pressing SHIFT + F10 on your keyboard

20. With the terminal now open, you will want to run the following command.
This command basically tells Windows to restart the out-of-box experience and bypass the networking requirement.
OOBE\BYPASSNROCopy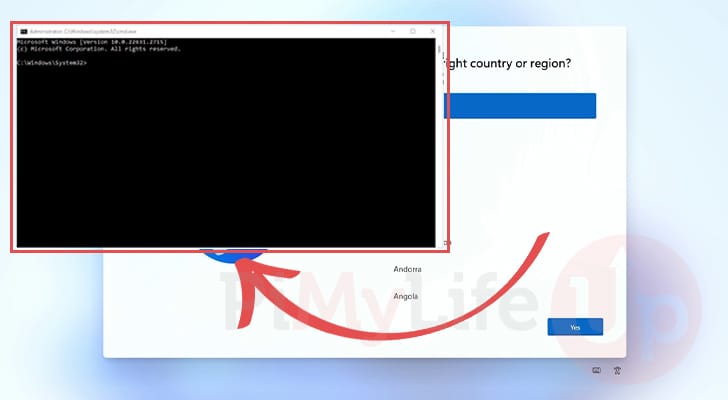
Setting up Windows on your Raspberry Pi
21. Once the out-of-box setup has finished restarting, you can select the country or region in which you are located (1.).
After selecting your region, click the “Yes” button to continue (2.).

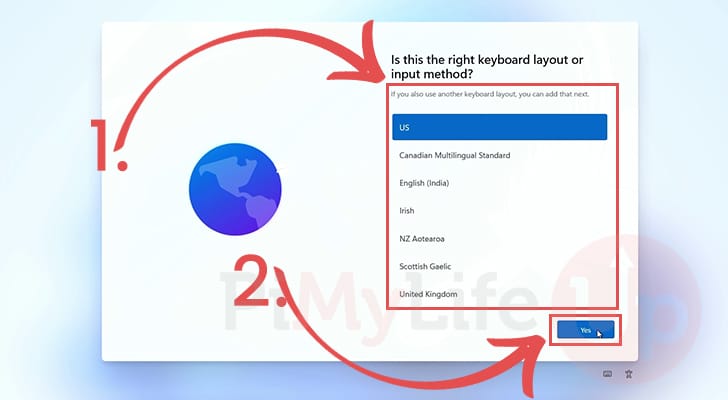
22. Next, you must select the keyboard layout or input method (1.) that you intend to use with your Raspberry Pi and Windows. The setup tool will have attempted to automatically select the correct one.
If everything looks correct, click the “Yes” button (2.).
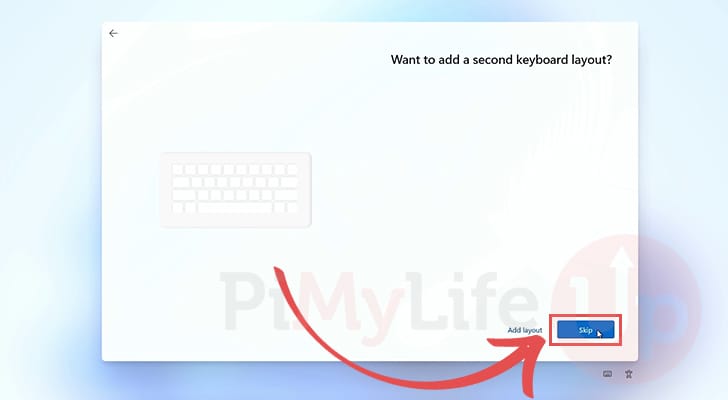
23. You will now be prompted if you want to add a second keyboard layout.
In our case, we didn’t, so we just clicked the “Skip” button.
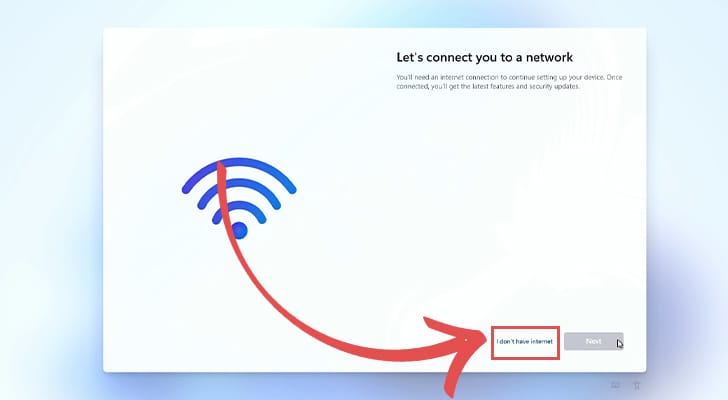
24. Windows will now attempt to check if there is an active internet connection.
Because Windows can be a bit funny with the networking on your Raspberry Pi, you can skip this whole process by clicking the “I dont have internet” link.
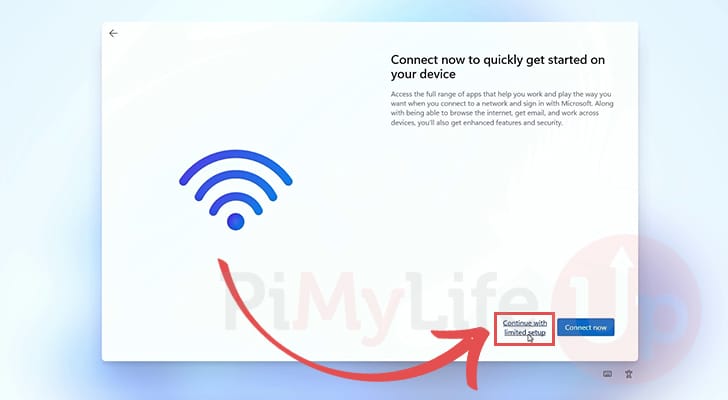
25. This next screen will prompt you to connect to the internet to set up Windows on your Raspberry Pi.
Thanks to running that command earlier, we can skip this process by clicking the “Continue with limited setup” link.
26. You will now be prompted to review the license agreement for both Microsoft and Windows.
If you are happy to agree to these terms, click the “Accept” button to continue the setup process.

27. This next screen allows you to fill out the username or name (1.) you want to use when logging into Windows on your Raspberry Pi.
After setting a username, click the “Next” button (2.).

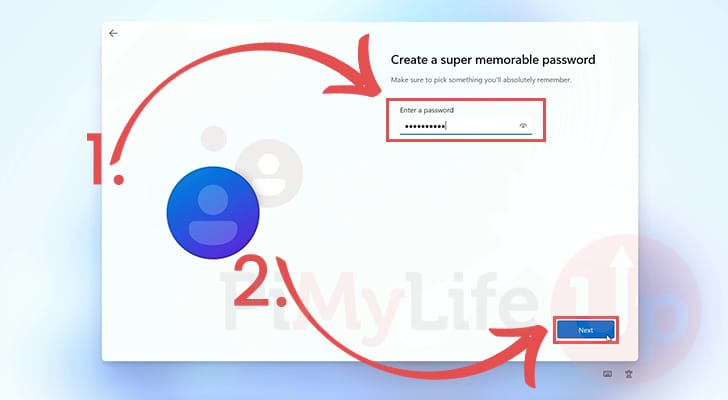
28. Now follow the subsequent two screens to set the password you will use to access this new account (1.).
After setting a password, click the “Next” button (2.) to proceed.
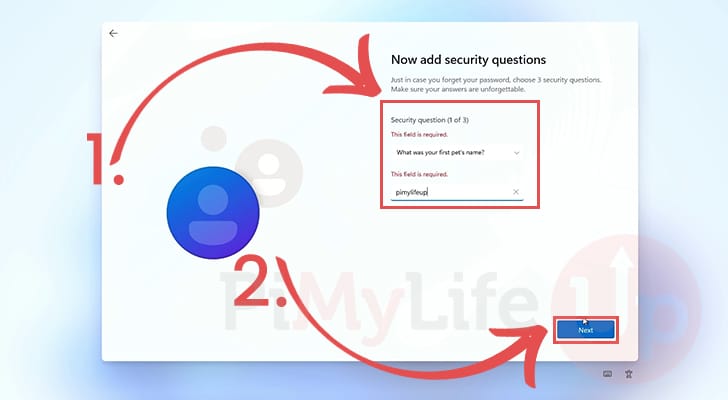
29. To stop you from being locked out of your account, you must set three security questions (1.).
You can continue with this setup process by clicking the “Next” button (2.).
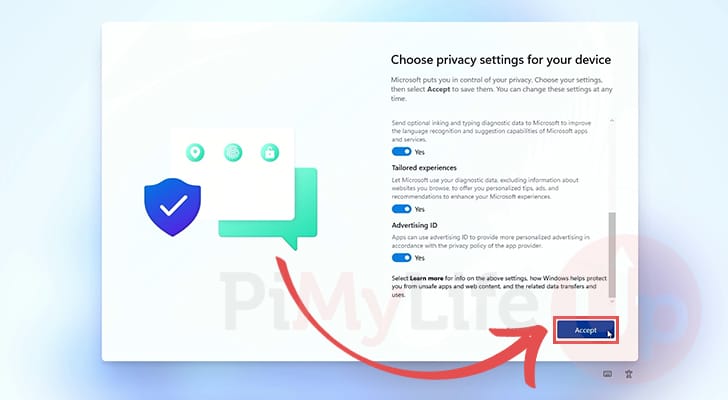
30. With all three security questions now set, you will be asked to tailor your privacy settings to suit your needs.
You can toggle all of these off if you desire. With your privacy settings set, click the “Accept” button. After clicking this button, your Raspberry Pi will automatically restart and begin setting up the Windows operating system.
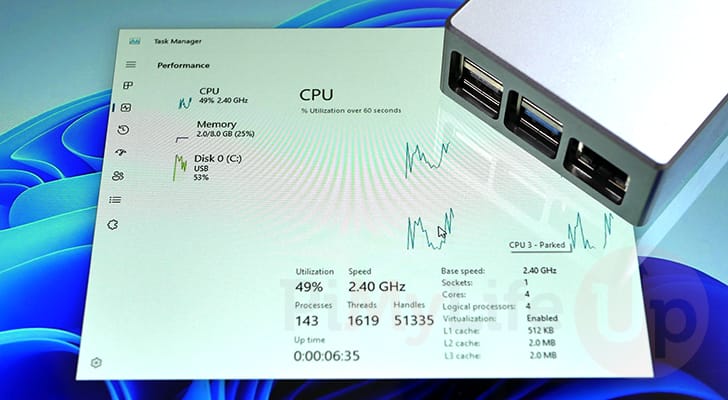
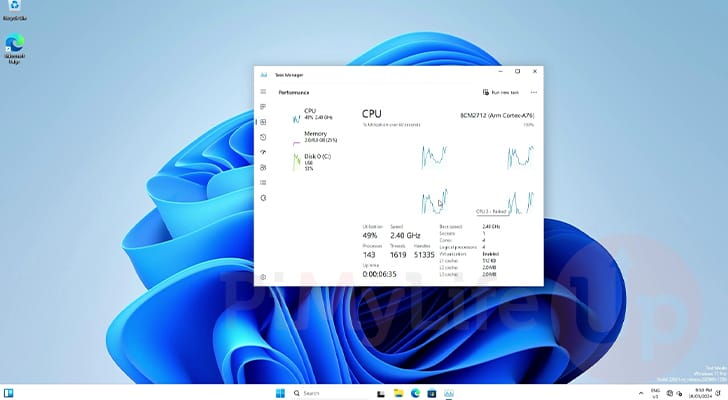
31. At this point, you have successfully installed Windows on your Raspberry Pi. You can now begin using this just like you would with any operating system.
Remember that you must use a USB to Ethernet dongle if you want network access.
Conclusion
Hopefully, by this point in the tutorial, you will have successfully installed Windows on your Raspberry Pi.
Windows can be a bit of a rough experience, especially due to the lack of any official support from the Pi team.
Please feel free to drop a comment below if you have had any issues installing and running this operating system on your Pi.
If you liked this tutorial, we highly recommend taking some time to explore some of our many other Raspberry Pi projects.


Okay i tried this early yesterday morning and it seems i have 2 nvme drives in usb adapters that just don’t want to work with this method. I then switched a SATA drive in a usb adapter, and it worked flawlessly with Windows 10. And it only took around 30 minutes total to get to a useable desktop ( wor, download, extract to SATA, reboot, install, desktop..)
I don’t know what was wrong with the nvme drives, but they halted for over an hour on the Windows setting up the drive screen with the progess bar at the zero position.
I’m presently attempting Windows 11 in the same way the SATA drive worked and I’ll report back.
BTW, I’m using an RPI 5, and I’ll eventually try this all on my RPI 4 later on.
Thank you for building this, and I hope the project can keep alive!
These instructions are great! I used this to install Windows 10 on my RPi4 8 GB. The only issue I ran into was using a USB drive for the install, it would error that the installation media could not be found. Everything worked great once I switched to using a microSD.