In this Raspberry Pi remote desktop tutorial, we go through the steps to set up your Pi to accept connections from the Remote Desktop Protocol.
The Remote Desktop Protocol (RDP) is Microsoft’s proprietary protocol that makes use of a low bandwidth connection to provide access to your desktop.
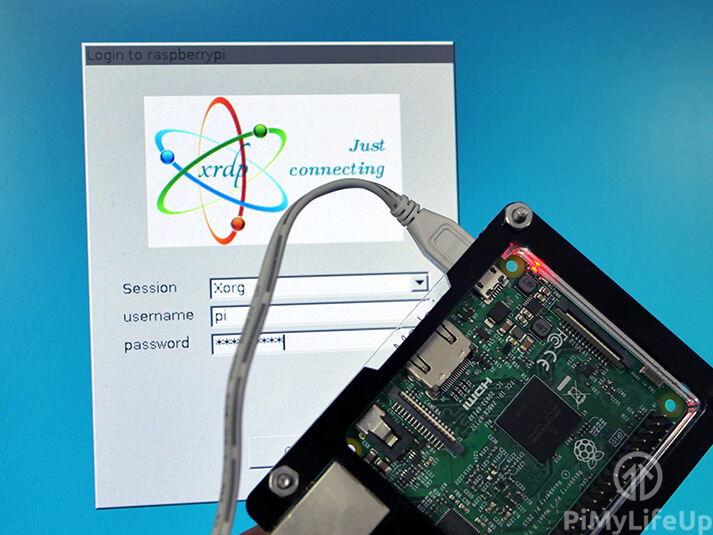
To allow usage of RDP on the Raspberry Pi, we will be making use of a piece of software called xrdp.
The xrdp software takes your screen and formats it into their implementation of the RDP.
There are various benefits to utilizing RDP on your Raspberry Pi over VNC server or Teamviewer. One of the main benefits being the low bandwidth required to use it.
Please note that this tutorial will not work if you’re running a headless system. The xrdp software requires an X Windows implementation to be installed to be able to display the desktop. Otherwise, you will be greeted by a blank screen.
Alternatively, if all you need is terminal sharing, then something like the tmate software package will work.


Equipment
Below is all the equipment that you will need for setting up a remote desktop on your Raspberry Pi.
Recommended
- Raspberry Pi Amazon
- Micro SD Card Amazon (8GB+ Recommended)
- USB Keyboard Amazon
- USB Mouse Amazon
- HDMI Cable Amazon
- Ethernet Cable Amazon or Wi-Fi Amazon
Optional
- Raspberry Pi Case Amazon
Installing the Remote Desktop Server on the Raspberry Pi
1. Before we install the required packages so that we can set up remote desktop on the Raspberry Pi, we must first ensure that everything is up to date.
To do this, you need to run the following two commands.
sudo apt update
sudo apt upgradeCopy
2. Now we need to install the xrdp package to the Raspberry Pi. This package will allow remote desktop on your Raspberry Pi.
Xrdp is an open-source implementation of Microsoft’s proprietary RDP Server, the same protocol that most installations of Windows can connect to and be connected from.
The xrdp software replicates Microsoft’s RDP protocol so that other remote desktop clients can connect to your device.
The software package even works with Microsoft’s own remote desktop client built into Windows.
sudo apt install xrdpCopy3. Now that the xrdp server is installed to the Raspberry Pi, you don’t have to make any changes to it’s configuration.
The xrdp server software is automatically installed with the best possible configuration and is ready to work straight out of the box.
4. However, we are required to make a user in which you will use for your remote desktop connection to your Raspberry Pi. The default user you create does not work with XRDP.
To create this user you can use the following command within the terminal. Ensure you replace “USERNAME” with the name you want to use for your user.
sudo adduser USERNAMECopyFollow the prompts to create your user and set information such as the users password.
5. If you need to retrieve the Raspberry Pi’s local IP address you can do that by using the following command.
hostname -ICopyConnect to the Raspberry Pi over Remote Desktop Protocol
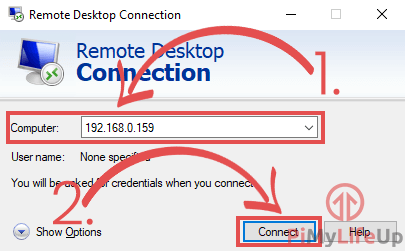
1. Connecting to the Raspberry Pi over the RDP is a simple process on the Windows operating system.
All you need is the remote desktop connection app on your computer and your Pi’s local IP address.
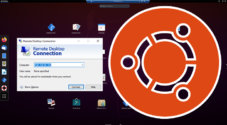
Begin by opening the Remote Desktop Connection application on your Windows computer. You will be greeted with the app as shown below.
Next to “Computer:” enter your Raspberry Pi’s local IP address (1.) then click the “Connect” (2.) button.
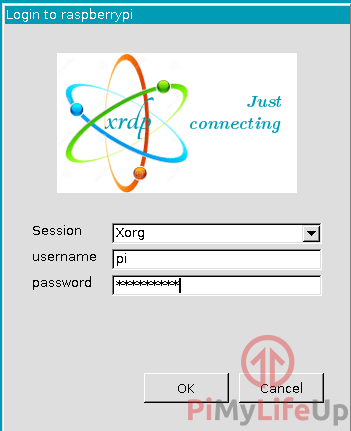
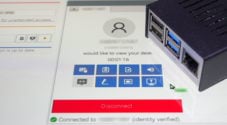
2. Once you are connected to your Raspberry Pi, you will be greeted with the following screen from the xrdp software.
Just enter the “username” and “password” for the user that you created earlier in this guide on your Raspberry Pi.
3. Hopefully, at this point, you will now be able to access your Raspberry Pi using the remote desktop tool on Windows.
If you are having issues connecting with the Raspberry Pi ensure that you are utilizing the correct IP address.
Alternatively, you can also make use of a different method such as TeamViewer or the TightVNC software.
I hope that you can now use the Raspberry Pi remote desktop using the tool of your choice. If you have anything to add to this tutorial, then please don’t hesitate to leave a comment below.
Installed on my pi and win11, I can see the pi on my windows screen, look at the pi drives contents but was expecting to remotely control the pi from windows… am I expecting too much?
Hi Tim,
You should be able to control your Raspberry Pi using the RDP through this but from my experience, things tend to just not like to work properly.
There are two other solutions I would honestly recommend over this:
The first is Raspberry Pi Connect, it is incredibly simple to get up and running and if you need access outside of your network it works without the need for portforwarding. Additionally it is built and supported by the Raspberry Pi team.
The other solution would to be set up a VNC server on your Pi. This can be a bit finicky but not as bad as getting the remote desktop protocol working properly. You would need to portforward if you want access outside of your home network.
Kind regards,
Emmet
Thank you, without the secondary user I had a black screen.
With the secondary user I was able to login.
Very useful for me, since I’m re-discovering my Pi from 2020 and lost the HDMI to micro HDMI cable haha.
Very helpful thank you, worked fine for me
As of 1/4/24 and with a Pi 5 (8GB): You don’t seem to need to add an rdp-only user. After installation and reboot you should be able to RDP to the device using the same user you used to install.
Agreed, I could use the usual username
Just a note, you can do this all headless, using PuTTY and SSH login. Since all your instructions were in command line already, start a putty session, login using your pi username and password (you can preconfigured this when you image your pi OS) then follow all the steps in this guide. Worked great for me! Thanks!
Thanks for posting this, I could never get TightVNC to work. Also, I can login using my default account, there was no need to create another User.
Do you start with Raspberry PI OS full or lite?
Hi RadiologyKen,
You will want to use Raspberry Pi OS full when following this tutorial.
Cheers,
Emmet
I would log in as “pi” and only see a blue background. After poking around reddit I found the solution – now it seems you have to create a new (non-root) user to log in.
sudo adduser “rdpuser”
And you’re in business!
Thanks mate, I had the same issue.
January of 2024 here – I didn’t have to do this on my updated RPi5. I was able to use my user account.
did… but have the same blue screen with black coursor on it
Thanks for this! Working great.
It is working for me. Thank you for tutorial.
This worked like a charm for me!
Additionally, you can also connect Windows RDP and Raspberry Pi using tools like on premise R-HUB remote support servers. It works on Windows, MAC, Linux, Unix, Android, iOS etc.