In this guide, you will be learning how to run Quake 3 on your Raspberry Pi.

Quake 3 is one of the first-person shooters that helped define the multiplayer arena shooter genre.
Even though Quake 3 was released back in 1999, it is still highly regarded amongst shooter game fans.
Thanks to the id Software team releasing the engines source code, it has now been ported to run on a variety of devices, including the Raspberry Pi.
For this tutorial, we will be walking you through two different methods to get Quake 3 running on your Raspberry Pi.
The first and most straightforward of these methods is to use the build provided through the package repository. This method, while easy, does have performance issues.
The other method we will be walking you through is to compile the highly optimized Q3Lite port. Q3Lite can easily run at high frames per second on the Raspberry Pi, making it the optimal choice.
For this guide to work, you will need to run a version of the Raspberry Pi OS with a desktop interface.
Equipment List
For this guide on running Quake 3 on the Raspberry Pi, we recommend that you have the following parts.
Recommended
- Raspberry Pi Amazon
- Micro SD Card Amazon
- Power Supply Amazon
- Ethernet Cable Amazon or Wi-Fi Amazon
- HDMI Cable Amazon
- Monitor Amazon
- USB Keyboard Amazon
- USB Mouse Amazon
Optional
- Raspberry Pi Case Amazon
We tested this tutorial on a Raspberry Pi 4 and a Raspberry Pi 3B+ running the latest available version of Raspberry Pi OS (Buster version).
Quake 3 from the Package Repository
Installing and running Quake 3 from the Raspberry Pi OS package repository is one of the easiest ways to play the game.
There are a couple of reasons you might want to use this version over the faster Q3Lite.
The number one reason is that it is super simple to get up and running. In just a couple of commands, you will have Quake 3 installed to your Raspberry Pi.
The second reason is that if you are using a Raspberry Pi 4, this is currently the only way you can play Quake 3 Arena. Q3lite does not currently have support for the Pi 4’s hardware.
The drawback of all of this is that performance leaves a lot to be desired. You will find that once you add more than a couple of players, frames will drop drastically.
Installing Quake 3 to your Raspberry Pi
For this section, we will be walking you through the process of installing Quake 3 to your Raspberry Pi.
To make this process simple, we are going to use the version of Quake 3 provided by the Raspberry Pi OS repository.
1. Our first task is to update our operating system.
We can upgrade all the pre-existing packages by running the following two commands.
sudo apt update
sudo apt full-upgrade
2. With our operating system now up to date, let us download Quake 3 from the repository.
We can begin the installation process by running the following command.
sudo apt install quake3This command will download the package directly from the Raspbian repository. Please note that this does not contain the game data and only contains the ported version of the Quake 3 Arena engine.
3. Once the Quake 3 package has been installed, we need to download the game data by using the command below.
To do that, we make use of a program called game-data-packager. This program will download the demo data for Quake 3 arena to your device.
game-data-packager quake3 -i --gain-root-command sudoPlease note that this process will take some time as it downloads the Quake 3 data and extracts it to the required locations.
4. If you want to use the retail version of Quake 3, then there are a couple more steps you will need to follow.
First, find the file called pak0.pk3 from within your retail Quake 3 Arena installation.
Then copy that file to the following directory /usr/local/games/quake3/baseq3 on your Raspberry Pi.
Running Quake 3 on your Raspberry Pi
Once you have finished installing Quake 3 to your Pi, we can go ahead and run it. To open the game, you will need a mouse and keyboard to be plugged into your Raspberry Pi.
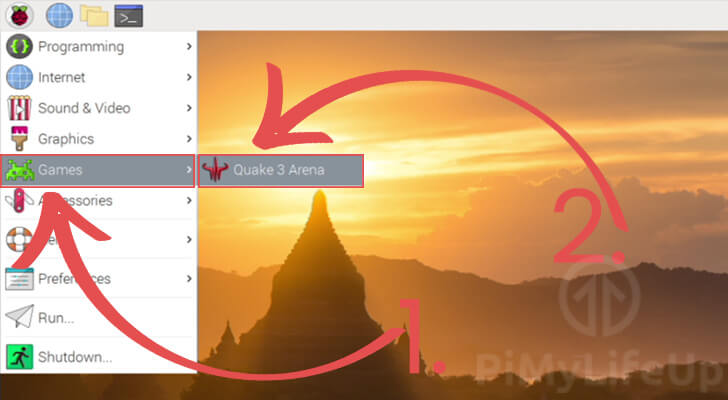
1. To find Quake 3 on your Raspberry Pi, you need to open the start menu.
You can open this by clicking the Raspberry icon in the top-left hand corner of the screen.

2. You next need to hover over the “Games” menu (1.). Hovering over this option will bring up a list of the games installed on the OS.
In the menu that appears, click the “Quake 3 Arena” option (2.).
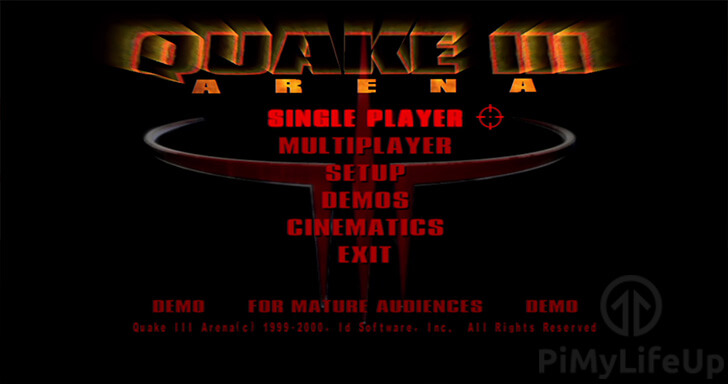
3. You should now have Quake 3 Arena running on your Raspberry Pi and now have access to its main menu.
From this menu, you can start a new game, and configure settings like the game’s resolution.
Using Q3Lite on the Raspberry Pi
In this section, we will be walking you through the process of compiling Q3Lite on your Raspberry Pi.
The most significant advantage of using the Q3Lite version of Quake 3 is that it has been built to run on the Raspberry Pi’s limited hardware.
Q3Lite takes the ioquake3 engine and cuts out unneeded features as well as implements an OpenGL ES renderer. These two improvements combined allow for much faster rendering on all Raspberry Pis.
Using this build, you can easily achieve speeds of over 60 frames per second on a non-overclocked Raspberry Pi 3.
At this stage, Q3Lite does not currently have support for the Raspberry Pi 4. However, the developer has been working on the changes required for it to work.
Compiling Q3Lite to your Raspberry Pi
For this section, we will be walking you through the process of installing Quake 3 to your Raspberry Pi.
To make this process simple, we are going to use the version of Quake 3 that is provided through the Raspberry Pi OS repository.
1. Before we compile Q3Lite on our Pi, we need to ensure our operating system is up to date.
We can update all the existing packages by running the following command.
sudo apt update
sudo apt full-upgrade
2. Next, we will need to install all the packages that are required to compile Q3Lite.
Run the command below to install the required packages.
sudo apt install git libasound2-dev libudev-dev libibus-1.0-dev libevdev-dev libdbus-1-dev libcurl4-openssl-dev fcitx-libs-dev libgbm-dev libsamplerate0-dev xinput3. Once the packages have all been installed, let us grab the Q3Lite source code.
We can retrieve the required code by making use of the git program.
git clone https://github.com/cdev-tux/q3lite.git3. Let’s now change into the Q3Lite directory.
cd ~/q3lite4. We now need to run the bash script that has been written by the Q3Lite team.
This script will do all the heavy work for us by compiling the Q3Lite software as well as downloading all of the extra data that it requires.
sudo ./make-raspberrypi.shPlease note that this compilation process will take some time as it must compile the code. This process is faster on newer Raspberry Pi’s.
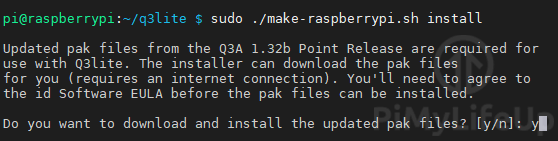
5. Our next step is to install the Quake 3 Arena patch data.
To do that, we will be making use of the make-raspberrypi script again.
sudo ./make-raspberrypi.sh install6. During the installation, you will be asked if you want to download the updated Quake 3 pak files.
As Q3Lite requires these to work, type in y, then press the ENTER key.
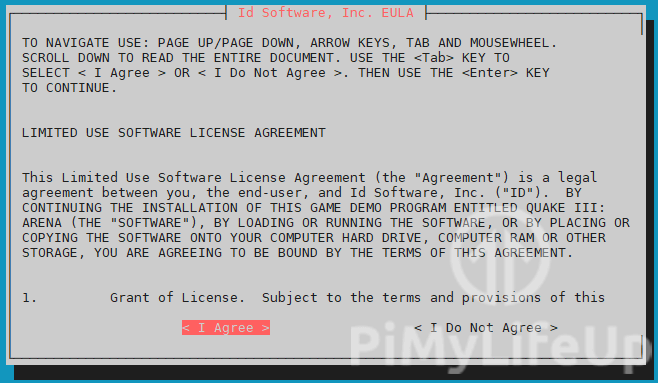
7. Before the script can download the pak files, we will need to agree to idTech’s EULA.
Use the TAB key to select “< I Agree >” and then press the ENTER key.
8. Once the installation process completes, we can move on to getting game data to play with.
Getting the Quake 3 Game Data
For this step, you will need to own Quake 3 Arena on another device, or you will need to download and install the Quake 3 Demo.
We cannot distribute the demo files ourselves due to licensing and copyright laws, so you will be required to locate it yourself.
1. You will need to locate a file called pak0.pk3 within the installation directory of Quake 3.
This is the file that contains all the data Quake 3 needs, including levels, characters, and sounds.
2. Once you have found the location of this file, you need to copy it to your Raspberry Pi.
The folder you need to copy it to is located at /usr/local/games/quake3/baseq3 on your Raspberry Pi.
3. Once you have copied over the files you can verify everything is as it should be by using the ls command on the directory.
ls -l /usr/local/games/quake3/baseq3/From this command you should see something like below. With all of the required game packs now available on your system.
-rw-r--r-- 1 root root 479493658 Jun 11 09:30 pak0.pk3
-rw-r--r-- 1 root root    374405 Nov 14  2002 pak1.pk3
-rw-r--r-- 1 root root   7511182 Nov 14  2002 pak2.pk3
-rw-r--r-- 1 root root    276305 Nov 14  2002 pak3.pk3
-rw-r--r-- 1 root root   9600350 Nov 14  2002 pak4.pk3
-rw-r--r-- 1 root root    191872 Nov 14  2002 pak5.pk3
-rw-r--r-- 1 root root   7346884 Nov 14  2002 pak6.pk3
-rw-r--r-- 1 root root    320873 Nov 14  2002 pak7.pk3
-rw-r--r-- 1 root root    454478 Nov 14  2002 pak8.pk3
drwxr-xr-x 2 root root      4096 Jun 11 08:43 vm
Playing Q3Lite on your Raspberry Pi
Now that we have finished installing Q3Lite, we can finally launch it on your Raspberry Pi.
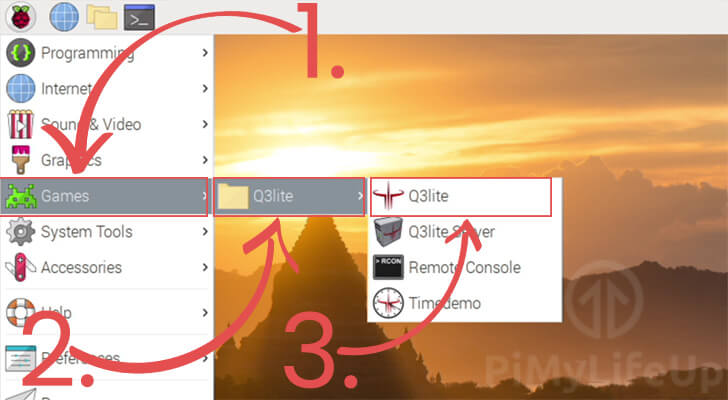
1. First, open the start menu on your Raspberry Pi.
You can open the start menu by clicking the Raspberry icon in the top-left hand corner of the screen.
2. Within the start menu, you need to hover over the “Games” option (1.).
Then hover over the “Q3lite” folder (2.).
Within the menu that pops up, click the “Q3lite” option (3.).
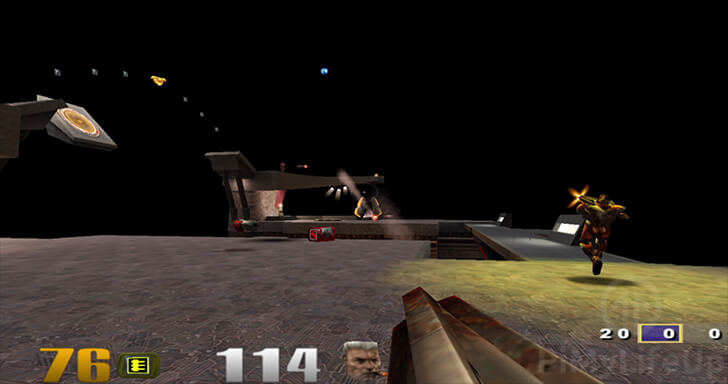
3. You should now have a fully working copy of Quake 3 running on your Raspberry Pi. Using the optimized Q3Lite engine.
At this stage of the tutorial, you should now have Quake 3 installed and running on your Raspberry Pi.
If you have run into any issues with getting the game to run on your Raspberry Pi, feel free to comment below.