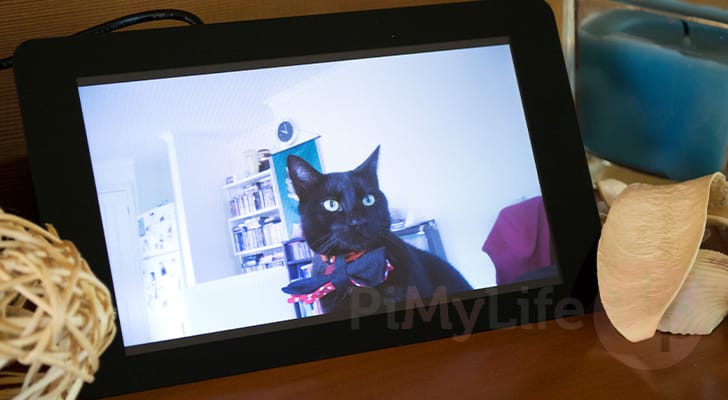
The Raspberry Pi photo frame is a perfect setup for anyone who wants to display photos of their loved ones, memories or anything else might want to display.
The Raspberry Pi makes a fantastic device to drive a digital photo frame thanks to it being a relatively low powered device. You can keep the digital frame running without having to stress to much about power usage.
This photo frame is very simple in that all it does is read from a folder on your Pi and display those images to your screen. Being so simple, you can get away with using a weaker and more power efficient Pi such as the Zero W series.
You could even expand this even further by synchronizing photos from cloud services such as Google Photos to have a constantly evolving photo frame.
For the best experience with setting up your Pi as a digital photo frame, we recommend you stick with the full desktop variant of Raspberry Pi OS. While you can get the lite variant to work, it just requires extra work we won’t be covering in our guide.
Equipment
Below you can find a list of equipment we used when setting up our Raspberry Pi as a digital photo frame.
Recommended
- Raspberry Pi Amazon
- Micro SD Card Amazon (8 GB+ Recommended)
- Ethernet Cable Amazon or Wi-Fi Amazon
- External Hard Drive Amazon or USB Drive Amazon
- Touch Screen Amazon or LCD screen
Optional
We last tested this tutorial using a Raspberry Pi 5 running the latest version of Raspberry Pi OS Bookworm 64-bit.
Hardware
For this project, I am just using the official Raspberry Pi touchscreen that I purchased earlier this year. However, you can use pretty much any screen that you can get your hands on. Just make sure you can hook it up to the Pi either over the DSI port, HDMI port or using a custom HAT.
If you’re looking for some 3D printable frames for either the official touch screen or just a spare screen you have, then Thingiverse has some pretty cool designs.
Setting Up the Raspberry Pi Photo Frame Software
To get this all setup correctly we are going to need to do a bit of setup on the software side of things.
Over the following sections, we will be walking you through the process of setting up your Raspberry Pi as a Digital Photo frame. To achieve this, we will be using the “imv” software to display images to our screen. This is a super simple, yet powerful tool.
Before you continue, there are a few things you might want to set up. To make adding photos to your digital frame a simpler process, you will want to consider setting up network shares on your Raspberry Pi. We have a guide that covers how to set up Samba shares on your Pi that we highly recommend.
In addition to this, we recommend that you have SSH set up on your Raspberry Pi. SSH is what will allow you to remotely access your digital photo frame. You will need this as the service needs to restart every time you add new photos to your frame.
Preparing your Raspberry Pi to act as a Digital Photo Frame
1. Before we begin to set up our Raspberry Pi to act as a digital photo frame, we need to ensure the operating system we are working off of is up-to-date.
You can update the package list and any out-of-date packages by using the following command.
sudo apt update
sudo apt upgrade -yCopy
2. Once your Raspberry Pi is up to date, we can now move on and install the “imv” package to our system. This package is what will enable us to easily display your photos on your connected display.
You can install this handy tool by using the following command in the terminal.
sudo apt install imvCopy3. With the “imv” package now installed, let us use the mkdir command to create a directory where we will store the script that will run our digital photo frame.
Create this directory at “/opt/digitalphotoframe” by using the following command.
sudo mkdir -p /opt/digitalphotoframeCopyWriting your Digital Photo Frame Script
4. Your next step is to write a really short bash script that will start up the imv software on your Raspberry Pi.
This software will handle all the hard work of displaying your digital photoframes, all we need to do is pass it a couple of options.
Begin writing this script by running the following command.
sudo nano /opt/digitalphotoframe/start_photoframe.shCopy5. Within this file you will want to type in the following two lines. The first line is simply something to help the terminal identify how it should run this file.
The second line is our call to the imv software we installed earlier and is the line that will actually run the digital photo frame software on your Raspberry Pi.
While typing out this line there are a few placeholders that you must replace.
<COMPOSITOR>: This first placeholder is where you specify the compositor your version of Raspberry Pi is using.wayland: If you are using a new version of Raspberry Pi OS, then this is the option you want to specify here. All new releases use Wayland by default.x11: Alternatively, if you are using a slightly older release of Pi OS, and are running a Raspberry Pi 3 or older, you will want to use this value instead.
<SCALING>: This option allows you to control how IMV will scale your photos. There are a few options for this.none: Setting to none with force IMV to display your photos as they exist.shrink: Images will be scaled down to fit your photo framefull: This will scale up or down your image so that it fits within the photo frame.crop: Crop will expand an image until it takes up the whole window regardless of whether parts of the photo will end up outside of the window.
<TIME>: With this placeholder you can specify how long the imv software should wait before changing the photo on your digital frame. This value is expressed in seconds.<DIRECTORY>: The final placeholder is where you will specify the directory where all of your photos are located. This needs to be an absolute path.
#!/bin/bash
/usr/bin/imv-<COMPOSITOR> -f -s <SCALING> -t <TIME> <DIRECTORY>Copy
For example, if you were running a new version of Raspberry Pi OS, and wanted 15 seconds between each of your photos and you photos are stored in the directory “/home/pi/Pictures” you would type out the following.
Additionally, we also set our photo frame to display our photos in full without cropping.
#!/bin/bash
/usr/bin/imv-wayland -f -s full -t 15 /home/pi/PicturesCopy
6. Once you have finished writing this short script, save and quit by pressing CTRL + X, Y, and then ENTER.
7. To ensure that our user can actually run this script, we will need to use the chmod command to give the script execute privileges.
sudo chmod +x /opt/digitalphotoframe/start_photoframe.shCopyTesting out your New Raspberry Pi Powered Digital Photo Frame
7. With everything now written, let us test that our Raspberry Pi powered digital photo frame is working correctly.
The easiest way to verify this is to simply run the script we wrote earlier.
/opt/digitalphotoframe/start_photoframe.shCopy8. If everything has been working correctly, you should now see your photos being displayed on your screen.
Starting your Photo Frame at Boot
9. Now if you plan on setting your Raspberry Pi up as a digital photo frame, you will want to have this script ran every time your Pi powers on. This section will cover how you can easily achieve this.
The first thing we must do is get the ID of your current user. In most cases this will likely be “1000” but we should make sure.
id -uCopyYou should get a value similar to the one below. Make a note of this as you will need it in the next step.
100010. With this next step, we can begin to write the Systemd service that will manage the digital photo frame on our Raspberry Pi.
We will be using Nano to write this file as it is relatively easy for beginners to get started with.
sudo nano /lib/systemd/system/photoframe.serviceCopy11. Within this file, fill out the following lines. These lines are pretty simple and basically tell your system to run the script we wrote earlier.
There are a couple of placeholders you will need to replace when typing out this file.
<USER>: Replace this placeholder with your username. For example, our user is called “pi” so we would type out “pi” here.<ID>: This placeholder must be replaced with the ID you got in the previous step. If you are using your original user, this will be “1000“.
[Unit]
Description=Photo Frame
Wants=graphical.target
After=graphical.target

[Service]
Environment=DISPLAY=:0
Environment=XAUTHORITY=/home/<USER>/.Xauthority
Environment=XDG_RUNTIME_DIR=/run/user/<ID>
Type=simple
ExecStart=/bin/bash /opt/digitalphotoframe/start_photoframe.sh
Restart=always
User=<USER>
Group=<USER>

[Install]
WantedBy=graphical.targetCopy
12. After you have finished writing the service file, save and quit by pressing CTRL + X, Y, and then ENTER.
Starting up the Custom Photo Frame Service
13. With the service now written, all we need to do to start up the digital photo frame on our Raspberry Pi is to run the following command.
This command actually performs two actions. First it enables the service so that it will automatically be started when your Pi starts. Secondly, thanks to us using the “--now” option, the service will be started immediately.
sudo systemctl enable photoframe --nowCopy14. If you have added new photos to your folder, you will need to restart the digital photo frame service to load in any new images.
Restarting this service can easily be done by using the following command within the terminal.
sudo systemctl restart photoframeCopy15. As the photo frame takes over the entire Raspberry Pi operating system, you will need to disable and stop the service to access the desktop.
This command disables the “photoframe” service from start at boot, the “--now” option stops the service immediately.
sudo systemctl disable photoframe --nowCopyConclusion
If you have got to this point in the tutorial, you should have successfully set up your Raspberry Pi as a digital photo frame.
The Pi makes a great tool for running your own digital photo frame. You can control how it works yourself and can pair it with any screen that you like.
Please feel free to leave a comment below if you have run into any issues with setting up a digital photo frame.
If you liked this project, we highly recommend that you take some time to explore some of our many other Raspberry Pi projects.


This was an excellent tutorial. I used it to help make a wall-hanging picture frame.
One minor problem: the text in step 10 is incomplete. The file path is wrong and sudo is missing.
Thanks David! I will fix that up.
I just finished this project, and it’s working good so far!
I also had to figure out to add sudo and pi to Step 10. Might be good to edit that in the post now.
Thank you so much for this tutorial! My cute cats electronic photo frame is a success!!
Do you think it’s dangerous to turn off with a switch on the power cord, and not by shutting down in PuTTY?
hey.i am using raspberry pi for the first time.can you please help me by telling how to actually start this coding?i want to make a photoframe using raspberry pi 3.but unable to do so coz firstly i am not able to connect my pi to wifi. Also,i dont understand that where to do all this coding?do we have a separate software for this or it should be written on the terminal?and is it this pi coding to do anything with my laptop?i mean do i need my laptop for this?or just have to do all the coding on pi only??
for you it may be a useless question but i need to know coz i havent used all this before.
thanx.
It’s ambitious to jump into a bigger project right off the bat. Better to take a few steps at a time. Setup the raspberry pi. Install the OS. In the process, you’ll learn a little about the editor and things will start to make much more sense. It is also hard to provide help when you ask for it as anonymous.
Does this work with the Raspberry Pi Zero? Thank you!
I’ve got it working on my pi zero. I deleted the –preload command to speed up the initial slideshow loading.
Great post! You may want to check out DAKboard for the software side of things. It integrates with Flickr, Dropbox, Instagram, 500px and more. Run it full screen in any web browser. DAKboard adds calendars, news and weather to the mix as well!
Great post! I will be using this for a digital sign in the office. My users will create their images in photoshop and use filezilla to copy it into the /home/pi/Pictures folder. Like others I had problems getting it to auto start. Debian Jessie changed when rc.local runs to be earlier in the process. That messes up these instructions, so to the rc.local file I added:
#debian jessie changed when rc.local runs this command makes it wait until the system is ready
sleep 10
#command to start the picture frame
sudo /bin/bash /home/pi/start-picture-frame.sh &
#end command
I know adding sleep 10 is hackish and there is probably a better way, but it works.
Hey,
Does anyone know if it is possible to also play animated GIFs -among static pictures- in this slideshow?
Any ideas on how to accomplish that?
GREAT POST!
When I add the line to stop the display from turning off, my Light Display Manager fails to start and the GUI does not load. I also get the feh error: can’t open X display.
Need to stop the display from turning off but these steps do not seem to work. I am using the most current NOOBS installation of Raspbian (may 2016)
Only way I’ve been able to fix this issue is install xscreensaver. To install you need “sudo apt-get install xscreensaver” . In the gui you will now have the “screensaver” option under preferences. Here you can disable the blank screen.
thnx for the great tutorial..!
the only thing was that i had to put
sudo bash /path/to/script into the rc.local
Awesome article but I guess i’m missing something. Does the PI have terminal access out of the box or are you loading some version of linux like raspbian or chromium before doing this DIY?
hi i have a problem,the sh file works good but itsn execute when restarting the system :S
I discovered I had to change permissions on rc.local. chmod 755 rc.local. The 755 is probably overkill but I don’t really care since my Pi won’t be on a network when running feh.
Great tutorial, is there a simple way to play a mp3 on a loop in the background which is embedded on the HDMI?
This is our first project (aside from getting the pi going.) We are stuck on step 2. When I paste our own directory into the command line I get the error message. feh: no loadable images specified. The images are jpgs. I have moved the folder from a USB stick to the desktop and have put just a few pics into the folder which I think should be specified by the path: /home/pi/Desktop/Sample picture frame
The whole command looks like this:
DISPLAY=:0.0 XAUTHORITY=/home/pi/.Xauthority /usr/bin/feh --quiet --preload --randomize --full-screen --reload 60 -Y --slideshow-delay 15.0 /home/pi/Desktop/Sample picture frameI imagine we are missing something really basic.
I renamed the folder of media to Samplepictureframe and edited the command line appropriately to good effect. I assume that any space in the command line has some significance I had not appreciated. Is that right?
Yes, that is right. Unless you quote a file path, it cannot contain any reserved characters (i.e. spaces, semi-colons, etc.)
I have double checked all the steps. I can run bash /home/pi/start-picture-frame.sh without any problems. However, I can’t get it to autorun at startup. followed all the steps and double checked it. Any help would be greatly appreciated.
Like you, I couldn’t run the bash script out of rc.local the way the instructions were written – probably a difference in Raspbian since the original instructions were written. I put the following line into my rc.local and the system autoruns fine:
su – pi -c ‘/bin/bash /home/pi/start-picture-frame.sh &’
I noticed that the instructions are missing the /pi/ folder in the Bash line:
bash /home/start-picture-frame.sh &
should actually be
bash /home/pi/start-picture-frame.sh &
Changing that got the slideshow to autorun at startup.
So did I, however, despite adding the /pi to the path it still doesn’t autostart, neither does the previous fix of preceding the line with su. In addition I’ve changed the permissions to make it executable as well and that also hasn’t worked.
Any suggestions?
this has not worked for me either. I can get the start-picture-frame.sh to run with the command
bash /home/pi/start-picture-frame.shbut I cannot get it to auto run after reboot. I have the following:
sleep 10su - pi -c '/bin/bash /home/pi/start-picture-frame.sh &'
but it does not work.
any help is greatly appreciated.
For me it did also not work at all. I had to edit /etc/profile and add at the end of that file
'bash /home/pi/script2call.sh &Then it worked (finally ;-).
Regards, Ralph
@Ralph,
I tried what you said and various other iterations of it and still its not working.
when i attempt to log in via ssh (putty) i see an error:
-bash: bash /home/pi/start-picture-frame.sh &: No such file or directory
I cant make the start-picture-frame.sh run at start-up i get the error :feh ERROR: you have no HOME, cannot read themes. What am I doing wrong ? : )
I have a same issue. What can i do?
how can i auto mount my nas i already have at home in startup so i can display photos from it
Simply add it to your /etc/fstab
Hello,
I put around 900 photos in my usb drive, and the total size is around 500 mb. However, it seems like it cannot load such huge amount of pictures. When I put only few photos, it loads pretty fast tho.
Do you have any suggestions on fixing that?
Thanks,
Hi Awei,
You could try removing the -p (–preload) tag, this will stop it from scanning through all the images at start up.
I haven’t tested this but when I do get the time I will test it and try work out how to best deal with huge amounts of images.
Hi,
It seems that pictures can keep the original aspect ratio. How to keep the photo’s aspect ratio so that it won’t get stretched or squeezed.
Thanks,
Eric
Oops… sorry, it’s not stretched or squeezed. it’s my HDMI cable’s problem. It’s all good now.
Thanks,
Hi, i am using Jessie. Should i run this ‘feh’ in condition that Xwindow already running?
I setup my pi to boot up directly to cli. This ‘feh’ can’t run.
trying to set this up, i keep getting
‘feh ERROR:Can’t open X display. It *is* running, yeh?’
This is with the official display or just a HDMI monitor, both work just fine editing command line and statrx. All code is direct copy/paste from above with exception of media/usb.
Any help appreciated.
Hi Wayne,
This error seems to only occur when the Raspbian GUI is not up and running. You can start it using the following command on the pi itself.
sudo startxIf you have done this can you please let me know the model of your Raspberry Pi and the OS version (Jessie or Wheezy). I’ll try and replicate the issue here.
Same issue here. Pulled out an older Pi (A+) and installed fresh Jessie (post 3/18 with a freshe update/upgrade). I launch into the GUI. Can’t make it run from terminal or rc.local. I get the ‘feh ERROR:Can’t open X display. It *is* running, yeh?
I have it working successfully on an Orange Pi running Ubuntu Mate (took a few changes about files and locations) so the process is sound. Any luck with Wayne’s issue, Gus? Thank you.
Solved the problem. For want of a nail, the kingdom was lost.
After 8 frustrating hours, I decided to blast away the SD and do a fresh start. Built up a new Jessie with the usual long update/upgrades. Added some utilities and started up the picture frame project. Got to the same place and had the same freakin’ problem. So the only possibilities were the board or the operator. I assumes operator error and went through every step, script, character etc. Finally was able to successfully run the test from the terminal prompt. Turns out I was missing the “:” after “DISPLAY=”
So for want of a colon, the script was lost.
Woohoo. Updated the bash script and rebooted. Nothing. Did a little digging into rc.local. Calling bash without a bit more power didn’t cut it so I made the bash call:
su – pi -c ‘/bin/bash /home/pi/start-picture-frame.sh &’
Et viola!
So now it’s working on an Orange Pi and a Raspberry.
My project calls for the system to boot up totally headless with nothing but a power connection and an hdmi connect to a projector. It is for a one man show and displays a single, never changing image on a screen (two screens that are two far apart to use a single source withing converting HDMI to Cat5, running the distance and converting back to HDMI). Because there is no user input, it had to have auto login enabled. Raspi config handles that on the Raspberry but must be manually put into
/usr/share/lightdm/lightdm.conf.d/60-lightdm-gtk-greeter.conf
This is also where the xserver=… must go
As talent, my guy can’t login and run it – he just runs up on stage to do his thing after hitting the power switch on the strip that runs the Pi and Projector. And that’s what they do now. Thanks for a great instructable.
If anyone needs details on the differences in doing this on the OPi or with Ubuntu Mate, leave me a note and I’ll add what I learned.
Thanks! I’ve used your guides a few times now with great success. This is just what i need to ‘keep the Mrs happy’ and to use a Pi for something she can appreciate for once.