In this Raspberry Pi InfluxDB tutorial, we will be showing you how to set up and install InfluxDB on the Raspberry Pi.
We will also be showing you how to enable authentication on your InfluxDB server to improve its security, as well as showing you how to interact with the database through the command line.
For those who are wondering what InfluxDB is, it is a time series based database system. This means that each data point in the database will contain a timestamp.
Being time series based makes InfluxDB one of the best databases for monitoring metrics and events. You can easily use InfluxDB to store information like the temperature in a room or the CPU usage of a system.
InfluxDB is the perfect database software to go alongside the popular visualization tool Grafana. Grafana has inbuilt support for displaying data from an InfluxDB database.
Equipment
Below is all the equipment that you will need to set up InfluxDB on your Raspberry Pi.
Recommended
Optional
This tutorial was last tested on a Raspberry Pi 400 running Raspberry Pi OS Bookworkm.
Installing InfluxDB to the Raspberry Pi
Over the next couple of sections, we will walk you through the process of setting up your Raspberry Pi to install and run InfluxDB.
Preparing your Raspberry Pi for InfluxDB
1. The first thing we should do before installing InfluxDB to the Raspberry Pi is making sure that all the currently installed packages are up to date.
We can upgrade all installed packages by running the following two commands.
sudo apt update
sudo apt upgradeCopy
Adding the InfluxDB Repository
2. With everything now up to date, we can now proceed with installing InfluxDB to the Raspberry Pi.
Our next step is to add the InfluxDB repository key to our Raspberry Pi.
Adding the key will allow the package manager on Raspberry Pi OS to search the repository and verify the packages its installing.
We can add the InfluxDB key by running the following command.
curl https://repos.influxdata.com/influxdata-archive.key | gpg --dearmor | sudo tee /usr/share/keyrings/influxdb-archive-keyring.gpg >/dev/nullCopyThis command will download the key using curl and pass it directly into the “gpg” program by using a pipe “|“. Once the keyring has been de-armored it gets saved into the “/usr/share/keyrings/” directory.
3. Now that we have the InfluxDB repository key installed to our Raspberry Pi, we will need to go ahead and add its repository to the sources list.
Now enter the following command to add the InfluxDB repository to the sources list. This command will work for anyone running a Debian based operating system such as Ubuntu or Raspberry Pi OS.
echo "deb [signed-by=/usr/share/keyrings/influxdb-archive-keyring.gpg] https://repos.influxdata.com/debian stable main" | sudo tee /etc/apt/sources.list.d/influxdb.listCopy4. With the repository added, we now need to go ahead and update the package list again.
We need to do this so that the apt package manager searches the repository that we just added for packages. The operating system does not automatically do this.
Run the following command on your Raspberry Pi to update the package list.
sudo apt updateCopyInstalling InfluxDB to your Raspberry Pi
5. Now that we have set up the repository, we can now move on to installing the InfluxDB software. Before you do this though, you must decide whether you want to run InfluxDB V2 or V1 on your Raspberry Pi.
These versions have some significant differences, so double check what version is required for your use case. Some users prefer to stick with V1 when using Grafana.
Installing InfluxDB V2 to the Raspberry Pi
6a. Installing InfluxDB V2 is as straightforward as using the following command within your terminal.
The package manager will install both the database as well as a CLI tool.
sudo apt install influxdb2CopyInstalling InfluxDB V1
6b. To instal InfluxDB V1 on your Raspberry Pi, then you will want to use the following command.
sudo apt install influxdbCopyStarting the InfluxDB Server
7. With InfluxDB now installed to our Raspberry Pi, let’s now get it to start at boot.
We can do this by making use of the systemctl service manager to enable our InfluxDB service file.
Run the following two commands to enable InfluxDB to start at boot on your Raspberry Pi.
sudo systemctl unmask influxdb
sudo systemctl enable influxdbCopy
The first command we use unmasks the influxdb service file. Unmasking the service ensures that we can enable and start the service as a masked service is unable to be started.
Our second command enables the influxdb service. This command will tell the service manager to keep an eye on the “influxdb.service” file and setup the service based on its contents.
8. Now that everything has been set up, we can now proceed to start up InfluxDB on our Raspberry Pi.
To start up the InfluxDB server, we will need to run the following command. The service manager will then start up the service and begin monitoring it.
sudo systemctl start influxdbCopyHow to Use InfluxDB V2 on the Raspberry Pi
One of th keye ways that InfluxDB V1 and V2 differ is how you access them. While V1 expects you to use the terminal for most things, V2 relies heavily on a GUI and access tokens.
This section will cover the initial setup experience of InfluxDB V2 on your Raspberry Pi. If you chose to use V1 instead, then skip this section.
Accessing the InfluxDB V2 Web Interface
1. First, you will need to know the local IP address of your Raspberry Pi. If you don’t know it, you can always use the hostname command as shown below.
hostname -ICopy2. Your next step is to go to the following URL in your favourite web browser. This will take you to InfluxDB V2’s web interface.
Ensure you replace “<IPADDRESS>” with your IP. If you are opening this page on the Pi itself, you can also use “localhost” or “127.0.0.1“.
http://<IPADDRESS>:8086/Initial Setup
3. When you first access the InfluxDB 2 interface, you will need to create an initial user.
To begin this process, click the “GET STARTED” button.

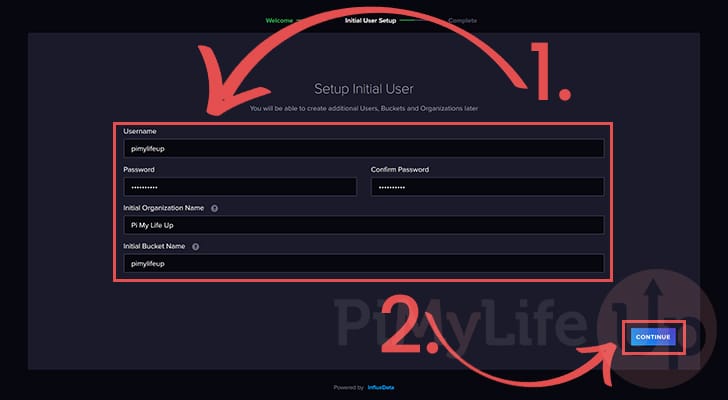
4. You will now need to fill out details for your user (1.). Ensure you set a strong password, as this is what you will use to access this web interface in the future.
Once you have filled out all the fields, click the “CONTINUE” button (2.).
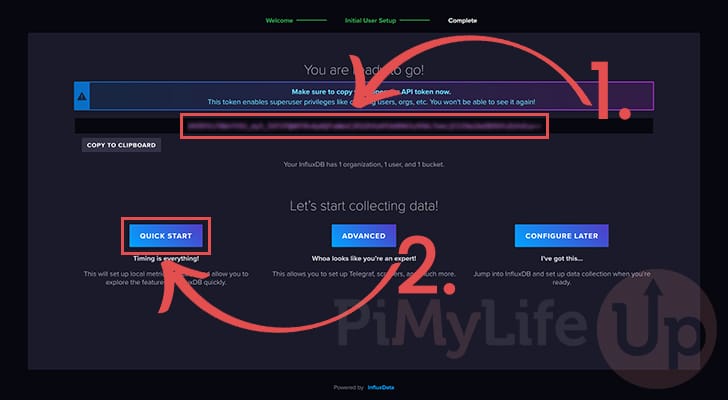
5. This next step is extremely important. InfluxDB2 will now have generated an API token on your Raspberry Pi. Copy down the API token as shown on your screen (1.). This token is what gives you superuser privileges and will not be shown once you leave this page.
Once you have copied the code down, click the “QUICK START” button (2.).
Getting Started
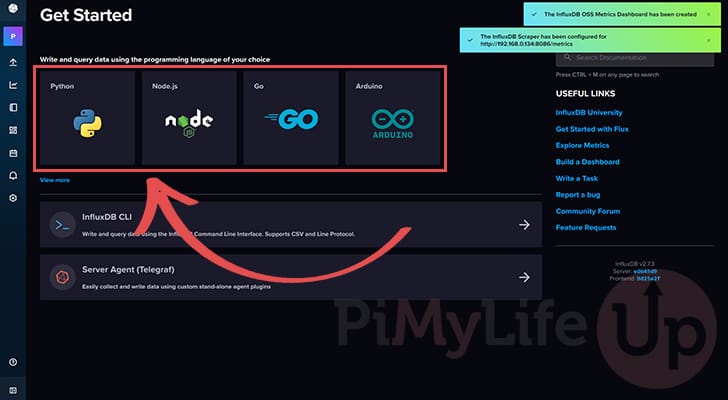
6. InfluxDB v2 provides various guides on using this database on your Raspberry Pi.
Select the box that represents the programming language you want to use and follow the steps.
Using InfluxDB V1 on your Raspberry Pi
In this section we will be exploring how you can use InfluxDB V1 on the Raspberry Pi. Msot of your interaction with this verison of InfluxDB will be using its command line interface.
Testing out InfluxDB V1
1. As we have now installed InfluxDB V1, we can now start talking with the database.
To do this, we will need to launch up Influx’s command-line tool by running the command below.
You don’t have to worry about specifying an address to connect to as the tool will automatically detect the local installation of InfluxDB.
By default, InfluxDB has no users setup. In our next section, we will explore creating an admin user to lock down access to your InfluxDB. For now, however, we will quickly explore InfluxDB.
influxCopy2. InfluxDB comes with no databases by default, so our first task will be to create one.
Creating a database is simple in InfluxDB and can be done by using “CREATE DATABASE <DBNAME>“.
For our example, we will be creating a database called “pimylifeuptemperature“.
CREATE DATABASE pimylifeuptemperatureCopy3. Before we can start modifying our new database, we must tell the CLI to “use” it.
Using a database is as simple as running the following command.
USE pimylifeuptemperatureCopy4. Our next step is to write some data to our newly created InfluxDB database.
To do this, we must first get a basic understanding of InfluxDB’s datastore.
Data in InfluxDB are sorted by “time series“. These “time series” can contain as many or as little data points as you need. Each of these data points represents a single sample of that metric.
A data point consists of the time, a measurement name such as “temperature”, and at least one field. You can also use tags which are indexed pieces of data that are a string only. Tags are essential for optimizing database lookups.
If you are familiar with the general layout of an SQL table, you can consider “time” to be the primary index, measurement as the table name, and the tags and fields as the column names.
You do not need to specify the timestamp unless you want to specify a specific time and date for the data point.
Below we have included the basic format of an InfluxDB data point.
<measurement>[,<tag-key>=<tag-value>...] <field-key>=<field-value>[,<field2-key>=<field2-value>...] [unix-nano-timestamp]If you would like to learn more about the InfluxDB line syntax, then you can check out the InfluxDB official documentation.
5. Now that we have a basic understanding of data in InfluxDB, we can now proceed to add our very first data point to our database.
For this example database, we are going to be storing measurements of the “temperature” of various locations around a house.
So for this, we will be inserting data points with a measurement name of “temperature” and a tag key of “location“, and a field key of “value“.
For our first sample point, we will be saying the location is the “living_room“, and the value is “20” .
INSERT temperature,location=living_room value=20Copy6. To make the data more interesting for showing off “selecting” data in InfluxDB, let’s go ahead and add some more random data.
Enter the following few commands to enter some extra data into our database. These are just variations of the above “INSERT” command but with the value and location adjusted.
INSERT temperature,location=living_room value=10
INSERT temperature,location=bedroom value=34
INSERT temperature,location=bedroom value=23Copy
7. Now that we have some sample data, we can now show you how to query this data using “SELECT“.
To start with, you can retrieve all data from a measurement by using a command like below. This command will grab all fields and keys from the specified measurement.
SELECT * FROM temperatureCopyUsing that command with our sample data you should get a result like we have below.
name: temperature
time                location    value
----                --------    -----
1574055049844513350 living_room 20
1574055196564029842 living_room 10
1574055196576516557 bedroom     34
1574055197188117724 bedroom     23
8. Let’s say that you now only wanted to retrieve the temperature of the bedroom. You can do that by making use of the “WHERE” statement alongside a “SELECT” statement.
We also specify the name of the tags/fields that we want to retrieve the values from.
When querying tag fields, you need to remember that all tags are considered to be strings. This means that we must wrap the value we are searching for in single quotes.
SELECT value FROM temperature WHERE location='bedroom'CopyWith that command, you should receive the following data set, showing only the temperature value in the bedroom.
Which in our example data’s case, this should be 34 and 23.
name: temperature
time                location    value
----                --------    -----
1574055049844513350 living_room 20
1574055196564029842 living_room 10
1574055196576516557 bedroom     34
1574055197188117724 bedroom     23
9. At this point, you should now have a basic understanding of InfluxDB and how its data works.
Adding Authentication to InfluxDB V1
1. The next step is to add extra authentication to our InfluxDB installation on the Raspberry Pi. Without authentication, anyone could interact with your database.
To get started, we need to first create a user to act as our admin.
To create this user, we must first load up the InfluxDB CLI tool by running the following command.
influxCopy2. Within this interface, we can create a user that will have full access to the database. This user will act as our admin account.
To create this admin user, run the following command within InfluxDB’s CLI tool.
Make sure that you replace <password> with a secure password of your choice.
CREATE USER admin WITH PASSWORD '<password>' WITH ALL PRIVILEGESCopyThis command will create a new user called “admin” with your chosen password and grant it all privileges.
3. With that done, you can now exit out of InfluxDB by typing in “exit” and pressing ENTER.
4. Our next job is to modify the InfluxDB config file to enable authentication.
We can begin editing the file by using the command below.
sudo nano /etc/influxdb/influxdb.confCopy5. Within this file, use CTRL + W to find the [HTTP] section and add the following options underneath that section.
Find
[HTTP]CopyAdd Below
auth-enabled = true
pprof-enabled = true
pprof-auth-enabled = true
ping-auth-enabled = trueCopy
6. Once added, save the file by pressing CTRL + X, then Y, followed by ENTER.
7. Now, as we have made changes to InfluxDB’s configuration, we will need to go ahead and restart the service by using the following command.
Restarting the service will ensure that our configuration changes are read in.
sudo systemctl restart influxdbCopy8. As we have now turned InfluxDB’s authentication on, we will need to enter our username and password before using the InfluxDB CLI tool.
You can use the “auth” command within the tool or pass the username and password in through the command line, as we have below.
influx -username admin -password <strong><password></strong>CopyConclusion
Hopefully, at this point, you will now have successfully set up InfluxDB on your Raspberry Pi. You should now have a basic understanding of InfluxDB as well as have authentication mode enabled.
You can easily see how using this database model will make storing data from sensors and other sources very useful.
If you have run into any issues with getting a Raspberry Pi InfluxDB up and running, then feel free to drop a comment below.


I added the repo for influx db, but I get
Hi Realtebo,
I have updated the repository steps to what should be the latest expected format for InfluxDB.
Can you please try following the steps again and let me know if the issue persists.
Kind regards,
Emmet
Hi Emmet
Thanks for this tutorial, which got me started with Influx, and all your efforts to help fix the current problems with the recent update.
I have been running Influx on a Pi0W to store weather data, with the data visualised using Grafana on a Pi4B. I had not been able to run Influx since the recent update and have followed all of your suggestions, including installing the release candidate influxdb_1.8.10rc0. Nothing has worked until now.
Today I found a way to downgrade to Influx_1_8_5 at https://community.influxdata.com/t/influxdb-1-8-7-will-not-start/20965/39 (post added on 31 August). This has worked for me and I have access to my data again.
[–MOD EDIT–]
Steps to downgrade and place hold on package.
After an update is pushed that fixes the issue you can remove the hold by using the follwing commands.
[–END MOD EDIT –]
I had to restart the service with
sudo systemctl start influxdb
Regards
Andrew
Hi Andrew.
Sorry to hear all of the other steps still aren’t fixing the issue. Heres hoping that the Influx team will be able to fix the issues and push an update sooner rather than later.
I edited your comment to include the steps for downgrading so anyone can quickly find them.
Thank you for linking to that solution to the issue.
Cheers,
Emmet
Hi Emmet
I’d appreciate any guidance you could provide.
btw, I find your tutorials well written and have had no problems with any up to this point.
Thanks
Jim
Hi Jim,
These issues are being caused by a problem with the service included with the current InfluxDB release.
To get around this you can manually install a release candidate for a newer version that is meant to solve the issues.
1. Start by downloading the release candidate to your Raspberry Pi. You can achieve this by using the following wget command.
2. Once the download completes, install the package to your Pi by running the following command.
This should install over the top of your existing installation, you will need to try restarting the service / restarting your Raspberry Pi after this has completed.
Hopefully this will fix the issue. This release should eventually get pushed to the official package repository.
Cheers,
Emmet
Hi, Emmet.
As you probably saw above, I followed your instructions. The thing worked (works) beautifully as long as I use the Wifi it was built with. However, when I set it next to my Eero device, it was pulling about 1/3rd of what a browser-based or eero-utility speedtest said it should. So I plugged an RJ45 jumper from the Pi4B+ (4GB) to the #2 eero port (#1 taken by the jumper from the cable modem. It worked find for a (half hour?) and then failed, with grafana unable to reach the database.
The influx console said `Failed to connect to http://localhost:8086: Get http://localhost:8086/ping: dial tcp [::1]:8086: connect: connection refused Please check your connection settings and ensure ‘influxd’ is running.`
I checked and it was. Removing the jumper and reinstalling the database caused it to work again, but plugging in the jumper brought on the same failure.
This isn’t anything to do with your tutorial, but if you have any thoughts, I’d appreciate hearing them.
Thanks Emmet! Now it works!
Cheers,
Mr. Pedroso
Hallo Emmet,
I have the same problem on 2 devices.
The Speediest set up worked fine for approx one month. After failing, I repeated the complete set up of the speedtest on another Pi (4 with 4G Byte).
It worked for 24 hours then the same problem occurred as on my first pi and with the same symptoms as Mr. Pedroso.
Your fix did not work for me.
Any other ideas?
Hi Hendrik,
I have had a quick look into some other possible solutions for this issue. There is meant to be a fix in the work but it has not yet been pushed to the package repository.
One of the current temporary solutions is to modify the “/usr/lib/influxdb/scripts/influxd-system-start.sh” script and increase the amount of times it tries.
1. Begin editing this file by running the following command.
2. Within this file we can attempt to make a couple of changes.
Find the following line.
Replace with the following. This will increase the maximum amount of attempts the script will try to 15 from 10.
Additionally we can also increase the amount of time between each attempt.
Change this number to 5.
3. Once you have made those changes to the file, save and quit by pressing CTRL + X, then Y, followed by ENTER.
4. Finally, you can try restarting the service or restarting the Raspberry Pi completely.
Hopefully this fixes your issue, and hopefully the team will push out a fix to their repository sooner rather than later.
Cheers,
Emmet
Hi Emmet,
Thanks for your quick reply.
Your solution I also found at the Influx pages.
I experimented a lot with removing and reinstalling several versions. Inclusive the version in the raspberry repositories. All without success.
Then I thoroughly removed Influx and all Python libraries to Influx.
After reinstalling the 1.8-9 version it worked again! In the repository I did to see that the release date has changed.
I know I should have recorded what exactly I have done, unfortunately I did not.
I use your utility to monitor my internet provider, they do play games with the bandwidth now and then. Being able to see and prove what they are doing, they treat me differently. Now i have dedicated a separate Pi for this function only. It runs now, I will clone the card, and skip updates for a while.
Thanks for your great website. Your manuals are really easy to follow, and understandable!
Hi Emmet,
I’m trying to get influxdb running on my Pi 4b, but I always get the following error when I try to start the service:
InfluxDB runs fine with:
Can you help me understand/troubleshoot what is possibly wrong?
Thanks,
Mr. Pedroso
Hi Mr Pedroso,
I have quickly looked into this and it appears as if something was recently broken with the package being provided by InfluxDB.
In the mean time there is a workaround that we can try. This seemed to fix the issues for me.
Please try running the following three commands on your system.
If this fix works for you, I’ll integrate it into the actual tutorial. Hopefully in the mean time the InfluxDB team correct these issues.
Cheers,
Emmet
Hi – trying to get the Influxdb to start with the above command: sudo systemctl start influxdb
I get an error – “Job for influxdb.service failed because the control process exited with error code”. I have checked the “systemctl status influxdb.service” and the “journalctl -xe” logs. All I see in the “systemctl status influxdb.service” is that the “Start request repeated to quickly” and then “Failed with a result ‘exit-code'”. And in the “journalctl -xe” I see the same errors. This is a freshly installed Raspberry Pi 3…using a 32 bit install from raspberrypi.org. Any help would be appreciated – trying to get influxdb and granfana setup for the logging of speedtest in your other post….
Hi Kevin,
Please refer to my reply to Mr Pedroso, the commands present there should hopefully solve the issues that you are experiencing.
Cheers,
Emmet
Thanks Emmet
I was able to find a better log that showed where the permissions issues were and fixed it yesterday – not quite the exact permissions changes you provided but close and its working (and its now working with Grafana and the Speedtest post you did)
Thanks!
Kevin
Got a problem!! When I go to update it fails, “updating from such a repository can’t be done securely, and is therefore disabled by default”
Does anyone know why this is happening?
Thank you
Hi John,
Try installing the apt HTTPS transport extension by running the following command.
Cheers,
Emmet
Hi, I have a problem with losing data by influxdb when making a restart or start/stop with systemctl. My influxdb is configured to work with network drive and database is created on my network drive. How to proper stop and start influxdb without losing data. Losted data is from few hours to few days, not whole data. Is there any cache or data in ram that I should write down before stop influxdb? Maybe something with retention policy?
Goodday
Thanks for the vary clear steps for installing influx.
I have taken al the steps and it worked for me, I can start influx and create a a database.
I am using a raspberry Pi Model B+ v1.02 with linux kernel version 4.19.97 and version “Raspbian GNU/Linux 10 (buster)”
installed
The problem is that the response from the influx cli tool very slow is.
if i look at the cpu usage with the commando top it shows a usage of 49% for influxd and 49% for influx.
And if ony the influx deamon is running it shows approx 98% CPU
part of the TOP output
ID USER PR NI VIRT RES SHR S %CPU %MEM TIME+ COMMAND
1144 root 20 0 834528 27720 19044 R 49.2 6.3 2:00.01 influxd
1149 pi 20 0 827004 22876 15020 R 48.9 5.2 1:30.40 influx
It makes no difference if influxd is started as service or from the cli
Do you have ideas what cases this problem.
Hi Leo,
First may I ask what version of the Raspberry Pi you are using (1, 2, 3 or 4)?
If you are using the original Raspberry Pi I would highly recommend upgrading. Even the Raspberry Pi 2 represented a huge improvement in performance.
Most applications will struggle on the original Raspberry Pi since it is hugely limited with its weak single-core processor.
Cheers,
Emmet
I’m stuck at step 3 of “Installing InfluxDB”. I’m not using Raspbian but Ubuntu Mate 16.04 instead. Which version of InfluxDB do I need to install? I found https://repos.influxdata.com/ubuntu/dists/ but honestly I don’t know which one is correct.
Hi Ed,
As Ubuntu 16.04’s codename is Xenial Xerus so you would need to use the following line instead.
We have made changes to point out the relevant repo for both Ubuntu 16.04 and Ubuntu 18.04.
Cheers,
Emmet