This Raspberry Pi Google assistant project will walk you through on how to build and set up your very own Pi-powered Google Assistant.
This assistant will actively listen to your voice and respond to your queries, all you need to say is “Ok Google” or “Hey Google” followed by your query.
To set up your own Google Assistant, we will be walking you through how to test your audio setup, signing up for the Google Assistant API and also show you how to download and set up the actual Google Assistant examples.
By the end of this tutorial, you should have a very capable virtual assistant operating on your Raspberry Pi.
To set up your own Google Assistant on your Raspberry Pi all you will need is a USB microphone and a set of speakers.
Of course, you will also need all the default equipment that you need for getting your Raspberry Pi started.
Equipment List
The entire list of all the pieces of equipment that we used for this Raspberry Pi Google assistant tutorial is listed below.
Recommended
- Raspberry Pi Amazon
- Micro SD Card Amazon
- Power Supply Amazon
- USB Microphone Amazon
- Speakers Amazon
- Ethernet Cable Amazon or Wi-Fi Amazon
Optional
- Raspberry Pi Case Amazon
Registering for the Google API
1. Before we get started with setting up the Google Assistant code on the Raspberry Pi itself, we must first register and set up a project on the Google Actions Console.
With your Google account ready to go to the Google Console Actions dashboard, or just go to the URL below which will take you there.
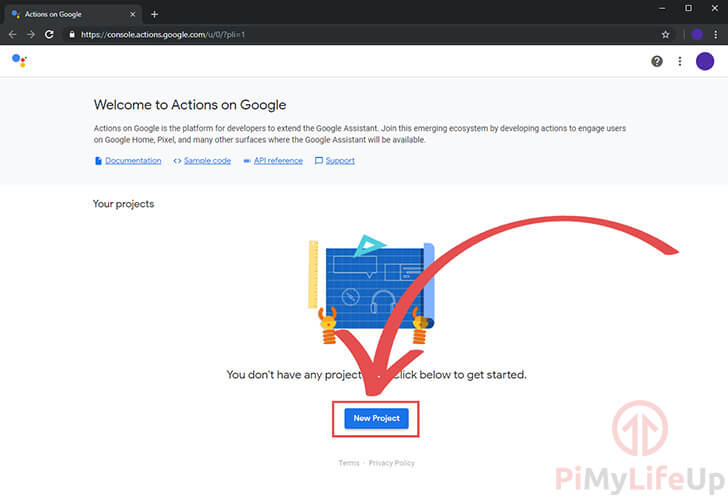
https://console.actions.google.com2. Once you have logged into your account, you will be greeted with the following screen.
On here you will want to click the “Add/Import project” button as shown in our screenshot below.
3. On this next screen, you will be asked to enter a “Project Name” (1.)
In addition to a project name you need to set both your country and your language as shown in the screenshot (2.)
Once you have set the Project Name and chosen your language and country, click the “Create Project” (3.) button.

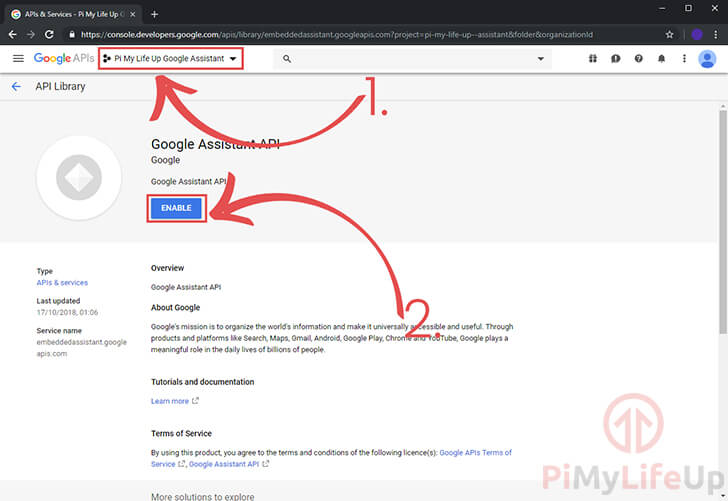
4. In a new tab, go to the Google developers console and enable the Google Embedded Assistant API.
Now before you go ahead and click the “Enable” button make sure that you have your project selected (1.)
Once you are sure you have your current project selected, click the “Enable” button (2.)
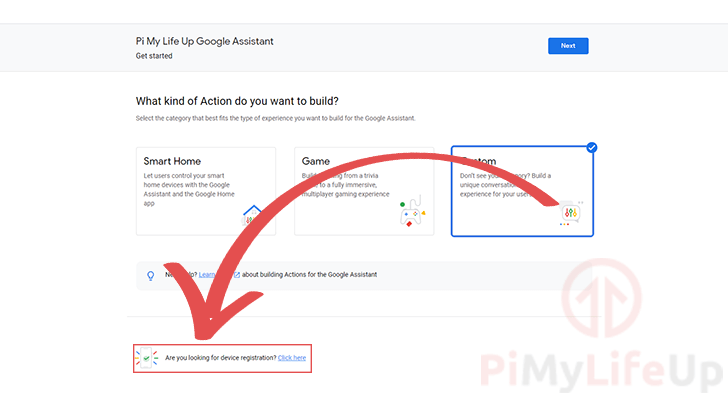
5. Now back in the other tab where you created the project, scroll down to the bottom of the screen.
You should see some text saying, “Are you looking for device registration? Click here“.
All you need to do to proceed is to click the “click here” text.
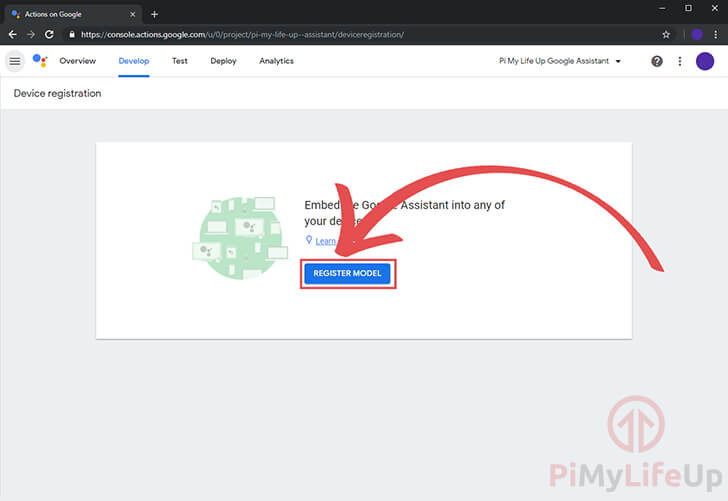
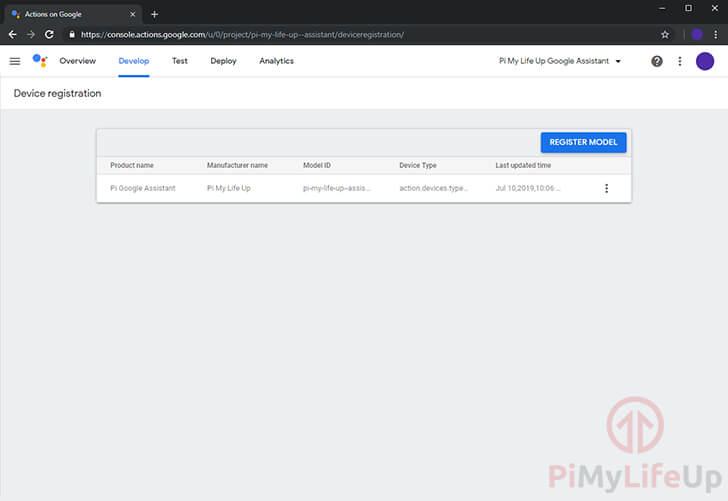
6. You will now be taken to the following screen, click the “Register Model” button to continue.
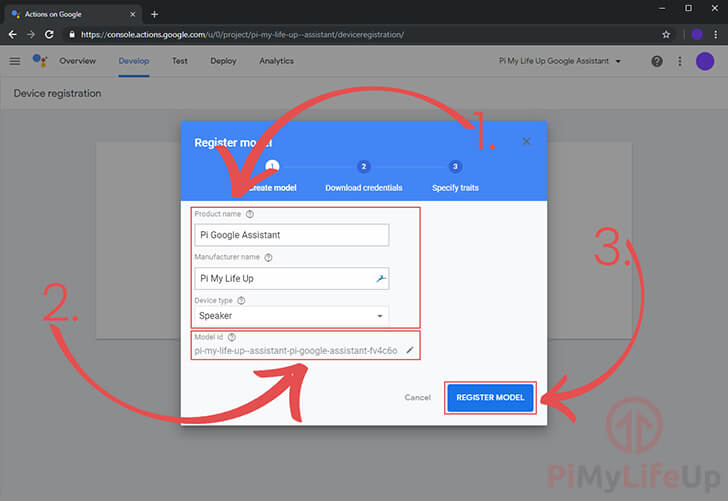
7. On this screen, you need to set a “Product Name“, “Manufacturer name” and set a “Device Type” (1.)
Below you can see the data that we entered into it, it doesn’t hugely matter what you set here, but all three boxes do need to be set for you to be able to register your model.
For the “Product Name” we just set this as a simple descriptor of what we are using this for, which in this tutorials case is simply a “pi3 Google Assistant“.
“Manufacturer name” doesn’t hugely matter as we have no intention of this being a widely used device, so we just set this to our websites name “Pi My Life Up“.
Lastly, we set the “Device Type” as “Speaker” as we felt it matched best what we intend on using the Google Assistant API for on our Raspberry Pi.
Make sure you write down then “Device Model ID” (2.) as you will need this later in the tutorial.
Finally, once everything is set, and you have written down the “Device Model ID” click the “Register Model” (3.) button to continue.
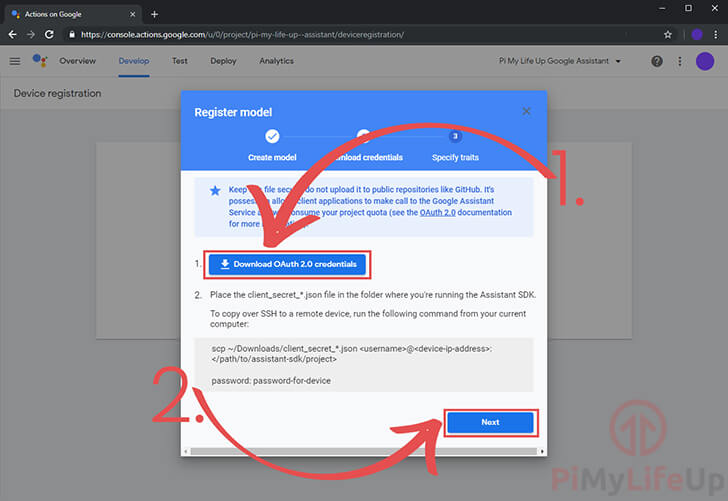
8. Now that you have registered the model you will now be taken to the “Download credentials” screen.
This screen is crucial as the provided credentials file is what we need for our Raspberry Pi 3 based Google Assistant to talk with the server.
To get this credentials file click the “Download OAuth 2.0 credentials” (1.) button as shown on the screenshot below.
Keep this somewhere safe, as we will the text inside the file to the Raspberry Pi. (Of course, unless you downloaded it directly to your Pi)
Once you have the credentials safely stored on your on your computer or Raspberry Pi, you need to click the “Next” (2.) button.
9. Finally, you can specify any traits that you might need.
In our case we don’t need any of these so we just clicked the “Save Traits” button as shown below.
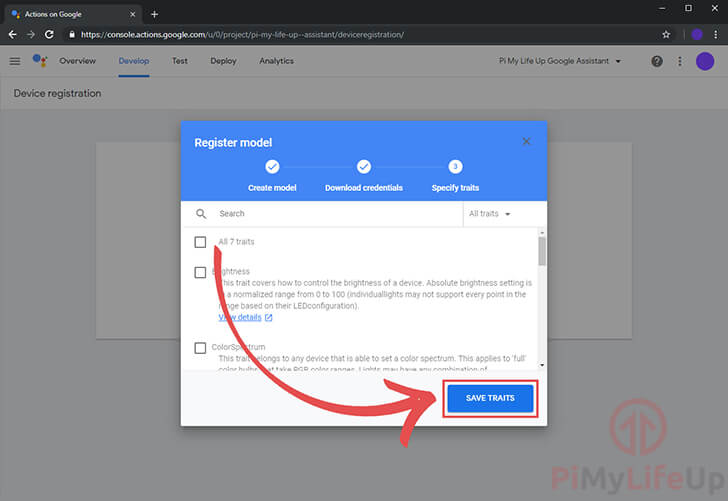
10. Once everything is done, you should be shown on this screen.
We now only have one last thing we need to do before we can set up the Google Assistant on the Raspberry Pi itself.
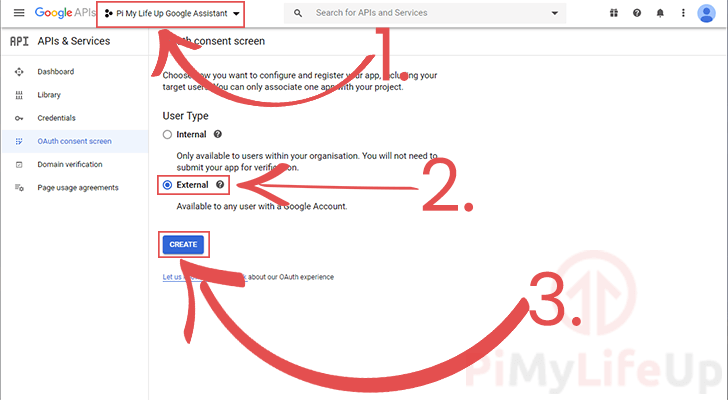
11. We also need to configure the OAuth consent screen. Without this, Google won’t let us authorize our Raspberry Pi Google Assistant device later in this tutorial.
To do this, you will need to go to the API Credentials OAuth consent screen settings page.
On this first page, make sure that your project is selected in the top dropdown box (1.)
Secondly, you will need to select “External” as the user type (2.). This option will allow anyone with a Google account to utilize the Google Assistant software that we are setting up.
Once all configured, click the “CREATE” button to continue on to setting up the auth screen (3.).
12. This page will allow you to set up the details of the auth screen. As we don’t intend this to be publicly accessible there is only one option we are required to set.
Click the email dropdown to select your accounts email address (1.), selecting this will allow us to continue with the guide.
Once everything required has been set, click the “Save” button (2.) at the bottom of the page.

13. Finally, we need to go to the Google My Account activity controls.
On here you will need to activate the following activity controls to ensure that the Google Assistant API works correctly.
- Web & App Activity
- Location History
- Device Information
- Voice & Audio Activity
Setting up your Audio for Google Assistant
1. Now that we have set up an account on the Google Actions Console we must configure the audio for it.
The Google Assistant SDK that we will be using has some strict requirements for it to work correctly.
To get started with setting up the audio on the Raspberry Pi we must first obtain the card and device numbers for our various inputs and outputs.
Our steps below will show you have to get the correct numbers for these devices.
1a. Locate your USB microphone by utilizing the following command.
Write down both the card number and the device number for it.
arecord -l1b. Now to locate your speaker, we will be utilizing the following command.
Again write down the card number and device number.
Note that the Raspberry Pi’s 3.5mm-jack is typically labeled as Analog or bcm2835 ALSA, with the HDMI output being identified as bcm2835 IEC958/HDMI.
aplay -l2. Now that we have grabbed our device and card numbers for both the microphone and our audio output we need to create a file named .asoundrc in the pi users home directory.
The .asoundrc file helps by defining which audio devices that the audio driver should be utilizing.
We can create this file by running the following command within the terminal.
nano /home/pi/.asoundrc3. Within this file enter the following lines.
Make sure that you replace <card number> and with <device number> their respective values that you retrieved during Step 1.
pcm.!default {
  type asym
  capture.pcm "mic"
  playback.pcm "speaker"
}
pcm.mic {
  type plug
  slave {
    pcm "hw:<card number>,<device number>"
    rate 48000
  }
}
pcm.speaker {
  type plug
  slave {
    pcm "hw:<card number>,<device number>"
  }
}
4. With the lines in, and changes made. Save by pressing CTRL + X then Y and finally ENTER.
Testing your Speakers and Microphone
1. Before we get into all the hard work of setting up our Raspberry Pi Google Assistant and setting up the required API, we will first test to ensure our audio is working.
At this stage, you must have your USB microphone and speakers attached to your Raspberry Pi.
Once you are sure both are connected to the Raspberry Pi, we can test to make sure that the speakers are working correctly by running the following command.
speaker-test -t wavYou should hear sound from your speakers. This sound will be a person speaking.
If you do not hear anything coming from your speaker’s double check they are plugged in correctly and are turned up.
2. Now, let’s test our microphone by making a recording, to do this we will run the following command on your Raspberry Pi.
This command will make a short 5-second recording.
arecord --format=S16_LE --duration=5 --rate=16000 --file-type=raw out.rawIf you receive an error when running this command make sure that you have your microphone plugged in. This command will only succeed if it can successfully listen to your microphone.
3. With our recording done we can now run the following command to read in our raw output file and play it back to our speakers.
Doing this will allow you to test the playback volume and also listen to the recording volume.
Doing this is a crucial task as you don’t want your Raspberry Pi picking up every little noise but you also don’t want it being able to barely hear you when you say “Ok Google“.
aplay --format=S16_LE --rate=16000 out.raw4. If you find the playback volume or recording volume is either too high or too low, then you can run the following command to launch the mixer.
This command will allow you to tweak the output volumes for your various output devices.
From our tests, we recommend you use a level of at least 70, utilize the command in Step 1 of this section to check the volume levels.
alsamixerOnce you have confirmed that your microphone and speakers are working correctly, you can move onto setting up your very own Raspberry Pi Google Assistant!
Downloading and setting up Google Assistant
1. With the Google Assistant API now configured and set up there are a few things we need to do.
Let’s first update the Raspberry Pi’s package list by running the following command.
sudo apt update2. Once the Raspberry Pi has finished updating, we can then proceed with setting up everything we need for running the Google Assistant API.
On your Raspberry Pi, we will be creating a file where we will store the credentials we downloaded earlier on our computer.
To do this run the following two commands to create a folder and begin writing our credential file.
mkdir ~/googleassistant
nano ~/googleassistant/credentials.json
3. Within this file, we need to copy the contents of the credentials file that we downloaded to your computer.
You can open the .json file in any text editor and press CTRL + A then CTRL + C to copy the contents.
Now in your SSH window, right-click and click “Paste”.
4. Once you have copied the contents of your credentials over to our nano session, we can then save the file by pressing CTRL + X then Y and then finally hitting ENTER.
5. Now with the credentials file now saved safely to our Raspberry Pi we will start installing some of the dependencies we rely on.
Run the following command to install Python3 and the Python 3 Virtual Environment to our Raspberry Pi.
sudo apt install python3-dev python3-venv python3-pip libssl-dev libffi-dev libportaudio26. We can now enable python3 as our virtual environment variable by running the following command on our Raspberry Pi.
python3 -m venv env7. With that now enabled we can go ahead and ensure that we have installed the latest versions of pip and the setuptools.
To update these Python packages, we will need to use the following command on the Raspberry Pi.
env/bin/python3 -m pip install --upgrade pip setuptools --upgrade8. To get into this new Python environment that we have set up we should run the following command in terminal.
source env/bin/activate9. Now that we have all the packages we need to install the Google Assistant Library.
To do this we will run the command below to utilize pip to install the latest version of the Python package.
python3 -m pip install --upgrade google-assistant-library
python3 -m pip install --upgrade google-assistant-sdk[samples]
Authorizing your Raspberry Pi for the Google Assistant
1. Now that we have set up all the prerequisites to running the Google Assistant software on our Raspberry Pi we can finally complete the last few steps to authorize the system.
To do this, we must first install the Google authorization tool to our Raspberry Pi.
This package will allow us to authenticate our device and give ourselves the rights to be able to make Google Assistant queries for your Google Account.
Run the following command on the Raspberry Pi to install the Python authorization tool.
python3 -m pip install --upgrade google-auth-oauthlib[tool]2. With the Google Authentication library now installed, we need to run it. To do this, we will be running the following command on our Raspberry Pi.
This command will generate a URL you will need to go to in your web browser so be prepared.
google-oauthlib-tool --client-secrets ~/googleassistant/credentials.json \
--scope https://www.googleapis.com/auth/assistant-sdk-prototype \
--scope https://www.googleapis.com/auth/gcm \
--save --headless
3. You will now be presented with the text “Please visit this URL to authorize this application:” followed by a very long URL.
Make sure you copy this URL entirely to your web browser to open it.
4. On this screen login to your Google account, if you have multiple accounts make sure you select the one you set up your API key with.
Afterward, you should be presented with a screen with the text “Please copy this code, switch to your application and paste it there” followed by a long authentication code.
Copy the authentication code and paste it back into your terminal session and press the ENTER key.
If the authentication was accepted you should see the following line appear on your command line:
“credentials saved: /home/pi/.config/google-oauthlib-tool/credentials.json“
5. Now with the authentication credentials now saved, Google still requires us to agree to some stuff.
With this command make sure you replace <projectid> with the id of your project.
If you don’t know what your Project ID is you can go to Actions Console on Google, click the project you created, then click the Cog in the top left-hand corner then “Project Settings“.
Also, make sure you replace <deviceid> with the device ID that you obtained earlier in the tutorial.
If you have lost your device ID can find it again by going to the Console Actions website, clicking the project you created then going to “Device registration“
To talk with the Assistant press ENTER in the terminal and speak an action such as “What is the time“.
If everything is working as it should be you will hear a verbal response from the assistant.
googlesamples-assistant-pushtotalk --project-id <projectid> --device-model-id <deviceid>6. If you don’t hear any response from the Google Assistant but a new tab does open that contains your results, then you should go back to the “Setting up your Audio for Google Assistant” section and the “Testing your Audio for Google Assistant” section.
In the next section, we will show you how you can rerun the Google Assistant without having to go searching through all the steps again, make sure you keep your “Project ID” and “Device ID” handy as we still need those to utilize the samples.
Using the Google Assistant on the Raspberry Pi
1. Now that we have finally fully authorized our Raspberry Pi we will now walk you through the steps on how to run the Google Assistant software without having to go through the entire tutorial.
To begin with whenever you start a new terminal session you will need to put it back into the environment that we set up the Google Assistant software in.
To do this, run the following command on your Raspberry Pi.
source env/bin/activate2. You will know whether this has worked correctly by seeing (env) appear at the front of each line.
With (env) appearing it means you can once again make calls to the Google Assistant samples.
To start up the push to talk sample you will need to run the following command, lucky for us, this time we do not need to write in the project id or the device id as these were cached when we first utilized the push to talk tool.
googlesamples-assistant-pushtotalk3. In addition to the push to talk sample, there is also the hotword sample code. This sample code will work by listening for certain phrases to trigger it. By default, this will listen for “Ok Google” followed by the command that you want to issue to it.
Starting the hotword sample is very much like the push to talk sample, however you are utilizing the googlesamples-assistant-hotword utility instead.
googlesamples-assistant-hotword --device-model-id <deviceid>4. Hopefully, by now you will have successfully set up your Raspberry Pi with the Google Assistant software.
If you run into audio issues, we recommend you go back to our “Setting up your Audio for Google Assistant” section and the “Testing your Audio for Google Assistant” section.
Getting the Google Assistant to Start on Startup
1. Now that you have got your Google Assistant up and running you will likely want to get it to start up on boot rather than having to go to the effort of entering the commands every time.
The easiest way to achieve this is to create a service for it. This service will allow the Google assistant to run in the background on the Raspberry Pi and easily allow us to retain control over it.
To begin, we will write our bash script that will execute the hotword sample. We will be calling this bash script from our service file.
nano /home/pi/start_assistant.sh2. To this file, you will want to add the following lines.
The first line helps define what should be utilized to run this file, so when the command line interprets it, it will know that it is required to make use of bash.
The second line we use source to read and execute commands from the activate file, this will put us into the python environment that we created earlier in the tutorial.
Finally, we run the hotwords Google Assistant sample. Make sure you replace <deviceid> with yours.
#!/bin/bash

source /home/pi/env/bin/activate
googlesamples-assistant-hotword --device-model-id <deviceid>
3. Once you have added those lines to the file, save it by pressing CTRL + X then Y and finally ENTER.
4. Now that we have created our bash script we can move onto creating our service file for our Google Assistant by running the following command on our Raspberry Pi.
sudo nano /lib/systemd/system/assistant.service5. Within this file enter the following lines.
These lines tell the operating system how to handle our service, what user to run it with and if it relies on a particular thing such as that the network is available.
[Unit]
Description=Google Assistant
Wants=network-online.target
After=network-online.target

[Service]
Type=simple
ExecStart=/bin/bash /home/pi/start_assistant.sh
Restart=on-abort
User=pi
Group=pi

[Install]
WantedBy=multi-user.target
6. With those lines added to the service file, save it by pressing CTRL + X then Y and finally ENTER.
7. Now that we have created the service we need to enable it so that it will actually start on startup.
To do this we just need to use systemctl, type in the following command to enable our new service.
sudo systemctl enable assistant.service8. With the service now enabled let’s try starting it, this will allow us to make sure that everything is working as intended.
sudo systemctl start assistant.service9. You should now be able to use the “Ok Google” hotword to talk and interact with the Google Assistant.
Try it now to ensure the service is working as intended.
If for some reason it is not working you can utilize the command below to display the last output from the Google Assistant sample, keep a lookout for any errors.
sudo systemctl status assistant.service10. Hopefully, at this point, you will now have your Google Assistant successfully set up to start on boot up.
Love personal assistants, then you might also want to check out our tutorial on setting up Alexa on the Raspberry Pi. It’s pretty easy to set ip and quite a bit of fun once you get it working.
If you hear a response, you have successfully set up your very own Google Assistant on your Raspberry Pi. If you want to provide feedback or discuss this Raspberry Pi Google assistant project, please leave a comment below.


Thanks for this tutorial, I am thinking of following it. I was wondering, if I have a usb headset with integrated microphone, will this be enough for the “USB microphone” that this project requires? I don’t want to have to buy an extra mic if I can do with that. And can the same be used for “speakers” or do I need to use my separate speakers? I have to get a project done in a few days so would really appreciate a fast reply.
Hi Snoopy,
While I don’t have my own USB headset to test this with anymore there is no reason it shouldn’t work.
Let me know how you get on with it.
Cheers,
Emmet
Hello,
Nice tutorial, all works, but unfortunately the following error occurs when I try to use the hotword command:
-bash: googlesamples-assistant-hotword: command not found
Pushtotalk works fine, but hotword doesnt exist.
Device informations:
RaspberryPi 4
OS: Raspbian 10 (Buster)
Hi Tim,
Sadly Google removed all support for the hotword system.
We are working on improving this tutorial to use Snowboy for hotword detection instead.
Cheers,
Emmet
I made it to Step 2 under Authorizing your Raspberry Pi for the Google Assistant.
I received this error and could not figure it out.
(env) pi@raspberrypi:~ $ google-oauthlib-tool –client-secrets ~/googleassistant/credentials.json \
[SNIP]
json.decoder.JSONDecodeError: Expecting property name enclosed in double quotes: line 1 column 2 (char 1)
Hi,
it appears that your credentials.json file is formatted incorrectly.
Make sure that you have copied it over correctly.
Cheers,
Emmet
Hi – Have you made a guide for using Snowboy for this yet please. I have the AIY kit and I want to make it work. The SD card download image also had the auth_helper.py error in line 75 needing to change the last parameter to preferred = True.
:-/ . For one unfamiliar with Linux, I have enough issues without debugging your application. As a retired EE, I appreciate the need to careful testing and configuration control. Please ensure testing before publishing.
Hi Nick,
Sadly I haven’t quite found the time to work on that project yet.
Cheers,
Emmet
I have a similar problem like Eugene’s issue where the google assistant service doesnt auto start after a reboot. I tried the setting to wait for network upon boot and that fixed the first message I was getting about a connection timing out. Only now It is saying that it was unable to open the audio device. Almost like it tried initiating the microphone before it was loaded. Is there a way to delay the service for like 30 seconds after a restart?
Thanks,
Drew
Here is how I solved my issue with the service not starting up properly after rebooting. I modified my asisstance.service file to look like this:
(Note the line ExecStartPre=/bin/sleep 60 was added to wait 1 minute to start the service)
[Unit]
Description=Google Assistant
Wants=network-online.target
After=network-online.target
[Service]
Type=simple
ExecStartPre=/bin/sleep 60
ExecStart=/bin/bash /home/pi/start_assistant.sh
Restart=on-abort
User=pi
Group=pi
[Install]
WantedBy=multi-user.target
Hi,
I am stuck at the ‘Hotword’ part. Everything works fine with ‘pushtotalk’ , but when I try to activate the Hotword with the command :”googlesamples-assistant-hotword –device-model-id ” , I just get the next error:
Segmentation Fault
What is the reason for this and solution to the problem?
Hi Boudrez,
This is currently a problem with the Google hotword tool.
We sadly haven’t yet worked out a workaround for this problem.
Cheers,
Emmet
Hi Emmet! Are you saying in your reply here that the “OK Google” portion of this doesn’t work anymore at all?
Hi Tim,
Last time I checked the hotword sample was throwing errors. We haven’t worked out a workaround for this yet.
Hoping to be able to look into it further in a few weeks
Cheers,
Emmet
I am curious, is there already a work around?
Kind regards
Thilo
Hi Thilo,
Sadly there is no work around for the error.
Google has decided to drop support for the hotword sample, instead you will need to make use of something like Snowboy to trigger your assistant. We are planning on writing up a guide on this in the near future.
Cheers,
Emmet
Everything went smoothly until I had to enter this command :
googlesamples-assistant-pushtotalk –project-id home-***** –device-model-id home-***********
(just censored the id’s)
The command gives me this error:
sounddevice.PortAudioError: Error opening RawStream: Invalid sample rate [PaErrCode -9997]
Since I could not find anything about it on internet, I decided to give this a try. Would be really nice if you’d find a fix!
Hi Lars,
Make sure that you have setup the .asoundrc file correctly.
Otherwise the code may be incompatible with your microphone.
Cheers,
Emmet
Lars,
Had the SAME problem. I found on the net this:
pcm.speaker {
type plug
slave {
pcm “hw:0,0”
rate 16000
}
}
AND…
pcm.!default {
type asym
playback.pcm {
type plug
slave.pcm “hw:0,0”
rate 48000
}
I put the rate 16000 in my .asoundrc file and IT WORKED! So, I DID NOT try the 2nd one.
Hope it works for you too.
The command goooglesamples-assistant-hotword –device-model-id XXXXXXX is throwing up an error
File “/home/pi/env/bin/googlesamples-assistant-hotword”, line 6, in
from googlesamples.assistant.library.hotword import main
File “/home/pi/env/lib/python3.5/site-packages/googlesamples/assistant/library/hotword.py”, line 27, in
from google.assistant.library import Assistant
ImportError: No module named ‘google.assistant.library’
Is it because that the The Google Assistant Library for Python is deprecated as of June 28th, 2019?
Hi,
We are already running the Google Assistant Service SDK in this tutorial which is still being actively maintained.
Make sure that you are within the virtual environment when running that command. (
source env/bin/activate)Cheers,
Emmet
When I run googlesamples-assistant-pushtotalk –project-id –device-model-id and ask the time, it does work I can see the voice detection working and I hear the correct time but I get this warning:
Warning: root:Device config not found: [ERRNO 2] No such file or directory: ‘home/pi/ .config/googlesamples-assistant/device_config.json’
Is that normal?
Hi Oliver,
It should be safe to just ignore that warning.
Cheers,
Emmet
can i do this with a normal 3.5mm microphone or do i need to get a usb mic. also will it work on a pi 1 b+?
Hi Solarflame5,
Sadly you are required to use a USB microphone for this Google Assistant project.
The reason for this as that the Raspberry Pi does not have any analogue input circuitry so there is no means to connect a analogue microphone to the Raspberry Pi without a 3rd party HAT.
Cheers,
Emmet
This tutorial looks great, but before I put any time into it, can it be setup to store all my data locally? I want nothing going to Google.
Hi Lyle,
This tutorial works off of the Google Assistant API. Meaning all voice data is sent and handled by their servers, there is nothing we can do about that as all the intellegience of the Google Assistant is handled through there servers.
Cheers,
Emmet
Is it possible to do this on the RetroPie OS?
Hi Andrew,
It should be possible as from memory RetroPie is built on top of Raspbian and isn’t using a super locked down and slimmed down OS.
Cheers,
Emmet
Hello and thank you for the amazing tutorials, I was doing fine the entire project but when I did the command “googlesamples-assistant-pushtotalk –project-id –device-model-id –display” (With my stuff in it obviously) I got the error: bash: googlesamples-assistant-pushtotalk: command not found
Is there any way to fix this or it something I did wrong? Thanks!
Hi Jason,
Can you make sure that you are still in the correct Python virtual environemnt?
We will try to rework back through this tutorial and update it if need be soon.
Cheers,
Emmet
For this project you need to install Raspbian or which OS?
Hi Gondzalo,
Almost all our projects are tested on Raspbian so we personally reccommend it.
There is probably other operating systems for the Raspberry Pi that it could work with but we mainly test everything with the full and lite versions of the Raspbian operating system.
Cheers,
Emmet
Commentgooglesamples-assistant-pushtotalk –project-id –device-model-id –display
bash: smart-mirror-9f174: Böyle bir dosya ya da dizin yok
I wonder why I get such an error
Hi Yusuf,
It appears as if you haven’t ran everything correctly and the googlesamples file is not in a place where the OS can detect it.
Cheers,
Emmet
Nice guide!
I got stuck (Raspbian Stretch desktop) on step 9 under “Downloading and setting up Google Assistant”. It was complaining about But after som googling the folowing command did the trick:
sudo apt-get install python-pip python-dev libffi-dev libssl-dev libxml2-dev libxslt1-dev libjpeg8-dev zlib1g-dev
Thought this may help someone else.
Thanks, helped sorting out my issue
Good day i am having a problem when i run sudo systemctl enable assistant.service it says failed to enable unit: file assistant.service : invalid argument
Hi Jacques,
Can you make sure that you saved the service file at “/lib/systemd/system/assistant.service”.
Cheers,
Emmet
Super random question. There’s a recent post regarding Snowboy detection. Is it possible to utilize just the Snowboy Hotword while using specifically Google Assistant SDK? I’d like to be capable of utilizing the Google Cloud, but I would like a custom hotword (Hence Snowboy), but it appears to be very unclear if Snowboy is a modification of a .py file OR if it’s own complete software ‘assistant’ with very low functionality (compared to Google Assistant). Thanks!
Hi J Washington,
It is fully possible to utilize snowboy to initialize the google assistant, we plan on doing a tutorial on this subject in the future.
Snowboy is purely just a hotword detection service, so its just designed to listen for a particular phrase like “Ok Google” for example.
Cheers,
Emmet
Thanks for a guide, everything works expect the auto-startup on boot thing. it seems that the service is launched before the network is up on WiFi and fails. Any way around that?
Hi Eugene,
That seems strange as the service file with the way its written with “network-online.target” should ensure that the Google Assistant software is only loaded once the network has been initialised.
Another way of achieving the same effect is to do the following, let us know if that fixes your issue and we may have to add that to the guide or look into the issue further.
1. Launch into the Raspberry Configuration tool.
sudo raspi-config2. Within this tool go down and select “3 Boot Options” using the arrows keys and press enter.
3. In the boot options menu select “B2 Wait for Network at Boot” and press enter again.
4. When prompted if you “Would you like boot to wait until a network connection is established” select and press enter.
5. Now exit out of the tool by hitting ESC, then type in the command below to restart your Raspberry Pi.
sudo rebootLet us know if this solves your issue with getting the Google Assistant software to start on boot on the Raspberry Pi!
SOOOOOOOOO, I got through to the part about running the sample on the browser without security just fine. I opened up the browser and ran the code, but when I asked a question, it displayed the answer without taking me to the “Meet your google assistant” page. Is that a problem?
Hi Rob,
If everything is still working as intended then you are fine to proceed without worrying about it!
Cheers