In this tutorial, we will be showing you how to install and use the Go compiler on the Raspberry Pi.

Go (Commonly referred to as Golang due to its website domain), is a programming language that is designed to help deal with programming for multiple cores and networked machines.
Go is similar to Python and JavaScript when it comes to code readability and usability.
Like Python, you do not need to end a line with a semicolon. The Go compiler automatically detects and handles when a line ends. However, there are some caveats to this implementation that we won’t go in to in this guide.
One of the best things about Go is that is is a reasonably portable code. This means you can get Go code to compile on an ARM machine such as the Raspberry Pi with relative ease.
In this Raspberry Pi project, you will be installing the Go compiler and learning how to write a simple hello world script to test it.
Equipment List
For this tutorial on installing and using the Go compiler on the Raspberry Pi, we utilized the following list of equipment.
Recommended
Optional
We tested our Raspberry Pi Go tutorial on a Raspberry Pi 5 running the latest available version of Raspberry Pi OS (Bookworm).
Installing Go on the Raspberry Pi
This section will show you how to install the Go compiler on the Raspberry Pi. For this guide, we will be downloading the latest version from the official Go website.
The reason for this is that the version provided through the Raspberry Pi OS repository is often out of date.
1. Before we proceed, let us make sure our operating system is up to date.
We can do that by running the following two commands on our Raspberry Pi.
sudo apt update
sudo apt upgradeCopy
2. Next, we must ensure that both the “curl” and “wget” packages are installed by running the following command.
We will use curl to grab the latest version number for Go, and wget to download the Go compiler.
sudo apt install curl wgetCopy3. Once the update has finished, we can now download the latest available version of the Go Compiler.
You can check for the latest version of the Go compiler by going to the Golang Download website and looking for armv6l.
To download the Go compiler, run one of the following commands on your Raspberry Pi.
Raspberry Pi Running 64-Bit OS
For 64-bit versions of Raspberry Pi OS, you will want to use the following comamnd to download Go.
wget "https://dl.google.com/go/$(curl https://go.dev/VERSION?m=text | head -n1).linux-arm64.tar.gz" -O go.tar.gzCopyRaspberry Pi Running a 32-bit OS
If you are running a Pi that is running a 32-bit operating system, you will want to use the following command instead.
wget "https://dl.google.com/go/$(curl https://go.dev/VERSION?m=text | head -n1).linux-armv6l.tar.gz" -O go.tar.gzCopy4. Once the archive containing the Go compiler has finished downloading, we can now extract it.
We need to extract these files to the /usr/local/ directory.
Begin extracting the Go files by using the command below.
sudo tar -C /usr/local -xzf go.tar.gzCopy5. Now that we have the compiler where we want it, we need to tell the command line that the files exist.
To do this, we will need to modify the current user’s bash aliases (.bashrc). This file is used by the command line to know where to find the GO binary.
Run the command below to begin editing the file using nano.
nano ~/.bashrcCopy6. Add the following two lines to the bottom of the file.
These lines tell the command line where the Go binaries exist. As well as define a new path variable called GOPATH.
export GOPATH=$HOME/go
export PATH=/usr/local/go/bin:$PATH:$GOPATH/binCopy
7. Once you have added the two lines, save the file by pressing CTRL + X, followed by Y, then the ENTER key.
8. We now need to force the command line to load in our changes to the .bashrc file.
Use the command below to load in our updated file.
source ~/.bashrcCopyIf we do not do this, we will need to restart our device for the changes to take effect.
Writing our Hello World Go Script
Now that we have installed the Go compiler on our Raspberry Pi, we can now test it. To verify it works, we will be writing a straightforward “Hello World” script.
1. To keep this simple, we are going to write our first script by using nano.
Begin writing a Go script called hello-world.go by running the command below.
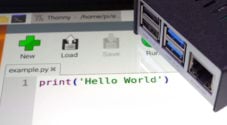
nano hello-world.goCopy2. Within this script, enter the following lines of code.
We will explain what each piece of code does as we go along.
package mainThis line of code defines the package name for this file. In Go, every file must start with a package name.
The package name helps improve your code re-usability and provides a level of separation.
In our case, we are using the package name, main.
import "fmt"Next, we need to import the package that we will be using. The fmt package is a standard one provided with the Go compiler.
This package will allow us to print text to the command line easily.
func main() {
    fmt.Println("Hello World")
}
With this block of code, we are doing two separate things.
1. First, we are defining the main() function.
When the program is executed, the main function is automatically run.
The main function should only ever be defined within the main package.
We use the curly brackets{ } to indicate the start and end of our function.
2. Within our main() function, we call our single line of code. This code is our fmt.println("Hello World") line.
This line makes use of the Println function that is part of the fmt package.
All this function does is print out the text we defined to the standard output.
3. Once you are finished, your code should end up looking like what we have below.
package main

import "fmt"

func main() {
    fmt.Println("Hello World")
}
If you have all the code entered correctly, you can save the file by pressing CTRL + X, followed by Y, then the ENTER key.
Testing the Go Compiler on the Raspberry Pi
In this section, we are going to show you how to compile our hello-world.go script using the Go compiler on our Raspberry Pi
1. Let us test that our code is working by running the Go compiler on our Raspberry Pi.
All we need to do is run the following command, specifying go, then run, followed by our source file.
go run hello-world.goCopyAs we are specifying run, the Go compiler will interpret and execute the code. It won’t be saved as a runnable executable.
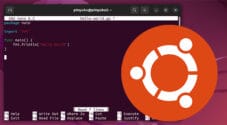
By running our hello world script, you should end up seeing the following text appear in your terminal.
Hello World2. If you want to compile your code into an executable application, we can make a slight modification to the previous command.
Instead of using the run argument, we will be using the build argument instead.
go build hello-world.goCopyThis command will compile our Go script into a program that we can run on our Raspberry Pi.
As we are not specifying anything to tell what system it should compile, it will automatically detect our current system architecture.
3. As we now have a compiled version of our Go script, we can run it directly without needing to invoke the Go compiler.
To run it, all we need to do is run the following command.
./hello-worldCopyAfter running this, you should see the following within the terminal
Hello WorldThis compiled version of our script should now be able to run on any device built on the same architecture as our Raspberry Pi.
Conclusion
Hopefully, at this point, you will now have an idea of how to set up, run, and compile a program using Go on the Raspberry Pi.
If you have run into any issue with this Raspberry Pi project, feel free to leave a comment below.


Thanks for doing this. I have been using PAT, a Winlink client, on my Raspberry Pi and it is written in Go, which allows it to run on Raspberry Pi OS, other Linux, Windows, and Mac.