In this tutorial, we will show you how to set up Firefly 3 on the Raspberry Pi.
Firefly 3 is an open-source and free personal finance manager that can be installed on your Raspberry Pi.
This software lets you track your expenses and income without relying on a cloud service.
It is an excellent solution for those trying to get on top of their finances and want to remain in control of their data.
By the end of the following steps, Firefly 3, you will have the finance manager running on your device.
Equipment
Below is a list of the equipment we used when setting up Firefly 3 on our Raspberry Pi.
Recommended
Optional
This tutorial was tested on a Raspberry Pi 400 running the latest version of Raspberry Pi OS Bullseye.
Installing Firefly 3 on your Raspberry Pi
The following steps will cover installing the Firefly 3 finance manager to your Raspberry Pi.
These steps involve setting up NGINX as a reverse proxy and installing Docker.
Preparing your Raspberry Pi Operating System for Firefly 3
1. Our first task is to update the Raspberry Pi operating system.
You can update the system by using the following two commands.
sudo apt update
sudo apt upgrade -yCopy
2. Next, we must install the packages we require to run Firefly 3 on our Raspberry Pi.
Since we will be using Docker, we aren’t required to install any additional packages to get this finance manager working.
The two packages that we will be installing are “wget” and “nginx“. We will use NGINX as a reverse proxy to put Firefly 3 behind SSL.
sudo apt install wget nginxCopy3. To proceed, you will need to install Docker.
Follow our guide on installing Docker on the Raspberry Pi, as it will get it setup correctly.
4. Once you have finished following our guide on installing Docker, you may continue to the next section.
Getting the Firefly 3 Configuration Files
5. Now that we have everything we need, let us work on installing Firefly 3 to our Raspberry Pi.
Our first task is to make a directory in the “/opt” folder named “firefly3“. This directory is where we will store the Docker compose file and the environment files it will read from.
sudo mkdir /opt/firefly3Copy6. Next, change into our newly created directory.
cd /opt/firefly3Copy7. Now that we are in the correct directory, we can download the official version of the Docker-compose file.
This file has everything pre-configured but will require us to make a couple of adjustments.
sudo wget https://raw.githubusercontent.com/firefly-iii/docker/main/docker-compose.ymlCopy8. Next, we need to download the environment files for the database and Firefly 3 on our Raspberry Pi.
We will edit this environment file in the next section.
sudo wget https://raw.githubusercontent.com/firefly-iii/firefly-iii/main/.env.example -O .envCopy9. We also need to download the environment file for the database.
sudo wget https://raw.githubusercontent.com/firefly-iii/docker/main/database.env -O .db.envCopyConfiguring the Firefly 3 Environment Files on the Raspberry Pi
10. We must modify the environment files to correctly set up Firefly 3 on your Raspberry Pi.
11. Before modifying the environment files, we should generate a random string to use as the app key.
The easiest way to generate a random key is to use the following command.
openssl rand -base64 24CopyBelow is an example of a value generated by the previous command. Don’t use this value.
eyLCpd9YmVBG80exVWacl18RRXUQ552bConfiguring the Environment for Firefly 3
12. Let us start by modifying the main environment file for Firefly 3 by using the following command.
Please note we will only be editing a tiny amount of the options available. Take your time to scroll through these options and see if you need to modify others.
sudo nano .envCopy13. The first thing we will need to set is replacing the default “APP_KEY” value.
Look for the following line within this file.
APP_KEY=SomeRandomStringOf32CharsExactlyCopy14. Once found, replace the value with the key you generated in step 11 of this tutorial. This key encrypts the session keys, so ensure you keep this value secure.
APP_KEY=YOURRANDOMSTRINGHERECopy15. Next, you will want to adjust the default time zone.
TZ=Europe/AmsterdamCopy16. You will want to replace “Europe/Amsterdam” with the timezone for where you live. You can find a list of supported time zones by going to Wikipedia.
For example, if you lived in Hobart, Australia, you would use the following value.
TZ=Australia/HobartCopy17. As we intend on using NGINX as a reverse proxy, you will need to find the following line within the environment file.
TRUSTED_PROXIES=Copy18. Replace this line with the one shown below. Using the two asterisk (**) allows Firefly 3 to be accessed through any proxy.
TRUSTED_PROXIES=**Copy19. We must also adjust the DB password to something more secure.
Find the following line within the file. This line defines the password to use when Firefly 3 connects to the database on your Raspberry Pi.
DB_PASSWORD=secret_firefly_passwordCopy20. Once you have found the line, replace “secret_firefly_password” with your chosen secure password. Remember what you write here, as you will need it in the next section.
DB_PASSWORD=TYPEYOURPASSWORDHERECopy21. You can now save and quit this file by pressing CTRL + X, then Y, then ENTER.
Editing the Database Environment File
22. The following environment file we want to edit is used to configure Firefly 3’s database server on your Raspberry Pi.
Begin modifying this configuration file by using the following command.
sudo nano .db.envCopy23. You will want to find the following line within this file.
MYSQL_PASSWORD=secret_firefly_passwordCopy24. Once you have found the above line, replace “secret_firefly_password” with the password you set in the previous section.
MYSQL_PASSWORD=YOURPASSWORDHERECopy25. Once you have changed the MYSQL password, you can save and quit by pressing CTRL + X, followed by Y, then ENTER.
Modifying the Docker Compose File for Firefly 3 on the Raspberry Pi
26. To modify the Docker Compose file, you will want to use the following command within the terminal.
We must modify this so you can only access the Firefly 3 container on your Raspberry Pi. NGINX is what will provide us with outside access.
sudo nano docker-compose.ymlCopy27. With the file opened in the nano text editor, you will want to find the following line.
- 80:8080Copy28. Replace that line with the one shown below. This change will lock the container to only listen to the localhost.
- 127.0.0.1:8080:8080Copy29. After making this change, save and quit by pressing CTRL + X, followed by Y, then the ENTER key.
Setting up the NGINX Reverse Proxy
30. Let us write a new NGINX configuration for Firefly 3 on your Raspberry Pi.
sudo nano /etc/nginx/sites-available/firefly3.confCopy31. Start by adding this base configuration to the file. Ensure that you replace “<DOMAINNAME>” with the domain name you plan on using or an underscore (_).
server {
    listen 80;
    listen [::]:80;
    server_name <DOMAINNAME>;
    return 301 https://$server_name$request_uri;
}

server {
    listen 443 ssl http2;
    listen [::]:443 ssl http2;

    server_name <DOMAINNAME>;

    access_log /var/log/nginx/firefly3-access.log;
    error_log  /var/log/nginx/firefly3-error.log error;

    client_max_body_size 100m;
    client_body_timeout 120s;

    ssl_certificate /etc/letsencrypt/live/<DOMAINNAME>/fullchain.pem;
    ssl_certificate_key /etc/letsencrypt/live/<DOMAINNAME>/privkey.pem;

    ssl_session_cache builtin:1000 shared:SSL:10m;
    ssl_session_cache shared:MySSL:10m;
    ssl_protocols TLSv1 TLSv1.1 TLSv1.2;
    ssl_ciphers HIGH:!aNULL:!eNULL:!EXPORT:!CAMELLIA:!DES:!MD5:!PSK:!RC4;
    ssl_prefer_server_ciphers on;

    location / {
      send_timeout 5m;
      proxy_read_timeout 240;
      proxy_send_timeout 240;
      proxy_connect_timeout 240;
      proxy_set_header Host $host:$server_port;
      proxy_set_header X-Real-IP $remote_addr;
      proxy_set_header X-Forwarded-For $proxy_add_x_forwarded_for;
      proxy_set_header X-Forwarded-Proto https;
      proxy_set_header X-Forwarded-Host $host;
      proxy_set_header X-Forwarded-Ssl on;
      proxy_set_header Connection "";
      proxy_cache_bypass $cookie_session;
      proxy_no_cache $cookie_session;
      proxy_buffers 32 4k;

      proxy_pass http://localhost:8080;
  }
}Copy
32. If you aren’t using a domain name, find the following lines within this file. If you use a domain name, you can skip to step 35.
    ssl_certificate /etc/letsencrypt/live/<DOMAINNAME>/fullchain.pem;
    ssl_certificate_key /etc/letsencrypt/live/<DOMAINNAME>/privkey.pem;Copy
33. Replace the above lines with the following. These lines will get NGINX to load in a self-signed certificate we will generate shortly.
    ssl_certificate /etc/ssl/certs/nginx-selfsigned.crt;
    ssl_certificate_key /etc/ssl/private/nginx-selfsigned.key;Copy
34. After making these changes to the file, you can save and quit by pressing CTRL + X, followed by Y, then ENTER.
Generating an SSL Certificate
35. Our next step is to generate an SSL certificate for Firefly 3’s reverse proxy. These steps will differ if you want a proper SSL certificate vs. a self-generated one.
You will need a domain name pointed to your Raspberry Pi for a signed SSL certificate.
Generating a Self-Signed Certificate
a. Generating a self-signed certificate for Firefly 3 on your Raspberry Pi is as straightforward as using the following command.
This command will generate a certificate that will last 365 days and be stored in the “/etc/ssl/certs/” directory.
sudo openssl req -x509 -nodes -days 365 -newkey rsa:2048 -keyout /etc/ssl/private/nginx-selfsigned.key -out /etc/ssl/certs/nginx-selfsigned.crtCopyb. During the generation of the self-signed certificate, you will be prompted several times to fill out some additional information.
You can press ENTER on each of these to use the default values. Alternatively, you can fill out more information about the certificate.
Country Name (2 letter code) [AU]:AU
State or Province Name (full name) [Some-State]:Tasmania
Locality Name (eg, city) []:Hobart
Organization Name (eg, company) [Internet Widgits Pty Ltd]:Pi My Life Up
Organizational Unit Name (eg, section) []:
Common Name (e.g. server FQDN or YOUR name) []:server_IP_address
Email Address []:admin@your_domain.com
c. At this point, your Raspberry Pi will generate a certificate, and you can proceed to step 36.
Using Certbot to Generate a Signed Certificate
a. If you have a domain name pointed to your Raspberry Pi, you can use Certbot / Lets Encrypt to generate a signed SSL certificate.
To generate a certificate, use the following command. Ensure you replace “DOMAINNAME” with the domain you want to generate the signed certificate for.
sudo certbot --nginx -d DOMAINNAMECopyb. During this process, you will be prompted to enter an email that Lets Encrypt will use to contact you when your certificate is close to expiring.
c. Once the certificate has been generated, you should see the following appear in your command line.
You should now be able to continue to step 36 safely.
IMPORTANT NOTES:
 - Congratulations! Your certificate and chain have been saved at
   /etc/letsencrypt/live/DOMAINNAME/fullchain.pem. Your cert will
   expire on 2023-11-27. To obtain a new or tweaked version of this
   certificate in the future, simply run certbot again with the
   "certonly" option. To non-interactively renew *all* of your
   certificates, run "certbot renew"
 - Your account credentials have been saved in your Certbot
   configuration directory at /etc/letsencrypt. You should make a
   secure backup of this folder now. This configuration directory will
   also contain certificates and private keys obtained by Certbot so
   making regular backups of this folder is ideal.
 - If you like Certbot, please consider supporting our work by:

   Donating to ISRG / Let's Encrypt:   https://letsencrypt.org/donate
   Donating to EFF:                    https://eff.org/donate-le
Restarting NGINX
36. Our next step is to create a symbolic link between the “firefly3.conf” file and the “/sites-enabled/” directory.
sudo ln -s /etc/nginx/sites-available/firefly3.conf /etc/nginx/sites-enabled/Copy37. Now, you can restart NGINX so that it reads in the SSL certificate you just generated.
To restart NGINX, use the following command in the terminal.
sudo systemctl restart nginxCopyRunning Firefly 3 on the Raspberry Pi
38. We are finally at the point where we can run Firefly 3 on the Raspberry Pi.
To start up the finance manager on your device, use the following command. This process can take a few minutes as Docker downloads the containers specified within the Docker compose file.
docker compose up -dCopyUsing the “-d” option, it will detach from the current terminal session once Docker finishes launching Firefly 3 and its services. This allows Firefly 3 to run in the background.
Accessing the Raspberry Pi’s Firefly 3 Web Interface
1. At this point, you will now have Firefly 3 running on your Raspberry Pi and will now want to access its web interface.
To access Firefly 3, you must know your Raspberry Pi’s IP address. The easiest way to get this IP address is to use the hostname command.
hostname -ICopy2. Once you have the IP address in hand, go to your favorite web browser.
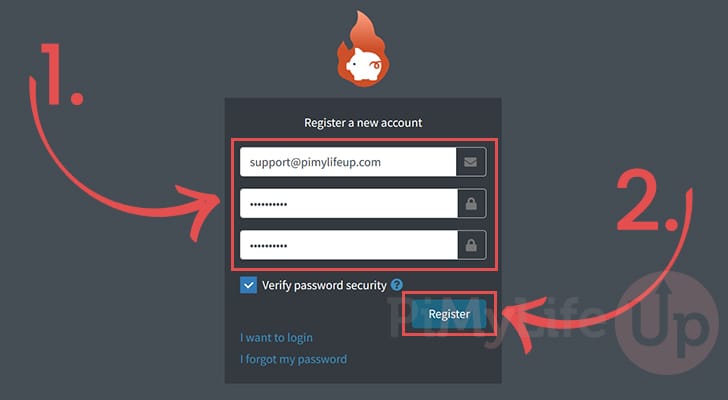
https://PIIPADDRESS3. When you first visit this web page, you will be asked to register your user (1.). Please note that Firefly 3 expects the password to be 16 characters long.
Once you are happy, click the “Register” button to create your user (2.).
4. You can now access the Raspberry Pi Firefly 3’s web interface and start setting everything up to track your finances.

Conclusion
At this point, you should hopefully have the Firefly 3 personal finance manager running on your Raspberry Pi.
This software provides a free, self-hosted solution for tracking your finances.
Please feel free to comment below if you have questions about installing Firefly 3.
If you found this tutorial helpful, we have many other tutorials and guides for the Raspberry Pi.


Hey there,
Thanks for the explanation. I followed through (without the certificate step, as i only run it on my private network.
But then i get the following error:
docker compose up -d
[+] Running 0/3
⠇ app Pulling 2.7s
⠇ db Pulling 2.7s
⠇ cron Pulling 2.7s
no matching manifest for linux/arm/v7 in the manifest list entries
I do want o install it on a Rasperry Pi 3. Does it only work with newer Hardware Releases?
Thanks,
Roman
Hi Roman,
Firefly 3 requires ARM64. So you would need to be running a 64-bit version of Raspberry Pi OS on your Pi for this to work. The Pi 3 from memory does support 64-bit so it should be fully possible to complete this guide, you just need to ensure you select “64-bit” when installing the OS.
Kind regards,
Emmet
Thanks for the helpful article. There’s a small mistake. After finishing step 35c, one should go to step 36 instead of directly to step 37.
Hi ZZ,
Glad you found the article to be helpful! Thank you very much for pointing out that mistake, I have corrected it to point to the correct step.
Kind Regards,
Emmet