In this Raspberry Pi project, we will be showing you how to set up your Pi as a low-powered eBook library using Booklore.
Booklore is a self-hosted web app that is designed to help you organize, manage, and read your eBook library. It has quickly become known for its modern web design and innovative design, and has easily earned its placement as one of the best alternatives to Calibre.
This software boasts a wide range of functionality to improve your book management. It can quickly and easily fetch metadata for your book library while allowing it to be easily edited through its web interface. To make your organization even better, you can set up a feature called magic shelves that dynamically organizes your eBooks for you.
In addition to its many management functions, Booklore is also a capable eBook reader. It keeps track of all the books you are reading and how far you have progressed through them. It can even sync this progress with your devices if you use the Koreader app.
The Raspberry Pi makes a fantastic device for running Booklore, as you can keep your book library running at all times without worrying about runaway power costs. Additionally, the Pi has more than enough performance to deal with a decent-sized book library.
Please note that you must be running a 64-bit operating system to run Booklore. The team does not provide 32-bit builds. We have a guide that explains how to check whether your Pi is running a 64-bit system.
Unfortunately, this also means you must be running a Raspberry Pi 3 or newer to run Booklore.


Equipment
Below is a list of equipment we used when setting up the Booklore eBook library tool on our Raspberry Pi.
Recommended
Optional
This tutorial was last tested on a Raspberry Pi 5 running the latest version of Raspberry Pi OS Trixie (64-bit).
Installing and Running Booklore on a Raspberry Pi
Over the following sections, we will be walking you through the process of installing and running Booklore on your Raspberry Pi.
These steps are all written for use within the terminal. If you are using a desktop variant of Raspberry Pi OS, you can often bring up the terminal by pressing CTRL + ALT + T on your keyboard.
Preparing your Pi for Booklore
1. Before you begin to set up Booklore on your Raspberry Pi, there are a few tasks you must complete first. The first part of this process is to ensure your Raspberry Pi is up-to-date.
Updating the software on your Raspberry Pi is as simple as running the following two commands within the terminal. The first command updates the package list, the second upgrades any out-of-date packages found by updating that list.
sudo apt update
sudo apt upgrade -yCopy
2. Once your operating system is up to date, your next step is to install Docker. This is the tool that will make running and updating the Booklore software on your Raspberry Pi a breeze.
Follow our guide on installing Docker before continuing any further with this Raspberry Pi project.
https://pimylifeup.com/raspberry-pi-docker/Preparing the Booklore Stack Folders
3. After installing Docker, we can now create a folder where we will store the data and Compose file for Booklore.
To create this folder, we will use the mkdir command. You can choose a different folder, but the rest of this tutorial will assume you used the same folder as ours.
sudo mkdir -p /opt/stacks/booklore/dataCopy4. On top of the “/booklore/data” directory, we must also create one for the “mariadb” files as well. This will help address an issue where Docker creates these as files rather than folders.
sudo mkdir -p /opt/stacks/booklore/mariadbCopyCorrecting Permissions
5. Now that we have all the folders created, our next step is to ensure that they have the correct owner. Starting off with the mariadb folder, we must ensure that it is owned by the user who has the id “1000“.
This is because the database is configured to use the user by default. You can change this, but for this guide, we will be sticking with the default values.
You can make this permission change by using the chown command below in the terminal.
sudo chown 1000:1000 /opt/stacks/booklore/mariadbCopy6. Next, we must take ownership of the data directory as well. This time, we will be using the user who will also have access to your books. For most people, this will be the user that you use to log in to your account.
To make this change, use the command below, but ensure you replace “<USERNAME>” with your chosen user.
sudo chown <USERNAME>: /opt/stacks/booklore/dataCopyFor example, if our username was “pi” we would run the command below.
sudo chown pi: /opt/stacks/booklore/dataCopyCreating a Place to Store Your eBooks on your Raspberry Pi
7. Before we begin writing up the Docker Compose file that will manage Booklore on our Raspberry Pi, we must create another two directories.
The first of these directories is called “books” and is where you will be storing your eBook library. For this tutorial, we will be storing these in our current user’s home directory. If you decide to use a different location, make note of it as you will need to enter it later.
mkdir ~/booksCopy8. The other folder we need to create is one for Booklore’s Bookdrop functionality. Essentially, this is a folder where you can copy your books into for Booklore to process and add to your library.
Like the Book folder, we will also be creating this directory within our current users home directory by using the mkdir command.
mkdir ~/bookdropCopyFinding your User and Group IDs
9. To help ensure Booklore doesn’t run into any permission issues on our Raspberry Pi, the software requires us to provide it with a user ID and a group ID. In most scenarios, you will likely want to use the IDs for your current user.
Let us start this process by getting the current user’s ID with the following command in the terminal.
id -uCopyYou should see a number printed out in the terminal. Make a note of this as you will need it later.
100010. We can also easily get the group ID we need by using the same command as before, but using the “-g” option instead of “-u“.
In most cases, you will find that the user ID and group ID are the same, but it’s better to be safe than run into issues later.
id -gCopyWrite down the number output by this command and make a note that it is the “group id” you will need in a later section.
1000Writing the Docker Compose file for Booklore on the Raspberry Pi
11. Now that we have created the folders, corrected any permissions, we are ready to move on to writing the Docker Compose file.
Before we do this, we will want to use the cd command to change into our newly created directory. We must be in this folder later on to start up Booklore.
cd /opt/stacks/bookloreCopy12. You can begin to write this Compose file using the Nano text editor by using the command below.
We use Nano because it is one of the easiest command-line text editors, especially for beginners.
sudo nano compose.yamlCopy13. Within this file, you will want to enter the following lines. These lines help define two separate containers. The first section is Booklore itself, the second is a MariaDB server where all your data will be stored.
While you fill out this file, there are a couple of placeholders you must replace. In particular, these are where we will define where the “books” and “bookdrop” folders we created earlier are stored on your system.
<BOOKSDIR>: If you are following our guide, you will swap this placeholder out with a path that looks like the following. Just ensure you swap “<username>” with your user’s name./home/<USERNAME>/books
<BOOKDROPDIR>: Likewise, you will also want to replace this placeholder with the path to where your bookdrop is located. If you are following our guide, you would use something similar to the following, just insert your username instead./home/<USERNAME>/bookdrop
services:
  booklore:
    image: ghcr.io/booklore-app/booklore:latest
    container_name: booklore
    environment:
      - USER_ID=${APP_USER_ID}
      - GROUP_ID=${APP_GROUP_ID}
      - TZ=${TZ}
      - DATABASE_URL=${DATABASE_URL}
      - DATABASE_USERNAME=${DB_USER}
      - DATABASE_PASSWORD=${DB_PASSWORD}
      - BOOKLORE_PORT=${BOOKLORE_PORT}
    depends_on:
      mariadb:
        condition: service_healthy
    ports:
      - "${BOOKLORE_PORT}:${BOOKLORE_PORT}"
    volumes:
      - ./data:/app/data
      - <BOOKSDIR>:/books
      - <BOOKDROPDIR>:/bookdrop
    restart: unless-stopped

  mariadb:
    image: lscr.io/linuxserver/mariadb:11.4.5
    container_name: mariadb
    environment:
      - PUID=${DB_USER_ID}
      - PGID=${DB_GROUP_ID}
      - TZ=${TZ}
      - MYSQL_ROOT_PASSWORD=${MYSQL_ROOT_PASSWORD}
      - MYSQL_DATABASE=${MYSQL_DATABASE}
      - MYSQL_USER=${DB_USER}
      - MYSQL_PASSWORD=${DB_PASSWORD}
    volumes:
      - ./mariadb/config:/config
    restart: unless-stopped
    healthcheck:
      test: [ "CMD", "mariadb-admin", "ping", "-h", "localhost" ]
      interval: 5s
      timeout: 5s
      retries: 10Copy
14. Once you have filled out this file, save and quit by pressing CTRL + X, Y, and then ENTER.
Setting up your Environment File
15. The Compose file we are using to run Booklore on our Raspberry Pi now requires us to create an environment file. This file will be read in by the Compose file and used to fill in various values.
To begin writing the environment file, use the command below.
sudo nano .envCopy16. Within this file, you will want to enter the following lines. While you fill this out, there are a few placeholders you must swap out. These help define things such as the user and group ID’s,
<USERID>: Change this to the user ID you got earlier in this tutorial. This helps ensure Booklore uses your user when reading and writing files.<GROUPID>: Swap this placeholder with the group ID that you got earlier as well.<TIMEZONE>: This placeholder needs to be replaced with the timezone for where you currently live. This uses the TZ identifier format. You can find the list of TZ identifiers on Wikipedia.
For example, based on where we live, we would use the value “Australia/Hobart“.<DBPASSWORD>: The final placeholder you just swap out is the one used to define the DB password for MariaDB. There are two instances of this, and they must be swapped with the same value.
This password can be just a random jumble of letters and numbers. You can also use some symbols, but be careful, as certain ones don’t play nicely with MariaDB.
# BookLore Application Settings
APP_USER_ID=<USERID>
APP_GROUP_ID=<GROUPID>
TZ=<TIMEZONE>
BOOKLORE_PORT=6060

# Database Connection (BookLore)
DATABASE_URL=jdbc:mariadb://mariadb:3306/booklore
DB_USER=booklore
DB_PASSWORD=<DBPASSWORD>

# MariaDB Container Settings
DB_USER_ID=1000
DB_GROUP_ID=1000
MYSQL_ROOT_PASSWORD=<DBPASSWORD>
MYSQL_DATABASE=bookloreCopy
17. After filling out this file, save and quit by pressing CTRL + X, Y, and then ENTER.
Starting up Booklore on the Raspberry Pi
18. With everything now set up, all we need to do to start up Booklore on our Raspberry Pi is to use the following command.
This command reads the Compose file, downloads, and runs the Booklore and MariaDB containers. This process shouldn’t take too long, and you will have your new book manager up and running in no time.
Once started, Booklore will continue to start whenever your Raspberry Pi starts. Docker will also automatically restart the book manager whenever it crashes.
docker compose up -dCopyAccessing the Booklore Web Interface
19. With Booklore now up and running on your Raspberry Pi, you will now want to access its web interface to finish up the setup process.
This web interface is also how you will manage your eBook library as well as configure the software. To access this interface, you will need to know the IP address of your
hostname -ICopy20. Now, to access the Booklore web interface, you will want to go to the following address in your favorite web browser.
Ensure that you replace “<IPADDRESS>” with the IP of your Raspberry Pi. You should have retrieved the correct address by using the previous command.
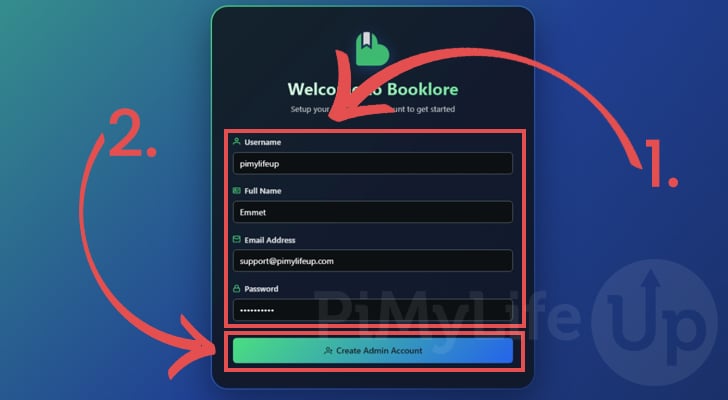
http://<IPADDRESS>:606021. The first time you connect to your Raspberry Pi’s Booklroe installation, you will be prompted to fill out details for your first account. This account will also be the admin for your eBook library.
Start by filling out a username, name, email address, and password that you want to use for your account (1.).
After typing out your details, click the “Create Admin Account” button (2.) to proceed.
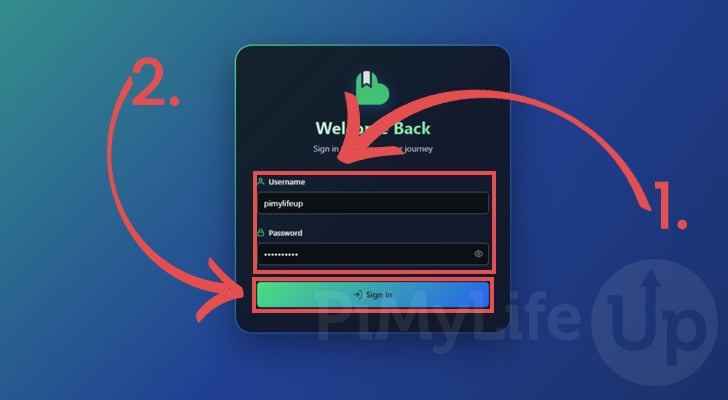
22. After creating your account, you will be taken to the login interface. Type out the username and password (1.) that you just set, and then click the “Sign In” button (2.).
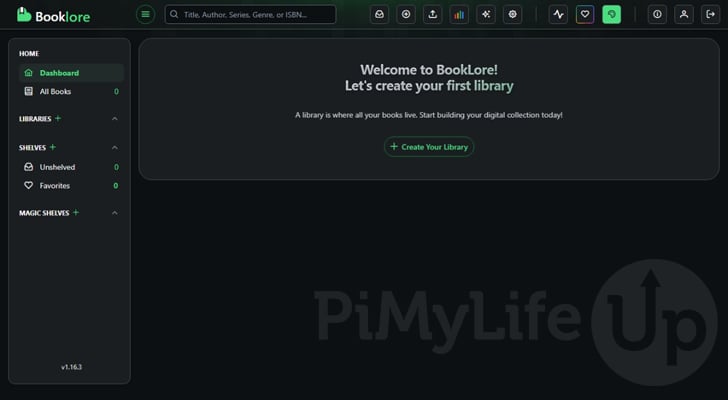
23. You have now successfully set up BookLore on your Raspberry Pi, you can now begin to use this interface to set up your eBook library.
Before getting too far ahead, it’s worth exploring the settings pages to ensure everything is tweaked. Additionally, when setting up your libraries, remember that, since this software runs as a Docker container, it can only see folders mounted to it.
Updating Booklore on your Raspberry Pi
One of the key advantages of using Docker to run software like Booklore on your Raspberry Pi is that it makes keeping it updated a very simple process. You don’t have to worry about OS updates potentially breaking the software, as everything Booklore needs to run is kept within its own container.
To update your release of Booklore to the latest, follow the next few steps.
1. The first thing you need to do is use the cd command to change into the directory where we wrote the Docker Compose file.
If you followed our tutorial as it was written, you can get to this folder by running the command below.
cd /opt/stacks/bookloreCopy2. Once you are in the correct directory, we can now tell Docker to pull the latest release of all containers specified within the Compose file.
Pulling the new release won’t automatically install it, but it will make it available to the software.
docker compose pullCopy3. If a new release was downloaded, you will now want your Raspberry Pi to update to it. Luckily, Docker makes this process simple as well, and all we need to do is run the same command we used to start Booklore in the first place.
Docker will detect that a new image is available, and automatically stop the running container and restart it on the new image.
docker compose up -dCopyConclusion
Hopefully, by this point in the tutorial, you will have gotten Booklore running on your Raspberry Pi.
Booklore is a modern book management software and is one of the best alternatives to the popular Calibre project. It offers a ton of functionality built into its core, including a very easy-to-use web interface
Please feel free to leave a comment below if you have run into any issues with getting Booklore to run on your Pi.
If you liked this project, we recommend taking the time to explore some of the many other Raspberry Pi projects that we cover.