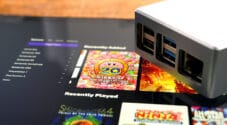
In this project, we will be turning our Raspberry Pi into a gaming machine using Batocera.
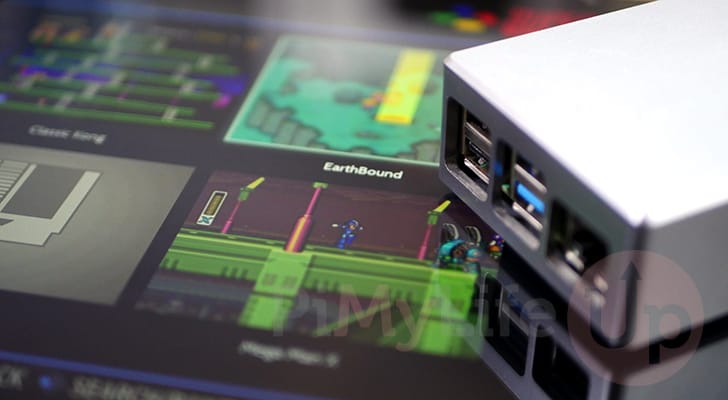
Batocera is an open-source distribution for devices like the Raspberry Pi that helps transform them into a retro gaming machine. It achieves this by bundling a ton of different game emulators under one package. Combined
If you have ever used RetroPie on your Raspberry Pi, you will definitely enjoy the experience of using Batocera. It is the more actively developed of the two projects and has been constantly improving since its original inception.
One of the core features of using Batocera on your Raspberry Pi over RetroPie is that it is basically a plug-and-play experience for the most part. If you use any of the more popular controllers, everything is meant to just work straight out of the box without you needing to configure anything.
Batocera is also packed with many additional features, such as the popular RetroAchivements project.
Performance-wise, you will not notice any major differences in your Raspberry Pi between Batocera and RetroPie. In fact, you can get a better experience with Batocera as they utilize newer releases.
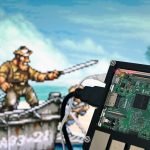
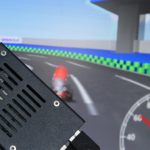
If you are interested in what sort of games you can run using Batocera, the team provides a compatibility list that indicates whether a particular system’s games will run on your Raspberry Pi. For example, using this we can see that you could even use Batocera to run GameCube games on your Pi, however, performance will definitely be on the slower side.
Before proceeding, you will likely want to decide on which Raspberry Pi you want to install Batocera on. For the best experience, the latest Raspberry Pi’s will always offer the best performance. At the time of publishing this, we recommend that you use a Raspberry Pi 5. However, you will still get a decent experience with using older devices such as the Raspberry Pi 4, and if you only intend to emulate super old retro games you can even get away with using devices like the Pi Zero 2.


Equipment
Below is a list of equipment we used when we set up Batocera on our Raspberry Pi.
Recommended
- Raspberry Pi Amazon
- Micro SD Card Amazon
- USB Keyboard Amazon
- USB Mouse Amazon
- HDMI Cable Amazon
- Monitor Amazon
Optional
- Retro USB Controllers or Joysticks Amazon
- Xbox Controller Amazon
- PlayStation Controller Amazon
- Ethernet Cable Amazon or Wi-Fi Amazon
This tutorial was last tested using a Raspberry Pi 5 running Batocera 41. These steps should continue to work fine for newer releases.
Installing and Running Batocera on your Raspberry Pi
Over the following sections, we will walk you through installing and running Batocera onto your Raspberry Pi.
As you will soon see, Batocera makes this entire setup process surprisingly easy.
In the video we have embedded below, we will walk you through all of the steps needed to get Batocera installed on your Raspberry Pi. If you prefer written instructions, you can skip to the next section.
Downloading the Batocera Image for your Version of the Pi
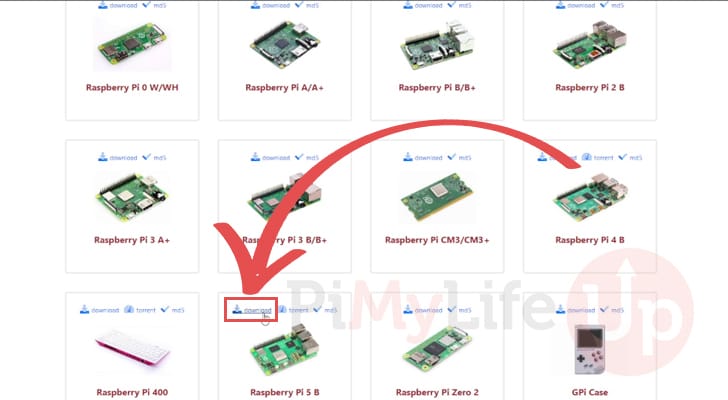
1. The first thing you must do is download the Batocera image for the Raspberry Pi you are using. This software isn’t available directly through the Raspberry Pi Imager, but the team makes it really easy to get the correct one yourself.
To start this process, go to the Batocera download page in your favorite web browser.
https://batocera.org/download2. Once you are on this page, we recommend selecting the “rpi” filter so that it only shows versions of the retro gaming operating system built for the Raspberry Pi’s.
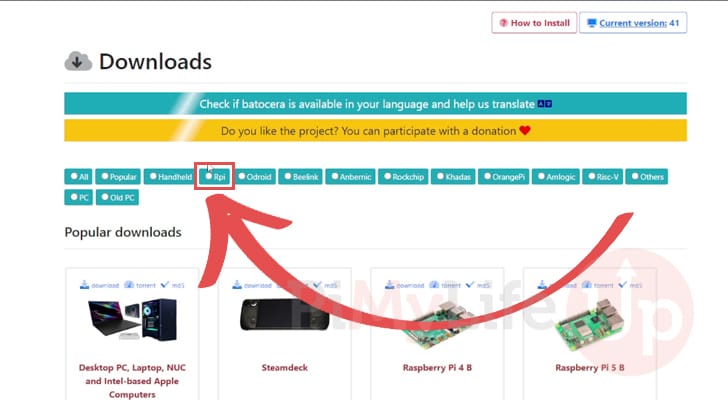
3. With the filter selected, find your model of Raspberry Pi and click the “Download” button.
This will save the image to your local machine. You can also use the torrent option if you prefer, as that may yield better download speeds.
Installing the Batocera Image to your Storage Device
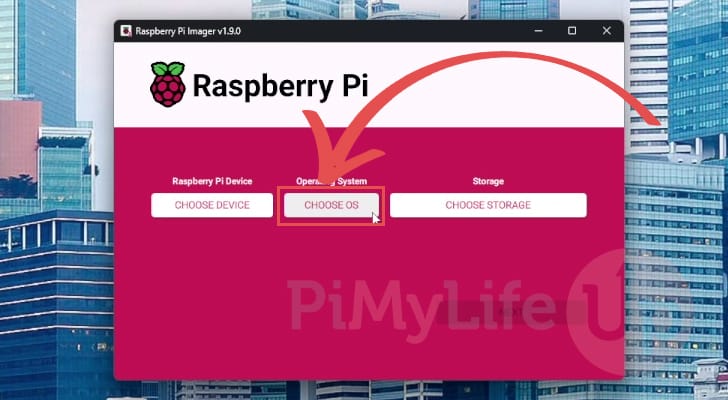
4. Now to install the Batocera image to your Raspberry Pi’s storage device we will be using a tool called Raspberry Pi Imager. This imager is one of the best ways to write images as it properly formats your storage device and writes the image.
If you don’t have this tool installed, you can get it by going to the official Raspberry Pi website.
https://www.raspberrypi.com/software/5. With the Raspberry Pi Imager now open, you will want to click the “CHOOSE OS” button.
As we are using a custom image, we don’t need to select the Raspberry Pi we are running.
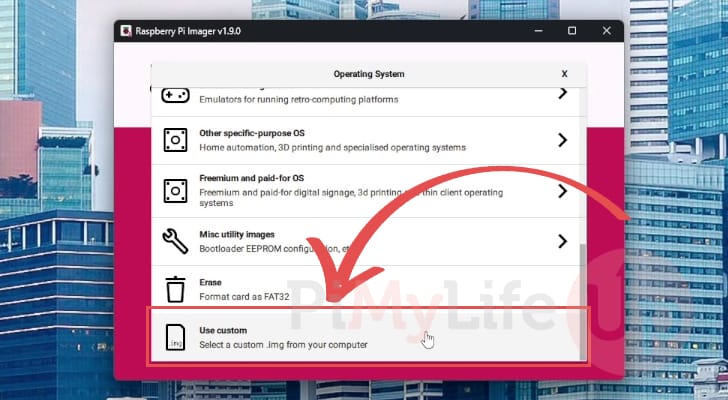
6. With the image select screen now open, scroll to the bottom of the list and click the “Use custom” option.
This will bring up a dialog box that will allow you to find and select the Batocera image you downloaded for your Raspberry Pi. Select that image to continue.
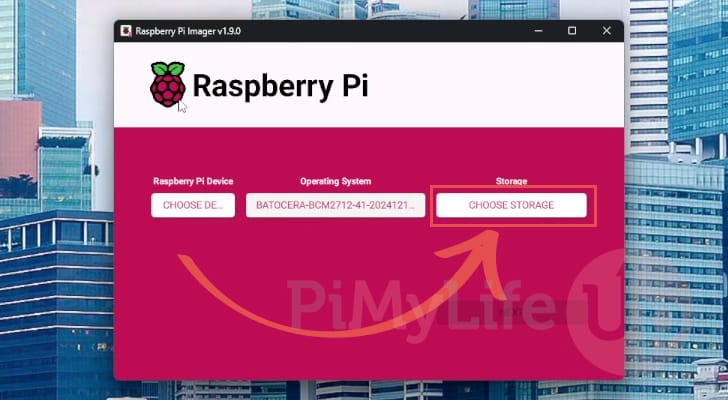
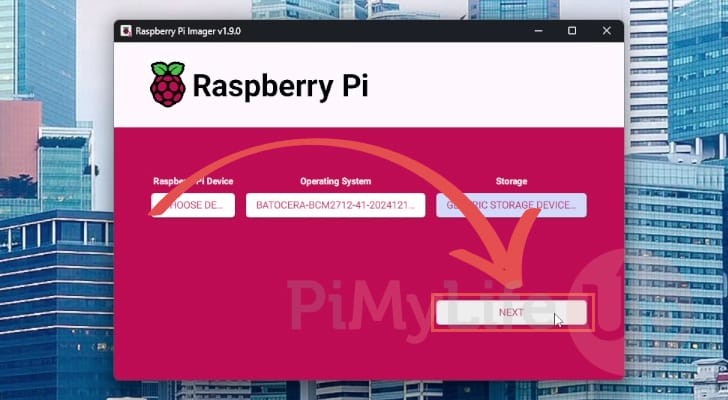
7. Your next step is to select the storage device which to write the Batocera image. To select this, click the “CHOOSE STORAGE” button.
Ensure you select the right storage device, as all data on that device will be removed.
8. After selecting your storage device, you will now want to click the “NEXT” button to begin writing the Batocera image to your Raspberry Pi’s storage device.
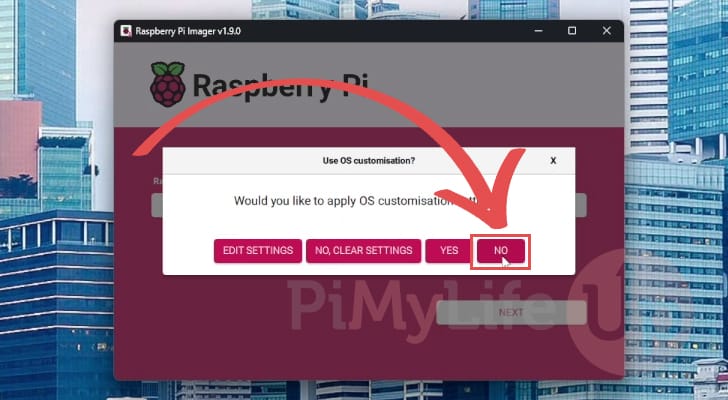
9. You may be prompted if you want to apply custom OS optimization to the Batocera image.
As this image isn’t something supported by the Imager, you must click the “NO” option.
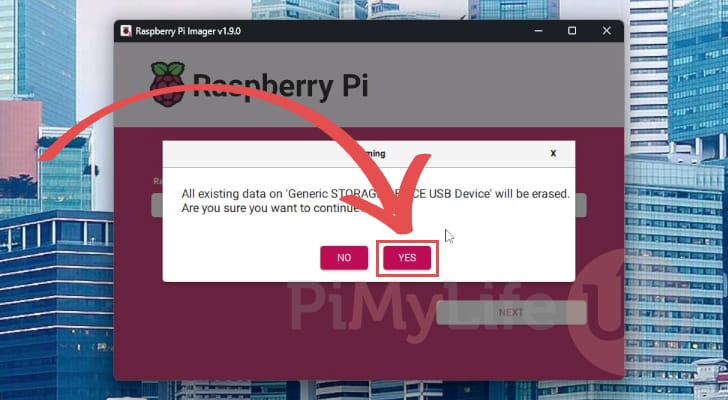
10. Now before the image is written, you will get one last warning that the data on your storage device will be lost during the writing process.
If you are happy, that you have selected the correct device that you intend on using with your Raspberry Pi, click the “YES” button.
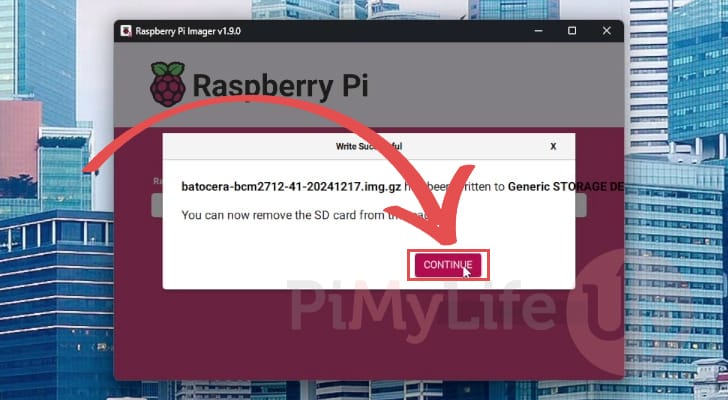
11. Once the Batocera image has been written, you can plug your storage device into your Raspberry Pi and power it on.
Starting up Batocera on your Raspberry Pi
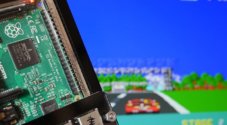
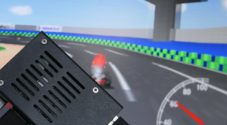
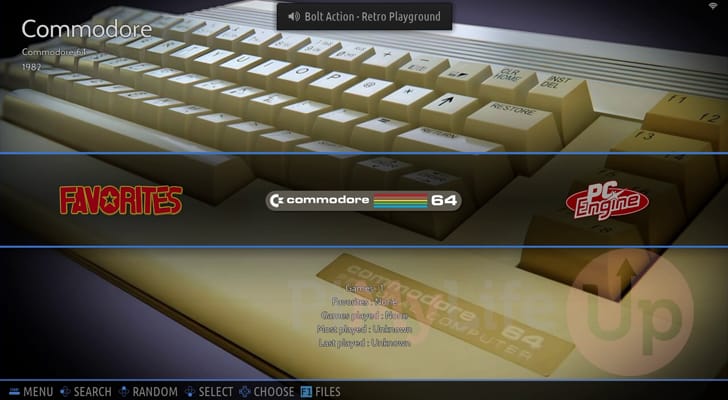
12. You will immediately be greeted by what makes Batocera such a great distribution. You will be taken directly to this retro gaming distribution’s interface.
If you have a controller connected, Batocera will even automatically map it if it’s a controller that is specified within their database.
Batocera comes with some pre-loaded games, so you can immediately test it to see how it will run on your Raspberry Pi and whether you need to remap your controller to suit your needs.
Mapping your Controller within Batocera
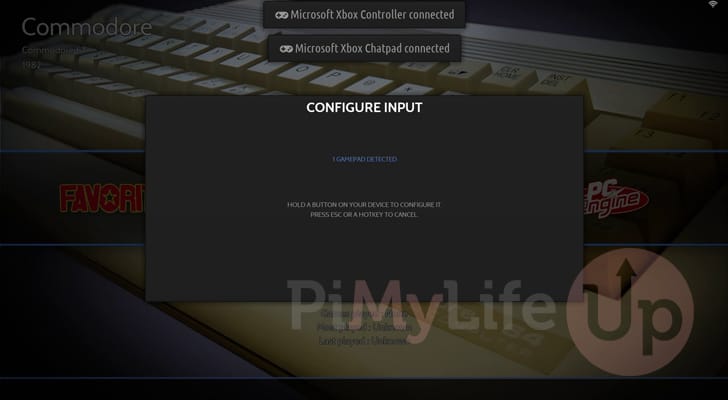
13. When you plug a gamepad into your Raspberry Pi for the first time, Batocera will prompt you on whether you want to configure the input device.
To remap your controller, hold down any button on it.
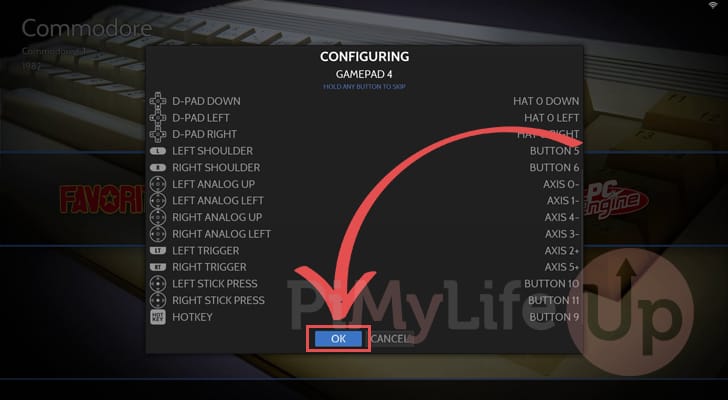
14. You will now want to map your controller to the corresponding controls on your screen. Pay attention to the spot the configurator is prompting you to use, then press a button that responds to that location on your controller.
If you don’t have a corresponding button, just hold down any already assigned button to skip that option.
One thing you must assign is the “START” and “HOTKEY” options. The hotkey is super important as that is what you will use to exit out of currently running games.
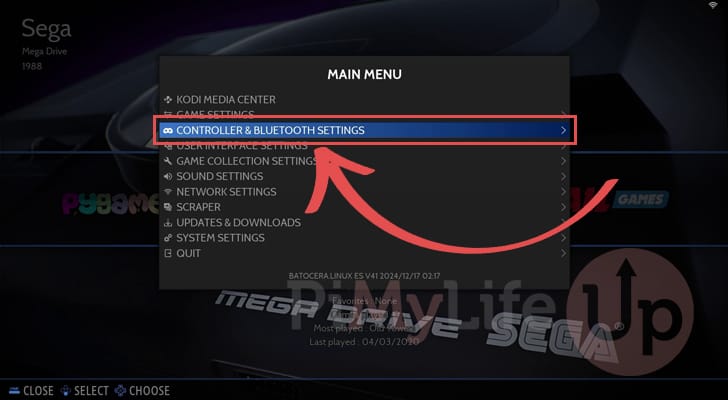
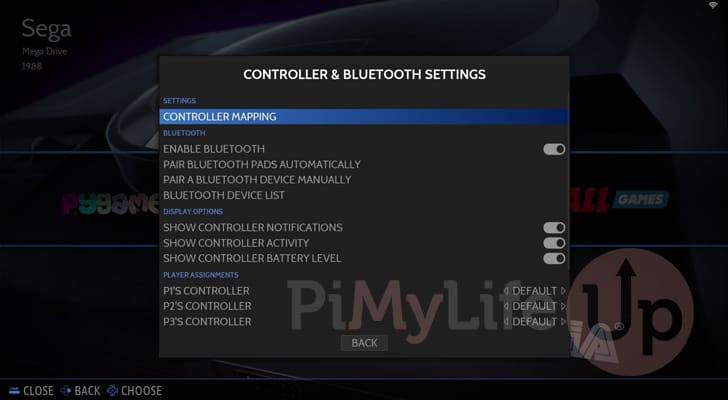
15. It is also possible to reconfigure a controller down the track by opening up the Batocera main menu by pressing START or the Escape key on your keyboard.
You will then want to select the “CONTROLLER & BLUETOOTH SETTINGS” option.
16. You will now be greeted with all the controller options that Batocera offers you. This is also the screen you will use if you want to pair a Bluetooth controller with your Raspberry Pi and Batocera.
To remap a controller, you would select the “CONTROLLER MAPPING” option.
Setting up Wi-Fi within Batocera
17. If you are using Ethernet with your Raspberry Pi your Batocera powered retro gaming machine will already have access to the internet. However, if you are relying on Wi-Fi, you must go through a couple of extra steps.
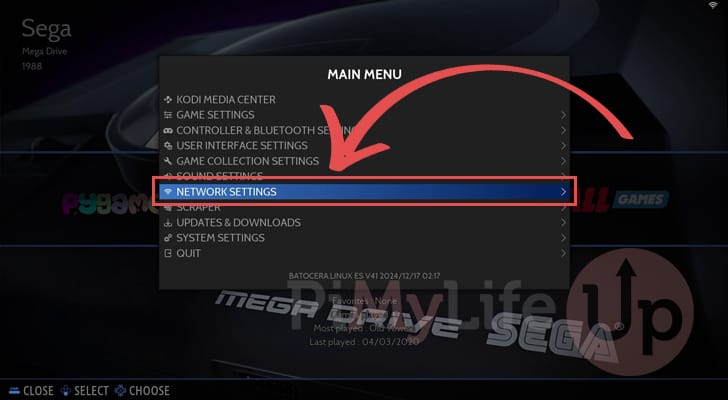
Start off by opening the start menu by pressing ESC or the start button on your controller

18. With the main menu now open, you will want to scroll down and select the option labeled “NETWORK SETTINGS“.
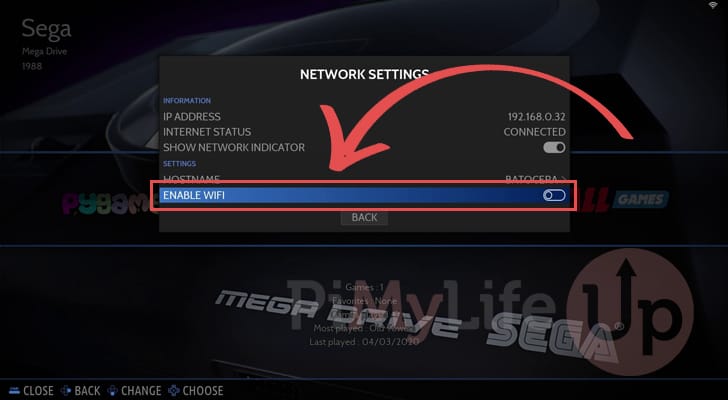
19. Within this screen, all you need to do to enable the Wi-Fi functionality on your Raspberry Pi within Batocera is to toggle the “ENABLE WIFI” option.
Batocera may become unresponsive for a minute or two as it switches the Wi-Fi functionality on.
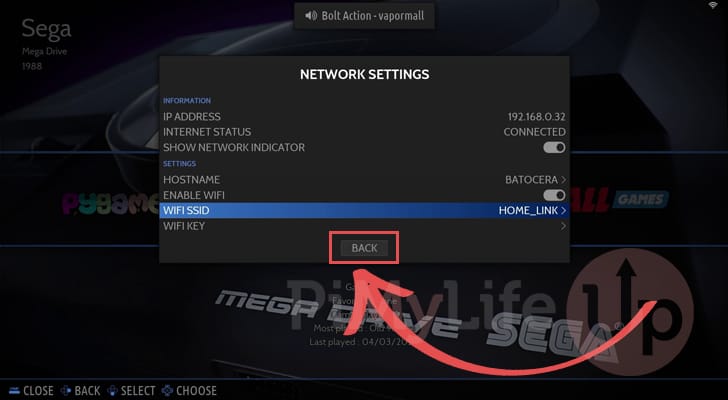
20. With Wi-Fi enabled, you will now want to select the “WiFi SSID” option to select the network to join.
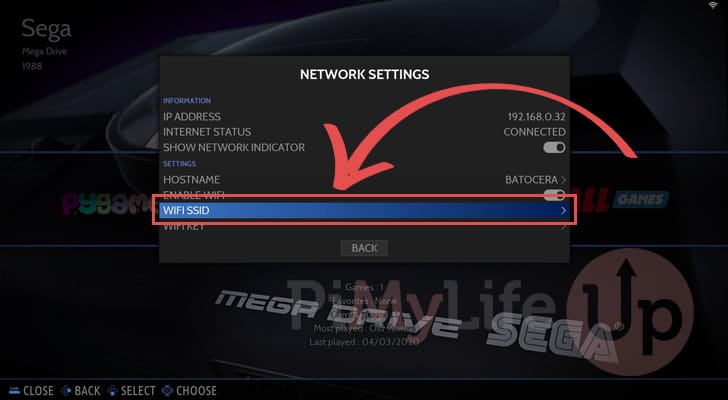
21. Your Raspberry Pi will have automatically scanned for any local Wi-Fi networks to join. Select one of these using Batocera’s interface to continue.
If you don’t see your network listed, you can try the “INPUT MANUALLY” option and type in the SSID yourself.

22. With a Wi-Fi network chosen, you will need to enter the password to use to connect to it.
To enter the password, select the “WIFI KEY” option and type in your password using the provided textbox.
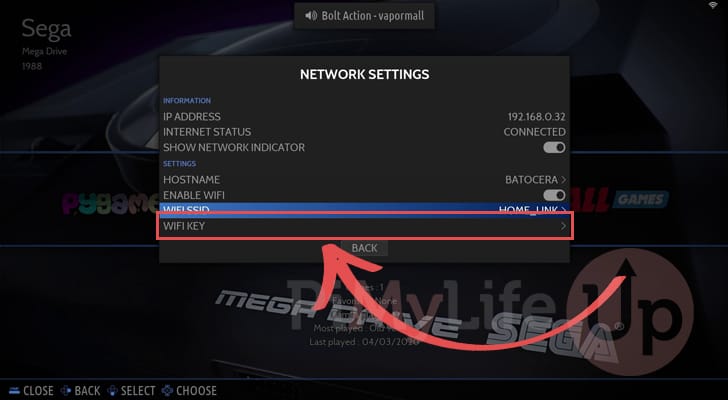
23. With your Wi-Fi network selected and your password entered, all you need to do now is click the “BACK” button. Batocera will immediately use your Raspberry Pi to connect to your Wi-Fi network.
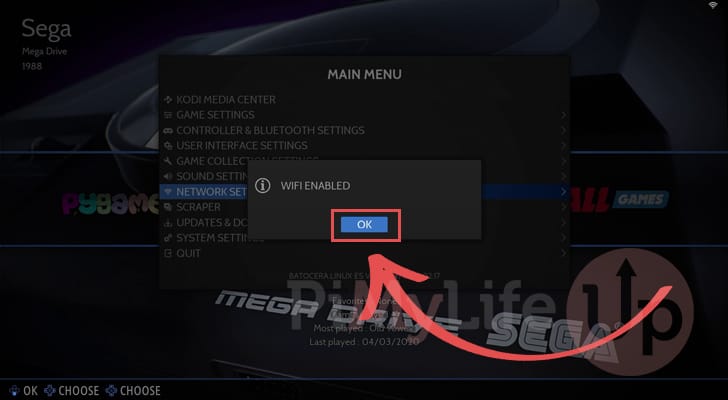
24. You have now successfully enabled Wi-Fi connectivity using the Batocera interface.
Copying your Games to your Your Raspberry Pi for Batocera
In this section, we will be exploring the easiest way to copy your games over to your Raspberry Pi so that you can play them using Batoccera. We will also show you how to refresh Batocera to load in these new games.
Copying your Games over using SAMBA
25. The final thing you will want to do is copy any of your games to your Raspberry Pi so you can play them within Batocera.
The easiest way to do this, and the method we will be showing you is to use the SAMBA share that Batocera automatically set up on your Raspberry Pi when you installed it.
The steps we are showing here are for Windows systems, but they should work on most other operating systems with slight changes.
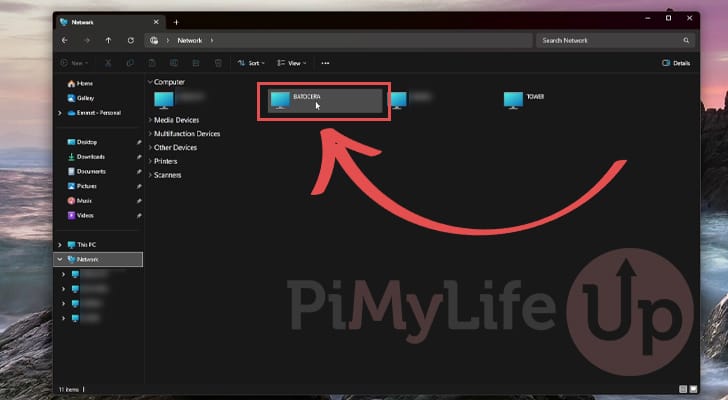
To begin this process, open File Explorer on your Windows PC and change it to the Network screen.
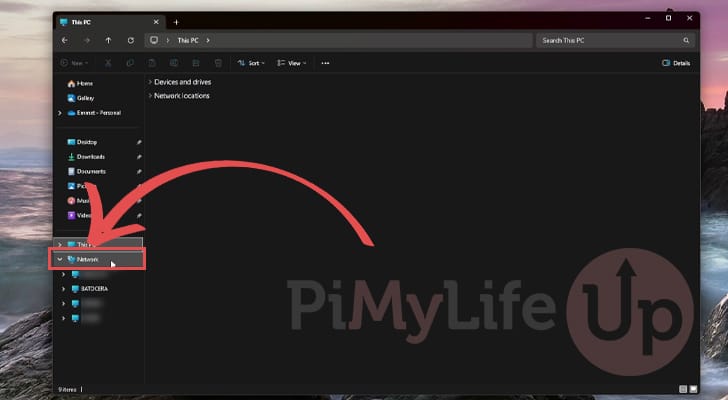
26. Once you have changed to the Network screen, you should see an entry labeled “Batocera“. Double c;ocl that option to open up the Batocera network share.
If, for some reason, you don’t see Batocera listed, try double-clicking the address bar and typing in “\\<IPADDRESS>\“. Ensure you replace “<IPADDRESS>” with the IP of your Raspberry Pi.
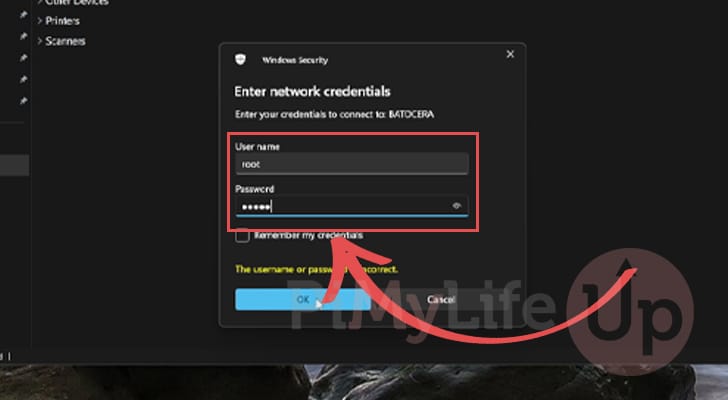
27. You will now be prompted to enter network credentials to access the network shares that have been set up on your Raspberry Pi using Batocera.
The default login details used by Batocera is “root” for the username and “linux” for the password.
28. Once you have connected to the Batocera Samba shares, change to the “Share” folder on which you will find a list of different folders.
The two ones you will be interested in here are the “bios” and “roms” options.
- bios: The BIOS folder is where you will copy over any BIOS files for the systems that require it. While most systems can work fine without these files, some, like PlayStation, do require it to emulate games properly.
- roms: Within this folder is where you will copy over all of your games. Your games must be copied into the folders here that correspond to the system for which your game is for.
For example, PlayStation 1 games would go within the “psx” folder.

Reloading the Batocera Interface
29. Once you have copied all of your games to your Raspberry Pi, you must refresh Batocera’s game list to see them.
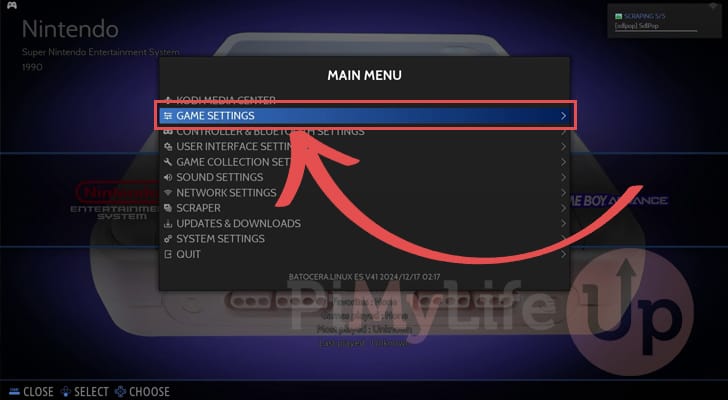
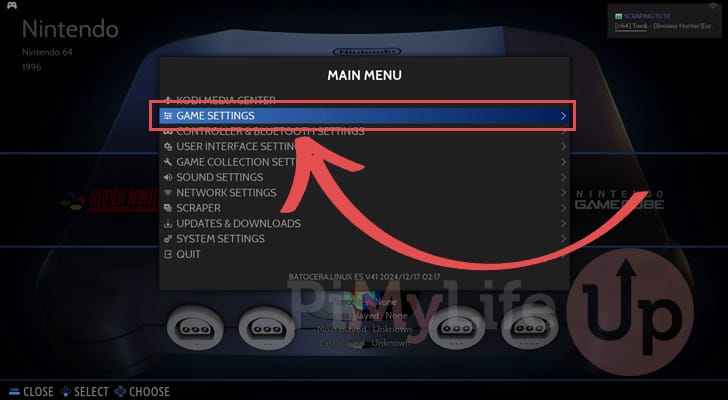
To do this, you will need to open the main menu by pressing START on your controller or by pressing the ESC key on your keyboard.
You will then want to select the “GAME SETTINGS” option.
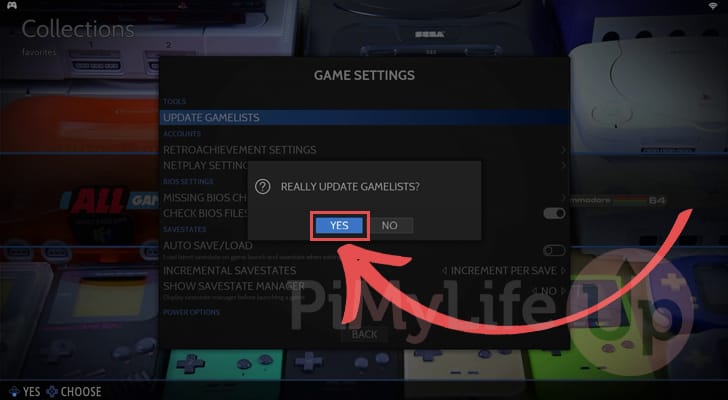
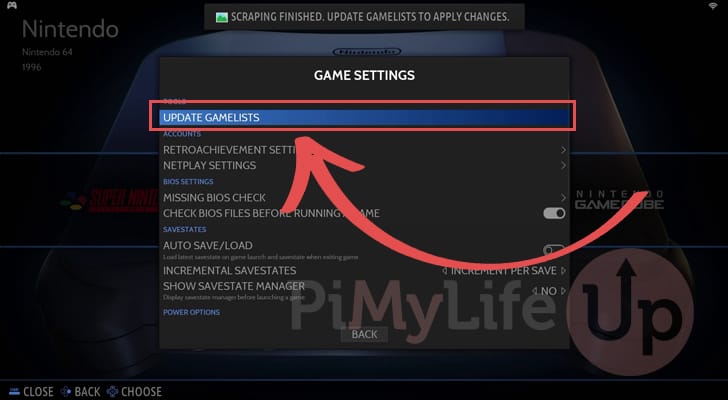
30. Within this screen, you will want to find and select the option labeled “UPDATE GAMELISTS“.
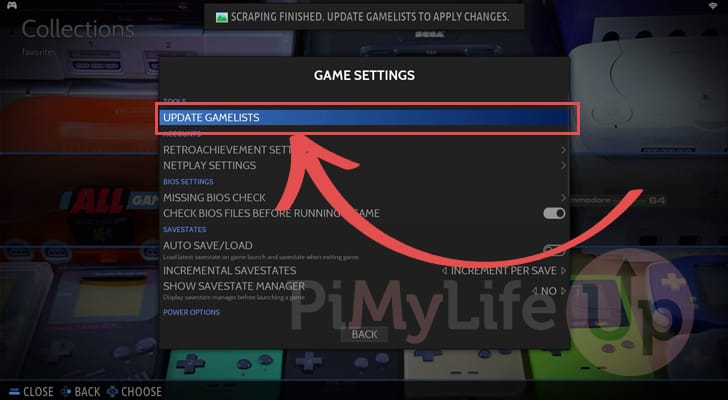
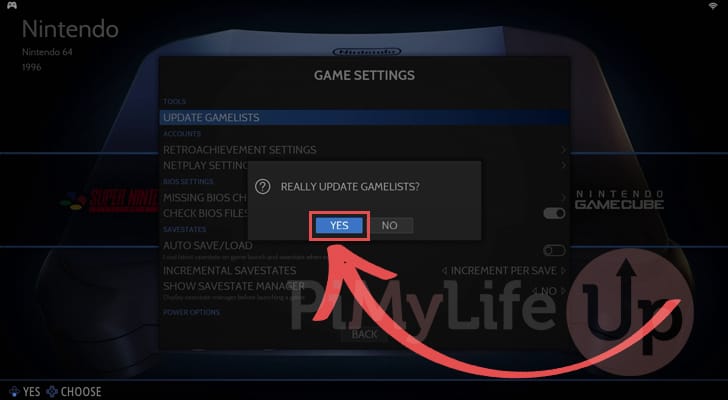
31. You will now be asked if you really want to update the game lists. As this is the only way Batocera will read in the games we just copied over, you will want to select the “YES” option.
Updating the Batocera Game Metadata
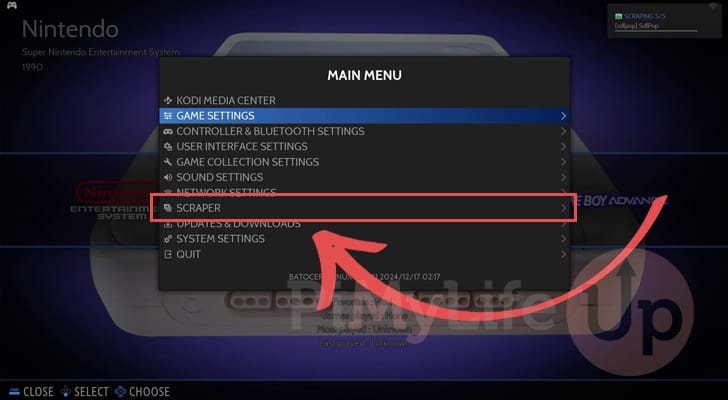
32. Once Batocera finishes restarting on your Raspberry Pi, you will now want to use its scraper so that it retrieves additional information about your games.
Open the main menu again, but this time, select the “SCRAPER” option.
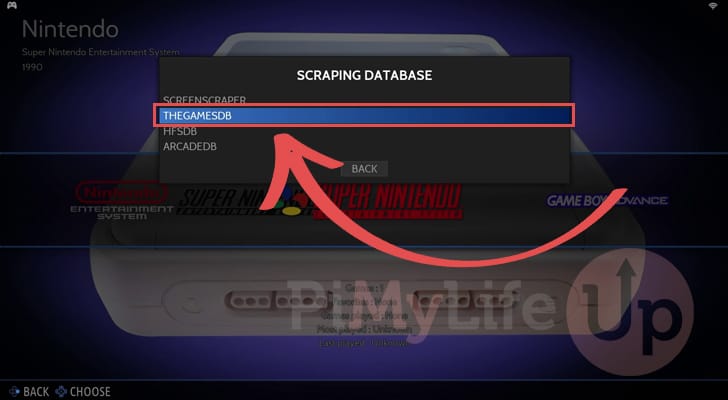
33. The default game scraper used by Batocera requires you to sign up for an account. If you already have a Screenscraper account, select the “SCRAPER SETTINGS” option and fill in your details.
Alternatively, you can use a different but not as good scraper that doesn’t require you to login. To change this, select the “SCRAPE FROM” setting.

34. Now on this page, you will want to select the option labeled “THEGAMEDB“.
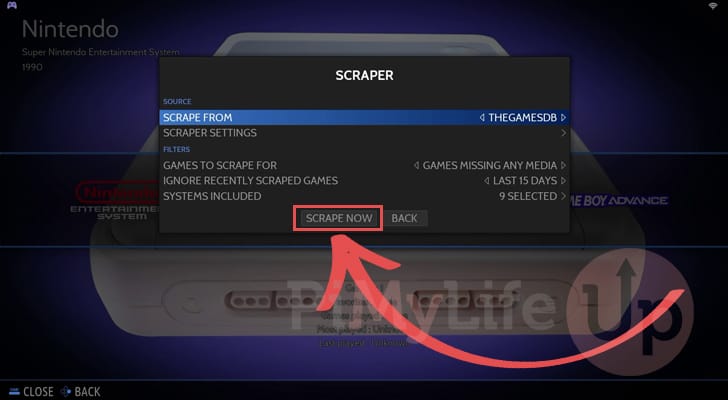
35. At this point, all you need to do to get Batocera to scan in metadata for all of your new games is to select the “SCRAPE NOW” button.
36. Once scraping is complete, you must refresh the game list again so that the Batocera interface will read in the metadata.
Back on the main menu screen, change to the “GAME SETTINGS” page.
37. Now select the “UPDATE GAMELISTS” option again.
38. When prompted if you really want to update the game lists, select “YES“.
Batocera will immediately restart itself and load all of your game data, including the newly fetched metadata.
Finished Setting up Batocera on the Raspberry Pi
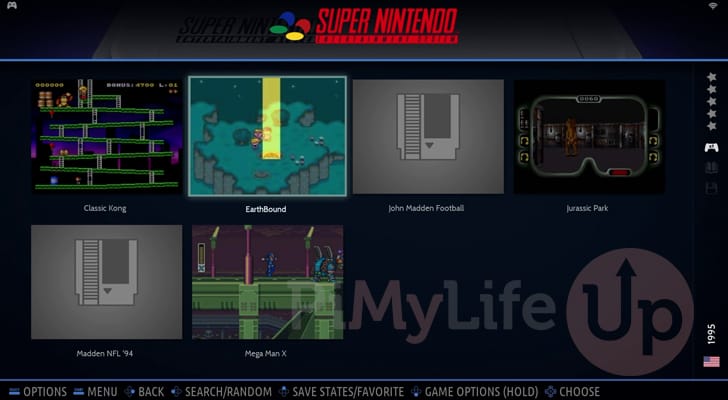
39. At this point, you have successfully finished setting up Batocera on your Raspberry Pi. You can now begin to play any of the games you have copied over using your controller or mouse and keyboard.
Conclusion
Hopefully, at this point in the guide, you will have successfully managed to get Batocera up and running on your Raspberry Pi.
Batocera is one of the best distributions that you can use to turn your Pi into a retro gaming machine. It is very well supported by the development team and has continually been optimized to work on all available Raspberry Pi’s.
Please feel free to post a comment below if you have had any issues with getting this gaming distribution running.
If you liked this guide, be sure to check out our many other Raspberry Pi projects.