This tutorial will show you how easy it is to install Nginx on an Ubuntu system.
Nginx is one of the most used web servers in the world. It has become the backbone for some of the biggest websites in the world, including Netflix, WordPress.org, and more. In fact, we even use Nginx to run our own website.
Nginx has proven itself to be one of the fastest and most lightweight web servers. This performance is partially thanks to their asynchronous event-driven approach to handling requests. This differs from Apache’s older behavior which used threads to handle requests.
In addition to acting as a web server, it can also work as a reverse proxy, load balancer, mail proxy, or even an HTTP cache. However, we will only be touching on using Nginx as a web server.
Within this guide, we will be showing you how to set up Nginx on your Ubuntu server. You will also see how to configure an Nginx server block for your website.
As Nginx is available as a part of the Ubuntu package repository, this tutorial should work on almost all versions of Ubuntu, including Ubuntu 20.04 and Ubuntu 18.04.
Installing Nginx on Ubuntu
Installing Nginx on Ubuntu is a straightforward process, thanks to it being available through the Ubuntu package repository.
This means that we can use the apt package manager to install Nginx with a single command. Of course, the only downside of this is that older versions of Ubuntu may potentially use outdated versions of Ubuntu.
1. Before we install a package using apt, we should update the package index.
If you don’t update the package index, apt could either download an old version or attempt to download from a mirror that’s not currently available.
Perform an update of your local package index by running the command below on your Ubuntu device.
sudo apt updateCopy2. Once the update completes, you can safely install Nginx to Ubuntu.
Installing Nginx is as simple as running the following command on your system.
sudo apt install nginxCopy3. Once the install process finishes, Ubuntu will automatically start up the Nginx web server.
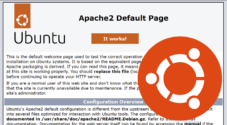
If you go and visit your server’s IP address, you will be greeted with the Nginx default webpage. This indicates to you that Nginx is now successfully running on your Ubuntu system.
If you can’t access your Ubuntu Nginx installation, then the chances are you have set up a firewall on the device that is blocking the connections.
In fact, if you don’t have a firewall set up on your Ubuntu server, it is definitely something you should look into. It is one of the best ways of helping secure your device from outside attacks.
Allowing Nginx Through the Ubuntu Firewall
Ubuntu comes with an inbuilt firewall called UFW. UFW is a incredibly simple to configure firewall and something you should be utilizing to help secure your Ubuntu device.
Within this section, we will touch on how to allow Nginx through UFW so you can access it outside of your server.
If you have never used UFW before, be sure to check out our guide on configuring firewall rules for UFW.
1. One of the benefits of using UFW is that apps can register their own profiles for UFW.
These profiles provide a list of the ports and protocols that the application needs to operate.
Nginx, in particular, provides us with three different profiles that we can use to easily whitelist it on UFW.
- Nginx Full: Using this profile will allow access through both port 80 and port 443.
This profile is equivalent to using both of the following ports. Typically you should only ever enable what you plan on using. - Nginx HTTP: The Nginx HTTP profile allows access only through the standard HTTP port.
The default port for HTTP connections is port 80. HTTP is used for unencrypted web traffic. - Nginx HTTPS: The last profile allows you to whitelist the default HTTPS port easily.
This port is 443 and is used to handle encrypted web traffic to Nginx.
In most cases, you will end up wanting to enable both the HTTP and HTTPS port, even if you only want to use encrypted web traffic.
The reason for this is that you will write your Nginx file to redirect anyone who hits the HTTP point for your website to HTTPS.
2. As this guide will only be touching on creating the most basic Nginx block, you will only need to enable HTTP support.
You can allow HTTP access through UFW by using “ufw allow” followed by the profile name, “Nginx HTTP“.
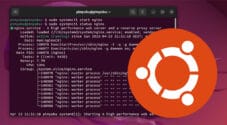
sudo ufw allow "Nginx HTTP"Copy3. You can verify that the Nginx HTTP port has now been allowed on your Ubuntu device by using the following command.
sudo ufw statusCopyFrom the list produced by this command, you should now see “Nginx Http“, indicating that port 80 is now open on your Ubuntu device.
Setting up your First Nginx Server Block
Nginx uses what are called server blocks to help define the configuration details for individual hosts.
Using these server blocks, you can easily host multiple websites on a single server and retain the ability to configure each of these sites exactly how they need to be.
This section will show you how to write your own Nginx block for a specified domain name. Nginx uses a domain name to separate one server block from another.
Creating a Directory for your Web Content
Before you get started, you will need to set up a directory to store all of the content you want to serve through the Nginx web server.
1. If you don’t have a domain name already, you can get one relatively cheaply from a provider such as Namecheap.
Once you have a domain name handy, you will need to configure the domain name to point towards your Ubuntu server’s IP address. You can either use a CNAME or an A Name
2. With a domain name on hand, let us create a directory to store all of the files we plan on serving.
When installing Nginx on Ubuntu, it will automatically serve files out of the “/var/www/html/” directory. Of course, using this isn’t the best when dealing with multiple websites, so instead, we will use a slightly different structure.
We will still be using the “/var/www/” directory but will create a subdirectory for our new server block.
Each new directory will use “DOMAIN_NAME” as its root. Thus, all of the contents for that website are stored within its “html” subdirectory.
You can use the following command on your Ubuntu device to create these directories. We use the “-p” tag so that it will create all necessary parent folders.
sudo mkdir -p /var/www/<strong>DOMAIN_NAME</strong>/htmlCopyMake sure that when you use this command, you replace “DOMAIN_NAME” with the domain name you are using. It will make it easier to identify what files belong within these folders.
For example, if we set this up for our website, we would end up with a folder like below.
/var/www/pimylifeup.com/htmlCopyCreating your first HTML file
Now that we have created a folder to store all of our web content, let us create a little example HTML file for Nginx to serve.
1. We will be using the nano text editor to create this file as we find it to be one of the easiest to use.
By calling this file “index.html“, Nginx will automatically serve this when someone hits your server through your domain name.
sudo nano /var/www/<strong>DOMAIN_NAME</strong>/html/index.htmlCopyEnsure that you replace “DOMAIN_NAME” with the same domain name you used when creating the directory.
2. Now that you should be within the text editor, we can write some basic HTML that will help tell us when we have configured our server block correctly.
<html>
    <head>
        <title>Your Nginx Server Block is working!</title>
    </head>
    <body>
        <h1>Your Nginx Block for <strong>DOMAIN_NAME</strong> is Setup!</h1>
    </body>
</html>Copy
3. Once you have entered the HTML, you can save the file by pressing CTRL+ X, then Y, followed by the ENTER key.
Creating a Server Block for Nginx
Now we finally get to the important bit, and that is creating an Nginx server block. As we briefly touched on earlier, these blocks allow us to configure Nginx for our websites.
1. Let us begin by creating the config file that we will store our Nginx server block. We will be naming this config file after the domain name we are setting it up for.
For Nginx, you should these website configurations within the “/etc/nginx/sites-available” folder.
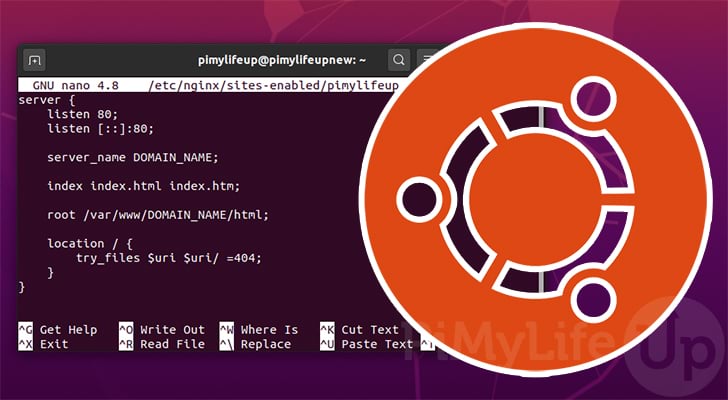
sudo nano /etc/nginx/sites-available/<strong>DOMAIN_NAME</strong>Copy2. Within this file, you will need to enter the following lines.
server {
    listen 80;
    listen [::]:80 ipv6only=on;

    server_name <strong>DOMAIN_NAME</strong>;

    index index.html index.htm;

    root /var/www/<strong>DOMAIN_NAME</strong>/html;

    location / {
        try_files $uri $uri/ =404;
    }
}Copy
These lines set up a basic Nginx server block available through port 80 (http) on IPv4 and Ipv6.
We use the “server_name” variable to define what domain name Nginx should associate with this block. When Nginx receives the specified domain name, it will route it through this configuration file.
The next important part is the “root” variable. This variable allows us to specify where we want Nginx to serve files from. In our case, this will be set to the directory we created earlier in this guide.
The final important part of this file is the “location” block. With this block, we are telling Nginx to use the request to see if a matching file exists within our directory. If the file exists, it will serve it. Otherwise, it will respond with a 404 error.
3. Once done, you can save and quit by pressing CTRL + X, then Y, followed by the ENTER key.
4. Before Nginx will know our new config exists, we need to create a symlink to the file in the “/etc/nginx/sites-enabled/” directory.
Creating a symbolic link and not just storing the config within this folder allows us to disable the config without deleting or moving the configuration itself.
We can create this link by running the following command on your Ubuntu device.
sudo ln -s /etc/nginx/sites-available/<strong>DOMAIN_NAME</strong> /etc/nginx/sites-enabled/CopyUsing “-s” with the ln command, we are telling it to create a symbolic link.
A symbolic link can be thought of as a shortcut to our Nginx server block. Thus, if we delete this link, we won’t delete the actual file.
5. After you make any changes to Nginx’s configuration, you should always perform a test. This test will help you tell if you have made a mistake somewhere and stop you from taking your web server offline.
You can get Nginx to test its configuration by using the following command.
sudo nginx -tCopyBelow is the message you should see if you have configured your new Nginx server block correctly.
nginx: the configuration file /etc/nginx/nginx.conf syntax is ok
nginx: configuration file /etc/nginx/nginx.conf test is successfulCopy
6. Our last step is to restart the Nginx service running on our Ubuntu device.
By restarting Nginx, we ensure that it will read in the server block that we just created.
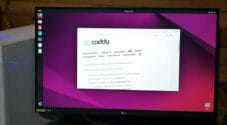
sudo systemctl restart nginxCopy7. If everything has gone correctly, you can now access your website through your specified domain name
If you navigate to your domain name, you should be greeted with a screen as we have below.

Ensure that when you navigate to your domain name, you use the HTTP protocol like so, “http://DOMAIN_NAME“. Setting up HTTPS requires some additional steps that we will go into in another guide.
Important Files and Directories for Nginx
At this point, you should now have a basic idea of how to install and set up a very basic website using Nginx on your Ubuntu device.
To better use Nginx on your Ubuntu system, you should remember a few directories and files. These directories are essential for configuring and running the webserver to its fullest.
/etc/nginx/: This folder is where Nginx keeps all of its configuration files by default.
You can modify the files located within this directory to modify the behavior of your web server./etc/nginx/nginx.conf: This file is the main entry point for Nginx. The web server will begin reading all your settings from this point.
Files such as your website server blocks are typically included from this file./etc/nginx/conf.d/: Any files saved into this directory will be included as a part of the default Nginx configuration.
You can use this directory to modify the behavior of Nginx without having to modify the core configuration files./etc/nginx/sites-available/: This directory is where you should be storing your Nginx server blocks. While these files won’t be loaded by Nginx automatically, you can consider it to be a sort of staging area.
Once you have your server block ready, you need to create a symbolic link from this file to the “/etc/nginx/sites-enabled/” directory./etc/nginx/sites-enabled/: This is one of the last important directories for Nginx regarding its configuration. Any server block saved in here will be included when the webserver is restarted.
As a general rule of thumb, you should store your config files in the “/etc/nginx/sites-available/” directory and create a symbolic link to it within this directory.
You can easily disable a website by deleting the symbolic link and not the actual configuration file.
/var/log/nginx/: This directory is the default place you will find all of the log files for Nginx on Ubuntu.
It is possible to change the location of these log files within a server block. You can even choose a custom name so that logs are separated for each website you are running./var/log/nginx/error.log: If you run into any errors with your Ubuntu Nginx installation, this is the first place you should check. An error that occurs will be logged to this file. This will include both Nginx and PHP errors./var/log/nginx/access.log: When a user is delivered content from your Nginx web server, it will create an entry in this file.
By default, each entry in this log will notify you of the path that the user tried to access, their IP address, and a wealth of other information. It is possible to modify what is logged both in the main Nginx config and within a server block.
Controlling the Nginx Service on Ubuntu
The last thing we will be touching on is how to control the Nginx service on your Ubuntu system.
Knowing how to manage the service can be helpful, especially when you want to take your website offline for some reason or need to restart it to flush the configuration.
Controlling the Nginx service is incredibly simple as we can make use of systemctl.
Starting the Nginx Web Server
To start the Nginx web server, you need to run the following command on your Ubuntu device.
sudo systemctl start nginxCopyIf the service is already running, this command will not do anything.
Stopping Nginx
Stopping Nginx on Ubuntu is as easy as starting it. All we need to do is reference the stop command and the nginx service name.
sudo systemctl stop nginxCopyLike with starting Nginx, if Nginx has already been stopped, then this command will do nothing.
Restarting the Nginx Service
Restarting Nginx can be useful when experiencing issues or having made configuration changes that aren’t taking effect on a reload.
sudo systemctl restart nginxCopyThis process is the rough equivalent to stopping the service then starting it back up immediately.
Making Nginx Reload its Configuration
Nginx can reload its configuration files without having to completely shut down. Forcing a reload rather than a restart allows the webserver to maintain its current connections.
sudo systemctl reload nginxCopyPlease make sure to test your Nginx files using the -t option. If an invalid configuration is loaded during the reload process, it will take Nginx offline.
Disabling the Nginx Web Server on Ubuntu
When you install Nginx on your Ubuntu system, it will be automatically configured to start up at boot. If you would rather this does not happen, you can use systemctl to disable the service.
sudo systemctl disable nginxCopyWith the Nginx service disabled, it is still possible to manually start and stop it. The only difference is that it will not be automatically started and managed by the system service manager.
Enabling the Nginx Service
If you have disabled the Nginx web server, it is possible to re-enable it with the following simple command.
sudo systemctl reload nginxCopyOnce you have enabled the Nginx service, it will automatically start up when your Ubuntu server boots. Additionally, if the Nginx service dies for any reason, it will attempt to restart it.
Conclusion
Hopefully, by now, you will understand how you can install and configure the Nginx web server on your Ubuntu device.
We touched on a few subjects throughout this guide, starting with installing the webserver. You also should know how you can create and set up your own Nginx server block.
Server blocks are a crucial component of Nginx and are what help separates multiple websites. It can also be used to configure Nginx differently for each of your sites.
If you have had any issues with getting Nginx up and running on your Ubuntu device, feel free to leave a comment below.
Be sure to check out some of our other Ubuntu tutorials, such as configuring a static IP address or using unattended-upgrades.