This Raspberry Pi Alexa tutorial will show you how to build and set up a fully functional personal assistant that uses your Raspberry Pi and the Alexa Voice service to respond to your voice commands.
The only negative to making your Alexa powered device is that it cannot access music services such as Pandora or Spotify.
This Raspberry Pi Alexa however, does come with all the other bells and whistles of Amazon’s very own Echo device as it utilizes the Alexa Voice Service. By default, it will have always listening, so you can talk to your Alexa by simply saying its name.
That means you have access to Alexa, Amazon’s own virtual assistant, something that is much like Microsoft’s Cortana, Apple’s Siri and Google Now.
Utilizing the Alexa Voice Service gives you the ability to do numerous different things such as unit conversions and checking sports scores just by using your voice.
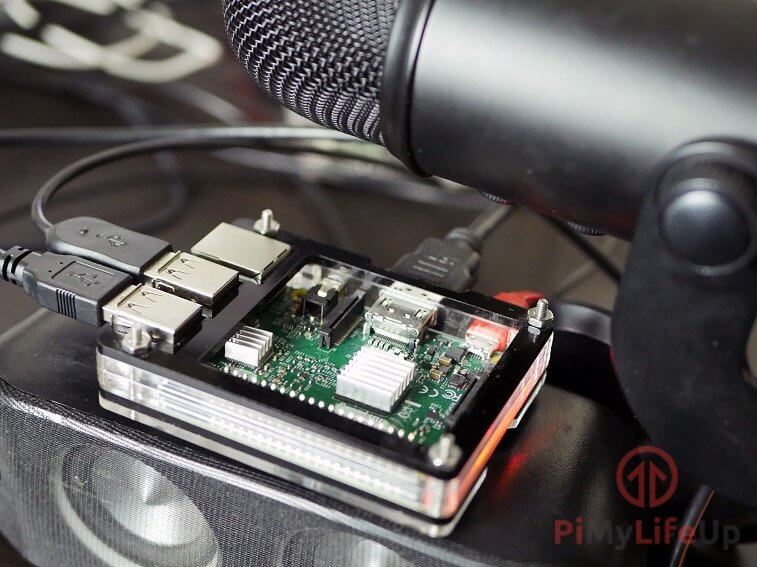
All you need to build your own Alexa powered personal assistant is a Raspberry Pi with a USB Microphone and speakers.
Equipment List
Below are all the bits and pieces that I used for this build your own Raspberry Pi Alexa tutorial, you will need a microphone and speakers handy to be able to set this up.
Recommended
- Raspberry Pi Amazon
- Micro SD Card Amazon
- Power Supply Amazon
- Network Connection Amazon
- USB Microphone Amazon
- Speakers Amazon
Optional
- Raspberry Pi Case Amazon
Registering an Alexa Voice Service Product
1. Before we get started with setting up the Raspberry Pi, we will first have to create our own Amazon Developer Account.
We can do this by going to Amazon developer web page and following the prompts. We won’t go through the exact steps to set up your account as it is self-explanatory.
Once you have created your account and logged in, we can then proceed with setting up everything we need for our Raspberry Pi Amazon Echo.
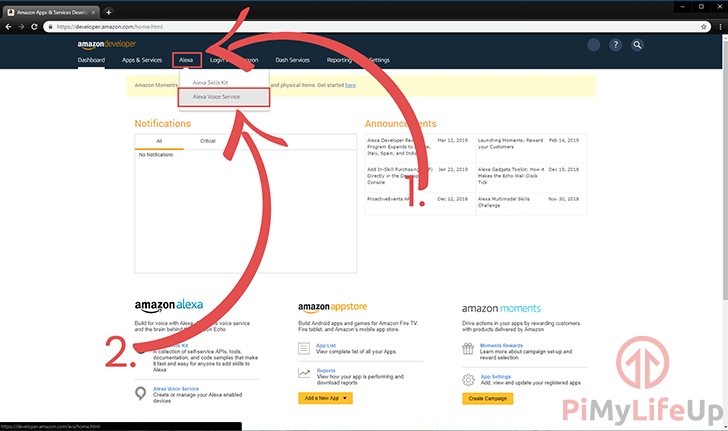
Upon logging in you will be greeted with the following screen, hover over the “Alexa” (1.) tab and select “Alexa Voice Service” (2.).
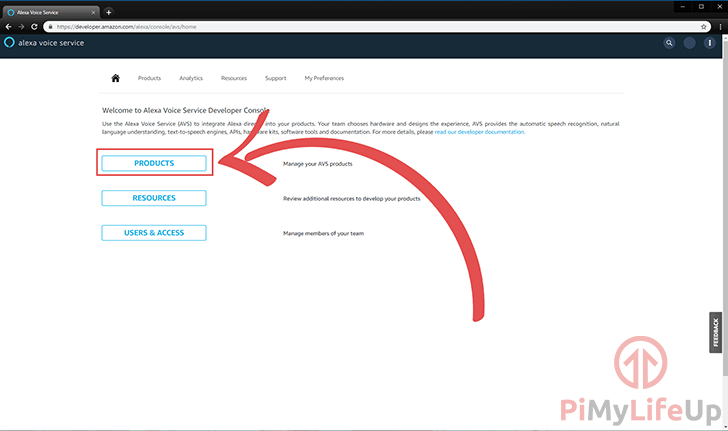
2. On this next screen, click Products. This screen is the area that will allow us to set up access for our Raspberry Pi to connect to the Alexa voice service.
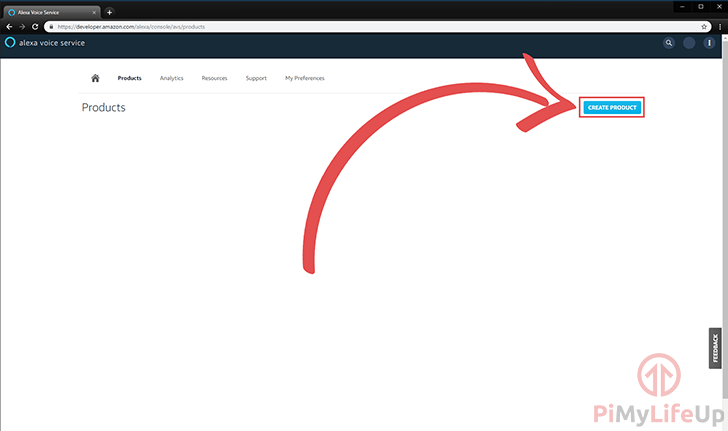
3. Now click “Create Product” to proceed on with the process of setting up a “product” for your Pi.
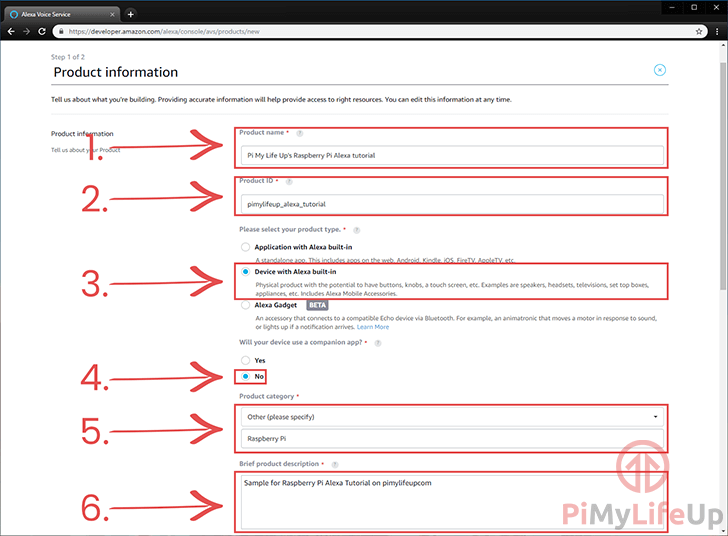
4. On this screen, there are a few things that you will have to set before you can proceed.
(1.) Product name is displayed to users in the “Alexa App“, set this to something simple but identifiable.
(2.) Product ID is used for the authorization process. The ID must only contain letters, numbers ,and underscores. For our example, we set this to “pimylifeup_alexa_tutorial“.
(3.) Make sure that you set the “Product Type” to “Device with Alexa built-in“.
(4.) Unless you intend on creating your own companion app, set this to “No“.
(5.) Now for “Product Category“, we set this to “Other (Please Specify)” with the specified category being “Raspberry Pi“.
(6.) Finally, you can write a short description of the device. This setting is purely for the AVS service.
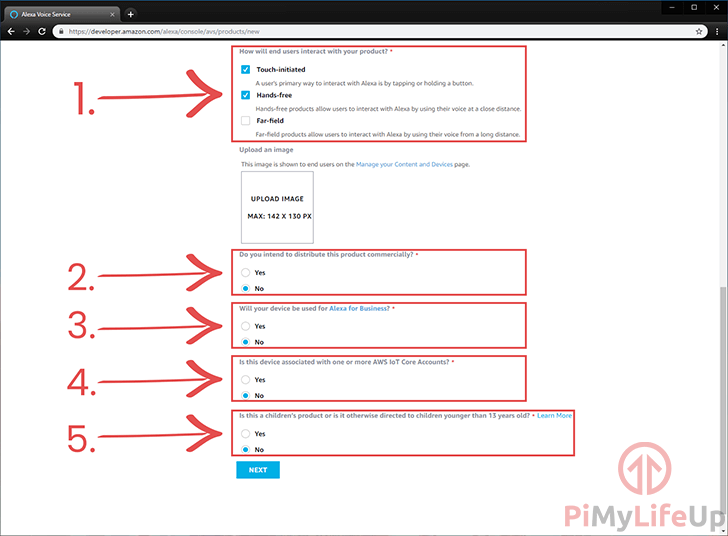
5. Continuing from the previous step, there are several more options that we still have to set on this page before being able to proceed.
Most of these options are for you to indicate how you intend on using the Alexa Voice Service to Amazon.
Below is a quick run through of each of these remaining options.
(1.) Here you can set the way that you intend on people interacting with your Raspberry Pi Alexa device.
In our guide, we are setting this to both “Touch-initiated” and “Hands-free” so that you can trigger it by either pressing a button or speaking to the device.
(2.) Unless you intend on distributing your Raspberry Pi Alexa commercially set this option to “No“.
(3.) For this option select “No” unless you intend on utilizing the “Alexa for Business” service.
(4.) Select “No” for this option, unless you happen to have the device also associated with AWS IoT Core accounts.
(5.) Now for the final option, make sure that you select “No” to this option as it is not intended purely for people under the age of 13.
6. Once you have filled in all the required options, you can proceed on with the setup process by clicking the “Next” button that is displayed at the bottom of the page.
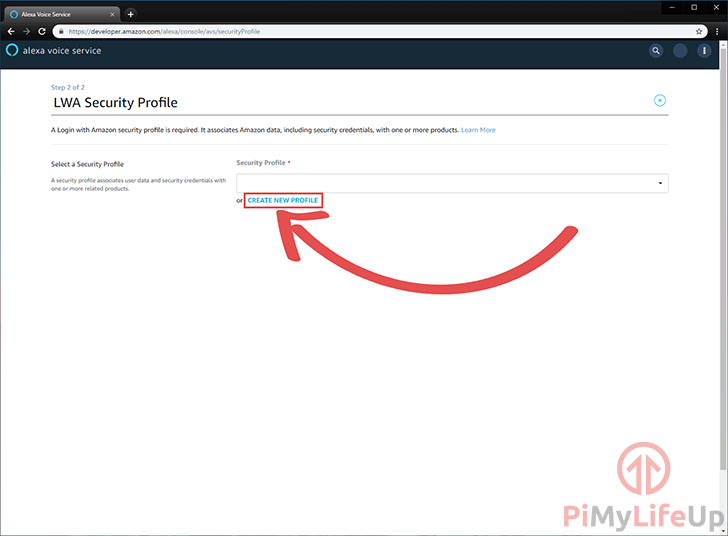
7. You will now be prompted to set up a Login with Amazon (LWA) Security Profile.
As we don’t already have a profile, we will have to create one by clicking the “CREATE NEW PROFILE” link as shown below.
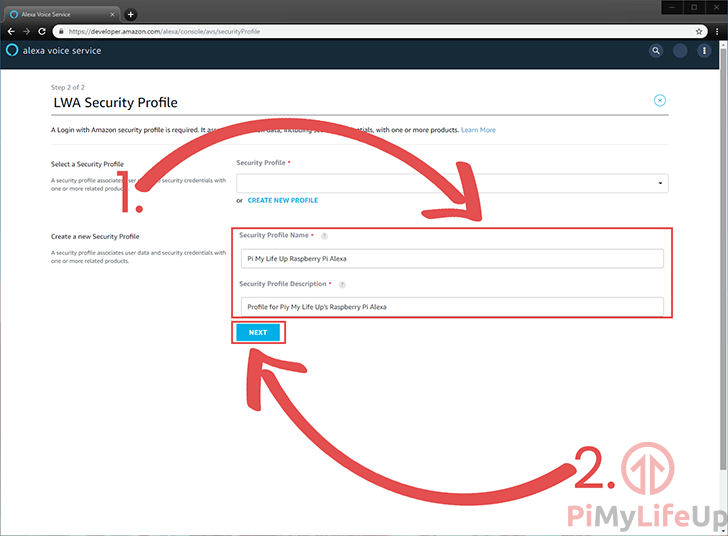
8. Now in the text boxes enter a name for this security profile and a short description (1.). We kept these as simple descriptors for what we intend on utilizing it for.
For our tutorial, we set the “Profile Name” to “Pi My Life Up Raspberry Pi Alexa” and set the “Profile Description” to “Profile for Pi My Life Up’s Raspberry Pi Alexa“.
The “Security Profile Name” field makes it easy to identify the security profile and what it is being utilized for. The “Security Profile Description” field is meant to explain what the profile is for.
Once you have set both fields, click the “NEXT” button (2.) to proceed.
9. With the “Login with Amazon” security profile created we can proceed to generating the required ID information so that we can make a connection to the Alexa Voice Service from our Raspberry Pi.
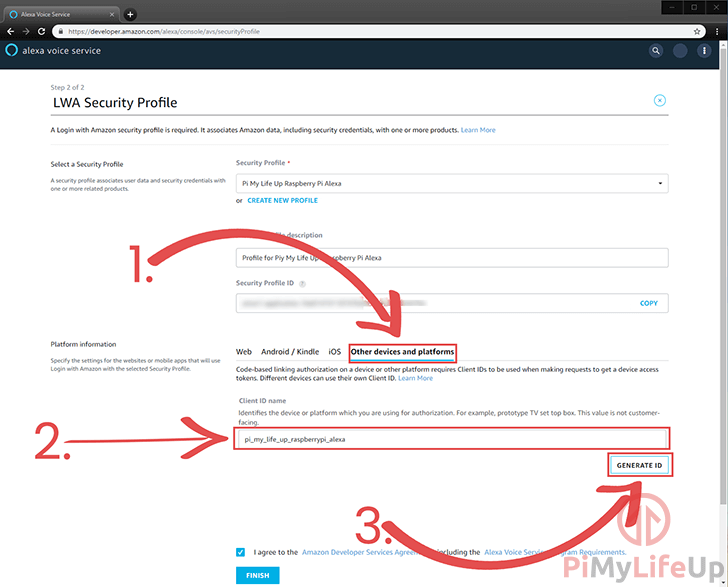
First, switch to the “Other devices and platforms” tab (1.) within the “Platform Information” section.
This section will allow us to generate the relevant data that we require to make a connection to the Alexa Voice Service.
Now we need to set a “Client ID name” (2.) before we can generate the actual ID and authorization data.
The client ID is used for identifying and authorizing your Raspberry Pi to connect to Alexa. This value is not shown to the end user and is purely for authorization.
For our guide, we set the client ID to “pi_my_life_up_raspberrypi_alexa” as it represents both the device and what we intend on utilizing it for.
Once you have set a client ID click the “GENERATE ID” button (3.).
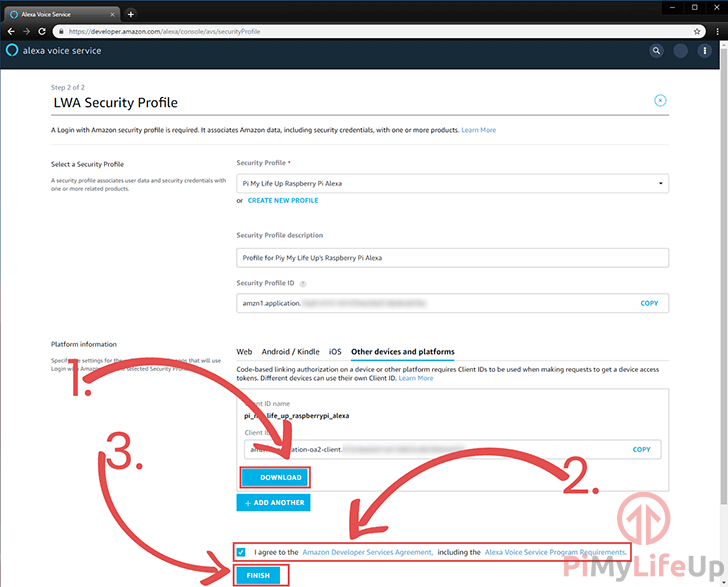
10. With the Client ID generated go ahead and click the “DOWNLOAD” (1.) button.
Make sure that you save the file somewhere that’s easily accessible as we will need to grab the contents of this file later on in the tutorial.
Now click the checkbox next to the “I agree” (2.) to the terms and conditions text.
Once you have downloaded the Client ID files go ahead and click the “FINISH” (3.) button.
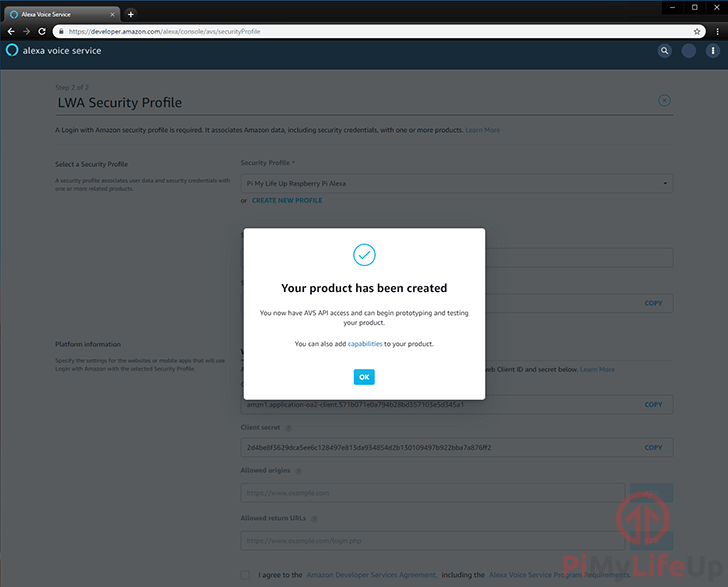
11. You have now successfully created your product allowing you to access the AWS API.
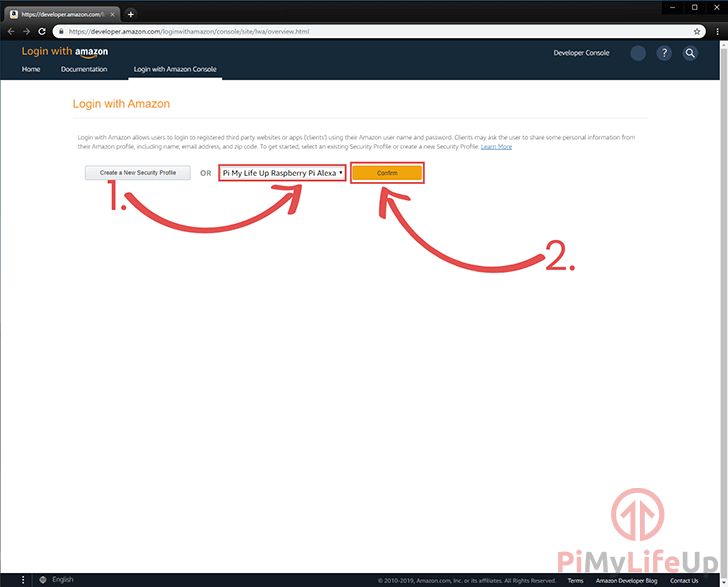
12. Before we can set up Alexa on our Raspberry Pi, we must enable the security profile that we just created.
To do this, you will need to go to the “Login With Amazon” homepage.
13. On this screen, you need to select the LWA Security profile that we created in previous steps (1.)
Once selected, click the “Confirm” (2.) button.
14. Here you are required to set the “Consent Privacy Notice URL” (1.). If you are only using this for personal use, you can set this to a fake URL to proceed.
For our tutorial, we just set the consent URL to “http://example.com” as we do not plan on this to be a publicly accessible profile.
Once you have set a Consent Privacy Notice URL, click the “Save” (2.) button.

Setting up Alexa on the Raspberry Pi
1. Before we proceed to install Alexa to the Raspberry Pi, let’s first ensure that we are running the latest available software.
You can achieve this by running the commands below on your Raspberry Pi.
sudo apt update
sudo apt upgrade
2. Before we can start the setup process, we will need to install some packages for the Alexa installer to work correctly.
For some reason, these packages aren’t installed during the standard setup process, and you will run into errors without them.
Install these additional packages by running the command below.
sudo apt install libcurl4-openssl-dev gstreamer1.0-alsa gstreamer1.0-tools gstreamer1.0-plugins-ugly3. Now let’s download all the installation and configuration scripts that we require from the alexa-device-sdk GitHub.
These scripts will setup and configure Alexa on your Raspberry Pi and handle most of the grunt work of setting up the Alexa software.
Download all three scripts by running the following three wget commands.
wget https://raw.githubusercontent.com/alexa/avs-device-sdk/master/tools/Install/setup.sh
wget https://raw.githubusercontent.com/alexa/avs-device-sdk/master/tools/Install/genConfig.sh
wget https://raw.githubusercontent.com/alexa/avs-device-sdk/master/tools/Install/pi.sh
4. With all the scripts now available to us we will now want to move the “config.json” file that we downloaded earlier to the right location.
If you downloaded the file on your Raspberry Pi, then you can move it to the “/home/pi” location and skip to step 5.
Otherwise, you can create a new file by running the following nano command.
nano ~/config.json5. Now copy and paste the contents of the “config.json” file you downloaded earlier to this file.
The contents should end up being 6 lines long as we have shown in our example below.
{
 "deviceInfo": {
  "clientId": "amzn1.application-oa2-client.xxxxxxxxxxxxxxxxxxxxxxxxxxxxxxxx",
  "productId": "pimylifeup_alexa_tutorial"
 }
}
Once you have entered the correct data, go ahead and save the file by pressing CTRL + X then Y and finally ENTER.
6. Now we can go ahead and run the “setup.sh” script by running the command below.
This script will install all the necessary information and prepare Alexa on your Raspberry Pi.
bash setup.sh config.json7. Before the setup process can start, you will be asked about whether you agree to various terms and agreements as the Alexa Device SDK relies on multiple third-party repositories.
We have included an example of what this message should look like below.
To proceed with the installation process, you will need to type in “AGREE” and press ENTER to continue.
If for some reason you do not agree with the terms you can enter “QUIT” but the software will not be installed and setup.
#############################################################################
#############################################################################


AVS Device SDK Raspberry pi Script - Terms and Agreements


The AVS Device SDK is dependent on several third-party libraries, environments,
and/or other software packages that are installed using this script from
third-party sources ("External Dependencies").


These are terms and conditions associated with the External Dependencies
(available at https://github.com/alexa/avs-device-sdk/wiki/Dependencies) that
you need to agree to abide by if you choose to install the External Dependencies.

If you do not agree with every term and condition associated with the External
Dependencies, enter "QUIT" in the command line when prompted by the installer.

Else enter "AGREE".


#############################################################################
#############################################################################
Please note that the setup process can take some time as there are a fair few packages that will be installed and several that will need to be automatically compiled from scratch.
During the installation process, it will require your input. So keep an eye on its progress from time to time. For example, at one point, you will need to press the ENTER key and then answer “YES” to some additional terms.
Changing the Default Language for Alexa
It is also possible to adjust the default language that your Raspberry Pi Alexa device will use.
If you are fine with the device operating in English, then you are free to skip to the next section.
1. To change the language, we will need to modify the “AlexaClientSDKConfig.json” file that was generated during setup.
We can begin modifying this file by running the following command.
nano /home/pi/build/Integration/AlexaClientSDKConfig.json2. Within this file, you need to search for the following section.
You can use the CTRL + W key combination to search the file.
"deviceSettings":3. Within this section, you should see an option called "defaultLocal".
"defaultLocale":"en-US",To change the default language, we need to change "en-US" to the locale of the language you want to use, below is a list of languages supported by the Alexa SDK.
| Language | Locale |
|---|---|
| English (US Dialect) | en-US |
| English (UK Dialect) | en-GB |
| English (Canadian Dialect) | en-CA |
| English (Australian Dialect) | en-AU |
| English (Indian Dialect) | en-IN |
| French (Canadian Dialect) | fr-CA |
| French (French Dialect) | en-FR |
| Spanish (Spanish Dialect) | en-ES |
| Spanish (Mexican Dialect) | en-MX |
| Spanish (US Dialect) | en-US |
| Japanese (Japanese Dialect) | ja-JP |
| Italian (Italian Dialect) | it-IT |
| Hindi (Indian Dialect) | hi-IN |
| Portugues e(Brazilian Dialect) | pt-BR |
4. As an example, if we wanted to switch the language to Spanish, we would modify the option so that it looks like the following.
"defaultLocale":"es-ES",5. With the default language changed, go ahead and save the file by pressing CTRL + X, then Y, followed by ENTER.
Setting up your Audio for your Raspberry Pi Alexa Device
1. Before we go ahead and run the Alexa software, we must first ensure that our audio is configured correctly.
We must first retrieve the card and device numbers for both our microphone and our audio output.
1a. Run the following command to list all available recording devices. From this command write down the card number and the device number for your microphone.
arecord -l1b. Now run the following command to list all playback devices. Record both the card number and the device number for the device you want to output through.
Note that the Raspberry Pi’s 3.5mm-jack is typically labeled as Analog or bcm2835 ALSA, with the HDMI output being identified as bcm2835 IEC958/HDMI.
aplay -l2. Now that we have all the device and card numbers that we require, we now need to go ahead and create our “.asoundrc” file for the pi user by running the command below.
This “.asoundrc” file is used for the ALSA sound driver to know what devices to utilize.
nano /home/pi/.asoundrc3. In this file, you will need to enter the following lines to configure your audio.
Replace both with their respective values that you retrieved during step 1 of this section.
pcm.!default {
  type asym
  capture.pcm "mic"
  playback.pcm "speaker"
}
pcm.mic {
  type plug
  slave {
    pcm "hw:<card number>,<device number>"
  }
}
pcm.speaker {
  type plug
  slave {
    pcm "hw:<card number>,<device number>"
  }
}
4. Once you are done, you can save the file by pressing CTRL + X then Y and finally ENTER.
Authorizing and Running Alexa on your Raspberry Pi
1. Now with Alexa setup on our Raspberry Pi, we can now proceed to start up the sample Alexa app to get our device authorized.
You need to enter the following command on your Raspberry Pi to start the Alexa sample app.
bash startsample.sh2. The first time you start up the sample Alexa app, you will be greeted with the message shown below.
{xxxx} is a unique code that has been generated to authorize your Raspberry Pi to access the Alexa voice service.
To authorize your Raspberry Pi, go to Amazon Code and follow the prompts to approve your Raspberry Pi’s connection to Alexa.
The Alexa sample app will automatically talk with the Amazon web servers to detect when you have authorized the device.
##################################
#       NOT YET AUTHORIZED       #
##################################

################################################################################################
#       To authorize, browse to: 'https://amazon.com/us/code' and enter the code: {XXXX}       #
################################################################################################
3. Once you see the text below, then you will know that your Raspberry Pi has been successfully authorized to talk with the Alexa Voice Service.
You may have to scroll up through the command line history as the Alexa software will produce a fair amount of output once it has been marked as authorized.
###########################
#       Authorized!       #
###########################
4. There are various ways you can interact with the Alexa sample software. The easiest way of interacting with it is to say “Alexa” followed by your prompt to the Alexa Voice Service.
Alternatively, you can also enter “t” into the command line to skip the process of having to say “Alexa” out loud.
If you want you can use “h” which will simulate holding a button down. Using “h” will make the Alexa sample software continually listen until you enter “h” into the command line again.
If everything is working as it should, you will get a response streamed from the Alexa Voice Service to your Raspberry Pi. This response will be played back through the audio device you configured earlier.
Getting your Raspberry Pi Alexa Device to Start on Boot
1. To get the Alexa software to startup at boot on our Raspberry Pi ,we will have to first make some modifications to the “SampleApp” code.
By default the code is designed to wait on input from stdin, but when stdin isn’t available it will throw errors so we will have to modify the input loop.
Begin modifying the “UserInputManager.cpp” script by running the following command.
sudo nano /home/pi/avs-device-sdk/SampleApp/src/UserInputManager.cpp2. Within this file use nano’s CTRL + W functionality to find the following section of code.
We found it easiest to find it by searching for “m_interactionManager->begin();“
Below that section of code and within the while loop make sure you add the code displayed below. This additional code will sleep the input thread and stop any of the input handling to happen.
Find the following block of code
SampleAppReturnCode UserInputManager::run() {
    bool userTriggeredLogout = false;
    m_interactionManager->begin();
    while (true) {
Add Below
        std::this_thread::sleep_for(std::chrono::hours(1));
        continue;
3. After the changes the code should look like what we have displayed below.
SampleAppReturnCode UserInputManager::run() {
    bool userTriggeredLogout = false;
    m_interactionManager->begin();
    while (true) {
        std::this_thread::sleep_for(std::chrono::hours(1));
        continue;
4. Now save the file by pressing CTRL + X then Y and finally ENTER.
5. As we have now modified one of the scripts we will now need to recompile it.
Don’t worry this will be a fairly quick process as we just need to rerun the setup script from earlier as shown in the following two commands.
cd /home/pi
sudo bash setup.sh config.json
6. Now that we have compiled the Alexa SampleApp we can now proceed on to creating a service file so that we can automatically start our Alexa service at startup.
Let’s create this service file by running the following command.
sudo nano /lib/systemd/system/alexa.service7. Within this service file, you will need to enter the lines shown below.
These lines of text will define how the operating system should handle our service.
It tells the operating system what user will execute the bash script. It also sets that we require the network to be active before initializing Alexa.
[Unit]
Description=Raspberry Pi Alexa
Wants=network-online.target
After=network-online.target

[Service]
Type=simple
ExecStart=/bin/bash /home/pi/startsample.sh
Restart=on-abort
User=pi
Group=pi

[Install]
WantedBy=multi-user.target
Once everything has been entered you can save the file by pressing CTRL + X then Y and finally ENTER.
8. With our Alexa service created we need to enable it before it can load on startup.
To enable the new service will use the systemctl utility. Type in the following command to enable it.
sudo systemctl enable alexa.service9. With the Alexa service now enabled, let’s proceed to start it. Starting the service now will allow us to ensure that everything is working as it should be.
Start the service by running the command below on your Raspberry Pi.
sudo systemctl start alexa.service10. With the service started you should now be able to use the “Alexa” hotword to interact with your Raspberry Pi Alexa device.
If you get no response, you can check the status of the service by running the following command.
sudo systemctl status alexa.serviceImproving your Microphone Gain
1. If your microphone is having trouble picking up your voice, then one solution would be to increase the microphone gain. It is possible to do this by utilizing alsamixer.
To launch alsamixer type the following command into terminal:
alsamixer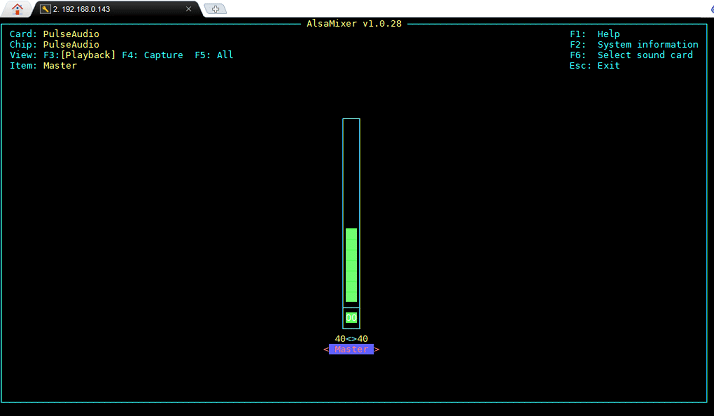
2. Once the AlsaMixer app has loaded up, you can press F6 to select a different USB Device, use the ARROW KEYS to select your microphone and press ENTER.
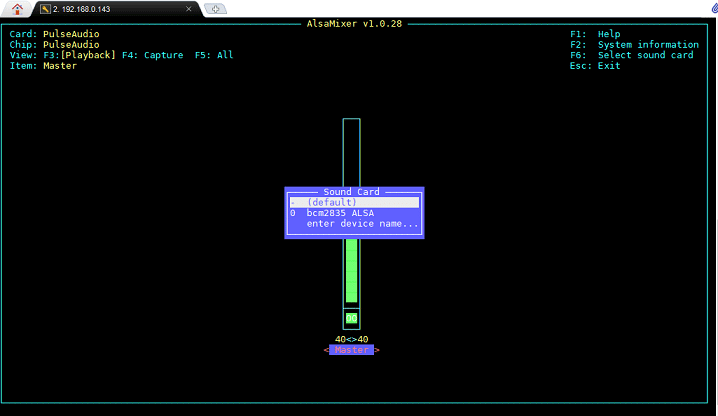
3. With your microphone selected, use the ARROW KEYS to increase the capture volume. Once you are happy with the capture volume, you can press ESC to exit.
4. Now to keep these new setting, we will need to tell alsa to store the new settings and make them permanent. To do this, we can run the following command.
sudo alsactl storeYou should now have a fully operational, build your own, Raspberry Pi Amazon Alexa up and running. If you found this tutorial helpful or you have run into any issues, then feel free to leave a comment below.


Stuck again 🙁 I’m trying to get Alexa to start on boot. so I open the UserInputManager.cpp file and search for m_interactionManager->begin();
The instructions say to look for this code:
void UserInputManager::run() {
if (!m_interactionManager) {
return;
}
m_interactionManager->begin();
while (true) {
But I don’t have that code. The nearest I have is:
SampleAppReturnCode UserInputManager::run() {
bool userTriggeredLogout = false;
m_interactionManager->begin();
while (true) {
Should I add the suggested code below this or is the fact that files have been edited for Buster mean that the code has changed?
Hi Oliver,
Thank you for pointing that out, the code has changed slightly but you are correct that the code snippet should be placed below that
while (true) {loop.We have amended the tutorial to reference the new code and where the snippet should be placed.
Cheers,
Emmet
I think I’ve hit the same problem as Neeraj Jangra. When I run bash startsample.sh it throws up a number of errors and then says Failed to create SampleApplication!
The list is long but reading through it, the relevant lines look to be:
[SNIP]
[ 1] E SQLiteUtils:openSQLiteDatabaseHelperFailed: :Could not open database. :rcode=14, file path=/home/pi/sb/miscDatabase.db, error message=unable to open database file
[ 1] E SQLiteUtils:createSQLiteDatabaseFailed: :Could not create database.
[ 1] E SQLiteDatabase:initialize: :Database could not be created. :file path=/home/pi/db/miscDatabase.db
[SNIP]
The list goes on with the cblAuthDelegate.db etc. It looks like nothing can be created within the db folder (and mine is definitely empty) but all of these are supposed to be created by SampleApp but for some reason aren’t. To the best of my knowledge by db folder has the same permissions as /home/pi/ and home/pi/build all of which these instructions have so far been able to write to.
Hi Oliver,
This does sound like a permission issue, you should be able to solve this by running the commands below.
cd ~sudo chown -R pi:pi .
Hopefully I’ve now corrected the tutorial so that this shouldn’t happen on a fresh run through of the tutorial.
Cheers,
Emmet
Well one step closer but still lots of problems. I did the CHOWN and now the db folder is accessible. Now however when running bash startsample.sh it a huge list is generated and then immediately below where it says NOTIFICATION INDICATOR SATE: OFF are what look like a lot of errors:
[20] 5 TemplateRuntime: addObserverInExecutor Expression ‘alsa_snd_pcm_hw_params_set_period_size_near( pcm, hwParams, &alsaPeriodFrames, &dir )’ failed in ‘src/hostapi/alsa/pa_linux_alsa.c’ line:923
[7] 9 LibCurlHttpContentFethcher:transferThread:numTransfersLeft=1 Expression ‘alsa_snd_pcm_hw_params_set_period_size_near( pcm, hwParams, &alsaPeriodFrames, &dir )’ failed in ‘src/hostapi/alsa/pa_linux_alsa.c’ line:923
Expression ‘paInvalidSampleRate’ failed in ‘src/hostapi/alsa/pa_linux_alsa.c’ line: 2043
Expression ‘paAlsaStreamComponent_InitialConfigure( &self->capture, inParams, self->primeBuffers, hwParamsCapture, &realSr )’ failed in ‘src/hostapi/also/pa_linux_alsa_c’, Line: 2714
Then a load more text followed by Not Yet Authorised and the URL and code but then below that is even more text ending in Failed to create to SampleApplication!
If I go to the URL and add the code the web page says validated but nothing changes and if I rerun startsample it says the same thing, gives a new code but that code is not recognised if I enter it at the URL
Hi Oliver,
Can you make sure the .asoundrc file has been created and that is has the correct ownership. (You can use
ls -lato list out all files in the current directory, including hidden ones)There is also a chance that your microphone might be having issues with Alsa and its failing to get the sample rate that it wants out of it. (Not unheard of, been trying to find a workaround but so far my searches havent turned up much)
May I ask what microphone you are using?
Cheers,
Emmet
Ahh well that was weird, the .asoundrc file was there and had the correct permissions but it looked like the content had either been overwritten or part of it had been deleted/changed. Once I changed it, it started working.
The only query I have is that when I say “Alexa” I see text appear on screen but I don’t hear Alexa say hello or beep or anything but if I ask a question, I do hear Alexa answer. So essentially you don’t know if Alexa has heard you say Alexa until you ask a question. I thought it was supposed to make a sound or something??
I’m only using a cheap mic and USB interface at the moment as I just wanted to see if I could get it working before I spent any real money on proper components (I also want to connect it up to an amp)
Hi Oliver,
Ahhh i thought that may be the issue.
Using my actual Amazon Echo and it doesn’t play any sound to acknowledge that it has in fact heard you. Instead it uses lights to indicate this.
So the behaviour of the sample application is the same as a standard Echo, you could probably modify the code so that it plays a sound relatively easily.
I think Googles might play a sound? but its been awhile since ive used my Google Home so I can’t be certain on that.
Oh cool, we need to look in to purchasing a cheaper microphone to test these projects with to ensure there isn’t any perculiar issues.
Cheers,
Emmet
everything is going good…
but while executing the bash startsample.sh command at last it shows
failed to create sample app.
what is the problem.
Please help me i am so confused about this for more than 1 month.
Hi Neeraj,
There should be errors outputted during the setup process. Without these we won’t have any idea about what could of gone wrong.
Cheers,
Emmet
I’m stuck on editing the .asoundrc file. My USB soundcard is detected as:
card 1: Device [USB PnP Sound Device], device 0: USB Audio [USB Audio]
Subdevices: 1/1
Subdevice #0: subdevice #0
Both as record and play.
I don’t understand what I’m meant to change in the example code of:
[SNIPPED]
Hi,
The example text managed to get broken.
We have updated the tutorial to correct it and it should now be more obvious what numbers are meant to go where.
Cheers,
Emmet
Aha! Thanks for that. That does now make perfect sense.
Only problem now is that I’ve realised that Alexa did not set-up properly. When I run sudo bash setup.sh config.json, I get the message asking me to agree but then after its builds the dependency tree it says:
The following packages have unmet dependencies:
libcurl3-openssl-dev : Conflicts: libssl1.0-dev but 1.0.2q-2 is to be installed
E: Unable to correct problems, you have held broken packages.
As a result there is no startsample.sh file. There seems to be a number of people with the same issue but I can’t find a solution. This is on a Pi4 2GB if that makes any difference.
Hi,
This is a frustrating issue i think thats happened from the move to Debian Buster.
Will hopefully work out a solution for this soon.
Cheers,
Emmet
Hi,
Just thought i would reply to let you know that we have come up with a solution that should get Alexa up and running on Raspberry Pi buster again.
This involved some slight modifications to both the “pi.sh” and “setup.sh” scripts so we have change the tutorial to use our modified versions for the time being.
Basically it involved changing it to use “libssl-dev” instead and in addition run the Python pip command as “pip3”.
We also ran into a linking issue which we also solved and the setup script should now automatically modify the needed file for the setup to proceed succesfully.
If you run into any more issues feel free to let us know.
Cheers,
Emmet
I’m afraid there appear to still be a number of problems. When I run sudo bash setup.sh config.json on your modified files I get these errors:
setup.sh: line 2: $’\r’: command not found
setup.sh: line 17: $’\r’: command not found
setup.sh: line 20: $’\r’: command not found
Line 2, 17, 20 are blank so I added a # to them to see if that made a difference. I kept getting the same error on various lines that were blank all the way down to line 55 (each time I added a # to the ‘offending’ line. I then got this error:
setup.sh: line 58: syntax error near unexpected token ‘$’ {\r’ ‘
Being a total newbie to Pi, Terminal and, well, pretty much everything I don’t know what any of this means.
Hi,
Looks like I made a mistake when I uploaded the files to our CDN and the line endings were incorrect.
I’ve now reuploaded them and the files should be correct now.
Cheers,
Emmet
Do i need Amazon Alexa apps on smartphone to do this project?
Hi Syahmir,
You do not need the Alexa app on your smartphone to create your own Raspberry Pi Alexa device.
Cheers,
Emmet
Just wondering if this method is still working for everyone now that the AVS-sample-app has been put into maintenance mode. Seems it’s been replaced by the avs-device-sdk. Does that matter or do your builds continue to function properly?
Hi Dan,
It doesn’t work for me too. Can’t clone it because it looks like the AVS-sample-app has been down. Really want to try this project. Any hints?
Hi Canhui,
Thank you for leaving a comment here, it looks like Amazon have gone ahead and drastically changed things.
We will work on updating this tutorial as soon as possible, hopefully have it redone within a day.
Cheers,
Emmet
Hi Canhui,
We have now overhauled our Raspberry Pi Alexa tutorial to make use of the latest Alexa SDK so everything should now be working fine.
Cheers,
Emmet
Can I makes this project with respbarry pi zero
I am not aware of any issues that will prevent it from working on the Pi zero.
Great piece of work and the best Alexa setup that I have found. I am scrapping my links to the others as they are just noise.
Based on Stretch I have now built rpi 3 and 2 without any software problems at all…they just run.
The biggest issue I have is getting a decent sound out of the jack..lots of squeals and noise on the device…still I am sure it will be solvable. On headphone, it is fine, so probably an earthing problem.
Hi I was on the step that need to type .automated_install.sh but after I done that it response “command not found” I’m so confused what went wrong? Could you help me with it? Thank you so much
Hey Kate,
Make sure you have a space between the . and automated_install.sh so it should look like
. automated_install.shCheers
Hi Gus thank you! I solved that problem, but a new problem occurred.
After I click okay on the step where you supposed to see the Device Tokens Ready page. I didn’t get the tokens ready page, instead I got ” An error occurred when we tried to process your requested….
I restart again, but still get the same result.
I wonder what went wrong?
Hey Kate,
Sadly im really not sure whats going wrong if you getting those errors, if the issue exists you may have to report this to https://github.com/alexa/alexa-avs-sample-app, as it appears your having issues reaching there website.
Cheers
Works like a charm, loving it!!!!!!! Much more versitaile and much easier than the Raspberry Pi Google Assistant!!!!
Hi Ruben
You apparently managed to make it run
I can also but only via the Java GUI
Cant run ./wakeWordAgent -e kitt_ai
any hint?
Hey Daniel,
What is the error that you are receiving when attempting to run it via the command line?
Cheers
I think part of the code in the alexa_startup.sh file is wrong
Three terminal windows open up and they’re called “NPM” “JVM and “WAKE”, but it doesn’t execute the instruction after that, it just stays as three terminal windows with nothing in them when I boot to the GUI.
I’d love to know how to fix it as each time I turn the RPI on I have to type in all the commands again which I’d rather not have to do
Thanks in advance ??
Hey Joseph,
We just updated the startup script, please let us know if the updated version works.
Cheers
i tried the updated startup script. It seems like it works at first since both NPM and JVM open and load. Once it gets to WAKE, the terminal window opens and remains open with nothing running. I tried using the wake word and no response.
Hi,
Really keen to have a go at this, just wondered if it could be run on Ubunti Mate instead of Raspbian ??
Cheers
Hey Matthew,
We haven’t tested Alexa on Ubuntu Mate, or used Ubuntu mate at all. But it won’t hurt to test it out.
Cheers
How is it possible to registrate the device at amazon by using a pi without GUI (the jave console will not start a browser there :-).
I would like to use my pi without any guy installed
Hey,
Sadly there is no real way to handle it without the GUI at the moment. There was a few forks of the code that attempted it but upon testing them they seemed incredibly unreliable.
Cheers,
Gus
Perfect instructions, walked through it with no issues! Used the wake word, heard the beep and asked (and received) the local weather! Until…until I rebooted. I waited for a few minutes, saw three small terminal windows open (NPM, JVM and WAKE). Minimized them to the panel and tried the Alexa wake word. Nothing. No beep or anything. Ideas?
Everything worked for me, until my reboot. I also see the three terminal windows but nothing works? I would have thought it would show the Alexa Java window, however it does not. I simply have the desktop with the three terminal windows. I have gone through all the last steps repeatedly, but cannot find where I went wrong?
Great article. This worked perfect without a hitch. Looks like I will need a better USB microphone, but aside from that… this is great. Thanks for the post!
What is the required or recommended model of Raspberry Pi used for this project?
Thanks,
Erick
Hi,
Well I can tell you that I have it working (today!) on a Pi 2 Model B. It was a spare that I found useful to experiment on.
Once the system is set so that it boots straight into Alexa, in headless mode, then I shall think about comparing with a real dot for performance comparisons. As it is, the performance is acceptable. With a network/cloud product like this it is hard to say where the performance issues are.
However, once you get to an rpi 3, what you pay is so close to the price of a dot you may as well buy the dot. It is, after all, a finished product.
Of all the instructions on the web, your’s is the best. However, I have a problem. I am running Stretch with a Raspberry Pi 3 B. When I start the Java client, my browser will not open. Alexa Voice Service – v20160207.5 opens. It wants an access token, but since my browser will not open to Amazon, I’m stuck.
I’m thinking it is because of the new os. I bought my pi last week.
Thanks!
Randall Figg, did you ever find a solution? I am facing the same problem (though I don’t even get to the voice service box). Any help would be appreciated.
We have run into the same issue. The browser window will not open but the Alexa Voice Service opens. Anyone resolve this?
Do I need Amazon Alexa for it?
No, you do need an Amazon account though
Hi Gus,
Working great and so easy to do, thank you for this article.
I have two more questions,
When i’m asking alexa to put some music, she answers that Amazon Music is not supported for this device. Is there a work around? and I have to press the “Talk to alexa” button to ask something, it seems that the “Wakeup Word” not working.
Please Advice.
Cheers,
Tomer Klein
Hi Tomer,
You can reinstall “. automated_install.sh” file. This resolved the issue for me.
Thanks
Ambika
Hi,
Great article but i’m having some problems:
1. Please note that Git is not installed by default on Raspbian, I had to install it.
2. The clone command is asking for credentials and then says the the git repo does not exist.
please advice,
Cheers!
Hi Tomer,
1. Git should be installed by default on normal Raspbian, if you’re using Raspbian lite then it’s likely it will need to be installed.
2. Sorry about that, there was a mistake in the spelling, this should be fixed and should now work without any issue.
Ok, I’ll Check it out.
Many thanks!