In this article, we will explore some benchmarks of the Raspberry Pi 5 and compare them against the Pi 4.

A benchmark is one of the easiest ways to quantify the performance of a device like the Raspberry Pi 5. It gives you a number that can easily be reproduced and compared to other hardware.
Throughout this article, we will be running a benchmark on both the CPU and GPU of the Raspberry Pi 5. To give you a good idea of how much the performance has improved, we will also run these same benchmarks on a Raspberry Pi 4.
One thing that became evident while benchmarking the Raspberry Pi 5 is that the team made massive performance improvements. It easily crushes the Raspberry Pi 4 in the same tests, even without adding an active cooler.
If you haven’t already, we highly recommend you check out our Raspberry Pi 5 vs Raspberry Pi 4 comparison guide before continuing. That article will help you understand where the Pi 5 has improved the most.
You can even run these benchmarks yourself if you want to get an idea of how your Raspberry Pi 5 runs and want to compare its numbers to what we got. Just skip down to our “Benchmarking the Raspberry Pi Yourself” to follow the steps we took.
Raspberry Pi 5 CPU Benchmarks
For these benchmarks, we will be using Geekbench 6 on our Raspberry Pi’s. We use Geekbench because its tests are modeled after real-world scenarios. This means we have a single benchmark tool that we can run to test a wide variety of different tasks.
The only drawback of using Geekbench 6 to benchmark the Raspberry Pi 5’s CPU is that it doesn’t support the 16kb page size. To get around this, we must set the Pi 5 to use the same kernel as the Pi 4. The only difference is that the page size is reduced from 16kb to 4kb.
Since the Raspberry Pi 5 runs quite hot we will be running the benchmarks multiple times. One round of benchmarks without any coolers attached, then a second round with the official Raspberry Pi Active cooler installed.
Single Core
The single-core benchmark really shows where the Raspberry Pi 5 truly shines. Here you can see the giant boost in performance the new CPU has brought over the older Pi 4.
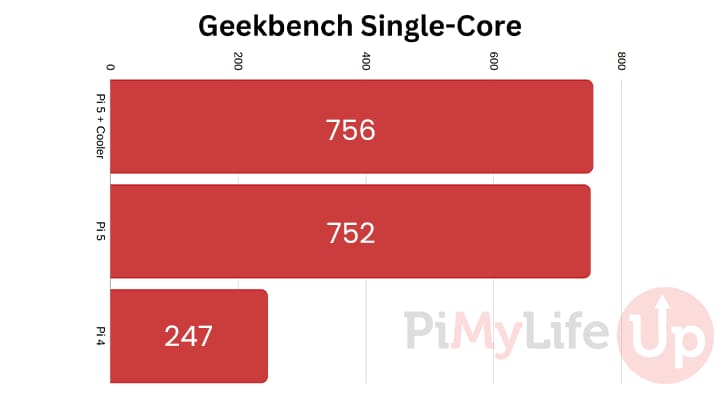
You can also check out our table if you just want to see the raw numbers.
| Single-Core | Geekbench Score |
|---|---|
| Raspberry Pi 5 + Official Active Cooler | 756 |
| Raspberry Pi 5 | 752 |
| Raspberry Pi 4 | 247 |
Multi-Core
The Raspberry Pi 5 CPU Benchmark shows that it also dominates when it comes to multi-core performance. You can roughly expect about two and a half times the performance of the older Pi 4.
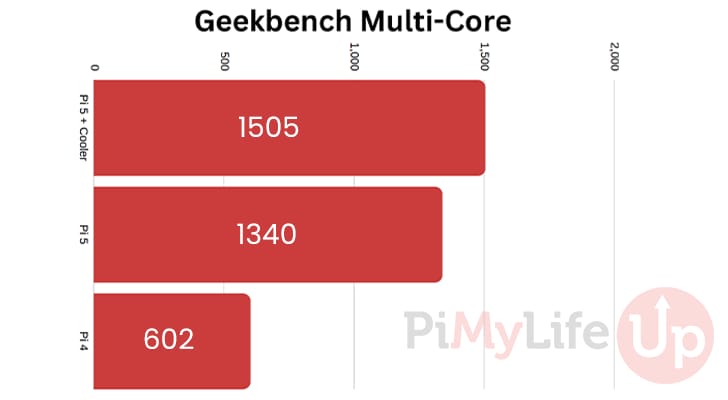
If you prefer, you can also use the table below to look at the raw numbers we got from Geekbench.
| Multi-Core | Geekbench Score |
|---|---|
| Raspberry Pi 5 + Official Active Cooler | 1505 |
| Raspberry Pi 5 | 1340 |
| Raspberry Pi 4 | 602 |
Observations
These benchmark results show that the Raspberry Pi 5 dominates in both single-core and multi-core performance. If you are running any software that benefits from running faster, you will want to invest in a Pi 5.
One of the more interesting things we gathered from our tests is how the active cooler affects performance. If you are dealing with single-core tasks, you won’t see a significant improvement unless you are thrashing the Raspberry Pi.
However, if you use programs that use the full four cores of the Raspberry Pi 5, an active cooler gives you much-improved performance. With the official cooler only costing roughly $5 USD it is worth getting for that extra performance. The active cooler will also allow you to run tasks back-to-back without worrying about throttling.
Raspberry Pi 5 GPU Benchmarks
To benchmark the GPU on the Raspberry Pi 5, we will use a tool called glmark2. This is a free benchmarking tool that tests the OpenGL functionality of a GPU.
This tool works by running through several scenes built to test different parts of a GPU. While this isn’t great for modern desktop GPUs, it is more than enough to benchmark the GPU in our Raspberry Pi 5.
GPU Benchmark Results
These GPU benchmark results have the Raspberry Pi 5 clearly in the lead. If you are doing anything that requires graphics processing, you should use the Pi 5.
Like with the CPU, you should see about a 2.5 times increase in performance.
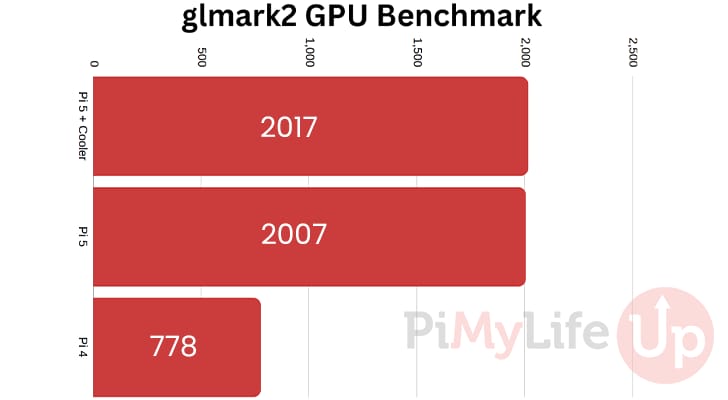
You can use the table below to quickly compare the glmark2 scores we got from running this benchmark.
| GPU Performance | glmark2 Score |
|---|---|
| Raspberry Pi 5 + Official Active Cooler | 2017 |
| Raspberry Pi 5 | 2007 |
| Raspberry Pi 4 | 778 |
Observations
Looking over these results, it makes it super hard to suggest still buying a Raspberry Pi 4. The Pi 5’s GPU scores are such a vast leap ahead that the Raspberry Pi 4 is really left in the dust.
Even better, the Raspberry Pi 5 can produce an impressive score even without an active cooler. It is basically within the margin of error when compared to using the active cooler.
However, one thing is that this test isn’t a sustained one. If your Pi is under constant load, you will see the GPU have to throttle itself. With the price of the official active cooler being extremely affordable, it is worth purchasing if maintaining performance is crucial for you.
Benchmarking the Raspberry Pi Yourself
Knowing the results of our Raspberry Pi 5 benchmark is one thing. But knowing how we got these results is also super important.
This section will walk you through all the steps we took to perform these benchmarks. Before we followed any of these steps, we started with a clean version of Raspberry Pi OS Bookworm 64-bit Desktop edition.
We then strictly followed the following steps to get both Geekbench and Glmark2 onto our device.
Installing the Benchmarking Tools
1. We should ensure the operating system is up-to-date before installing any software.
This ensures that we are running on what should be the most stable base.
sudo apt update
sudo apt upgrade -yCopy
2. Once the Raspberry Pi has been updated, we can install the initial software we need by using the command below.
- wget: We will be using wget to download Geekbench to our Raspberry Pi.
- glmark2-wayland: glmark2 is the software that we will be using to benchmark the Raspberry Pi 5’s GPU.
sudo apt install wget glmark2-waylandCopy3. Our next step is to download Geekbench to our device using the wget package we installed in the previous step.
This process can take a few minutes to complete if you have a slower internet connection. Geekbench is not the smallest benchmarking tool.
wget https://cdn.geekbench.com/Geekbench-6.2.1-LinuxARMPreview.tar.gzCopy4. let us now extract the Geekbench 6 software to our Raspberry Pi by running the following command
tar -xvf ./Geekbench-6.2.1-LinuxARMPreview.tar.gzCopyChanging the Used Kernel for Raspberry Pi 5 Benchmarking
5. Because we are choosing to use Geekbench to benchmark our Raspberry Pi 5 we must change the kernel.
The default kernel the Pi 5 uses a 16kb page size, but the software only supports a smaller 4 kb page size. While this can slightly decrease the performance, it shouldn’t be enough to throw out the results significantly.
To adjust this, we need to edit the “config.txt” file within the boot partition.
nano /boot/config.txtCopy6. To the top of the file add the following line. This line tells your Pi to use “kernel8.ing“. This is the same kernel the Raspberry Pi 4 uses when you are running a 64-bit system.
kernel=kernel8.img7. Now save and quit out of this file by pressing CTRL + X, followed by Y, then pressing the ENTER key.
8. Since changed the kernel we want our Raspberry Pi to use, we must reboot using the command below.
sudo rebootCopyRunning the CPU Benchmark
9. To run the CPU benchmark on our Raspberry Pi 5, we need to change to the directory we extracted Geekbench.
You can change to this directory by using the cd command.
cd ./Geekbench-6.2.1-LinuxARMPreviewCopy10. Once you have changed into the directory, you can start the CPU benchmark by running the command below in the terminal.
Please note that this benchmark can take a few minutes to complete. The slower the processor, the longer it will take to complete.
geekbench6Copy11. After the benchmark has finished, you will see a link that you can follow to see your results.
For example, we were given the following link after using this tool to benchmark our Raspberry Pi 5.
https://browser.geekbench.com/v6/cpu/3496075Running the GPU Benchmark
12. Our next benchmark focuses on testing the GPU of the Raspberry Pi 5. This simple test runs through several scenes to test how the GPU handles them.
You can begin this benchmark by using the following command in the terminal. Please note you must run this benchmark directly on the Raspberry Pi. It will not work when used over SSH.
glmark2-waylandCopy13. glmark2 will now run through several different scenes to benchmark your GPU.

14. Once the GPU benchmark finishes on your Pi, you will be given a score back in the terminal.
Below, you can see how it was displayed to us after running the benchmark on our Pi 4.
===================================================
                            glmark2 score: 778
===================================================
Conclusion
While benchmark tools aren’t a perfect science, you should now have a good idea of how well the Raspberry Pi 5 performs when compared to its predecessor.
We ran these tests twice on the Raspberry Pi 5 to see how better it would perform when used with and without an active cooler.
Please feel free to comment below if you have any questions about our benchmarks of the Raspberry Pi 5.
Now that you have checked out these benchmark results, you should check out our many Raspberry Pi projects.


my pi5 with freenove pc case w/ tower cooler and 3.14ghz stable overclock on piOS:
https://browser.geekbench.com/v6/cpu/16548777
Worth doing updates as just got mine, out the box, and got this:
====================
glmark2 Score: 1155
====================