In this guide, I will take you through the steps of installing pip on a MacOS computer.
If you plan on coding in Python, you may want to install the package manager pip on your Mac computer. You can use pip to install modules and libraries for use within your Python programs. You can also use pip to upgrade and remove existing packages from your installation.
There are plenty of reasons why you should use pip for handling packages. For example, pip makes it easier to track and keep your packages updated. You can also easily remove any unnecessary packages. Pip gives you access to the Python Package Index (PyPi), which contains a vast variety of modules and libraries that you can use in your software project.
This tutorial will take you through several different methods on how you can install the pip package manager on MacOS. We will also quickly show how you upgrade pip on an existing installation.
Depending on your installation, you may need to swap python3 for python in the code segments throughout this page.
Installing pip to a Mac Computer
Before you install pip, you will first need to make sure that you have Python installed on your Mac.
Run the following command in the terminal to check if Python is installed.
python3CopyIf it is installed, you will enter the Python prompt. To exit the prompt, enter exit() into the terminal. If you get an error message saying “command not found“, you will need to install Python.
There are a few different methods that you can use to install pip for Python on MacOS. Some Python environments may already have pip installed, and if so, you can skip these steps.
You can check if pip is installed by running the following command. The -m option lets you specify a module you want to run.
python3 -m pipCopyUsing ensurepip Module
To install the pip software package, you can use a pre-installed Python module called ensurepip.
Within the terminal, run the following command.
python3 -m ensurepip --upgrade
Copy
If you see any errors, double-check that you have Python available on your Mac computer.
Using get-pip.py
You can use the get.pip.py Python script to install the latest version of Pip and any dependencies it requires. You will need to have Python installed for this method to work.
All the following steps are done in the terminal application on your Mac computer.
1. First, you must download the script from the pypa bootstrap website. It is always good practice to check through the script before downloading it to your computer.
wget https://bootstrap.pypa.io/get-pip.pyCopy2. Now, use Python to run the script and install pip to your Mac computer.
python3 get-pip.pyCopyUsing a Zip File
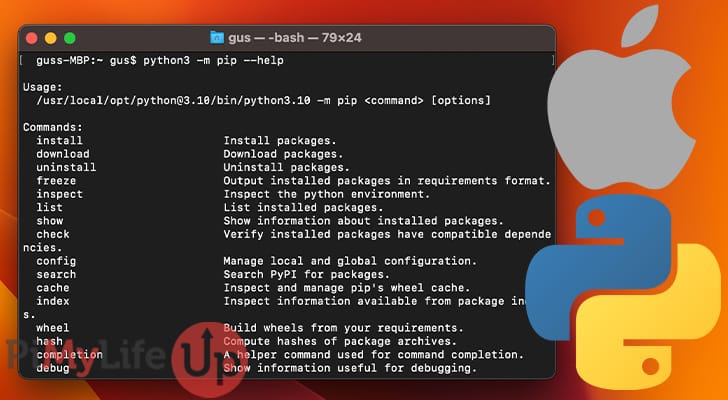
The last method involves using pip via a zip file. This method is the least recommended option but is available if you wish to use it.
1. First, download the standalone Zip application from the pypa website by using the wget command in the terminal of the Mac computer . As with any online script, first, check the script to ensure it is the one you want.
wget https://bootstrap.pypa.io/pip/pip.pyzCopy2. Use Python to run the Zip application. The example below will run the help command for the pip package.
python3 pip.pyz --help
Copy
How to Upgrade pip
You can easily upgrade pip by entering the following command into the terminal.
python -m pip install --upgrade pipCopyConclusion
You should now have pip ready to use in your Python environment on your Mac computer. If you are having issues, you might want to double-check the steps of this tutorial and see if you have missed anything.
With pip available, you can install, update, and uninstall packages from PyPI or other sources. You will find this very useful if you require the use of multiple modules in your coding projects.
If you are new to Python, I recommend checking out our getting started guide for Python. It will be very beneficial if you want to learn some of the basics.
If you have run into any issues or have any feedback, please feel free to leave a comment below.