In this guide, we will show you how to overclock your Raspberry Pi and how to achieve the balance between stability and performance.
There aren’t any real best settings for overclocking your Raspberry Pi, and before we get started, we must warn that overclocking does void the warranty of your Pi. Overclocking can also create various problems with the device, so use it at your own risk.
Most projects don’t require you to overclock your Pi, but it can be beneficial for things such as gaming, servers, and other heavy software packages.
Every Raspberry Pi’s processor has a different upper limit on how far they can be pushed before problems will start occurring.
This difference in limits is due to the way CPU’s are manufactured. CPU’s are fabricated in large wafers.
This wafer contains many CPU’s, not all of them come out the same during this manufacturing process.
Some will be more capable of higher clock rates. Others will be best suited to sit at the default clock rate. The default factory clock rate is the guaranteed performance of the processors that come out of the wafer.
Achieving the Best Overclocking Performance
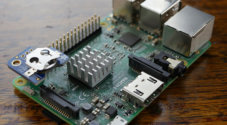
To be able to achieve the best possible overclocking performance for your Raspberry Pi, it is highly recommended to apply a heat sink to the processor.
The need for a heat sink is due to that as you overclock a processor, it drives more power into it, which increases the heat generated by the processor. If this heat isn’t dissipated fast enough, it can cause some severe damage to the processor.
A heat sink works by increasing the total surface area that the heat is transferred to, while also being designed so air can quickly travel between it and cool the heat sink back down.
You must adequately test your overclocking settings to see how far you can push the Raspberry Pi before it starts to hit its limit and freeze. We will go into a method that you can use to see how capable your Raspberry Pi is at overclocking before it will start to fail.
We also highly recommend that you make sure that your power supply is sufficient (5V 2A). You will find most USB chargers don’t provide a stable enough power supply to handle the Raspberry Pi while its overclocked.
Frequency Overclocking Options
arms_freq – This setting dictates the frequency of the ARM processor. The higher the number, the faster it will try to run the processor.
gpu_freq – This sets every GPU related frequency to the same value, so core_freq, h264_freq, isp_freq and v3d_freq will be set to this value.
core_freq – GPU core frequency, and on the Raspberry Pi 1, this has an impact on ARM performance since it drives the L2 cache. This issue is no longer a problem with the Raspberry Pi 2 and later.
h264_freq – The frequency of the hardware video block that renders the h264 codec.
isp_freq – This is the frequency of the image sensor pipeline block GPU. It handles things such as the camera.
v3d_freq – The frequency of the 3D rendering block of the GPU.
sdram_freq – This is the frequency of the SDRAM chip. This setting controls the speed at which the RAM of the Raspberry Pi runs.
Voltage Overclocking Options
(!) The voltages can’t be chosen individually. They will all be set to the lowest voltage (!)
(!) The minimum is -16 and the maximum 8. Every step is 0.025 volt. The default is 0, with 1.2 volts (!)
over_voltage – ARM and GPU core voltage adjustment, default
over_voltage_sdram – ARM and GPU core voltage adjustment, default
over_voltage_sdram_c – SDRAM controller voltage adjustment
over_voltage_sdram_i – SDRAM I/O voltage adjustment
over_voltage_sdram_p – SDRAM phy voltage adjustment
Overclocking the Raspberry Pi 1 and 2
Before you get started with overclocking your Raspberry Pi 1 and 2, you first need to boot up the raspi-config tool.
Please note that if you are using a Raspberry Pi 3, you need to skip down to our “Raspberry Pi 3 Overclocking” section as the raspi-config tool has no preset overclock for the Pi 3 and newer.
To open up the raspi-config tool, you need to first go into the terminal. There is an icon located on the Raspbian desktop.
If you are already in a terminal session, then all you need to do enter is the following command.
sudo raspi-configThe option that we are interested in is “ Overlocking.
Navigate to it using the UP and DOWN arrow keys.
Once you have highlighted the menu item, press ENTER to select it.
After pressing ENTER, you will see the following warning. If you are worried about any problems occurring with your Raspberry Pi, then here is an excellent spot to stop with the guide.
Be aware that overclocking may reduce the lifetime of your
Raspberry Pi. If overclocking at a certain level causes
system instability, try a more modest overclock. Hold down
shift during boot to temporarily disable overclock.
See http://elinux.org/RPi_Overclocking for more information
Raspberry Pi 1 Overclocking
Below are the options that are available to choose from on the Raspberry Pi 1.
Choose overclock preset

None   700MHz ARM, 250MHz core, 400MHz SDRAM, 0 overvolt
Modest 800MHz ARM, 250MHz core, 400MHz SDRAM, 0 overvolt
Medium 900MHz ARM, 250MHz core, 450MHz SDRAM, 2 overvolt
High   950MHz ARM, 250MHz core, 450MHz SDRAM, 6 overvolt
Turbo  000MHz ARM, 500MHz core, 600MHz SDRAM, 6 overvolt
The Raspberry Pi 1 is the most open Raspberry Pi to being overclocked. This ability to overclock is mainly due to its modest default clock rate of 700MHz.
It also only has a single ARM core. There is a much larger payoff for users to overclock so they can run more intensive tasks compared to the Raspberry Pi 2 and Raspberry Pi 3. The Pi 2 and 3 both boast quad-core processors, and higher default clocked cores.
Any overclocking that requires overvolt means you will need to have a very stable power supply that can supply the right amount of voltage and amperage to the Raspberry Pi.
If you would like to overclock the Raspberry Pi 1 with little to no consequences, then modest should be a safe option as it requires no extra voltage to the processor.
Advanced Raspberry Pi 1 Overclocking
There is a more advanced option for overclocking the Raspberry Pi 1. This option requires modifying the config file that stores all the overclocking values and tweaking each one individually.
This config file allows you to overclock the Raspberry Pi 1 further than the raspi-config tool allows, as you can tweak each value. Editing these values requires some understanding of overclocking, so be careful.
The Raspi-config tool already offers quite an extensive list of options for overclocking the Raspberry Pi 1. We highly recommend utilizing the options available in the tool before going and changing the values individually.
Modifying the file is recommended for advanced users only.
To achieve this, begin by editing the config file present on the SD Card at “/boot/config.txt“.
Raspberry Pi 2 Overclocking
Choose overclock preset

None  900MHz ARM, 250MHz core, 400MHz SDRAM, 0 overvolt
High 1000MHz ARM, 500MHz core, 500MHz SDRAM, 2 overvolt
The Raspberry Pi 2 boasted a massive increase in the Raspberry Pi’s power, bringing with it a 900MHz default clock, and 4 cores. The Pi 2 offers a significant improvement over the Raspberry Pi 1’s 700MHz, single core processor.
However, despite the performance increase, there is always more to be squeezed out. Unlike the Raspberry Pi 1, the Raspberry Pi 2 only has one extra overclocking option in raspi-config.
That is the “High” overclocking option, while only being a somewhat slight overclock it does require you to have a stable power supply.
Please note, using the raspi-config tool is not the only way to overclock a device. You can also overclock by modifying “/boot/config.txt“, but that is only for advanced users who know what tweaking each value does.
Advanced Raspberry Pi 2 Overclocking
There is a more advanced option for overclocking the Raspberry Pi 2. This option requires modifying the config file that stores all the overclocking values and tweaking each one individually.
Modifying this file allows you to overclock the Raspberry Pi 2 further than the raspi-config tool allows, as you can tweak each value.
Changing this file requires some understanding of overclocking, so be careful with fiddling with the values. We explain each configurable variable earlier on in the tutorial.
Changing these values are recommended for advanced users only.
To achieve this, begin by editing the config file present on the SD Card at “/boot/config.txt“.
Below we have some tested overclocks for the Raspberry Pi 2. Please note these can cause some issues so if you are interested in advanced overclocking, it is worth using these as a starting base.
arm_freq=1050
gpu_mem_512=384
core_freq=500
h264_freq=0
isp_freq=0
avoid_pwm_pll=1
sdram_freq=550
over_voltage=6
avoid_safe_mode=1
force_turbo=0
If the overclock cause any issues, you can try holding the SHIFT key during boot up to revert to default clocks.
Or modify the “/boot/config.txt” file to remove any overclock.
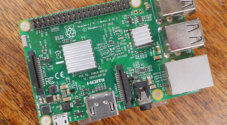
Raspberry Pi 3 Overclocking
The Raspberry Pi 3, along with the Raspberry Pi Zero, are the more complicated Raspberry Pi’s to overclock. At publication, the raspi-config tool had no support for overclocking the Raspberry Pi 3 or Raspberry Pi 4.
Instead of relying on the raspi-config tool to overclock the Raspberry Pi 3, you will have to tweak the values in “/boot/config.txt” manually.
Having to edit the values manually makes the device an awful lot more complicated to overclock. So, instead of using a pre-tested and pre-thought out overclock, you must tweak all the values individually.
Two things to note about the Raspberry Pi 3, is that even at its base clock rate, it generates a lot of heat.
So before you get started overclocking the Raspberry Pi 3, it is a requirement to have a heat sink placed onto the processor of the Raspberry Pi 3 to ensure any overclock will remain stable.
It is also a requirement for the Raspberry Pi 3 to have a sufficient power supply. Ensure that the adapter you are using for it provides a guaranteed 5v 2500 mA.
Try to steer away from cheap power supplies or USB chargers as they often don’t provide the right amount of power, which will cause the overclock to be unstable.
Advanced Raspberry Pi 3 Overclock
This option requires some understanding of overclocking, so be careful with fiddling with the values. We explain each configurable variable earlier on in this guide. Tweaking this option is recommended for advanced users only.
To achieve an overclock, begin by editing the config file present on the SD Card at “/boot/config.txt“.
Below we have some tested and somewhat stable settings for you to start off utilizing. They should provide a decent speed increase, but again you should be careful as this can lower the lifetime of the device.
#Overclock Settings
arm_freq=1350
over_voltage=6
temp_limit=80
core_freq=500

#GPU Based
h264_freq=333
avoid_pwm_pll=1
gpu_mem=320
v3d_freq=500

#Ram Overclock
sdram_freq=588
sdram_schmoo=0x02000020
over_voltage_sdram_p=6
over_voltage_sdram_i=4
over_voltage_sdram_c=4

#Sound Fix
hdmi_drive=2
Use the script located below to test your Raspberry Pi overclock.
Testing your Raspberry Pi Overclock
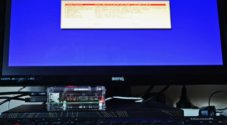
After setting up an overclock on any of the Raspberry Pi’s, you will want to know whether it is stable.
While some overclock will appear to function correctly, it is not a guarantee. The script we utilize below pushes the Raspberry Pi to its limit.
This script intends to do multiple things.
The first is to max out the CPU utilization. This script will force the Raspberry Pi to hit your overclocked speed, heating the processor and putting the power supply under load.
Secondly, the script reads the entire contents of the SD card. This script tests the ability of the RAM to sustain its clock rate and ensures that the I/O interface of the Raspberry Pi isn’t suffering from any issues.
Finally, the script tests to ensure that the SD card won’t be corrupted by the overclock. It achieves this by writing a 512mb file to the SD card multiple times.
The script will help detect whether the overclock is causing any corruption that will lead to significant issues when using your Raspberry Pi every day.
Raspberry Pi Stability Test Code
First off, we need to write the bash script to the Raspberry Pi for you to utilize it.
Using your favorite text editor such as nano or vi, create a new file at “/home/pi/stresstest.sh” and write the following script to the file.
#!/bin/bash
#Test from https://elinux.org/RPiconfig
#Overclock_stability_test
#Simple stress test for system. If it survives this, it's probably stable.
#Free software, GPL2+

echo "Testing overclock stability..."

#Max out all CPU cores. Heats it up, loads the power-supply.
for ((i=0; i<$(nproc --all); i++)); do nice yes >/dev/null & done

#Read the entire SD card 10x. Tests RAM and I/O
for i in `seq 1 10`; do echo reading: $i; sudo dd if=/dev/mmcblk0 of=/dev/null bs=4M; done

#Writes 512 MB test file, 10x.
for i in `seq 1 10`; do echo writing: $i; dd if=/dev/zero of=deleteme.dat bs=1M count=512; sync; done

#Clean up
killall yes
rm deleteme.dat

#Print summary. Anything nasty will appear in dmesg.
echo -n "CPU freq: " ; cat /sys/devices/system/cpu/cpu0/cpufreq/scaling_cur_freq
echo -n "CPU temp: " ; cat /sys/class/thermal/thermal_zone0/temp
dmesg | tail

echo "Not crashed yet, probably stable."
Using the stability code
Once you have written the script correctly. Save and exit, by pressing CTRL + X then Y and lastly ENTER.
Before we run this script, we must give the script execution privileges; otherwise, it will fail to run correctly.
We achieve this by typing the following command into the terminal.
sudo chmod +x /home/pi/stresstest.shNow, all we need to do is run the script.
Please note that this has a high chance of causing your Raspberry Pi to either crash entirely or freeze up. If it does, this indicates that the overclock you have applied to your Raspberry Pi is unstable, and you should try dialing it back.
The script will also show errors from the command dmesg, if any errors show, it is an indication that the overclock is NOT stable. Again, as before, try dialing back the overclock.
Any SD Card issues are caused by an overclock to the core_freq. You should attempt to dial this back to reduce the chance of the SD Card being corrupted.
Once you are ready, run the following command to start the stress test. Be prepared to give this a few minutes to complete.
bash /home/pi/stresstest.shOnce completed, it should give you a few bits of information.
It will give you the current running speed of the processor, which after the test should be about the same as the overclock.
The second value it gives back is the current temperature of the processor. The first two digits of this number are the ones you want to pay the most attention to. For instance, 43850 will be 43ºC. Anything above 63ºC is highly likely to cause issues with your Raspberry Pi.
There are a few ways to solve a high temperature on your Raspberry Pi.
- Firstly, you can install a heat-sink.
- Secondly, make use of a case that provides a good airflow design.
- Lastly, you can always try to install a small fan to the Raspberry Pi to try and cool the device down faster.
Of course, the simpler and cheaper option is just to dial the overclock back to reduce the extra strain on the processor.
After the processor speed and temperature, the dmesg will print the message buffer from the kernel. This message will be an important message to read. Pay attention to any errors here.
If there are no errors here, it means that your Raspberry Pi should now have a stable overclock, however as always there is still no guarantee that it will remain stable.