In this tutorial, we will show you how to install and run a self-hosted tunneled reverse proxy using Pangolin and how to route a device like a Raspberry Pi through this proxy.
Pangolin is a self-hosted solution that enables you to easily set up your own tunneled reverse proxy. It resembles solutions like Tailscale and Cloudflare Tunnels, but you retain full control of the entire stack.
With Pangolin using WireGuard as its backend, you can have confidence that the team hasn’t attempted to re-invent the wheel where it wasn’t needed and is relying on fast, well-tested software.
The biggest feature of a tunneled reverse proxy, like Pangolin, is that it can punch through a firewall, saving you the need to open ports. This same functionality is critical for anyone stuck behind a CGNAT, where your public IP address might not even be routable to your network.
What makes Pangolin even better is that it has a ton of additional functionality baked into it. This includes a centralized authentication system that allows you to protect your exposed services. This saves you the hassle of setting up additional software like Authelia or relying on Cloudflare Zero Trust.
The one drawback of Pangolin compared to the hosted solutions is that you will, of course, need a server to set up Pangolin on. This can be a server running in a network where you can easily open ports or on a VPS or dedicated server.
Within this tutorial, we will be setting up Pangolin on a DigitalOcean droplet (Affiliate Link). We use them for our website hosting and have never had a bad experience. We have also used Vultr (Affiliate Link) in the past with no issues either.
Please note that you will also need a domain name to route your services when setting up Pangolin. Domain names can be obtained relatively cheaply through providers like Namecheap (Affiliate Link) or Porkbun.
Once that is set up, we will show you how to connect a device to your new Pangolin tunneled reverse proxy using its Newt client. In particular, we will be setting up Newt on a Raspberry Pi.
Officially, the Pangolin server supports Ubuntu/Debian, Fedora, OpenSUSE, RHEL, and Amazon Linux.
Equipment
Below is a list of some of the equipment we used throughout this guide on installing Pangolin.
Recommended
- Domain Name Namecheap
- VPS DigitalOceanVultr
Optional
- Raspberry Pi Amazon
We last tested this tutorial on installing Pangolin on Ubuntu Server 24. We also tested the tunnel creation itself by setting up Newt on a Raspberry Pi 5 running Bookworm.
Installing Pangolin on your Linux System
In this section, we will walk you through the fairly simple steps to installing Pangolin on a Linux-based system. We will focus on Debian-based systems such as Ubuntu and Raspberry Pi OS.
These steps are being run on a Digital Ocean VPS that has Ubuntu Server 24 installed. However, they should work for any provider as long as you run a compatible operating system.
The only task you must complete before beginning to set up Pangolin is ensuring that your domain name points to your VPS.
If you want to make using Pangolin even simpler, you can set up an “A” record with the name as an asterisk symbol (*) and have that point to your IP address. Doing this means that any subdomain that is not defined will be routed to your IP.
Not all domain name providers will support this, but from our experience, both Namecheap and Cloudflare do.
If you do not want to go down this route, you will at least need to set up a subdomain such as “dashboard.domainname.com.” and have that pointed to your server. You will then need to manually add any additional subdomains as you set up your services.
Preparing your System
1. Before installing Pangolin on your Linux system, we will first want to ensure that the package list cache is up to date.
Updating your package list and upgrading any out-of-date packages is as simple as using the following two commands in the terminal.
sudo apt update
sudo apt upgrade -yCopy
2. Once your system is up to date, we must ensure that we have “wget“, “sed“, “jq” and “curl“, installed on your system.
To install all of these packages, run the following command on your system.
sudo apt install wget sed curl jq -yCopy3. Our next step is to create a directory where we will have Pangolin install itself. In particular, we will be using the mkdir command to create a directory at “/opt/pangolin“.
You can install this anywhere, but the “/opt/” directory is a good place for storing software that isn’t managed by your package manager.
sudo mkdir -p /opt/pangolinCopy4. With the directory created, change into it using the cd command.
cd /opt/pangolinCopyDownloading and Starting the Pangolin Installer on Linux
5. With our Ubuntu system now prepared for Pangolin, we can download and run its installer.
Before we download the installer, we should first determine the latest version that we can install. You can either go to the Pangolin Github and get the latest tag yourself, or you can run the command below.
This command below uses curl to grab the Pangolin tags page and then uses “jq” to interpret the data and get the tag name. The result of this is then stored in our “VERSION” bash variable.
VERSION=$(curl "https://api.github.com/repos/fosrl/pangolin/tags" | jq -r '.[0].name')Copy6. With the version now stored, we must work out the type of CPU your server has. In most cases, this is likely an “amd64” system, but we can get the value we need by running the command below.
This command uses the “uname” command to get the machine type, and then runs it through “sed” to replace certain results with the name we require.
CPU=$(uname -m | sed 's/x86_64/amd64/;s/aarch64/arm64/')Copy7. Finally, we download the correct version of the Pangolin installer onto our Linux system by running the following command in the terminal.
We are using “wget” to grab the installer using the two bash variables we set in the previous two steps. This installer will be saved as “installer” within our current directory.
wget -O installer "https://github.com/fosrl/pangolin/releases/download/$VERSION/installer_linux_$CPU"Copy8. Before we run this installer, we will need to use the chmod command to give the file execute privileges.
sudo chmod +x ./installerCopy9. We are finally at the point where we can run the Pangolin installer by using the command below.
This installer will set up everything the software requires to run, including installing Docker on your system.
sudo ./installerCopyWalking Through the Pangolin Installer
At this point, you should have the Pangolin installer running on your Linux device. These next few steps will walk you through the entire process and explain what these various options do.
Please note that the installer may have changed since we wrote these steps, so please feel free to comment below if you need assistance.
Initial Setup Questions
10. The first question that the Pangolin installer asks you is what is the base domain that you want to utilize. This is crucial as its the domain name that the software will use for all of the services that you setup.
For example, if you wanted your services to be accessible from a subdomain like “nginx.pimylifeup.com“, you would set the base domain name to “pimylifeup.com“.
Enter you base domain (no subdomain e.g. example.com):11. With the base domain now set, you will need to set the domain name from which the software dashboard will be accessible. In a typical setup, this will be a subdomain of your base domain name.
Here you can just press ENTER to accept the default value (This will make Pangolin available at the subdomain of “pangolin“).
Alternatively, if you want to use a different domain name or subdomain, type it here. For example, we could use “dashboard.pimylifeup.com” instead.
Enter the domain for the Pangolin dashbaord (default pangolin.example.com):12. Next up, you will need to enter an email address that Let’s Encrypt will use when generating SSL certificates for your chosen domain names.
This can be any email address as long as you are reachable on it. Let’s Encrypt will notify you of any issues with your certificates using this address.
Enter email for Let's Encrypt Certificates: 13. Up next, you will be asked if you want to use Gerbil to allow and set up tunneled connections. For the vast majority of cases, you will want this functionality, so accept the default option and press ENTER. You can also just type in “yes“.
Gerbil is what helps facilitate the Cloudflare Tunnel / Tailscale functionality of Pangolin. Without Gerbil Pangolin is essentially just a proxy.
Do you want to use Gerbil to allow tunneled connection (yes/no) (default: yes): Setting up the Admin User
14. We have now finished up with the basic settings for Pangolin on Linux, our next step is to fill out details that will be used to create the admin user.
The first part of this process is to type in the email that you will use to login to the dashboard.
Enter admin user email (default: admin@example.com):15. With an email set, you must now type in a password that you will use to login to Pangolin. You will be required to enter the password twice before continuing.
The password must meet the following criteria to be accepted as valid by the installer:
- At least one uppercase letter (e.g.
ABCEFGH) - At least one lowercase letter (e.g.
abcdefgh) - At least one digit (e.g.
0–9) - At least one special character (e.g.
!@#$%^&*)
Create admin user password:
Confirm admin user password:
Security Settings
16. With the user now created, you will be asked some questions relating to the security of Pangolin. The vast majority of users will want to just press ENTER and accept the default values.
The first of these questions is whether you want to disable signups. This forces a user to be invited to sign up for your Pangolin server. We highly recommend setting this to “yes“. Otherwise, anyone could create an account.
Disable signup without invite (yes/no) (default: yes):17. Pangolin enables users by default to set up their own organization. Having your own organization enables you to set up all your services separate from one another.
Whether you want users to be able to create their own organizations is entirely up to you, but Pangolin’s default behavior is to let anyone create their own.
Disable users from creating organizations (yes/no) (default: no):Email Configuration
18. You can configure Pangolin so that it can send emails to you to notify you of various things. To set up this functionality, you will require an SMTP server for it to connect to. We won’t be covering how to do this in our guide, as every provider is different.
Type in “yes” if you want to enable the email functionality, or simply press ENTER to proceed with the “no” option.
Enable email functionality (yes/no) (default: no):Final Installation Steps of Pangolin on Linux
19. If you haven’t installed Docker to your Linux machine before, you will be prompted if you want Pangolin to install it for you.
Since Docker is required for Pangolin to run on your machine, you will want to type in “yes” and press ENTER to continue.
Docker is not installed. Would you like to install it? (yes/no) (default: yes):20. Once the installer has finished installing Docker on to your system you will now be prompted to install and start the Pangolin container, alongside the other software that it requires.
You must type in “yes” and press ENTER to continue here. Typing in “no” would mean that Pangolin would not be installed to your system.
Would you like to install and start the containers? (yes/no) (default: yes):21. With the Pangolin Docker container now running on your Linux system, you will be prompted if you want to install Crowdsec.
This is a piece of software that is designed to help protect your Pangolin installation from bad actors. It works by checking every connection to see if it breaches a set rule.
We personally chose not to use Crowdsec and selected “no” which is the default option.
Would you like to install CrowdSec? (yes/no) (default: no):22. The installation of Pangolin is now complete and we will now be able to access its dashboard nad begin setting up devices to run through the tunnel.
Installation Complete!Accessing your Pangolin Dashboard
23. Now that Pangolin is running on your Linux system, you will want to access its dashboard.
Your dashboard can be reached through the domain name that you set up during the installation process. For example if you set your dashboard domain name to “pangolin.pimylifeup.com” that is the domain name you will want to go to..
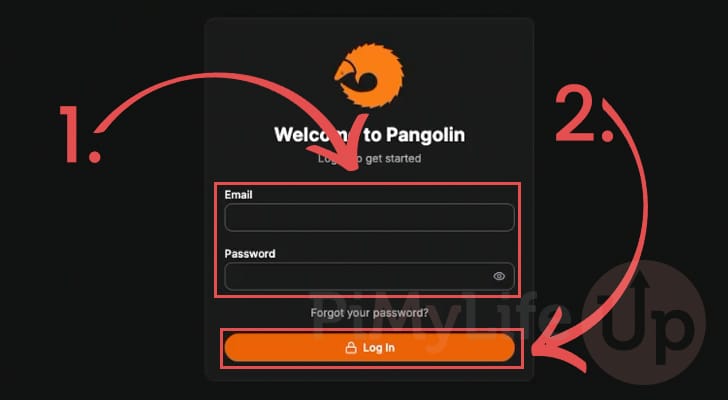
https://<DOMAINNAME>24. When accessing the Pangolin dashboard, you will be greeted by the login screen.
Use the email and password you set up within the installer (1.), and then click the “Log In” button (2.).
Creating an Organization
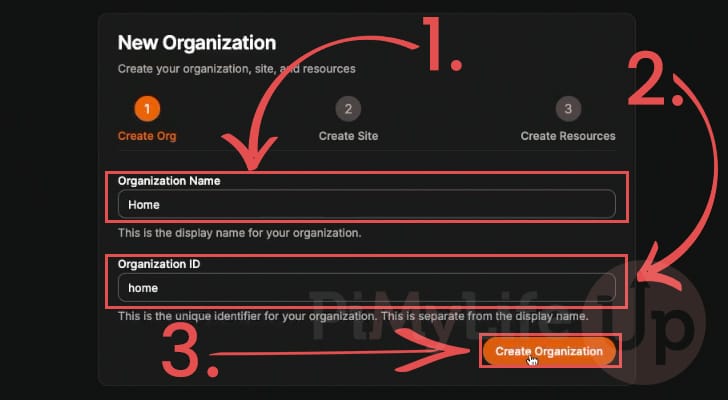
25. The first time you log in to this software, you will be prompted to create a new organization. With Pangolin an organization is where you will organize your “sites”. A “site” is a location that Pangolin has created a tunnel to.
You can give this organization any name (1.), but you will want to use something that makes sense. For example, all of the services we will be running through this organization are for our own home use, so we will be naming ours home.
Next, you must specify an ID for your organization (2.), this should not include any symbols or spaces. This is used internally by Pangolin to identify your organization.
Once you have the name and ID set, you might want to click the “Create Organization” button (3.).
Setting up your first Pangolin Site
26. After creating an organization, you will be taken to the “Create Site” page. With Pangolin, a site is basically a location where it creates a tunnel. Typicall,y you will have one site per network as Newt (Pangolins tunneling software) handles routing for all entities the device you set it up on can access.
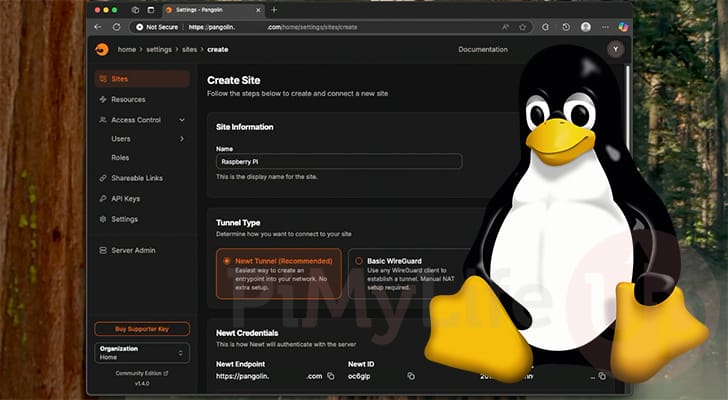
The first thing you will want to do is give a name for this site (1.). You can use anything, but choose something that makes it easily identify, for example “Home Lab“, “Raspberry Pi“, “Office” are all valid choices.
Next, you choose the type of tunnel (2.) that you want Pangolin to utilize when connecting to your device. We highly recommend sticking with Newt, as it makes the whole process incredibly easy.
Now, just under the tunnel type, you will see three different values that you must copy down. These are what you will use when setting up Newt to create the tunnel to Pangolin.
- Newt Endpoint: This is the endpoint that you must use and is how Newt will communicate from your device to your Pangolin instance (3.).
- Newt ID: The ID is a unique identifier (4.) that helps Pangolin identify what site this endpoint belongs to.
- Newt Secret Key: The final value you will want to copy is the secret key (5.). This is one of the most critical values as it is how Newt is able to setup and connect to Pangolin through the tunnel.
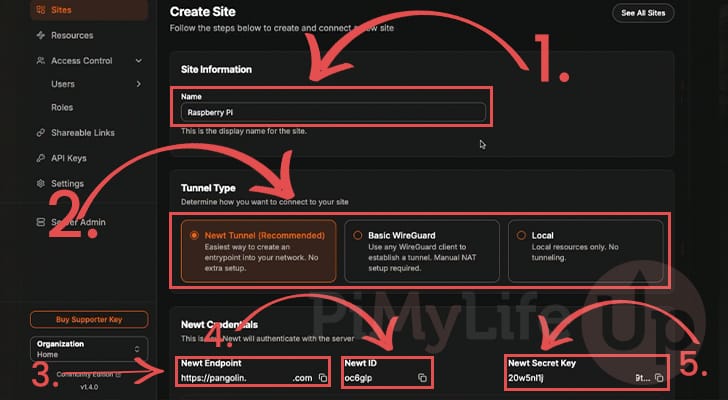
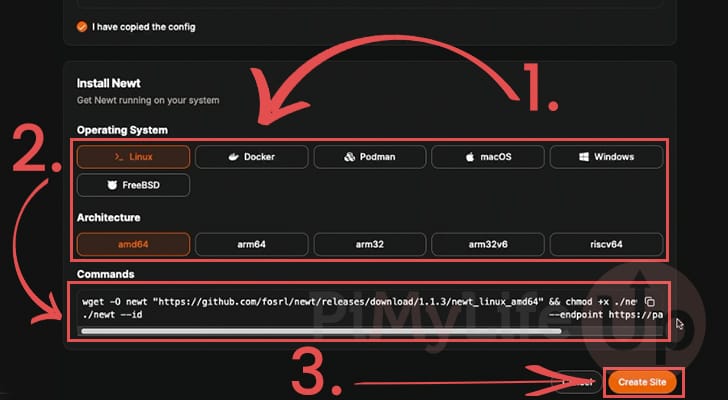
27. At the bottom of the screen, you will get some basic instructions for setting up Newt on your system. Use this screen to select the operating system and architecture of your system (1.).
After selecting your system, Pangolin will generate a command that you can run on your system. This command will install and immediately launch Newt and set up the secure tunnel (2.). We have a section that covers on how to properly set up Newt further down in this guide.
Once you have everything ready, you can click the “Create Site” button (3.).
28. You can check the status of your new Pangolin site by clicking “Sites” (1.) in the sidebar.
If you see the status of your site as “Online” (2.) then you are ready to begin setting up a resource.

Routing New Resources through your Pangolin Proxy Tunnel
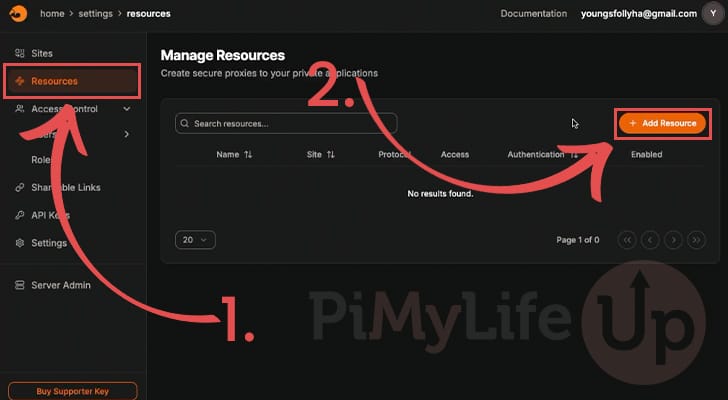
29. Now change to the “Resources” screen using the sidebar (1.) and then click the “Add Resource” button (2.).
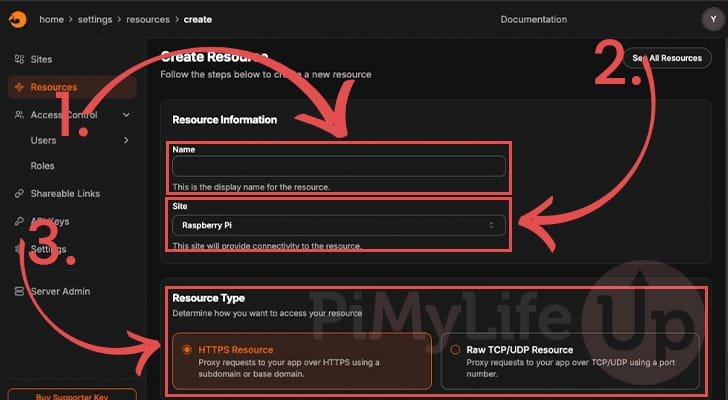
30. On this page, you will want to start off by giving this resource a name (1.). For example, if this is for software like AirTrail, you might name this “Airtrail“.
Next, you can select the site (2.) from which this resource will be routed. In our case, this will be the “Raspberry Pi” site that we set up earlier.
Up next, you will want to select the type of resource that this is. The choices are “HTTPS Resource” or “Raw TCP/UDP Resource” (3.). Things like a game server will likely be set up as a “Raw TCP/UDP” resource, and things like a web app will run through the “HTTPS” resource.
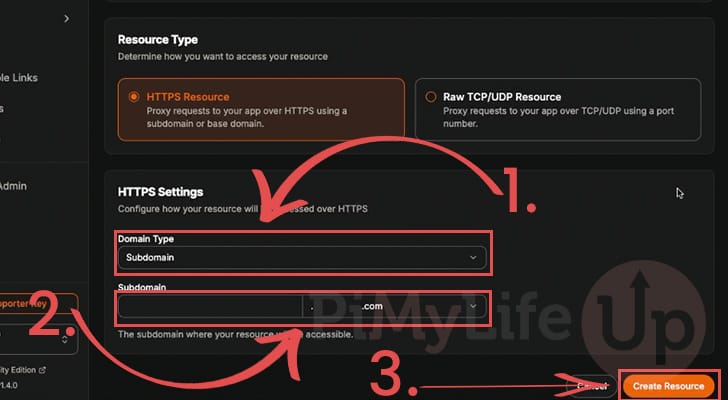
31. If you have selected the “HTTPS Resource” type, you will now need to select a “Domain Type” (1.). For most cases you will just want to select “Subdomain“. However, you can also set “Base Domain” but that will require you to point that domain name to your Pangolin tunnel.
With the domain type set, you will want to fill out the subdomain or domain name that you want to utilize (2.).
With everything filled out, click the “Create Resource” button (3.).
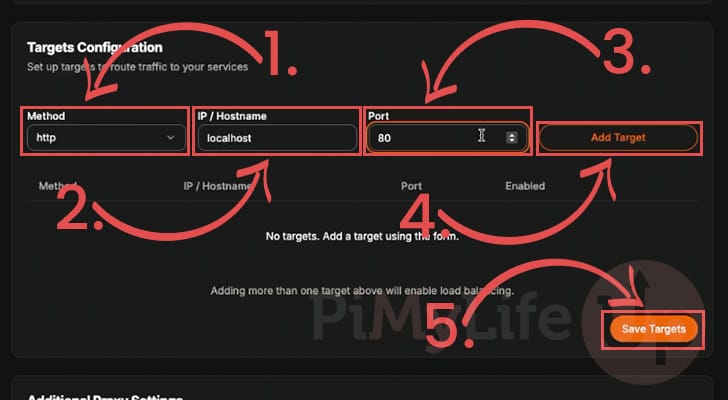
32. Even though you have created a new Pangolin resource for your site, you will need to fill out target information. This tells Pangolin how it should route the traffic from Newt through the Pangolin proxy.
- Method: The first thing you will want to do is select wether the service you are routing is running over HTTP or HTTPS (1.). Many web apps are set up by default with only HTTP, unless you have gone to the effort of configuring HTTPS.
- IP/Hostname: Next, you must specify the IP address or hostname that this resource is located on (2.). For our example, the service we want to route through Pangolin is on our local machine so we just used “
localhost“. - Port: You will now want to specify the port that the service you are routing is running under (3.). Refer to the app you are using before setting this option.
For our example, we are forwarding Nginx so we are using port80.
Once all three values are set, you will now want to click the “Add Target” button (4.). Then, once the target appears underneath, click the “Save Targets” button (5.).
Controlling Resource Authentication
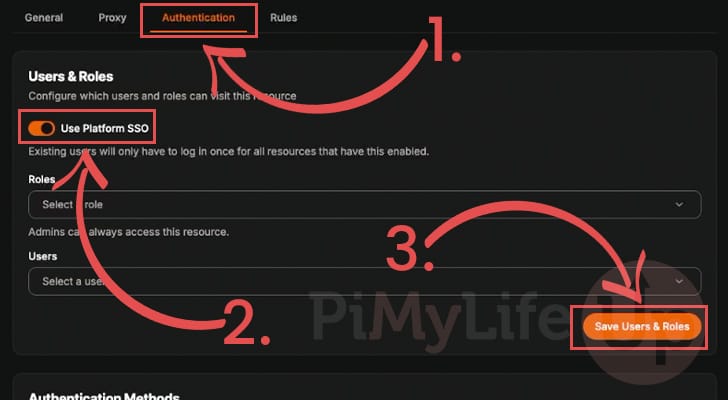
33. By default, Pangolin will set up any new resource to run under its authentication platform. Essentially this means anyone who attempts to access your domain name will be prompted to login to Pangolin to access it.
For this guide, we will be leaving SSO turned on as it helps keep outside users from gaining access to the software we are hosting.
If you don’t want this, you will want to change to the “Authentication” tab (1.). Once on this tab, then toggle the “Use Platform SSO” option (2.) to off, and then click “Save Users & Roles” (3.).
Accessing your Resource
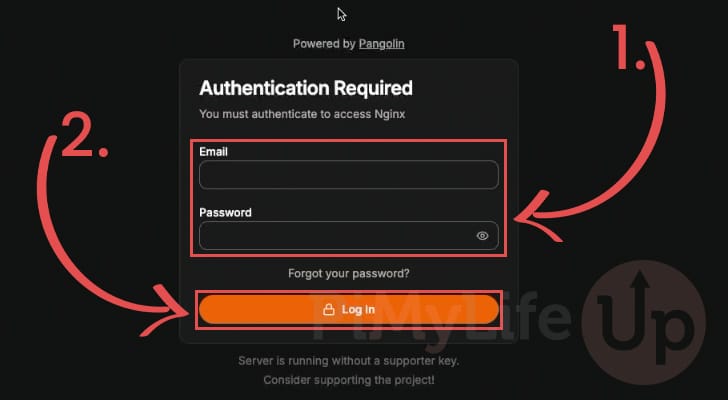
34. Now if we were to head to the subdomain that we just set up, we will be greeted by an Authentication Required scree.
To access your new software, fill out your email and password for your account (1.) and then click the “Log In” button (2.).
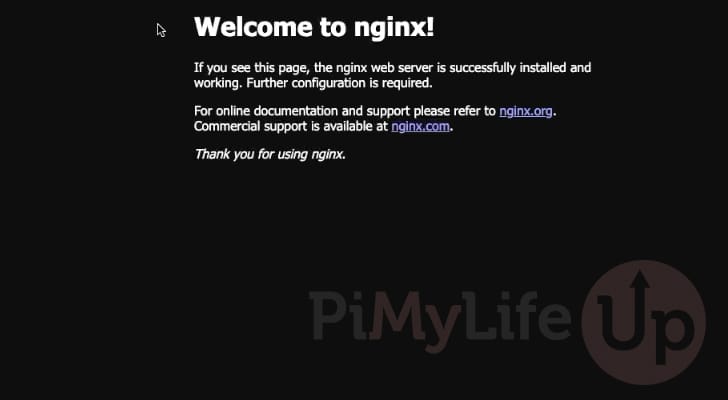
35. We now have access to the software that we just routed from our Raspberry Pi using Newt to our Pangolin instance running on Linux on a VPS.
Updating Pangolin
This section will show you how to update your Pangolin instance on Linux to the latest version. This involves modifying the Docker Compose stack that the Pangolin installer created.
Please note that you should check the Pangolin GitHub to ensure that no critical changes have been made that might break things.
Updating Pangolin to the latest release requires us to grab three version numbers: Pangolin itself, Gerbil, its tunnel software, and Traefik, the software Pangolin uses to manage the proxy.
To make this entire process easier, we will utilize some simple one-line commands. If you installed Pangolin on your Linux system by following our guide, these should all work without issue.
Please note that before updating Pangolin, we highly recommend that you back up the source files and directories. It’s always good to have something to return back to if something goes wrong.
Changing to the Right Directory
1. To update Pangolin to a new release, you will first need to change to the directory where you installed it.
If you have followed our guide, you will want to use the following command.
cd /opt/pangolinCopyGetting the Version Numbers
2. Before we continue, we need to obtain the latest version numbers for each piece of software that Pangolin uses. Write down each of these numbers, as you will need them when you edit the Compose file shortly.
To get started, let’s use the command below to print out the version number of the Pangolin itself.
curl -s "https://api.github.com/repos/fosrl/pangolin/tags" | jq -r '.[0].name'CopyBelow is an example of what a valid version of Pangolin will look like when printed using the command above.
1.4.03. Next, you will want to get the version number for Gerbil. As mentioned throughout this guide, Gerbil is the software that manages the secure tunnels.
curl -s "https://api.github.com/repos/fosrl/gerbil/tags" | jq -r '.[0].name'CopyAfter using the command above, you should see a version number that looks similar to the one we have shown below.
1.0.04. Finally, we need to use the command below to get the version for Traefik. This software handles the reverse proxy side of Pangolin.
curl -s "https://api.github.com/repos/traefik/traefik/tags" | jq -r '.[0].name'CopyIn the response, you will see a version number that is similar to the one we have below.
v3.4.0Modifying the Pangolin Docker Compose File
5. Now that we know the latest version number for each container, edit the Docker compose file using the command below.
Editing this file will allow us to tell Docker to download newer releases of Pangolin to your Linux system and the services it relies on.
sudo nano docker-compose.yamlCopy6. Within this file, you will want to find and update the version number for each of the three available services. Below, we have highlighted each of the lines you might want to modify.
You will need to update the text after the colon symbol (:) with the new version number.
To update the Pangolin version, update the following line.
image: fosrl/pangolin:1.4.0Likewise, to update Gerbil to a newer release, update the image line to look like the following:
image: fosrl/gerbil:1.0.0Finally, if a new version of Traefik is available, you can update the line shown below.
image: traefik:v3.3.67. Once you have updated the version string, save and exit the file by pressing CTRL + X, Y, and then ENTER.
Updating to the Latest Release
8. Now, to get Docker to download the latest releases of Pangolin and its other containers to your Linux system, you will need to use the command below.
This command gets Docker to download the new releases, but it won’t update the currently running containers.
docker compose pullCopy9. Once the images are downloaded, use the command below to get Docker to automatically restart any container that has a new image available.
docker compose up -dCopyInstalling and Setting up your Tunnel to your Pangolin Instance
In this section, we will show you how to connect a device like a Raspberry Pi so that it can run through your newly set up Pangolin reverse proxy tunnel.
To achieve these connections, Pangolin offers a piece of software called Newt. Newt is what handles creating and maintaining the tunnel between your device and your proxy.
If you are following this section, you must have the endpoint, ID, and secret key for Newt. These values will be available when you set up your site in the previous step.
We will split this section into two parts: one that shows you how to use Docker to run Newt on your system and the other that involves installing Newt natively on your machine.
Both support the same systems; it just depends on what you prefer. Personally, we would choose Docker as it is the easiest to keep updated.
Using Docker to Run Your Pangolin-Powered Reverse Proxy Tunnel
These next few steps will show you how to set up the Pangolin proxy tunnel using the Newt Docker container. Docker’s biggest advantage is that it makes maintaining and updating Newt a breeze.
Preparing your System
1. Of course, you will need to install Docker to set up Newt using Docker and connect it to your Pangolin tunnel.
If you don’t have Docker installed, we highly recommend following our guide, which will walk you through the entire process. The following steps will assume that you installed Docker using our tutorial.
https://pimylifeup.com/linux-docker-install/2. Once that is done, we need to create a directory to store the Compose file for the Pangolin Newt Docker container.
To create this folder, we will be using the mkdir command and its “-p” option.
sudo mkdir -p /opt/stacks/newtCopy3. Once the folder is created, change into it using the cd command.
cd /opt/stacks/newtCopyCreating a Docker Compose file for Pangolin’s Newt Tunnel
4. We can now utilize the Nano text editor to begin writing the Compose file for Newt.
A Compose file is essentially a way of instructing Docker what container it should install and what options it should use to start up said container.
sudo nano compose.yamlCopy5. Now, within this file, type out the following lines. These lines define the Newt container that we are using.
While filling out this file, you will need to place a few placeholders that tell the Newt Docker container how to connect to your Pangolin instance.
<ENDPOINT>: Replace this with the URL to your Pangolin instance. This is required so that Newt can communicate with Pangolin and create a secure tunnel.<ID>: Here, you must specify the unique Pangolin ID that was generated when you created your site.<SECRET>: This last placeholder must be replaced with the secret key that was generated for your Pangolin site.
services:
  newt:
    image: fosrl/newt
    container_name: newt
    restart: unless-stopped
    environment:
      - PANGOLIN_ENDPOINT=<ENDPOINT>
      - NEWT_ID=<ID>
      - NEWT_SECRET=<SECRET> Copy
6. Once you have finished filling out the file, save and quit by pressing CTRL + X, Y, and then ENTER.
Starting up Newt with Docker
7. Now that the Compose file has been written, all we need to do to start up Newt and begin creating the tunnel to our Pangolin instance is to run the following command.
We are utilizing the “-d” option to ensure that Docker starts up in the background.
If you are finding that your tunnel won’t connect and is showing as “Offline” within the Pangolin dashboard, remove the “-d” option and run it again. This will help you see if any errors within Newt prevent the tunnel from being created.
docker compose up -dCopyUpdating Newt to the Latest Release with Docker
8. From time to time, Newt will get updates from the Pangolin team that might either improve its tunneling functionality, enhance security, or introduce new features.
Luckily, Docker makes updating to the newer releases a relatively painless process. First, change the directory to the one where we wrote the Compose file.
cd /opt/stacks/newtCopy9. Once in the right directory, you will want to tell Docker to pull the latest version of Newt to your Linux machine. Doing this is as simple as running the following command within the terminal.
docker compose pullCopy10. After Docker has downloaded a new image, it won’t automatically update an already running container.
Luckily, we can get Docker to restart your Newt tunnel if required by using the command below.
docker compose up -dCopyRunning Newt Natively on your Device
For those who prefer not to use Docker, the Pangolin team do provide native builds of Newt that you can run outside of a container. These a great for those who don’t mind a little bit more effort to avoid any overheads introduced by Docker.
Preparing to Setup the Pangolin Tunnelling Software
1. If you prefer not to set up your Pangolin tunnel using Docker, you can install Newt directly on your Linux machine.
Before we install Newt using this method, let’s update the existing system by running the following commands.
sudo apt update
sudo apt upgradeCopy
2. We now need to install some additional packages that we will use to download and install the latest version of Newt.
You can install the packages we need by using the command below.
sudo apt install wget curl jqCopyGrabbing the Latest Release of Newt
3. With the packages we need now installed, we will want to work out what the latest version of Newt is so that we easily install it.
There are two ways to do this: we can go to the Newt GitHub page or run the command below. This command grabs the Newt GitHub tags and then fetches the first one, which should be the latest release.
VERSION=$(curl "https://api.github.com/repos/fosrl/newt/tags" | jq -r '.[0].name')Copy4. We also need to know your system’s CPU architecture so that we can download the right version of Newt.
Luckily, we have another handy command that we can run to fetch this.
CPU=$(uname -m | sed 's/x86_64/amd64/;s/aarch64/arm64/')Copy5. Finally, with both the “version” and “CPU” bash variables set, we can now download Newt onto our Linux system by using the command below.
This command retrieves the latest release and saves it in the “/usr/local/bin” directory. We saved it in this directory so that we could launch Newt easily.
sudo wget -o /usr/local/bin/newt https://github.com/fosrl/newt/releases/download/$VERSION/newt_linux_$CPUCopy6. We now need to modify the permissions of the “newt” executable and give it execute privileges. To achieve this we can utilize the chmod command like we have below.
sudo chmod +x /usr/local/bin/newtCopySetting up a Service for your Pangolin Newt Tunnel
7. With Newt now installed to our system, we will want to create a service that will start up the Pangolin tunnel and ensure that Newt continues to run in the background.
If we were to start up Newt without a service, it would just run in the terminal session, so if you closed the terminal, you would stop Newt.
Luckily, creating a service is really simple, and we can begin to write one for Newt by using the command below.
sudo nano /lib/systemd/system/newt.serviceCopy8. In this file, you should enter the following lines to define a simple service that will manage your Pangolin tunnel using the Newt software.
We must replace three placeholders to configure this service to talk with your Pangolin instance.
<ID>: Replace this placeholder with your site’s ID. You should have received this during the site creation process in Pangolin.<SECRET>: You must also replace this with the secret key that was generated during the setup process.<ENDPOINT>: Finally, replace the endpoint placeholder with the URL of your Panglin dashboard. Again you would of been shown the correct value for this during the creation of the tunnel.
[Unit]
Description=Newt
After=network.target

[Service]
ExecStart=/usr/local/bin/newt --id <ID> --secret <SECRET> --endpoint <ENDPOINT>
Restart=always
User=root

[Install]
WantedBy=multi-user.targetCopy
9. After filling out this file, you can save and quit out of Nano by pressing CTRL + X, Y, and then ENTER.
10. With the service now written, we will want to enable it so that your operating system will automatically start your tunnel when your system starts up.
You can enable your new Newt service by running the following command in the terminal.
sudo systemctl enable newtCopy10. Finally, you can start up your new Pangolin tunnel by using the command below in the terminal. After a minute or two you should see this tunnel get marked as “Online” within the Pangolin dashbaord.
sudo systemctl start newtCopyUpdating your Pangolin Newt Tunnel when using the Native Build
11. Updating Newt to the latest release isn’t super hard, but it does involve retracing many of the steps you followed to set it up in the first place.
Now, to start the updating process, you must first stop the already running tunnel. Stopping this tunnel is as simple as running the command below.
sudo systemctl stop newtCopy12. Once the service is stopped, you must now follow steps 3 to 6 of this section. This will download the latest release of Newt.
13. After updating the Newt software on your Linux system, we can safely restart the tunnel by using the command below.
sudo systemctl start newtCopyConclusion
Hopefully, if you have reached this point, you will have successfully set up the Pangolin reverse proxy tunnel on your Linux system. We have also covered how you can set up Newt on a machine like a Raspberry Pi so you can route services through Pangolin.
Pangolin is a brilliant self-hosted alternative to closed-source and proprietary solutions such as Tailscale and Cloudflare Tunnels. You remain in full control of the tunneling software, which uses WireGuard to help ensure the tunnels it creates are secure.
Please feel free to leave a comment below if you have had any issues with setting up Pangolin on your system.
If you liked this tutorial, we highly recommend checking out our many other Linux tutorials and our wide range of Raspberry Pi projects.


Thank you! The Pangolin is really cool service! Must have!
there is a small mistake in step 7. The closing ” is missing. Thanks for your good tut.
Thank you! We have now fixed that step!