In this tutorial, we will take you through the steps of installing the Homebrew package manager on macOS.
Homebrew is described as the missing package manager for macOS and is widely used amongst developers, power users, and anyone else who requires beyond the basics. The software is free and open source.
If you look through the documents for Homebrew, you will notice the terminology is slightly different from what you might be used to seeing. Below I will quickly touch on some words that you will need to know.
- Formula is the package definition that has been built from upstream sources.
- Cask is the package definition that installs macOS native applications.
- Caskroom is the directory that contains one or more casks.
- Keg is the installation directory of a given formula version.
- Rack is a directory that contains one or more kegs.
- Cellar is a directory that contains one or more racks.
For more information, I recommend checking out the Homebrew manual page, as it contains a ton of information that will make your life easier.
Table of Contents
- Xcode Software Package
- Installing Homebrew
- Installing Packages
- Updating Homebrew and Packages
- How to Uninstall Homebrew
- Conclusion
Xcode Software Package
For Homebrew to work, we will need to ensure that Xcode is installed on our Mac device. Thankfully the process of installing Xcode is very straightforward.
Xcode is an integrated development environment (IDE) that also contains software development tools for macOS. It is primarily used for developing software for macOS, iPadOS, iOS, WatchOS, and tvOS.
Since Xcode is a large package at roughly 12GB+, you might not want to install it on your Mac. An alternative is to use the Xcode command line tools (Xcode CLT). The CLT will provide you with everything you need to run Homebrew without it taking up a huge portion of your hard drive.
If you do not need an IDE, I recommend installing the XCode CLT. Otherwise, Xcode is a decent IDE experience for the Mac.
Installing Xcode IDE
The process of installing the entire Xcode IDE is relatively straightforward. I will detail each of the steps you need to do below.
1. Launch the app store by clicking on it in the dock or locate it using the finder app.
2. Search for Xcode inside the app store and click on “GET” once you find it.
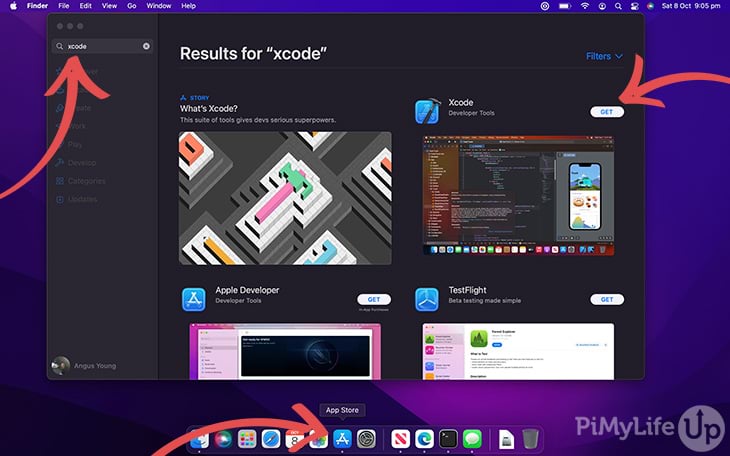
3. Once downloaded, you can open it and check it out. You can now proceed to install Homebrew.
Installing Xcode CLT
The Xcode CLT (Command Line Tool) contains all the components we need to run Homebrew, so it is the perfect alternative if you do not want to install the entire Xcode IDE. You will need to complete a few easy steps to install the CLT.
1. Open the terminal by going to launchpad and searching “terminal“. Click on Terminal.
Alternatively, you can go to finder and open the Applications folder. Next, find the Utilities folder. Then, inside utilities, click and load the terminal application.
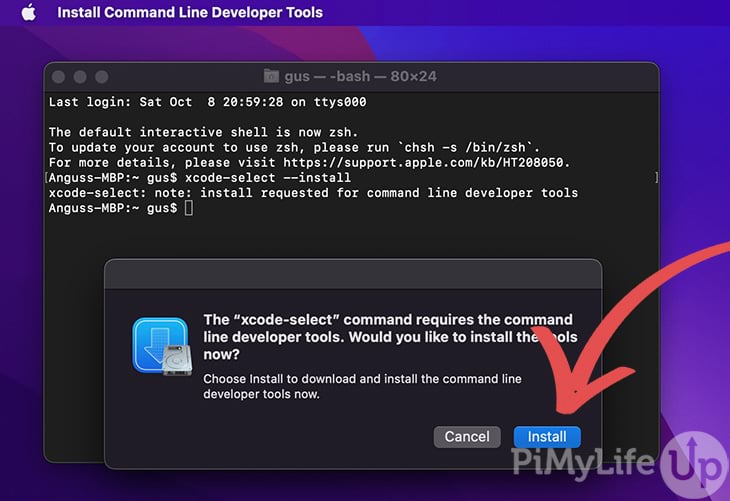
2. Enter the following command into the terminal to start the installation.
xcode-select --installCopy3. You will see a prompt asking if you want to proceed with the installation. Click Install.
Next, you will also be asked to accept a software license.
Once done, the command will download and install the software. This process may take a while, depending on your internet speed and the specs of your Mac.
Installing Homebrew
If you have the IDE or CLT of Xcode installed, we can proceed with installing the Homebrew package manager onto MacOS. The steps are super easy and will not take up much of your time.
1. To install Homebrew, we will run a script that will automatically install everything it needs to operate. You can view the script on their GitHub if you are worried about running external scripts.
Run the following command in the terminal application on your Mac computer to install Homebrew.
/bin/bash -c "$(curl -fsSL https://raw.githubusercontent.com/Homebrew/install/HEAD/install.sh)"Copy2. The installation process may prompt you several times. For example, you may need to enter your password if the script doesn’t already have sudo access.
You may also see an error message when installing, such as needing to perform an unshallow operation. Follow the instructions provided to you in the error message. The unshallow operation may take some time, and will likely not provide feedback until it is done.
3. Run the following command in the terminal.
brew updateCopyAt this point, you may get a permission error in the terminal. To fix this error, enter the command suggested in the terminal. It should chown the homebrew directory.
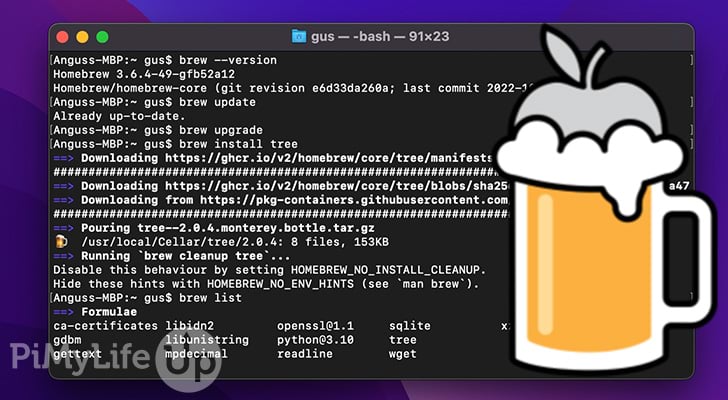
4. You now have homebrew installed onto your computer running macOS. You can confirm the version installed by running the following command in the terminal.
brew --versionCopyThe above command should print something similar to the output below.
Gus-MBP:~ gus$ brew --version
Homebrew 3.6.4-49-gfb52a12
Homebrew/homebrew-core (git revision f83724a0e01; last commit 2022-10-08)Copy
5. By default, Homebrew collects anonymous data that the maintainers might use to help prioritize work. If you do not want to send anonymous analytics, you can turn it off by running the following command in the terminal.
brew analytics offCopy6. If you are having issues with your Homebrew installation, you can run the repair tool by entering the following into the terminal. This command will return a range of fixes required to get Homebrew working correctly again.
brew doctorCopyInstalling Packages
Now that you have installed Homebrew, installing packages to your Mac computer is easy. There is a huge number of packages that you can install using the brew software, as you can see in their official documentation.
This short section will go through how you can install wget using Homebrew.
1. To install the wget package using Homebrew, enter the following line into the terminal.
brew install wgetCopy2. Homebrew will take a couple of minutes to install the requested package. To test the package installed correctly, use wget to download the changelog from the Homebrew GitHub.
wget https://github.com/Homebrew/brew/blob/master/LICENSE.txtCopyThe command should run and download the requested file. You can download any package you require as long as it exists within the Homebrew package manager.
Updating Homebrew and Packages
Updating homebrew and its packages is a relatively straightforward process. The steps below will take you through the process of updating and upgrading packages.
1. To begin, enter the following command into the terminal on your Mac computer. This command will update the package definitions and homebrew.
brew updateCopy2. After updating, you might see a range of different information. For example, the output may contain outdated installed packages, new packages, and more.
You can run the following line in the terminal to view all the outdated installed packages.
brew outdatedCopyThe above command will output all the packages with the installed and current release version numbers.
Gus-MBP:~ gus$ brew outdated
gdbm (1.18.1) < 1.23
openssl@1.1 (1.1.1d) < 1.1.1q
python@3.10 (3.7.4_1) < 3.10.7
readline (8.0.1) < 8.2.1
sqlite (3.29.0) < 3.39.4
xz (5.2.4) < 5.2.7Copy
3. Lastly, the upgrade command can upgrade all the outdated installed packages. To do this, enter the following command.
brew upgradeCopyIf you come across any permission errors, follow the instructions in the terminal.
4. If you want to upgrade a specific package, specify the package next to the upgrade command. For example, the command below will only upgrade wget.
brew upgrade wgetCopyHow to Uninstall Homebrew
Uninstalling Homebrew is as easy as it was to install. All you need to do is run the uninstall script, which will remove itself from your system. You can check through the script by checking it out on their GitHub.
/bin/bash -c "$(curl -fsSL https://raw.githubusercontent.com/Homebrew/install/HEAD/uninstall.sh)"CopyThe script may prompt for input several times throughout the uninstallation process.
Conclusion
At this point, you should have Homebrew installed on your Mac computer and be ready to install previously unavailable packages. If you are a developer or power user, this software will be incredibly useful in future tasks.
We are slowly working on more Mac tutorials, so if you have anything that you would like to see, be sure to let us know.
If you have run into any issues or have any feedback, please feel free to drop a comment below.