In this tutorial, we will walk you through the process of easily installing and running Homebridge using Docker.
Homebridge is software that enables you to integrate your various smart home devices with HomeKit, even when they are not natively supported. Numerous plugins can be installed to increase its functionality even further and add support for popular devices such as the UniFi Protect, Ring, and Nest cameras.
It is also a great alternative to setting up Home Assistant and its HomeKit bridge if you want your smart devices to be accessible in Apple HomeKit without the extra work needed to set up Home Assistant.
Docker is one of the best ways to run Homebridge and connect to your Homekit devices because of its ease of use. Updating to the latest release always requires just a couple of commands, and you don’t have to worry about setting up NPM.
There are some things to take note of before you try setting up the Homebridge container. The first is that this will not work on Windows and Mac due to various issues.
However, the Docker container does support x64 devices and both ARM32 (32-bit) and ARM64 (64-bit) systems. This means you can even use Docker to run Homebridge on the Raspberry Pi.
You Might Also Like


Setting up the Homebridge Docker Container
In the following few sections, we will explain how to set up the Homebridge docker container easily.
To make the whole process easier to maintain, we will utilize a Docker Compose stack. This allows us to define the Homebridge container to download and its options.
We personally tested this tutorial on setting up Homebridge using Docker on the Linux-based operating system Ubuntu.
Preparing your Device for HomeBridge
1. Before you start, you must install the Docker runtime on your Linux machine.
We highly recommend following our guide on installing Docker, as it will ensure you have the latest version of the runtime. Newer versions have additional functionality that we require and have Compose functionality built-in.
https://pimylifeup.com/linux-docker-install/2. Once Docker has been installed, we want to create a directory to store the Docker Compose file for Homebridge.
You can create this directory by using the mkdir command within the terminal. We use the “-p” option to ensure the whole path is created.
We choose to use the “/opt/stacks” directory because it is convenient for storing our Compose files. You can use whatever directory you want, but our tutorial will assume you are using this one.
sudo mkdir -p /opt/stacks/homebridgeCopy3. Once you have created the Homebridge stacks folder, change to the directory by using the cd command.
cd /opt/stacks/homebridgeCopyWriting the Docker Compose File for Homebridge
4. Now that we are in the correct place, we can use Nano to begin writing the Docker Compose file for Homebridge.
You can use whatever text editor you like, but we find Nano to be one of the easiest, especially for beginners.
sudo nano compose.yamlCopy5. In this file, you should enter the following lines. These lines define the Homebridge image that we want to run within the Container and set it to always restart.
Additionally, we set up this container to run in host mode. This enables the container networking to act as if it were running on the host machine itself, which is crucial for the way Homebridge works.
Finally, we set up Homebridge so that it will store it’s data within the “./data” directory of our “/opt/stacks/homebridge” folder.
services:
  homebridge:
    image: homebridge/homebridge:latest
    restart: always
    network_mode: host
    volumes:
      - ./data:/homebridge
    logging:
      driver: json-file
      options:
        max-size: "10mb"
        max-file: "1"Copy
6. Once you have finished writing out the Compose file, you can save and quit by pressing CTRL + X, Y, and then ENTER.
Starting up Homebridge
7. Now that we have written the Compose file, starting up Homebridge using the Docker container is as simple as running the command below within the terminal.
We utilize the “-d” option to ensure that Homebridge will run in the background once Docker has downloaded and started the container.
If you are having trouble starting Homebridge, remove this option to reveal any errors that might be occurring.
docker compose up -dCopyAccessing the Homebridge Web Interface
8. At this point, you should have the Homebridge software up and running on your device. You will want to access its web interface so you can begin using it and integrating your devices with Homekit.
If you don’t know your machine’s IP address, you can often use the hostname command to find out.
hostname -ICopy9. Once you have your IP, you will want to go to the following address in your favorite web browser. Ensure that you replace “<IPADDRESS>” with the IP you retrieved earlier.
http://<IPADDRESS>:8581First Launch of Homebridge
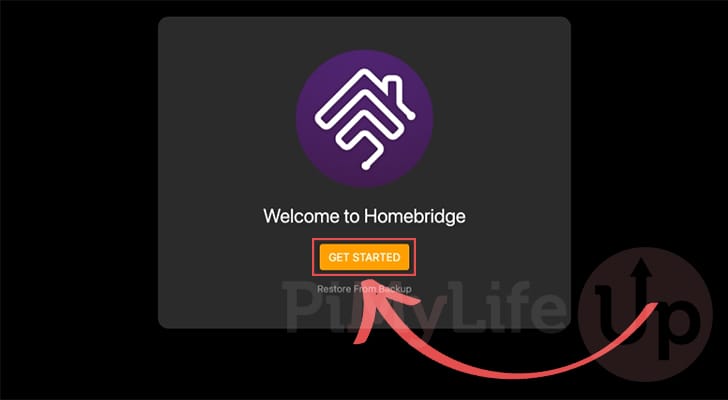
10. The first time you open the Homebridge web interface, you will need to follow some setup steps.
To start up this process, you will want to click the “GET STARTED” button.
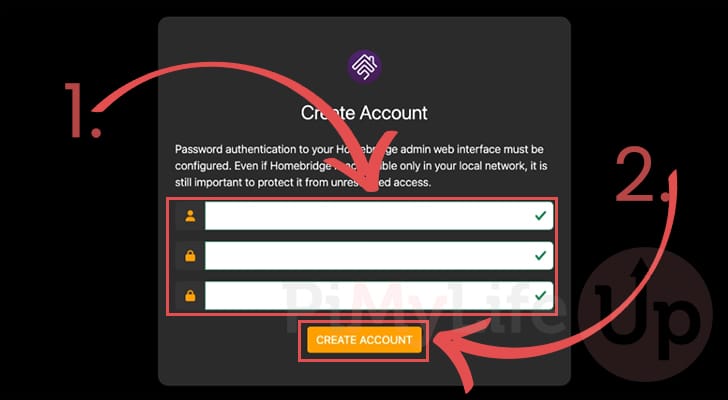
11. Next, you will be asked to create an account for your Homebridge Docker container. This account will be used to access the web interface.
Fill out a username and password for your account (1.), and then click the “Create Account” button (2.).
12. That is everything you need to do to get Homebridge up and running. You can now go to the dashboard by simply clicking the “Open Dashboard” button.

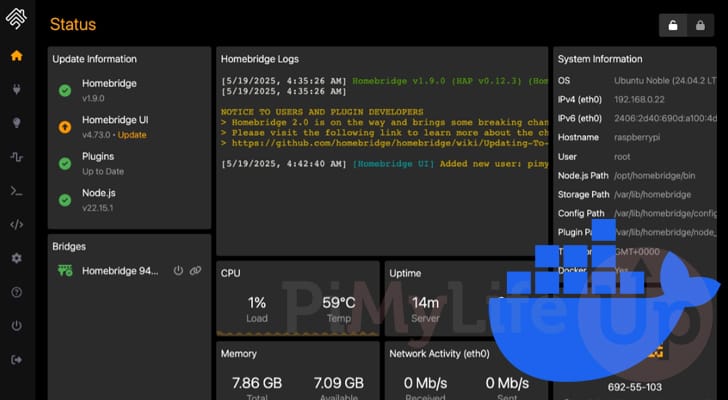
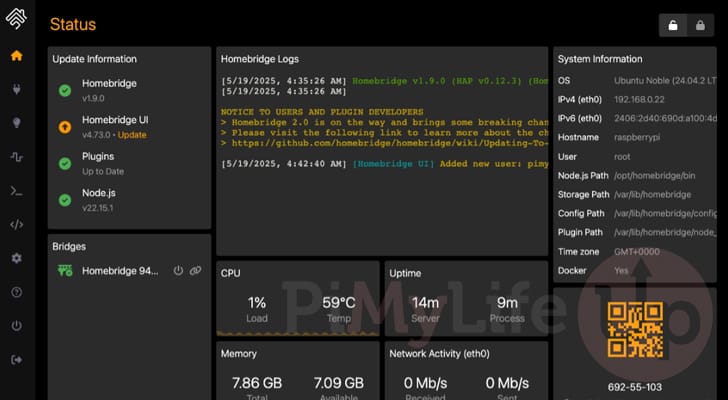
13. At this point, Homebridge is up and running on your device. You can now begin to integrate your various smart home devices with Apple Homekit using this software.
This initial screen will also show you the pairing code that you will need to use to get Homebridge to actually communicate with Apple Home.
Conclusion
By this stage of the guide, you should hopefully have the Homebridge Docker container up and running on your device.
Homebridge is a neat piece of software that enables you to easily link your various smart home devices into HomeKit. This allows you to use the devices you want without having to worry about whether they have official Apple Home support.
Best of all, Docker makes getting Homebridge up and running a really simple process, with just a few simple commands to run.
Please feel free to comment below if you have had any issues running this software.
If you liked this guide, we highly recommend exploring the many other self-hosted Docker projects we cover.