In this tutorial, we will be showing you how to compile and use gDrive. gDrive is a command-line tool for interacting with Google Drive.
gDrive is a handy tool for uploading files to Google Drive through the command line. It is relatively simple to use once you have it set up on your device.
This guide will show you how to compile the gDrive software for the Raspberry Pi using your own Google credentials.
Even though this guide focuses on the Raspberry Pi, you can compile gDrive for most operating systems by following the same steps.
By using your own Google credentials, you will be less likely to run into errors like “Sign in with Google temporarily disabled for this app“.
Setting up the Go Compiler
Before we can compile the gDrive software on our device, we must first install the Go compiler.
If you are doing this on a Windows or macOS device, then you can grab the relevant installers from the Golang website.
1. However, if you are doing this tutorial on a Linux based system like Raspbian, the steps get a bit more involved.
On the terminal on your Linux system, run one of the following commands. These wget commands differ depending on what architecture you are using.
Linux ARMv6 (Use when running a 32-bit OS on a Pi)
wget https://go.dev/dl/go1.19.4.linux-armv6l.tar.gz -O go.tar.gzCopyLinux ARM64 (Use this when running a 64-bit OS on a Pi)
wget https://go.dev/dl/go1.19.4.linux-arm64.tar.gz -O go.tar.gzCopyLinux 64-bit
wget https://dl.google.com/go/go1.19.4.linux-amd64.tar.gz -O go.tar.gzCopy2. With the Go binaries downloaded, we need to now extract it to the /usr/local/ directory.
Run the following command on your device.
sudo tar -C /usr/local -xzf go.tar.gzCopy3. Our next step is to get the terminal to interact with Go.
We can do this by modifying the bash aliases file. This file is automatically executed by Bash and will load in our new paths.
nano ~/.bashrcCopy4. To the bottom of this file, add the following two lines.
These two lines will allow us to run the compiler straight from the command line without having to reference its path directly.
export GOPATH=$HOME/go
export PATH=/usr/local/go/bin:$PATH:$GOPATH/binCopy
5. Now save the file by pressing CTRL + X followed by Y then ENTER.
6. To load in the changes to the bashrc file without having to restart, run the following command.
source ~/.bashrcCopyRetrieving your Google Drive API Credentials
Before we proceed to compile the gDrive software we need to retrieve your Google Drive API Credentials.
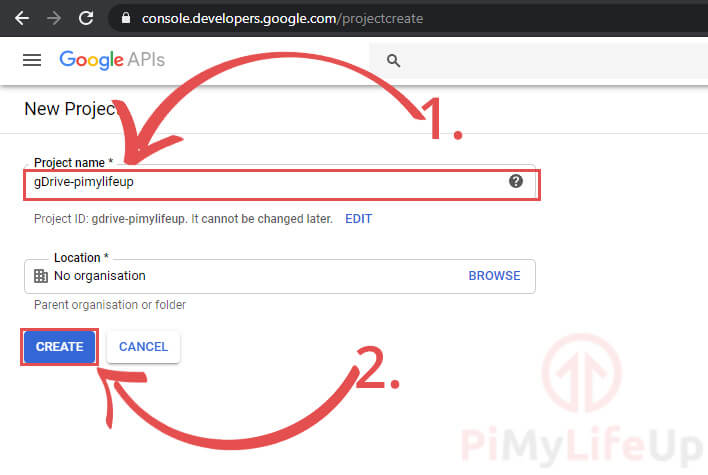
1. Begin by going to the “Create Project Page” in the Google Developer Console.
On this page, you need to enter a name for your project (1.). For our example, we will be using the name “gDrive-pimylifeup“.
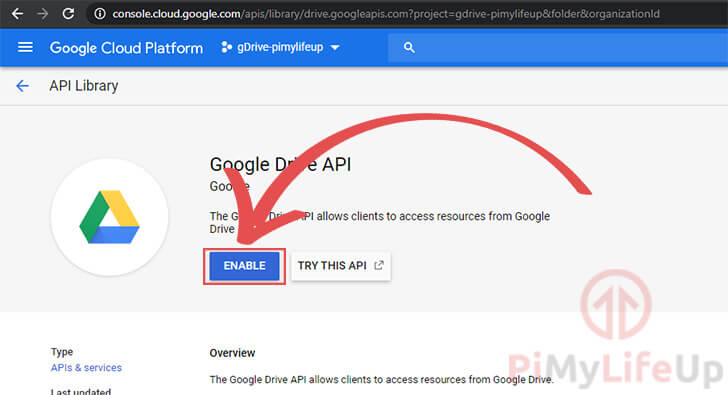
2. Next, we need to enable the Google Drive API for our new project.
We can do that by going to the Google Drive API page within the Google Cloud console.
On this page, click the ENABLE button.
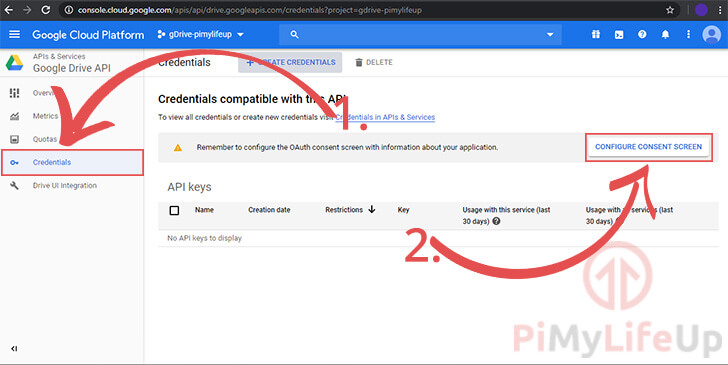
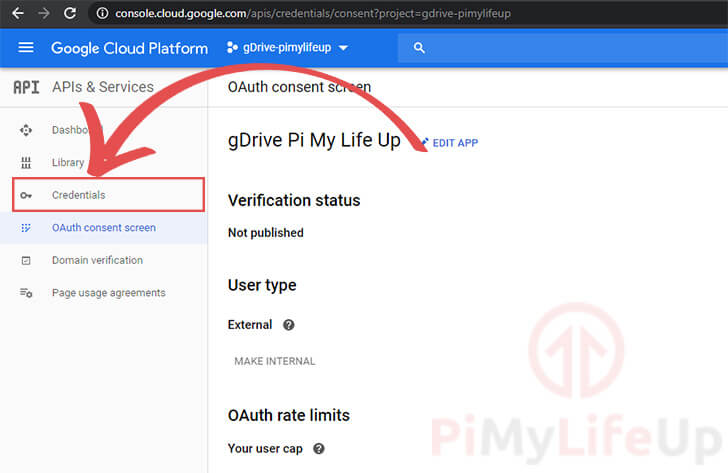
3. On the next page you are taken to, click the “Credentials” option in the sidebar (1.).
Next, we need to click the “CONFIGURE CONSENT SCREEN” button (2.).
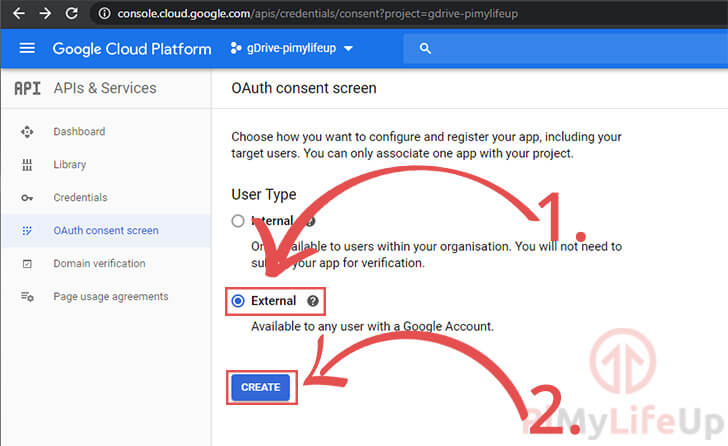
4. You will now be asked to pick the “User Type“. Unless you are running an organization, you will need to use the “External” option (1.).
Once selected, begin creating the app by clicking the “Create” button (2.).
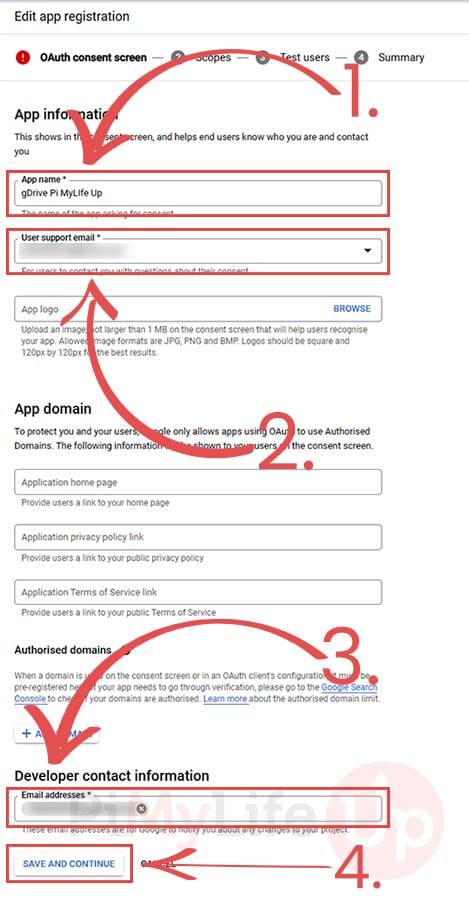
5. On this page, you will need to enter a name for your application (1.).
For our example, we will be using the application name “gDrive Pi My Life Up“.
Next, you will need to ensure that you have a support email selected (2.).
The last option you will need to set is the “Email addresses” under the “Developer contact information” header at the bottom of the page (3.).
Once you have the required information filled out, you can save your settings by clicking the “Save and continue” (4.) button.
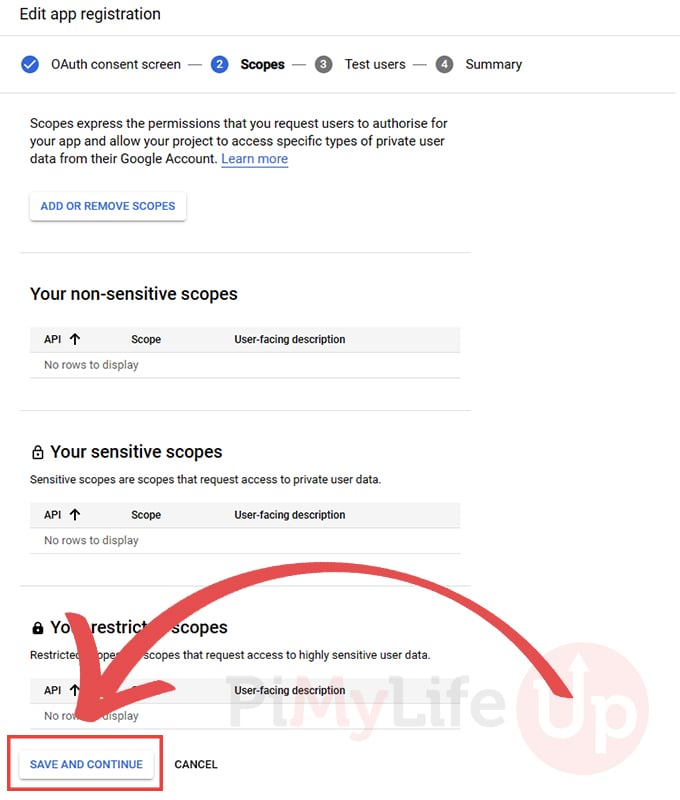
6. This next screen allows you to configyre you OAuth consent screen to give access to additional information.
As we don’t need any of this to run or install gDrive you can safely click the “SAVE AND CONTINUE” button.
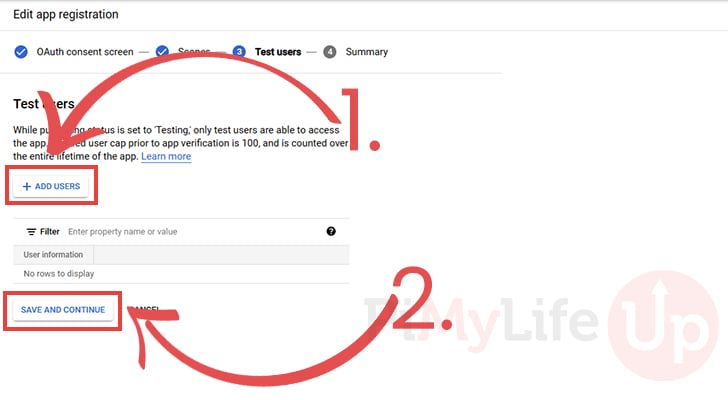
7. We now have the chance to add users that will have access to this particular instance of gDrive. Any user that you want to access the contents of their gDrive account must be added here.
To begin adding test users you will need to click the “ADD USERS” button (1.). Please note you will need to even add your own user to this otherwise you will run into an authentication error later on.
Once you have added any users you might want to use, click the “SAVE AND CONTINUE” button (2.) to proceed.
8. Next, we need to return to the “Credentials” page by clicking the “Credentials” option in the sidebar.
You can use the sidebar to easily get back to the page.
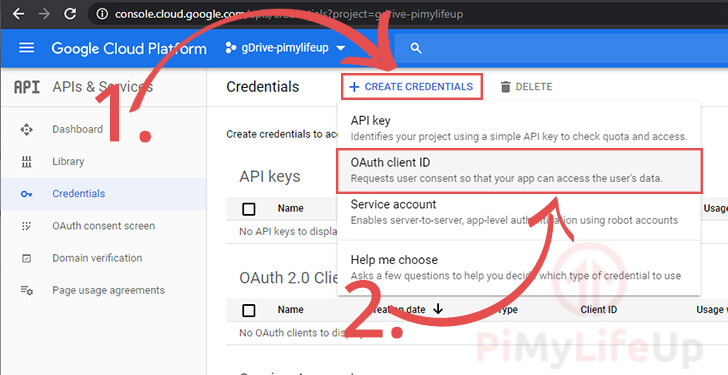
9. On this screen, click the “Create Credentials” button (1.).
In the pop-up that appears, click the “OAuth client ID” button (2.).
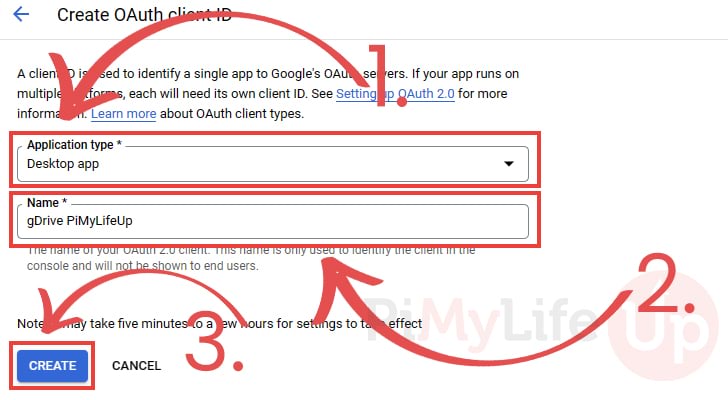
10. We now need to select the application type. As none of the options fit what we are using the API for we selected “Desktop App“. (1.)
We then need to enter a name for this application (2.). For this example, we just used the name “gDrive Pi My Life Up“.
Once all the data has been entered, click the “Create” button (3.)
11. You should now have both the client id and client secret.
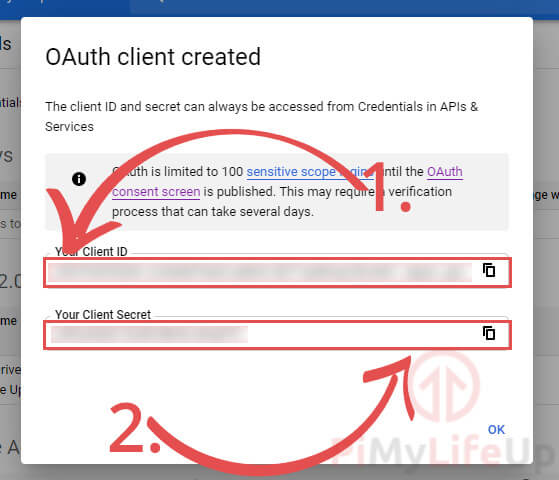
Copy both of these values down as you will need them later on in this tutorial.
Compiling gDrive with your API Credentials
To compile gDrive, we will need to get its source code by using git.
Before we do this, we should first install git to our device.
You can download the software from the official Git website, or follow the steps below for Debian based system such as Ubuntu and Raspbian.
1. Before we install git, we need to first update the package list by running the command below.
sudo apt updateCopy2. Now, all we need to do is to run the following command.
sudo apt install gitCopy3. With git installed to your device, run the following command to clone the gdrive code.
git clone https://github.com/msfjarvis/gdrive/Copy4. Our next job is to replace the client secret and client id defined in the code.
Begin this process by changing into the cloned directory and modifying the “handlers_meta.go” file using nano.
cd gdrive
nano handlers_drive.goCopy
5. In this file, find the following lines and replace them with their required data.
You should have both the client id and client secret from the previous section.
Find
const ClientId stringReplace With Your own Client ID
const ClientId = "YOURCLIENTID"Find
const ClientSecret stringReplace With Your own Client Secret
const ClientSecret = "YOURCLIENTSECRET"6. With the changes made, save the file by pressing CTRL + X, followed by Y, then ENTER.
7. We can now compile gDrive to our device by running the following command.
go build -ldflags '-w -s'CopyThe next few steps will make the file usable within the command line
8. To be able to access the binary by using gdrive in the command line, we need to move the file to /usr/local/bin/.
Run the following command to move the executable file.
sudo mv gdrive /usr/local/bin/gdriveCopy9. The last thing we need to do is give the gdrive executable execution privileges.
sudo chmod a+x /usr/local/bin/gdriveCopyAuthenticating your new gDrive Installation
Before we can utilize gDrive on your device we will need to authenticate it with your account. If you are running a desktop flavour of your chosen operating system than this is very straightforward.
For those who are running a headless system we will have to make sure of the curl command and a separate computer with access to a web browser.
1. To begin authenticating your gDrive installation you will want to run the following command.
You can use any gdrive command, but list is one of the simplest ones.
gdrive listCopy2. When you run any command before being authenticated you will see a message such as the one below.
If you are running this directly on your device and have access to a web browser then you can simply go to the address shown and follow the prompts.
Alternatively, if you are using SSH and the system you are setting this up on is headless we have some alternative steps you can use.
Authentication needed
Go to the following url in your browser:
http://127.0.0.1:45439/authorize

Waiting for authentication response
Headless Setup Workaround
3. The following steps will need to be ran in a separate terminal session as we need gDrive to be running for the following steps.
Only run these steps if you are running a headless setup. If you have access to a web browser on your system than it is far simpler to use it.
4. With the URL from the previous command handy we can utilize the curl tool to fetch the address we need to go to.
For example, in our case the URL was “http://127.0.0.1:45439/authorize” so we utilized the following command.
curl http://127.0.0.1:45439/authorizeCopy5. After running the above command you should see some HTML printed to the terminal like we have shown below.
You will want to go to the address between the two double quotes within your browser.
<html><head>
<title>Redirect to authentication server</title>
</head><body>
Click <a href="https://accounts.google.com/o/oauth2/auth?access_type=offline&client_id=EXAMPLECLIENTID.0.0.1%3A45439%2Fcallback&response_type=code&scope=https%3A%2F%2Fwww.googleapis.com%2Fauth%2Fdrive&state=6mUZIaLhl2
</body></html>
Copy
For example, the address from the HTML code shown above would be the following.
https://accounts.google.com/o/oauth2/auth?access_type=offline&client_id=EXAMPLECLIENTID.0.0.1%3A45439%2Fcallback&response_type=code&scope=https%3A%2F%2Fwww.googleapis.com%2Fauth%2Fdrive&state=6mUZIaLhl26. Once you have loaded up the Google page, follow the prompts until you have authorized the client.
Eventually you should get to a point where your web browser is redirected to a “127.0.0.1” local address like shown below. Copy this address for use in the next step.
http://127.0.0.1:45439/callback?state=EXAMPLESTATE&code=4/EXAMPLECODE&scope=https://www.googleapis.com/auth/drive7. Finally, to authorize your client all you need to do is run the following command. Ensure that you replace the URL we have shown with the URL you got in the previous step.
This is simply making the callback call as if it was running locally.
curl "http://127.0.0.1:45439/callback?state=EXAMPLESTATE&code=4/EXAMPLECODE&scope=https://www.googleapis.com/auth/drive"CopyPlease ensure that you keep the double quotes ("") as they stop bash from interpreting the ampersand symbols (&) as running a new command.
8. If everything has worked, you should see the contents of you gDrive account listed in the terminal session where you are running
Testing gDrive on your Device
1. Let’s now begin testing gDrive by connecting your Google account to the application.
To start this process, we need to use the gdrive command alongside the “list” argument.
gdrive listCopy2. If a list of files is displayed, then you have successfully set up gDrive on your device.
This command also shows you the id for each of your folders, If you want to sync a particular folder, you will need the IDs mentioned here.
3. If you want to try syncing a folder, then you can use the following command.
Replace <DIRECTORY> with the path to where you want the files synced to.
You also need to replace <GOOGLEFOLDERID> with the id of a folder you have retrieved using the grdive list command.
gdrive sync upload <strong><DIRECTORY></strong> <strong><GOOGLEFOLDERID></strong>CopyAt this point in the guide, you should now have gDrive up and running on your device.
If you are after a tutorial to put gDrive to use, be sure to check out our internet speed monitor guide.
If you have run into any issues with this tutorial, feel free to drop a comment below.


Hello sir, it’s franck
I resolved my pb with gDrive
In ID clients OAuth 2.0, choose “Desktop computer”
Now with command “gdrive list” I saw my gdrive files 😃
Are there any updates for this instruction, cause Google deprecated the oauth-out-of-band-oob-flow-on-october-3.. and i got error messages at ‘gdrive list’..
any suggestions how to change the credential to fit the new rules ??
Hi Big11,
I just updated the guide to hopefully work around the new issues caused by the deprecation of the out-of-band flow.
Please let me know if you run into any issues with the new chages.
Cheers,
Emmet
Having a problem with the last section, Error i receive is
bash: ./gdrive: No such file or directoryHere is the code ive entered, Have i made a mistake?
Hi Stephanie,
There was a slight mistake in the guide we I included the “
./“.As during the tutorial we moved gdrive to the bin file you should be able to run that same command but without the “
./“.The “
./” is basically telling the terminal that it should look for that file / executable in the current path, which is why you are running into the no such file or directory error.Let me know if that helps you out with the issues you are facing.
Cheers,
Emmet
I have followed everything but when I come to step 7: command: “go get github.com/prasmussen/gdrive” in “Compiling gDrive with your API Credentials” I get theis error:
-bash: /usr/local/go/bin/go: cannot execute binary flie: Exec format error
I have verifyed that I am executing the command in the ~/gdrive folder and with the ls command I can see that I have all the files on my PI in the ~/gdrive path
In advance ty for the help and the guides
Found the error.
Not the right version of go
Hello I have a this working on one (raspi) but I want to also get it running on a few other raspi’s. Do I need to set up separate credentials for each Pi or can I use the same one for all of them.
Hi Daniel,
From memory you should be able to use the same credentials for each device. Unless you are using the gDrive software super heavily you shouldnt run into any limitations.
Cheers,
Emmet
7. We now need to run the following command so that the Go compiler retrieves all the additional packages that we require to compile our modified version of gDrive.
go get github.com/prasmussen/gdrive
This step seems to be not working anymore. Not sure if I am not doing the steps right or something has changed.
Hi Kacey,
I tested the tutorial again just then and everything is still working as expected. It’s likely you made a mistake at some point.
Make sure you are using the “go get” command within the
~/gdrivedirectory.Cheers,
Emmet
I am having a problem with the last part on syncing the files it isnt clear in the replacing and part.
Hi Tyler,
I have fixed the final command so that it should be more obvious on how to use the command.
Thank you for pointing out the mistake.
Cheers,
Emmet