In this tutorial, we will show you an easy way to set up a WireGuard VPN using Docker.

WireGuard is a popular alternative to OpenVPN, known for being incredibly fast yet super secure. Thanks to its significantly smaller code base, it has a much smaller attack surface than its competing protocols.
A VPN is a virtual private network that operates over a secure encrypted tunnel. Someone needs the encryption keys to snoop on the data within this tunnel while it’s in transit. There is a wide variety of uses for a VPN like WireGuard, such as accessing your home network when you are traveling.
Traditionally, setting up WireGuard can be a bit of a messy experience. Luckily, Docker makes this significantly simpler.
To improve the experience further, we will use a container called WG-Easy. This Docker container comes with WireGuard and a neat web interface that makes managing your VPN a breeze.
Additionally, WG-Easy is a great choice since it contains full support for both X64 and ARM operating systems. So, you could even follow these guides on your Raspberry Pi if you wanted.
Installing WireGuard VPN using a Docker Container
In the following sections, we will show how to run the WireGuard VPN using a Docker container.
We will achieve this by writing a Compose file that utilizes the WG-Easy image. This image is an excellent choice as it makes setting up and controlling WireGuard straightforward.
Below we have embedded a video that walks you through the whole set up process. However, if you prefer our written content be sure to continue on.
Installing Docker to your Machine
1. To run WireGuard using Docker, you will need to have Docker installed on your machine. You can skip to step 4 if you already have Docker.
If you are using a Linux-based operating system you can use the following command within the terminal.
curl -sSL https://get.docker.com | shCopy2. Once you have Docker installed, you will want to add your current user to the “docker” group. Adding your user to this group will allow you to stop and start the WireGuard Docker container without having to utilize the super user.
You can make this change by using the command below.
sudo usermod -aG docker $USERCopy3. Changes to users on Linux require you to log out and back in.
If you are using SSH to connect to your machine, you can easily log out using the following command.
logoutCopyAlternatively, you can restart your machine by running the command below.
sudo rebootCopyPreparing for WireGuard
4. Since you are setting up a VPN, you must have your device accessible from outside your network.
This likely means you must port forward on a home network and ensure your device has a static IP address.
To access your WireGuard VPN from outside your network, you will want to open port “51820“. If you need to specify the protocol, then use “UDP“.
We won’t be covering how to port forward as routers drastically differ.
5. Our next step is to create a directory to store the Compose file for running WireGuard using Docker.
It is also the same location we will be storing all of the configuration files for Wireguard. You can create a directory at “/opt/stacks/wireguard” by using the mkdir command.
sudo mkdir -p /opt/stacks/wireguardCopyBy using the “-p” option we are ensuring this command will create the entire path, rather than just attempt to make the ending path.
6. After creating the directory, we will need to change into the folder by using the command below.
For the rest of the tutorial, we expect that you are within this folder.
cd /opt/stacks/wireguardCopyGenerating a Password Hash for your WireGuard Docker Container
7. Before we can begin to set up the Compose file for WireGuard, we will need to generate a quick hash for the password you intend on using. Luckily the Docker container has an easy script we can execute.
Within the terminal, run the following command. While typing out this command, ensure that you replace “<PASSWORD>” with the password you intend on using to access the WG-Easy web interface.
docker run --rm -it ghcr.io/wg-easy/wg-easy wgpw '<PASSWORD>'CopyFor example, to generate a hash for the password “pimylifeup” we would run the command below.
docker run --rm -it ghcr.io/wg-easy/wg-easy wgpw 'pimylifeup'Copy8. After running the above command, you should end up with a line that looks somewha like what we have shown below.
This is a bcrypt hash of your password. However, before this line can be used in the Docker Compose file, it requires some modifications.
PASSWORD_HASH='$2b$12$coPqCsPtcFO.Ab99xylBNOW4.Iu7OOA2/ZIboHN6/oyxca3MWo7fW'Copy9. Before you write this password hash value down, remove the tw0 single quotes ('), and add an additional dollar sign ($) after each dollar sign.
So, for example, our line above would turn into the following
PASSWORD_HASH=$$2b$$12$$coPqCsPtcFO.Ab99xylBNOW4.Iu7OOA2/ZIboHN6/oyxca3MWo7fWCopyWriting a Docker Compose File for Wireguard
10. We are finally at the point where we can write the Docker Compose file for our WireGuard VPN. A Compose file is like a set of instructions that Docker will use to manage and run your WireGuard VPN.
By running the following command, you can begin writing this file using the nano text editor.
sudo nano compose.yamlCopy11. Within this file, you will want to type in the following lines.
<PASSWORD_HASH>: Replace this placeholder with the value that you got earlier in on this guide. The password that was generated for this hash is what you will use to log in to the WG-Easy web interface.
This web interface is what you will be using to create and manage clients for your WireGuard VPN easily.
This line will end up looking a bit like what we have shown below. The hash should differ as your password and “salt” will be different.
- PASSWORD_HASH=$$2b$$12$$coPqCsPtcFO.Ab99xylBNOW4.Iu7OOA2/ZIboHN6/oyxca3MWo7fW<IPADDRESS>: Next, specify the IP address or domain name where your VPN can be accessed.
The IP address must be your external one and not local. Additionally, if you use a domain name, you will want to ensure that it is pointed to where your WireGuard VPN is hosted.
services:
  wg-easy:
    container_name: wg-easy
    image: ghcr.io/wg-easy/wg-easy

    environment:
      - <PASSWORD_HASH>
      - WG_HOST=<IPADDRESS>

    volumes:
      - ./config:/etc/wireguard
      - /lib/modules:/lib/modules
    ports:
      - "51820:51820/udp"
      - "51821:51821/tcp"
    restart: unless-stopped
    cap_add:
      - NET_ADMIN
      - SYS_MODULE
    sysctls:
      - net.ipv4.ip_forward=1
      - net.ipv4.conf.all.src_valid_mark=1Copy
12. After typing out the above lines, you can save and quit by pressing CTRL + X, Y, and finally, the ENTER key.
Starting up your Wireguard Docker Stack
13. With the Compose file written, starting WireGuard using Docker is incredibly simple.
To get our VPN up and running, we need to use the command below.
docker compose up -dCopyBy using the “-d” option, we are telling Docker to detach from the terminal once it has started our WireGuard container.
Accessing your Wireguard Docker Container Web Interface
14. Before you can start using your new VPN, you will need to create a new client. Typically, this can be a bit of a pain, but the container we are using comes with a super easy-to-use web interface.
To access this web interface, you will want to know the local IP address of your device. You can get this IP easily by using the hostname command.
hostname -ICopy15. Once you know your IP address, you can go to the following address to access the WG-Easy web interface.
http://<IPADDRESS>:51821Using WG-Easy to Manage your Wireguard Docker Container
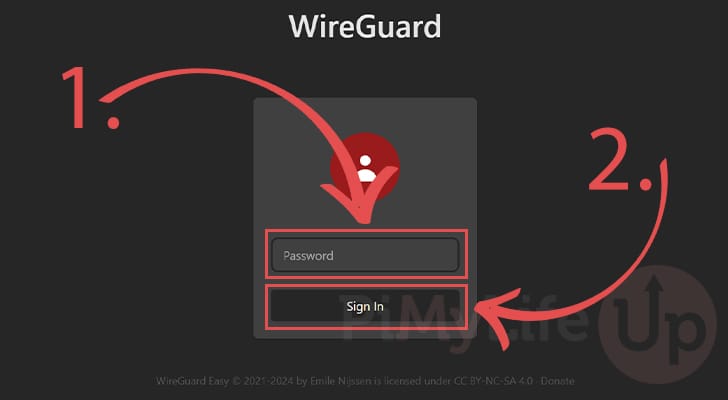
16. You should now see the following screen asking you to log in to the WG-Easy web interface.
First, you must type in the password you set earlier in this guide (1.).
After typing in your password, simply click the “Sign In” button (2.) to access the web interface.
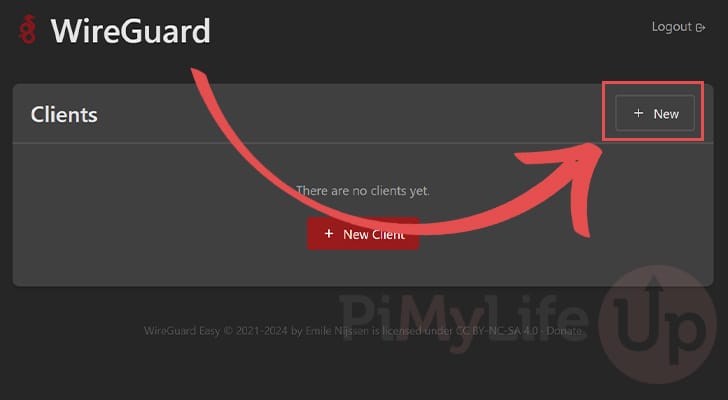
17. Once you are logged in, you can create your first client for your WireGuard VPN Docker container.
To begin this process, click the “+ NEW” or “+ New Client” button.
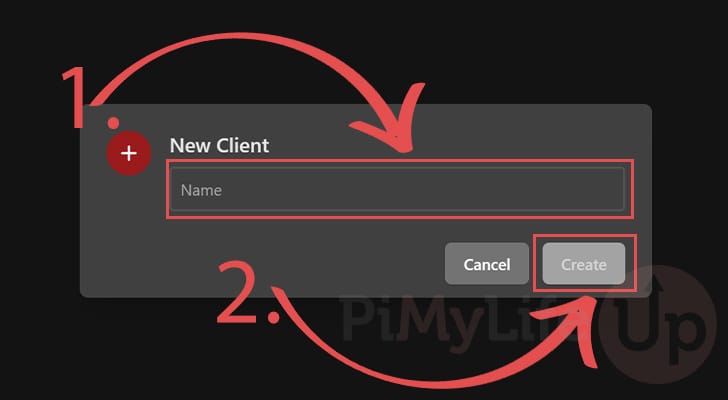
15. On this screen, you will now want to give a name to your new client (1.). Name this something so you know where this client is being utilized.
After typing a name, click the “Create” button (2.).
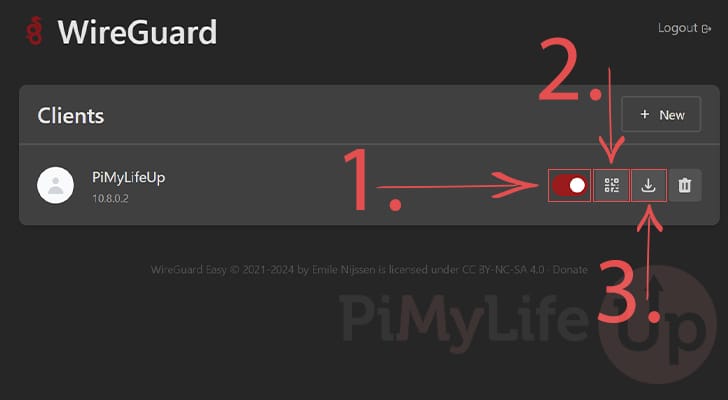
16. At this point, you finally have WireGuard up and running using a Docker container. You can now download your client details and connect to your VPN.
The WG-Easy web interface we are using allows you to generate a QR code (2.) for easy adding of your client.
You can also download the config files if your client doesn’t support scanning QR codes (3.).
If you want to stop a client from accessing your WireGuard VPN, you can click the toggle (1.).
Updating your WireGuard Docker Container
One of the advantages of running your WireGuard VPN using Docker is that you can easily update to the latest available version with ease.
Over the following steps, we will show you just how easy it is to update to a newer version.
1. Your first step is to change to the directory where we wrote the Compose file for WireGuard earlier on in this guide.
Changing to this directory is as easy as typing in the following command.
cd /opt/stacks/wireguardCopy2. Once you are in the correct place, you will want to tell Docker to pull the new version of all images specified within the compose file.
You can download the latest version of WG-easy and WireGuard by using the command below.
docker compose pullCopy3. Even though Docker downloaded a new version of WireGuard, you will need to get it to actually use it.
Luckily, you can start your Compose file again, and Docker will automatically power down your VPN and start it again using the new image.
docker compose up -dCopyConclusion
Hopefully, at this point in the guide, you will now have your WireGuard Docker container up and running.
Using Docker to run WireGuard allows you to quickly get your VPN up and running while also making it super easy to update and restart. If your VPN crashes, Docker will automatically restart the software.
Please feel free to comment below if you have any questions about running WireGuard through a Docker Container.
If you found this tutorial to be helpful, we highly recommend checking out our many other guides.


Great instructions even for an 82 year old guy
works great!
the only change I needed to make was to change the version to
version: “3.3”
maybe I have an old version of docker-compose
thanks!
Love this. Thank you
For “WG_HOST=”, would this be the static ip of the raspberry device?
Hi Mohammed,
This should be set to the address from which your device can be reached. In most home cases this will be your external IP address. You will then have to set up port forwarding in your router so that it routes connections to the port 51820 to your Raspberry Pi.
Hopefully that helps you with working out what you need to set here.
Kind regards,
Emmet
If my external ip (WAN ip I think?) changes due to my ISP, should I use Dynamic DNS services like DuckDNS or would using my own domain and CloudFlare Tunnel a good alternative?
Thanks for the help!
Hi Mohammed,
Yes, I would definitely recommend setting up dynamic DNS, its usually something pretty simple to set up and will save you a lot of pain down the road if your IP address changes.
The free version of Cloudflare Tunnel is really only aimed at dealing with HTTP and HTTPS traffic. Anything else they expect you to be using an enterprise plan. A good alternative to that however would be to use something like Tailscale. It would also save you the hassle of having to worry about setting up dynamic DNS.
Kind regards,
Emmet
Note that PASSWORD= is no longer supported by wg-easy, the container won’t start up. You *need* to use PASSWORD_HASH instead, see
https://github.com/wg-easy/wg-easy/blob/master/How_to_generate_an_bcrypt_hash.md
Hi Chris,
Thanks for the heads up about that. I have updated the guide to now reference generating a password hash instead.
Kind regards,
Emmet