In this tutorial, we will show you how to change your username on the Ubuntu operating system.
Changing your username on an operating system like Ubuntu is a fairly straightforward process. Where things get tricky is the side effect of changing the name.
Starting off, you don’t have to worry about permission issues. Any file owned by your current username will follow the new username. This is because permissions are tied to the user ID (UID), not the username.
You may run into issues after changing your username when something specifically references the username. A place where this can occur is within service files, especially when writing your own. It can also cause issues for things that directly reference your home directory. However, we can solve this by using a symbolic link.
To change your username on Ubuntu you will need to use the terminal. While there is a way you could potentially do this through the GUI, it is more time-consuming and can potentially break things.
Don’t worry, though; changing your username is made incredibly simple thanks to the usermod tool. This tool allows you to modify almost all aspects of your user on Ubuntu, including its username.
In the following section, you will learn how to change the username on your system and create a symbolic link from your old home directory to your new one.
Changing your Username on Ubuntu
The following sections will be run within the terminal. If you use Ubuntu desktop, you can launch the terminal by pressing CTRL + ALT + T on your keyboard.
Throughout these sections, you will create a temporary user with root privileges. This means you must log out and back in during this guide.
Once you are using the temporary user, changing a username is a straightforward process on Ubuntu.
Creating a Temporary User
1. If the username you want to change belongs to the user you are using, you must create a new temporary user. This is because you cannot change the name of a user who is currently logged in.
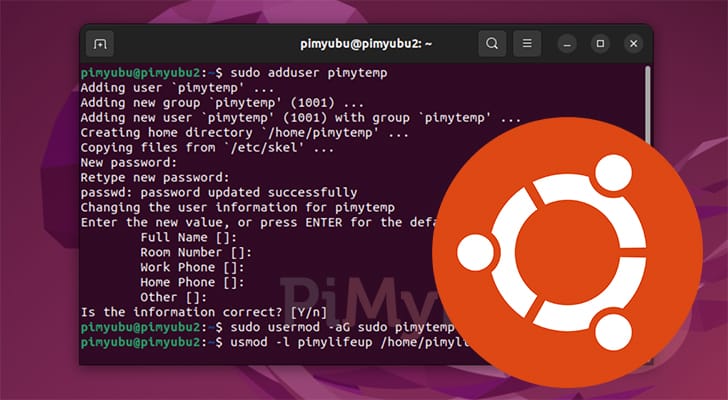
Let us start by creating a temporary user by using the following command. For this tutorial, we will be calling this user “pimytemp“.
sudo adduser pimytempCopy2. When creating the new user, You will be asked to assign a password. Even though this is a temporary user that we will delete later, ensure you set the password to something secure.
3. Once you have created the user, you must add it to the “sudo” group by using the command below.
Any user within this group has access to the superuser.
sudo usermod -aG sudo pimytempCopy3. With that done, you log out of your current user. Ubuntu won’t let us change the username if it is still logged in.
If you are using Ubuntu server, logging out is as simple as using the command below.
logoutCopy4. Now, log back into Ubuntu using “pimytemp” as the username and then the password you set.
Changing the Username of an Ubuntu User
5. After logging back in, ensure the terminal is open on Ubuntu.
With the terminal open, let us elevate ourselves to the superuser using the following command. Being the superuser will save you from having to type “sudo” for the next few steps.
sudo suCopy6. Finally, we can use Ubuntu’s terminal to change our username. Luckily, the usermod command makes this part of the whole process very simple.
You must use the following command to change your username and move its home directory. While typing out this command, replace “<NEWNAME>” with your new username and replace “<OLDNAME>” with your old username.
usermod -l <NEWNAME> -d /home/<NEWNAME> -m <OLDNAME>CopyFor example, if we were to change our username from “pimyubu” to “pimylifeup“, we would use the following command.
usermod -l pimylifeup -d /home/pimylifeup -m pimyubuCopy7. After changing the username of a user on Ubuntu, you should also change the group name.
Changing the group name is as straightforward as changing the username, but instead, you will use the groupmod command.
Run the following command within the terminal and replace “<NEWNAME>” with your new username and “<OLDNAME>” with your old one.
groupmod -n <NEWNAME> <OLDNAME>CopyAn example of how this command would look after filling it out with your details is the following.
groupmod -n pimylifeup pimyubuCopyCreating Symbolic Link for Old Home Directory
8. After changing your username on Ubuntu, you will also have moved your home directory.
A problem can occur here if you have scripts or programs still expecting your old home directory to exist. You can work around this by creating a symbolic link from the old directory location to your new one.
Creating this link is as simple as using the following command in the terminal. Ensure you replace “<OLDNAME>” with your old username and “<NEWNAME>” with the new one.
ln -s /home/<NEWNAME> /home/<OLDNAME>CopyFor example, if we wanted to create a link to our old “pimyubu” home directory, you would use the command below.
ln -s /home/pimylifeup /home/pimyubuCopy9. Since we created this symbolic link using the root user, we must change its ownership.
Change the ownership of the symbolic link to your new username by using the following command.
chown -h <NEWNAME>: /home/<OLDNAME>CopyCleaning Up After Changing your Username on Ubuntu
10. Now that you have changed your username on Ubuntu, we can clean up.
As we are currently in the “root” shell, we must first exit before we can log out of our temporary user.
exitCopy11. Once we are back to operating as the temporary user, we can log out using the following command within the terminal.
logoutCopy12. You should now be able to log in using your newly changed username.
Once logged back on, you can delete the temporary user we created by running the following command.
sudo userdel pimytemp -f -rCopyBy using the “-f” option, we are telling the “userdel” tool that it should force removal of files. The “-r” option tells the tool that we will want to remove the home directory created for this temporary user.
Troubleshooting Changing a Username on Ubuntu
In this section, we will explore potential issues you may run into and offer some potential solutions. If you have any problems not covered, comment below, and we will try to address them.
usermod user is currently used by process
When attempting to change a user’s username on Ubuntu, you may run into an error similar to the one we have shown below.
This error indicates that the user is still being used to run a process, so you can’t modify it.
usermod: user <USERNAME> is currently used by process <PROCESSID>The easiest way to work around this is to kill the process running on your Ubuntu system. The simplest way to do this is to use “kill” followed by the process ID. The process ID is the number at the end of the error message.
kill <PROCESSID>CopyRepeat this process until the command completes successfully.
Conclusion
At this stage you should now have successfully changed your username on Ubuntu. This process will hopefully have been reasonably straightforward outside of having to create a temporary user.
Please feel free to comment below if you have any questions about changing a user’s name.
If you found this tutorial useful, be sure to check out our many other Ubuntu guides.