In this tutorial, we cover the basics of using the id command on a Linux operating system.
The id command in Linux is extremely helpful for finding both the user ID (UID) and group IDs (GID) of a user. Knowing these IDs will be useful for tasks that involve user management. For example, checking if a specific user belongs to a group.
For managing users on Linux, several other commands might interest you. For example, usermod, useradd, userdel, and passwd help with the creation and modification of users on a Linux operating system.
This tutorial will show the basic syntax of the id command and the many options you can use to alter the behavior. We will take you through several examples of how you will likely use the command.
Table of Contents
id command Syntax
The syntax of the id command in Linux is very straightforward. The command will accept two arguments, but neither is required for the command to function. For example, the command will look up the current user if no user is specified.
id [OPTION] [USER]Copy- [OPTION] is where you can specify any options you would like to apply to the command. We go through the options that you can use further down this page.
- [USER] is where you can specify the users you want to view. By default, the command will show you the current user’s information. You can specify a single or multiple users.
id Command Options
There is a variety of different options that you can use with the command. Below is a brief description of the different options you can use.
-Zor--contextprints the security context of the process. It will only work on an SELinux-enabled kernel.-gor--groupprints the effective group ID.-Gor--groupswill print all the group IDs attached to the user.-nor--nameuses the name instead of the number. It will need to be used with-u,-g, or-G.-ror--realprints the real ID instead of the effective ID. It needs to be used with-u,-g, or-G.-uor--userprints the effective user ID.-zor--zerowill delimit the entries with NUL characters rather than white space.--helpdisplays some helpful information.--versionoutputs the version of the command.
Real ID vs. Effective ID
In this guide, the terms real ID and effective ID are used. The real ID is the actual group or user. On the other hand, the effective ID is how the operating system views the user or group. In most cases, the real ID will be the same as the effective ID.
The above is a very simplistic description, so I recommend further research if you require more information.
Using the id Command
The id command is surprisingly easy to use as the arguments it requires are easy to understand, and the output is usually very straightforward. In the following few sections, we will take you to the most likely use cases for using this command.
Basic Usage
You do not need to specify any arguments for the id command to work. By default, the command will display information about the current user. The information includes the user ID (UID), primary group ID (GID), and all the supplementary groups.
Simply enter id into your terminal to view information on the current user.
idCopyAfter running the above command, you will have output that is similar to the example below.
dev@pimylifeup:~$ id
uid=1000(dev) gid=1000(dev) groups=1000(dev),4(adm),24(cdrom),27(sudo),30(dip),46(plugdev),116(lxd)Copy
Printing Group IDs
There are several different options for printing group ids (GID), so we will briefly touch on each of them.
In all of our examples, we use the current user, but do not forget that you can specify users after the options.
Print the Effective Group ID
To print the effective group ID, you can use the -g or --group option.
id -gCopyAs you can see in our output below, a number is returned. This ID is the effective group ID.
dev@pimylifeup:~$ id -g
1000Copy
Printing All Groups
To print all the groups attached to a user, you need to use the -G or --groups option.
id -GCopyThe output below showcases all the group IDs attached to our current user.
dev@pimylifeup:~$ id -G
1000 4 24 27 30 46 116Copy
Use Group Names Instead of Group ID
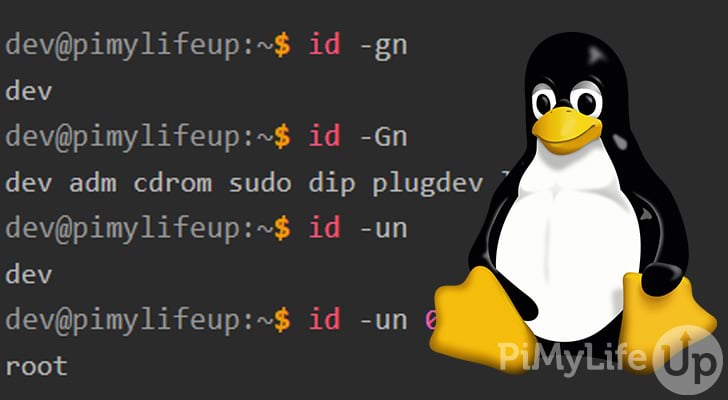
If you wish to view the different group names instead of the ids, you can use the -n or --name option alongside -g or -G.
id -gn
id -GnCopy
In our output below, you can see that the -n option uses the group’s name rather than the ID.
dev@pimylifeup:~$ id -gn
dev
dev@pimylifeup:~$ id -Gn
dev adm cdrom sudo dip plugdev lxdCopy
Use the Real Group ID
By default, the id command will show the effective ID instead of the real ID. You must use the -r or --real option if you require the real group ID. In most cases, the real and effective group ID will be the same.
You can use the -r or --real option with -g, --group, -G, or --groups options.
id -gr
id -GrCopy
Below are the real group IDs for all groups attached to our user. You will notice these IDs are the same as our effective ids.
dev@pimylifeup:~$ id -gr
1000
dev@pimylifeup:~$ id -Gr
1000 4 24 27 30 46 116Copy
Printing User IDs
This section will go through a few options for printing the user ID (UID). We will be using the current user for each of these commands, so do not forget you can specify a user after the options.
Print the Effective User ID
To print the effective user ID, you must use the -u or --user option.
id -uCopyIn the example below, you can see that our command returned the user’s ID.
dev@pimylifeup:~$ id -u
1000Copy
Use User Names Instead of the User ID
You can use the -n or --name option with the -u option to view the username of a certain user. For this example, we will simply use the current user, so we do not need to specify an user id.
id -unCopyIn our example output below, we display the output for our current user, which is “dev“. The second command checks to see the user’s name with the id of 0.
dev@pimylifeup:~$ id -un
dev
dev@pimylifeup:~$ id -un 0
rootCopy
Use the Real User ID
By default, the -u or --user option will simply get the effective ID of the user rather than the real ID. However, in most cases, the real and effective user ID will be the same.
To get the real ID, you will need to use the -r or --real option alongside the -u or --user option.
id -urCopyAs you can see below, our real id is the same as the effective ID.
dev@pimylifeup:~$ id -ur
1000Copy
More Help
If you require more help with the command, you can quickly get help within the Linux operating system.
The first method is to use the built-in manual tool included in most Linux distributions. To bring up the manual for the id command, you simply write man followed by the command name.
man idCopyTo exit the manual pages, simply press the q key.
You can also get help with the command itself using the --help option.
id --helpCopyBoth options above should hopefully provide you with the information you require.
Conclusion
Hopefully, this tutorial has helped guide you through how to use the id command. You will likely use this command a lot if you do a lot of system administration with multi-user systems. Thankfully it is relatively easy to remember most of the command’s available options.
If you want to learn even more tools that you can use on a Linux distribution, check out some of our other Linux command tutorials. For example, we have guides for adding users to Linux, modifying user settings, and more. They are absolutely great if you want to become a Linux expert.
Please let us know if you notice a mistake or an important topic is missing from this guide.