In this tutorial, we will take you through using the zip command so you can archive and extract data. We also cover some of the extra options you can use when using the command.
A zip archive is very common, and you will easily recognize it by the .zip file extension. The archive can consist of as little as a single file or contain thousands of files and directories.
Zip supports file compression, with the deflate method being the most commonly used. Both Windows and Mac have built-in support for zip files.
The zip command can create zip archive files and supports many options that help achieve different archiving tasks. However, a separate command called unzip is used to extract zip archives.
You can only use this command to handle zip files. If you have a tar archive, you will need to use the tar command.
Table of Contents
- Installing the zip Package
- zip Command Syntax
- zip Command Options
- Using the zip Command
- More Help
- Conclusion
Installing the zip Package
Some operating systems will already have the zip package installed. However, if your operating system throws an error like the one below, you will need to install it. Luckily installation is super easy.
Command 'zip' not found1. To install the zip package for Ubuntu or Debian, simply enter the following command.
sudo apt install zip2. If you are running CentOS or Fedora, you need to run the command below to install zip.
sudo yum install zip 3. Once you have installed the zip command, you should get a list of options if you enter just zip into the terminal.
zip Command Syntax
An example of the standard syntax for the zip command is below. I explain in more depth what option, archive, and path mean underneath the example.
zip [OPTIONS] [ARCHIVE] [PATH]…Use OPTIONS to specify any extra options that you would like to apply when running the command. For example, you may need to identify if you are deleting or updating.
ARCHIVE is where you specify the name of either an existing archive or a new archive. When editing an existing archive, you can use several options to change the behavior of the command.
PATH is a file path or directory where you wish to archive.
zip Command Options
There are many options that you can use with the zip command. Below is a quick summary of some of the options you can use. Please keep reading this guide for a more detailed explanation of each option.
-for--freshenwill replace outdated files in the zip archive with newer versions if they are available. You need to run this in the same directory where you first zipped the archive.-uor--updatewill update outdated files and add new files to the archive.-dor--deleteallows you to delete files from the archive.-mor--movewill move files into the archive and delete the original once finished. It is recommended that you use this option with the-Toption.-ror--recurse-pathstells zip to travel directories recursively. It is important to use if you want all the subdirectories archived as well as the main directory.-qor--quietturns off informational messages. Only use this if you do not require any extra information.-vor--verboseenables the progress output during the compression. When this option is the only argument, it will output a diagnostic screen.-eor--encryptallows you to password protect the archive file.-Tor--testwill have the software check the integrity of the newly created zip archive. Upon failure, the old zip file will remain, and none of the original files are deleted (If using-moption).
For more options, I suggest reading the manual pages for the command, but these are likely the only ones you will need to use.
Using the zip Command
To help teach you how to use the zip command, I have made a simple example zip archive. It contains several text files and a few log files. It will help when playing around with some of the commands below. However, you may still need to create additional files or edit them, so make sure you understand how to use a text editor such as nano.
To download the example files, simply use the following wget command.
wget https://files.pimylifeup.com/zipcommand/example.zip
You can extract the zip file by using the unzip command. I will explain a lot more throughout this tutorial.
unzip example.zip
rm example.zip
Zip Files and Directories
The most common way to use this command is to zip one or more files. There are a few ways you can achieve this, which we will quickly touch on now.
To zip one or multiple files and directories, you can specify them one after another after the name of the zip file.
Also, if you do not specify .zip in the archive name, it will be automatically added.
Below is an example of creating an archive that consists of two files. The archive will be named example.zip.
zip example.zip file1.txt file2.txtOnce you use the above command, you should get an output similar to the one below.
adding: file1.txt (stored 0%)
adding: file2.txt (stored 0%)
You can mix and match files and directories, as shown in the example below.
zip example.zip file1.txt example/Again that should give you an output similar to the one below.
adding: file1.txt (stored 0%)
adding: example/ (stored 0%)
Zip Recursively
You will likely find that you will need to zip recursively quite often, so this option will come in handy a lot. It is a must if you need to archive a directory that contains many subdirectories and files.
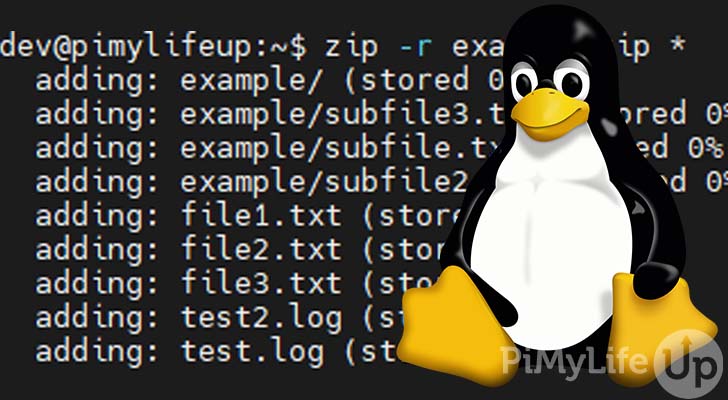
If we want to zip our current working directory, including all the subdirectories and files, we will need to use the -r or --recurse-paths option. Below is an example of using the recursive option.
zip -r example.zip *The above command will give us output similar to the one below. Notice how it has archived our subdirectory and the files inside. If you remove the -r option, it will simply archive the files in our current directory and not the subdirectory.
adding: example/ (stored 0%)
adding: example/subfile3.txt (stored 0%)
adding: example/subfile.txt (stored 0%)
adding: example/subfile2.txt (stored 0%)
adding: file1.txt (stored 0%)
adding: file2.txt (stored 0%)
adding: file3.txt (stored 0%)
Delete Original Files After Zip
You may want the original files deleted once the zip process is complete. No deletion will take place until the archive has been created without error. However, I also recommend using it in combination with -T to check the archive for errors first.
I recommend manually verifying the zip file and deleting the files using the rm command. However, if you are willing to take the risk, you can use the -m or --move option.
zip -r -m example.zip *You should get output similar to the example below.
adding: example/ (stored 0%)
adding: example/subfile3.txt (stored 0%)
adding: example/subfile.txt (stored 0%)
adding: example/subfile2.txt (stored 0%)
adding: file1.txt (stored 0%)
adding: file2.txt (stored 0%)
adding: file3.txt (stored 0%)
You can verify the files have been deleted by using the ls command. The output should look similar to the example below.
example.zipZip Compression Mode and Level
By default, zip will store your data using the deflate method. However, if deflation provides no benefit, it will simply store it with no compression. You can override the default behavior of zip and set the compression mode yourself. You can also use bzip2 rather than the deflate or store methods.
If you wish to override the default behavior, you can use the -Z option followed by the compression algorithm you want to use, such as store, deflate, or bzip2.
zip -r -Z bzip2 example.zip *You can also specify a number between 0 and 9, with 0 being no compression and 9 being the highest level of compression.
-0simply stores files with no compression. It is the equivalent of using store.-1to-9, with 1 being the fastest compression and 9 being the best compression. Specifying 6 is the equivalent of using deflate.- You cannot fine-tune the bzip2 compression.
Below is an example of using a number to specify the level of compression you want.
zip -r -6 example.zip *Encrypting the Zip Archive
You can encrypt the zip archive to prevent unauthorized access to your data. Using the -e or --encrypt option, you will be prompted to enter a password. The password prompt is repeated to help prevent typing errors.
zip -r -e example.zip *The output should be similar to the example below. In addition, the command will ask you to enter the password twice before proceeding with archiving.
Enter password:
Verify password:
adding: example/ (stored 0%)
adding: example/subfile3.txt (stored 0%)
adding: example/subfile.txt (stored 0%)
adding: example/subfile2.txt (stored 0%)
adding: file1.txt (stored 0%)
adding: file2.txt (stored 0%)
adding: file3.txt (stored 0%)
If you extract or alter the archive, you will see a prompt to enter a password.
[example.zip] example/subfile3.txt password:Exclude Files from Zip Creation
There may be times when you need to archive a large set of files, but you do not want specific files in the archive.
For example, if you do not want log files archived, you can use the -x or --exclude option.
zip -r example.zip * -x *.logIn the folder I have two log files, test.log and test2.log, as you can see in the example output below they have not been archived.
adding: example/ (stored 0%)
adding: example/subfile3.txt (stored 0%)
adding: example/subfile.txt (stored 0%)
adding: example/subfile2.txt (stored 0%)
adding: file1.txt (stored 0%)
adding: file2.txt (stored 0%)
adding: file3.txt (stored 0%)
adding: test/ (stored 0%)
Adding to the Zip Archive
You can add files to an existing zip archive using the -g or --grow option. If the command fails, the software will attempt to restore the original archive.
zip -g example.zip test3.logThe output should contain the single file being added to the zip archive. Do not forget you can specify multiple files or use wildcards.
adding: test3.log (stored 0%)Delete Files from the Zip Archive
If you need to remove files from the archive, you can do this by using the -d or --delete options.
Below is an example of using the delete options to remove the files.
zip -d example.zip test3.logYou should get output that is similar to the example below.
deleting: test3.logFreshen a Zip Archive
One cool feature of the zip command is being able to freshen the contents of an archive. Freshen will not add new files but update existing files in the archive if the non-archived versions are newer.
You will need to run the command in the same directory the zip was created.
You will need to use the -f or --freshen options to freshen an archive.
zip -f example.zip *We edited test2.log, so it was newer than the version in the archive. When we ran the zip command, it resulted in the output below.
freshening: test2.log (stored 0%)Update a Zip Archive
If you want to update the zip archive with updated and new files, you can use the -u or --update option instead of freshen.
To update an archive, simply structure your command like ours below.
zip -u example.zip *The update option notices that test2.log is out of date and test3.log is missing and outputs the following details.
updating: test2.log (stored 0%)
adding: test3.log (stored 0%)
Extracting Files from the Zip Archive
To extract files from a zip file, you will need to use a different command to zip. The unzip command will extract zip files and has quite a few options to tweak its behavior. However, we will just use it in its basic form for this guide.
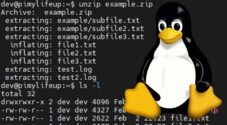
unzip example.zipThe command will output each directory created and each file it extracts. Below is an example of us unzipping our example.zip file.
Archive:  example.zip
creating: example/
extracting: example/subfile3.txt
extracting: example/subfile.txt
extracting: example/subfile2.txt
extracting: file1.txt
extracting: file2.txt
extracting: file3.txt
creating: test/
extracting: test/example.zip
extracting: test2.log
extracting: test.log
extracting: test3.log
Enabling Verbose
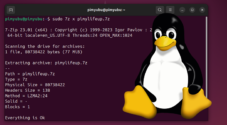
You can use the -v or --verbose option for additional information on the archiving process and results
zip -v example.zip *
As you can see below, there is additional information outputted for the archive.
adding: example/      (in=0) (out=0) (stored 0%)
adding: file1.txt     (in=25) (out=25) (stored 0%)
adding: file2.txt     (in=13) (out=13) (stored 0%)
adding: file3.txt     (in=5) (out=5) (stored 0%)
adding: test/         (in=0) (out=0) (stored 0%)
adding: test2.log     (in=6) (out=6) (stored 0%)
adding: test3.log     (in=5) (out=5) (stored 0%)
adding: test.log      (in=4) (out=4) (stored 0%)
total bytes=58, compressed=58 -> 0% savings
If you use -v or --verbose without any other arguments, you will see some diagnostic information. This information may come in handy if you need to debug your setup.
zip -v
Disabling the zip Output
If you rather have no output from the command, you can use the -q or --quiet option to silence any output. It is useful whenever you do not require extra information, such as running a shell script or a background task.
Below is an example of how you should structure the command to suppress the output.
zip -q example.zip *More Help
As I mentioned earlier, this guide does not cover everything there is to know about the zip command. If you require further information, you can get help with several methods.
The first and easiest way to get help is simply using the man command built into most Linux distributions.
man zipYou can use the Q key to exit the manual pages.
Alternatively, you can use --help, -h, or -? with the zip command to get some basic information on using the command.
zip --helpFor some advanced help, you can use the options -h2 or –more-help.
zip -h2Hopefully, one of the methods above will help you get the answer you want. Alternatively, you can try leaving a comment at the bottom of this page.
Conclusion
I hope that this guide has given you a decent insight on how to use the zip command on Linux or Unix distributions.
You will likely find yourself using this command quite a bit as the zip file format is quite heavily used. I also find it handy whenever I need to archive files for backup, distribution, or moving a large amount of data.
There are many more Linux commands that I highly suggest you take the time to learn as they will make maintaining a Linux distribution a lot easier. We also have some general Linux tutorials that might take your fancy.
Please let us know if you see anything that needs further explaining by leaving a comment at the bottom of this page.