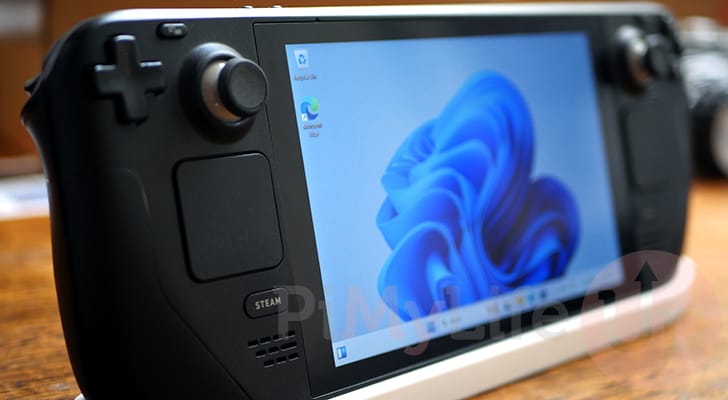
In this tutorial, we will be showing you how to dual-boot Windows on your Steam Deck.
SteamOS is a highly capable operating system that the Steam Deck utilizes for all of its tasks. Its capable of running many games incredibly well.
Combined with Proton, your Steam Deck can even play many games that were never ported to the Linux operating system it uses.
However, sadly, not all Windows games will run using Proton. The main thing that tends to break this is the implementation of certain anti-cheat engines and games that rely on particular Windows behaviors not yet covered by Proton or Wine.
This leaves you with two choices: accept you can’t play the game natively on your Deck. Alternatively, you can dual-boot Windows on your Steam Deck.
Dual booting lets you have Windows and SteamOS operating systems on your Steam Deck. During start-up, you can change to the boot manager and select the OS you want to boot from.
While this can be a little clunky, it allows you to run games that only run on Windows.
Preparing to Dual-Boot Windows on your Steam Deck
Over the following steps, we will show you how to dual-boot Windows on your Steam Deck. We will be focusing entirely on the easiest way of doing this.
That easy method is installing Windows to an SD Card and booting from that. You could also use a portable SSD drive, but that can be a bit clunky, especially if you are using your Deck on the move.
While it is possible to re-partition the Steam Deck’s internal drive and install Windows that way it is a bit more involved and can mess with SteamOS, which we would prefer to avoid.
For the best experience, aim for a large “endurance” class MicroSD Card. These cards are meant to survive more read and writes than standard cards.
If you are going down the MicroSD Card route, you will also need a Micro SD Card reader for your Steam Deck.
Dual-Booting Windows on the Steam Deck
Over these sections, we will show you how to dual-boot Windows on your Steam Deck. This process is fairly simple, but there are a lot of steps involved.
Make sure you give yourself adequate time to complete this project. However, there are plenty of points you can safely stop and return.
Downloading the Windows ISO
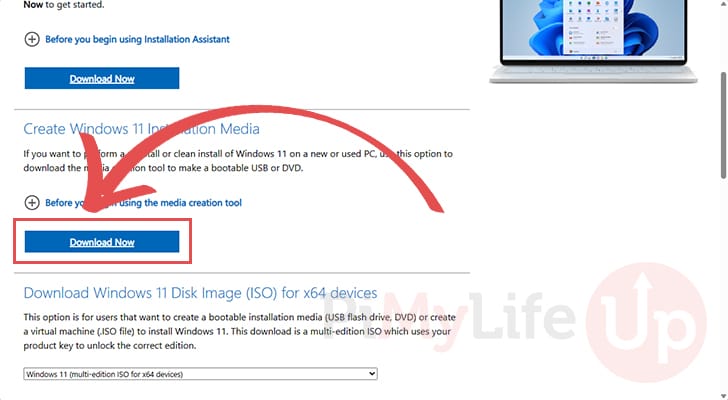
1. Before we can modify the Steam Deck to dual-boot into Windows, we must download the official Windows ISO
To do this, we will utilize the official “Media Creation Tool“. It makes getting an official version of Windows super simple.
https://www.microsoft.com/en-us/software-download/windows11Once you are on the download page, look under the “Create Windows 11 Installation Media” heading and click the “Download Now” button.
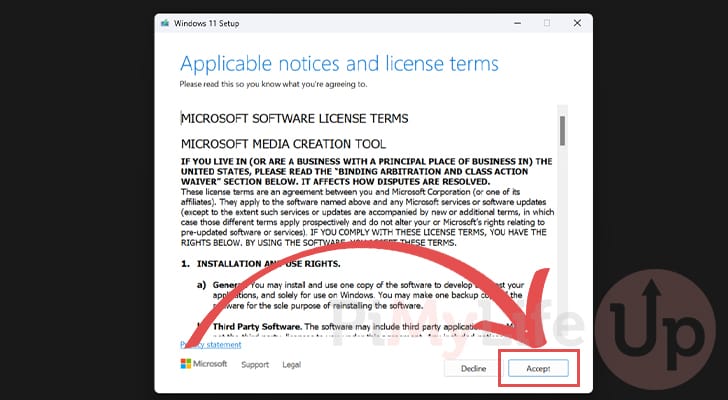
2. After running the installer, you will be asked to accept some terms and conditions.
If you agree to the terms and want to continue, click the “Accept” button.
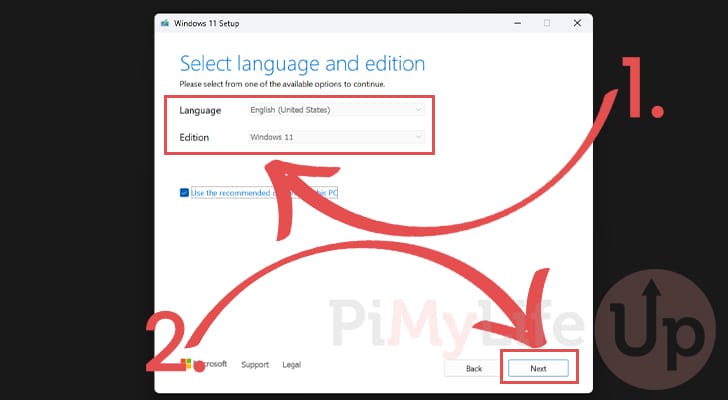
3. You will now be asked to select the language and edition of Windows you want to download (1.). The default settings are usually correct for most users.
To continue with downloading the Windows ISO for the Steam Deck, click the “Next” button (2.).
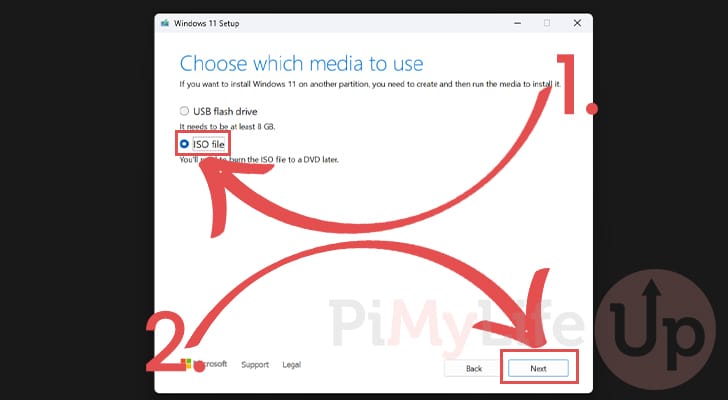
4. Next, you will be prompted to select how you want the Windows 11 iso to be provided. As we want to flash this ISO using RUFUS, click the “ISO file” (1.) option.
After choosing the media type, click the “Next” button (2.). You will be prompted to ask where you want to save this file.
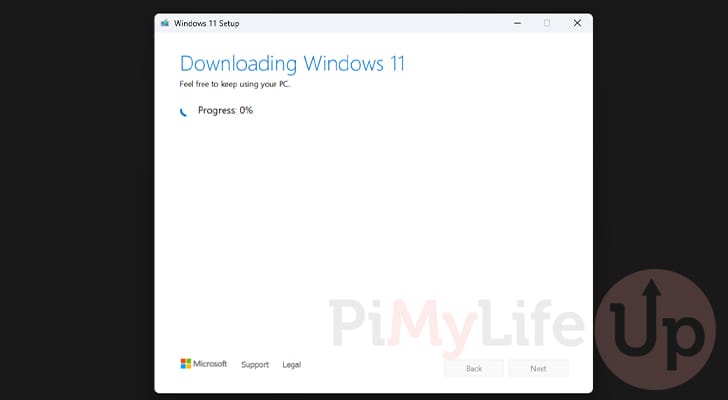
5. The tool will now download, the Windows 11 ISO to your designated folder.
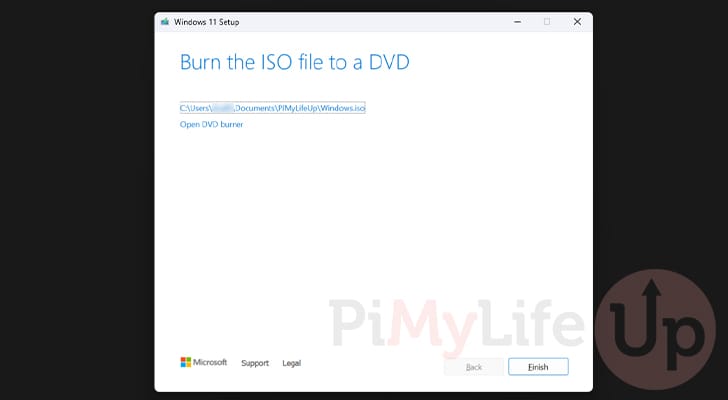
6. Once the file is downloaded you will see a screen similar to the one below.
You can now proceed to the next section.
Using Rufus to Prepare the Bootable SD Card/USB Drive
7. To get a copy of Windows on your drive that the Steam Deck can boot from, we will be using a tool called Rufus.
Browse the official Rufus website in your favorite web browser to grab the installer.
https://rufus.ie/en/Once you are on the website, scroll down to the “Download” heading and download and install Rufus for your version of Windows.

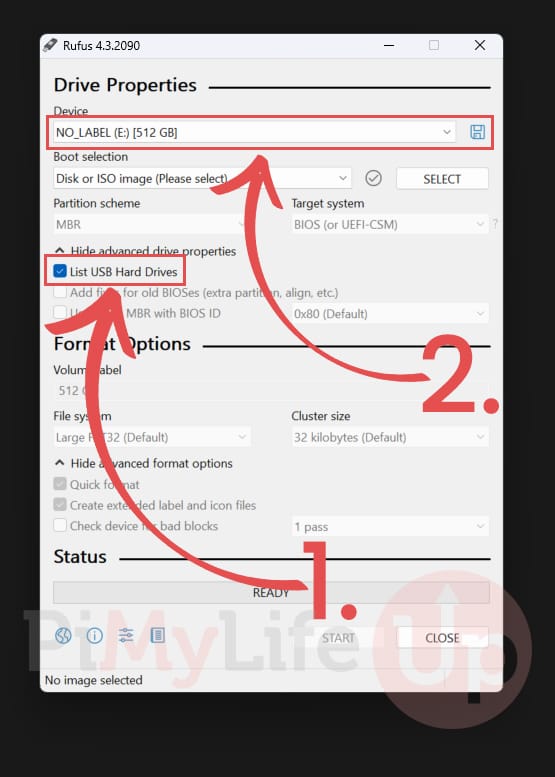
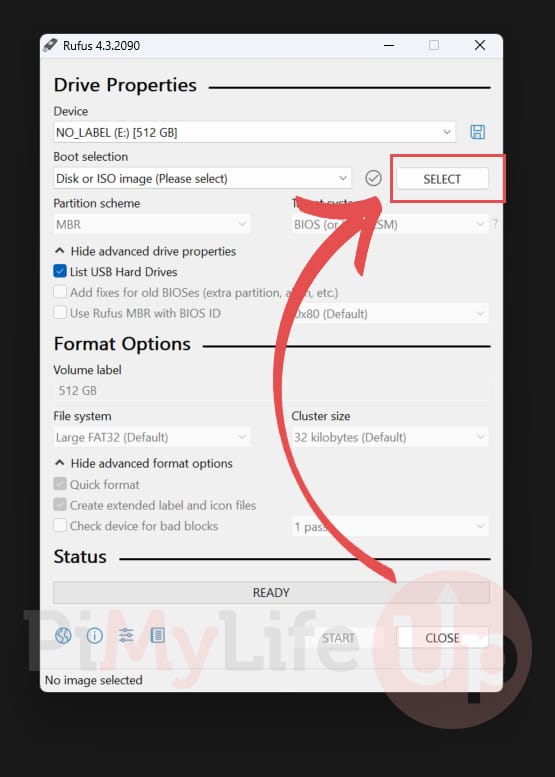
8. Now, with Rufus open on your PC, you will want to enable the “List USB Hard Drives” (1.) option.
After enabling this option, select the device for which you want to write the Windows ISO (2.). Ensure this is correct, as all data on the chosen SD Card/ USB Drive will be wiped.
9. With your drive now chosen, click the “SELECT” button to browse to and select the Windows ISO you downloaded earlier in this guide.
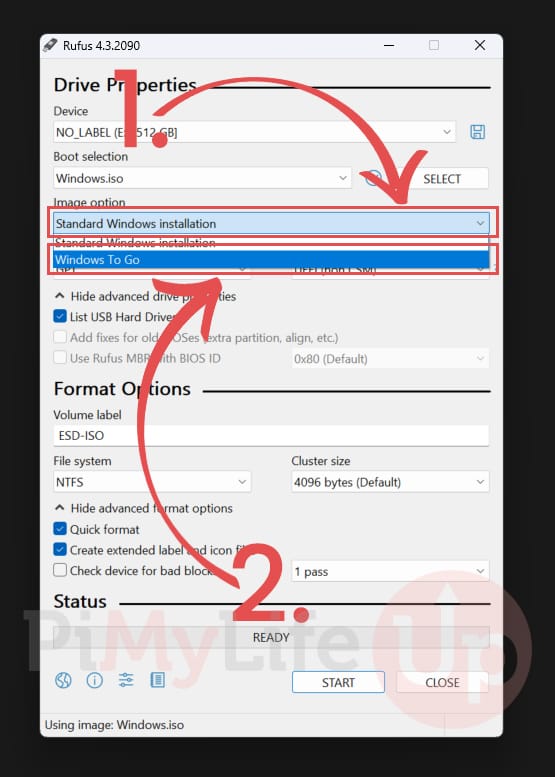
10. After selecting the Windows Image, you must change the “Image Option” (1.) from “Standard Windows installation” to “Windows To Go” (2.).
This option will allow Rufus to set up Windows so that we can boot it from the Steam Deck easily.
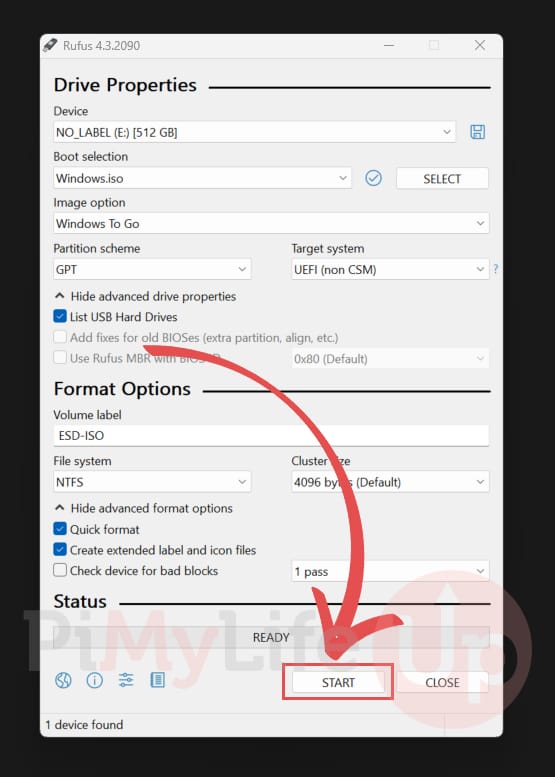
11. You can begin writing the Windows image by clicking the “START” button at the bottom of the tool.
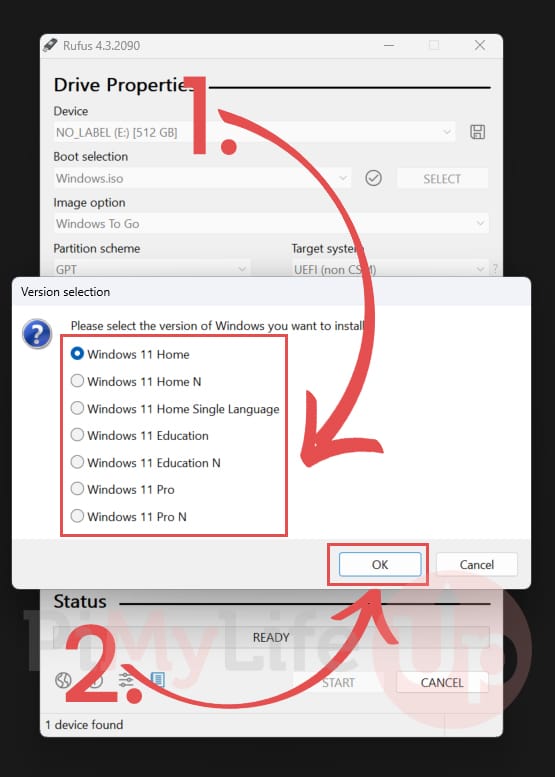
12. The following prompt will allow you to select the version of Windows you want to use (1.).
After selecting a Windows edition, click the “OK” button (2.) to continue.
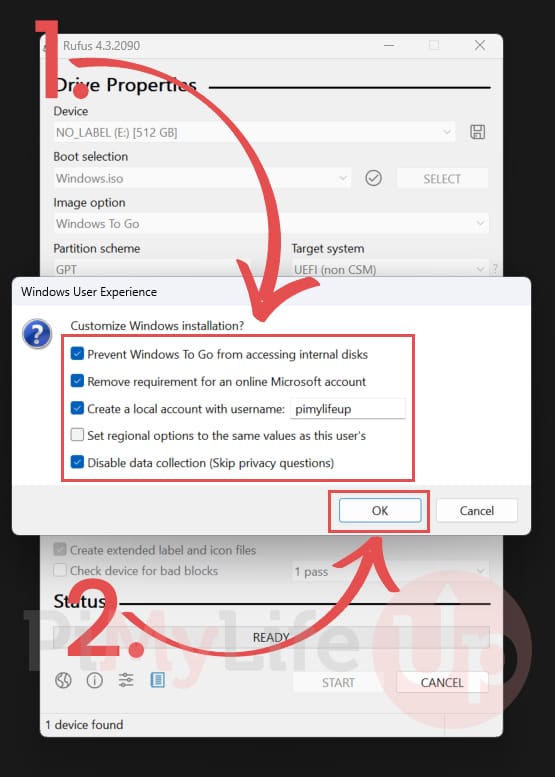
13. You will now be greeted with a few different ways to customize the Windows installation (1.). Below, are our recommended settings. However, you can tweak this to your liking.
Once you have set your options, click the “OK” button (2.).
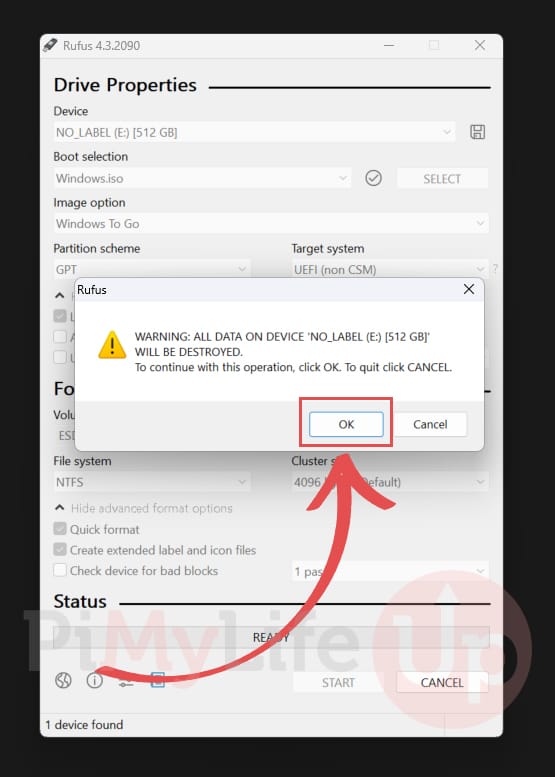
14. You will get a warning that all data on your disk will be wiped during the writing process.
To install Windows to your disk for the Steam Deck, click the “OK” button.
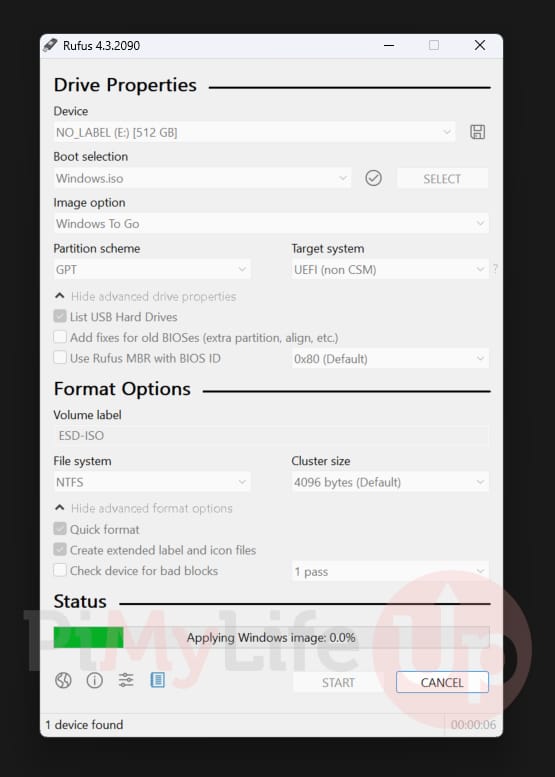
15. Rufus will now prepare your SD card by installing Windows to it and preparing it so your Steam Deck can boot to the operating system.
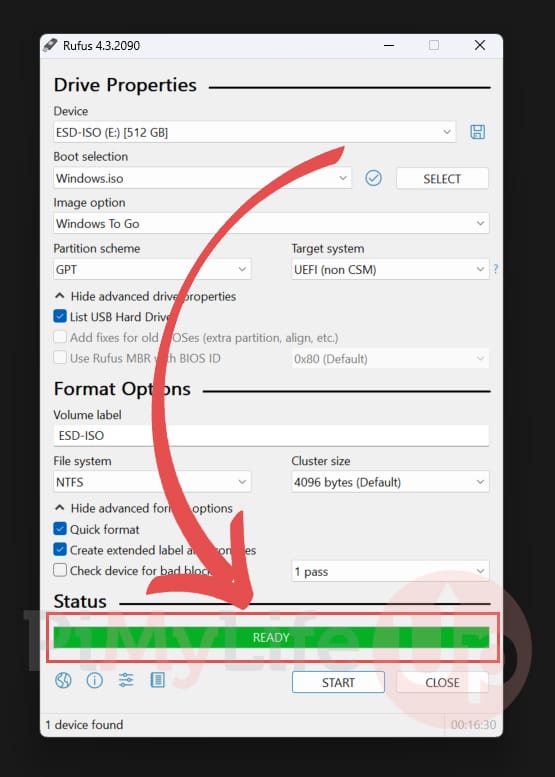
16. You can continue once the progress bar is marked as “READY“, and the status bar is green.
Getting the Steam Deck Drivers for Windows
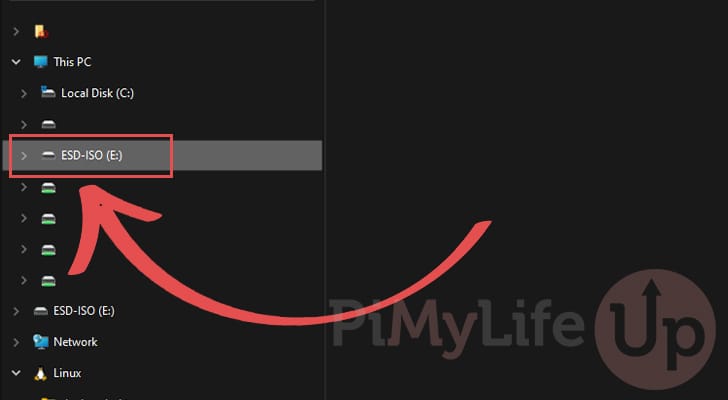
17. Our next step is to get the Steam Deck drivers for Windows and save them to your drive.
It’s easier to handle all this now than on your Steam Deck. In your file browser, navigate to the drive you just installed Windows. In our case, this drive was labeled “ESD-ISO“.
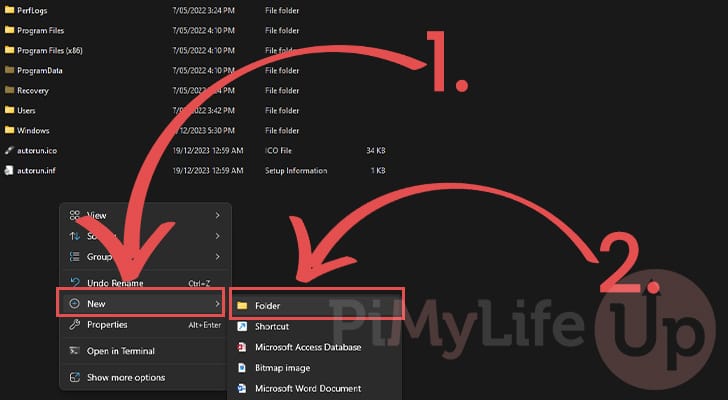
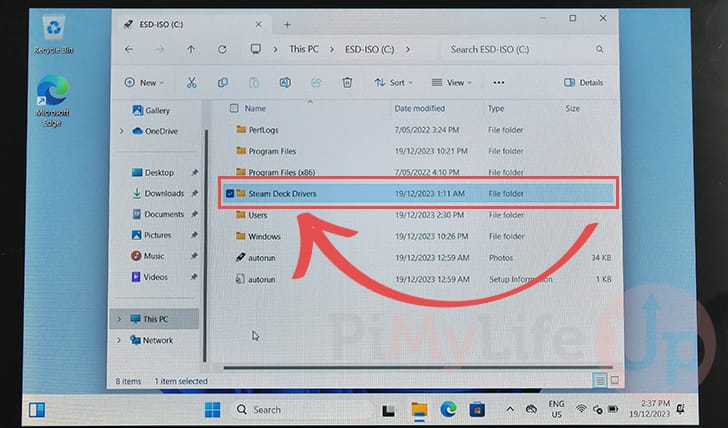
18. After navigating to the drive, you must create a new directory called “Steam Deck Drivers” within the root directory.
This is where we will store all the drivers you need for the Steam Deck to play nicely with Windows.
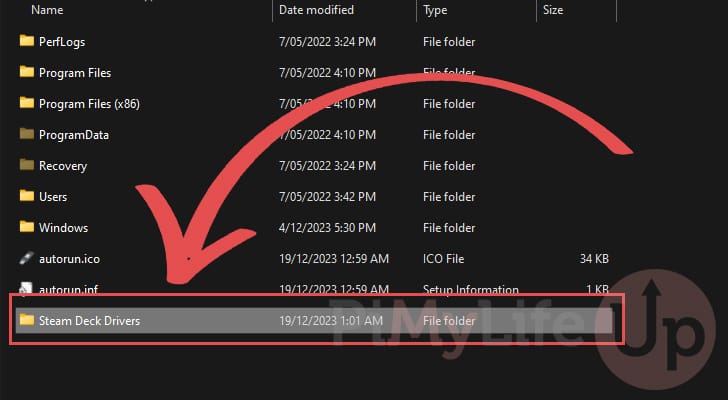
19. Once you have created the folder, navigate into it.
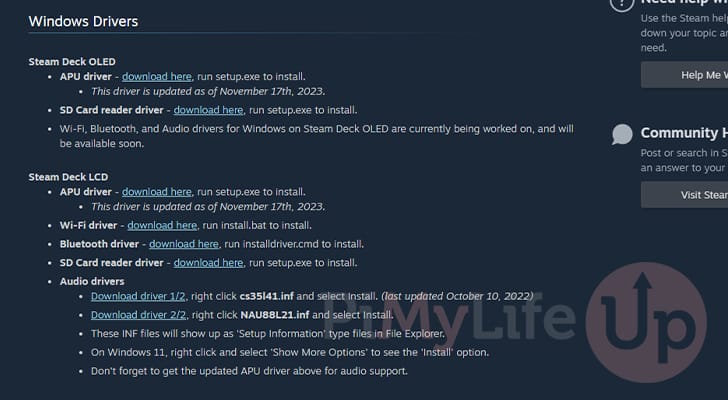
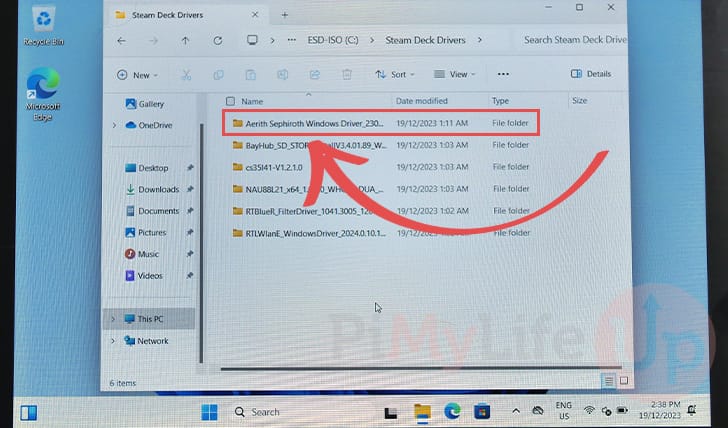
20. Your next step is to download and extract each Steam Deck Windows driver.
First, navigate to the Windows Resources page on Steam. Here, you will find a list of drivers. Click the “download here” link for each of these. The drivers do differ between the OLED and LCD models.
After downloading these drivers, you must extract the contents of each archive to the “Steam Deck Drivers” folder you created.
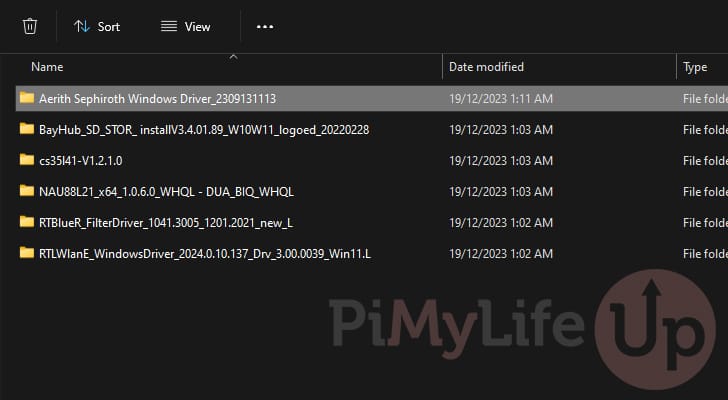
21. After extracting all of the archives, you should have a folder structure that looks a bit like what we have shown below.
The folder names might differ slightly, but the start of most folders should be the same. We will run these installers once we boot our Steam Deck to Windows.
Loading into the Boot Manager
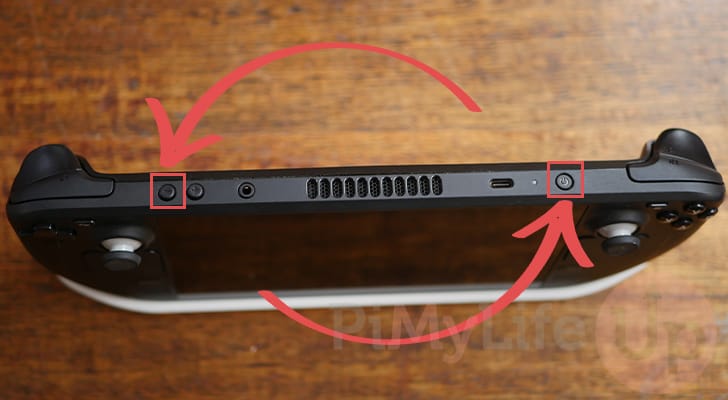
22. Now that your SD card or USB drive is formatted, plug it into your Steam Deck and power the device off.
Once you have powered your Steam Deck off, you must press and hold the MINUS VOLUME and the POWER buttons simultaneously. Let go of the buttons once you hear a beep.
This combination will allow us to boot into the boot manager.
Booting into Windows on the Steam Deck
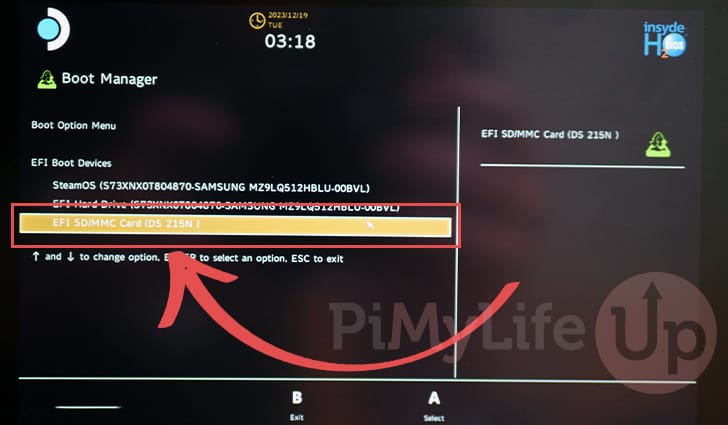
23. Once you have booted into the boot manager, you can now quickly boot the Windows installation that is on your drive.
Typically, the entry you want to select is at the bottom of the list. As we are using our SD card, this option was labeled “EFI SD/MMC Card“. Once selected, press “A” on your Steam Deck to boot into Windows.
Initial Windows Setup Experience on the Steam Deck
24. This is the first time you are booting your Steam Deck into Windows, so you must go through the initial installation process.
One slightly annoying thing is that Windows will be stuck in portrait mode until we finish this process.
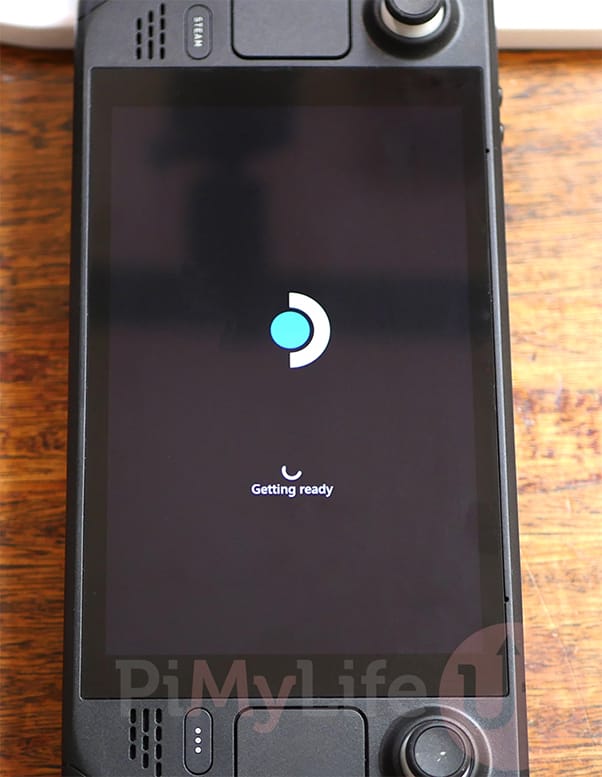
It can take a few minutes for your Steam Deck to boot into Windows for the first time, so please be patient.
25. Once the Windows boot sequence is complete, you will be asked to select your country or region (1.). Windows uses this to set things such as your language, time zone, and more.
After selecting the region, click the “Yes” button (2.)

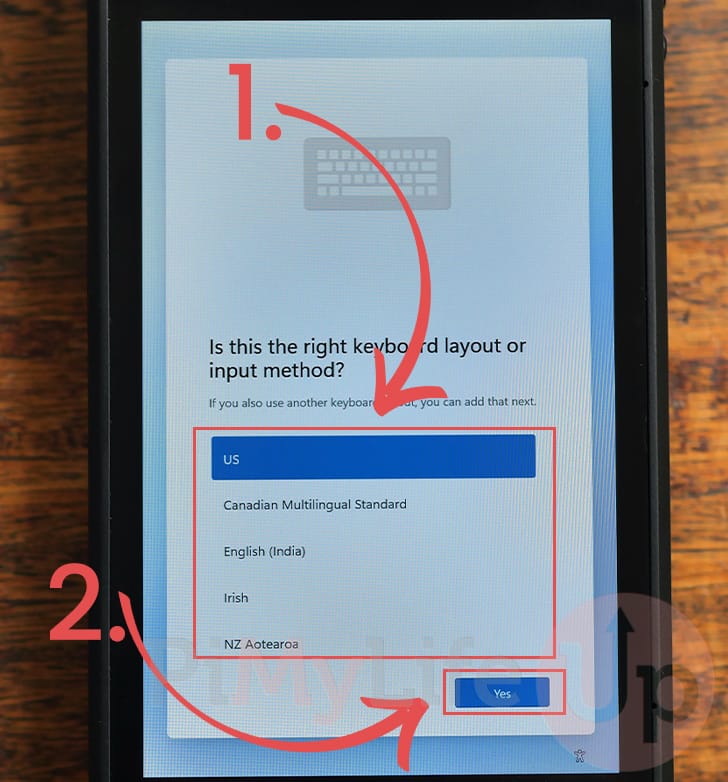
26. Next, you will be asked to confirm the Windows keyboard layout for your Steam Deck.
Ensure that the layout is set correctly (1.), and then click the “Yes” button (2.) to continue.
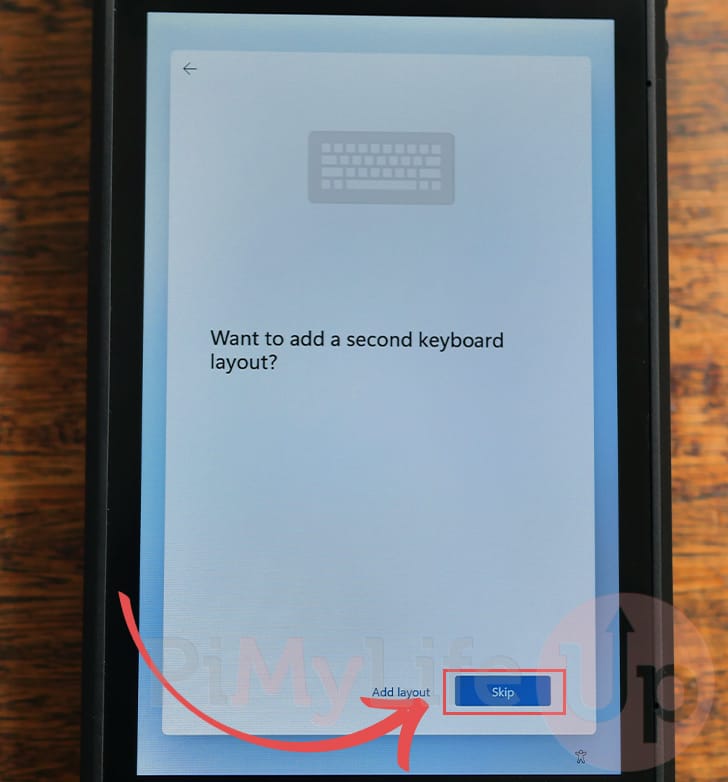
27. You will be asked whether you want to configure a second keyboard layout. Proceed by clicking the “Skip” button.
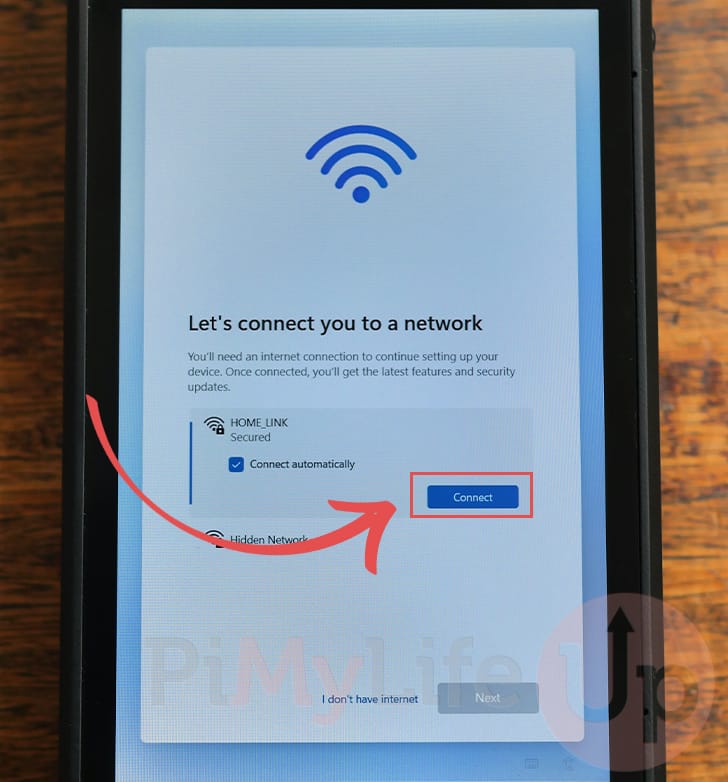
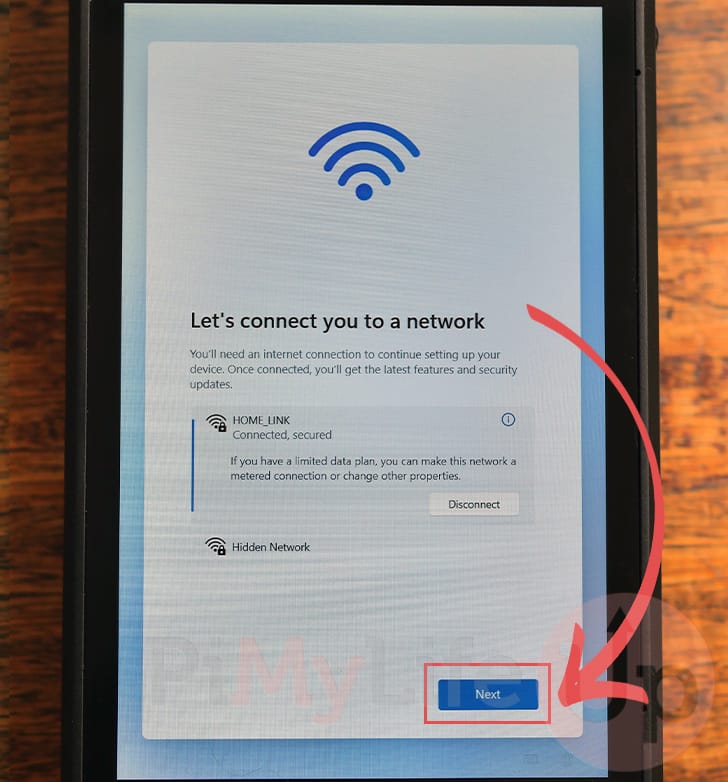
28. Next, you can connect Windows on your Steam Deck to your Wi-Fi network. Locate your Wi-Fi network and click the “Connect” button.
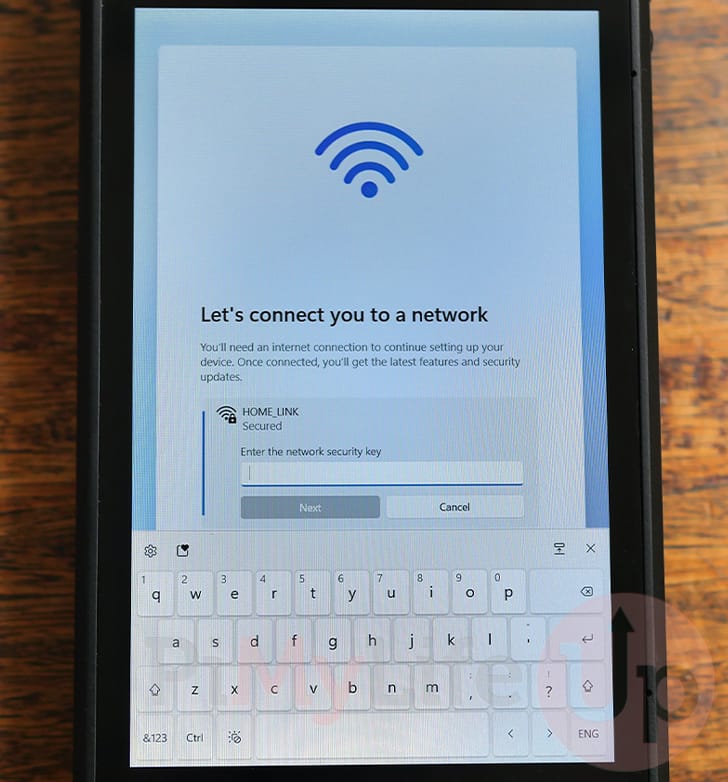
29. Use the on-screen keyboard to type in your Wi-Fi password and click the “Next” button to proceed.
30. You should now be connected to your Wi-Fi network.
Finish up the connection by clicking the “Next” button.
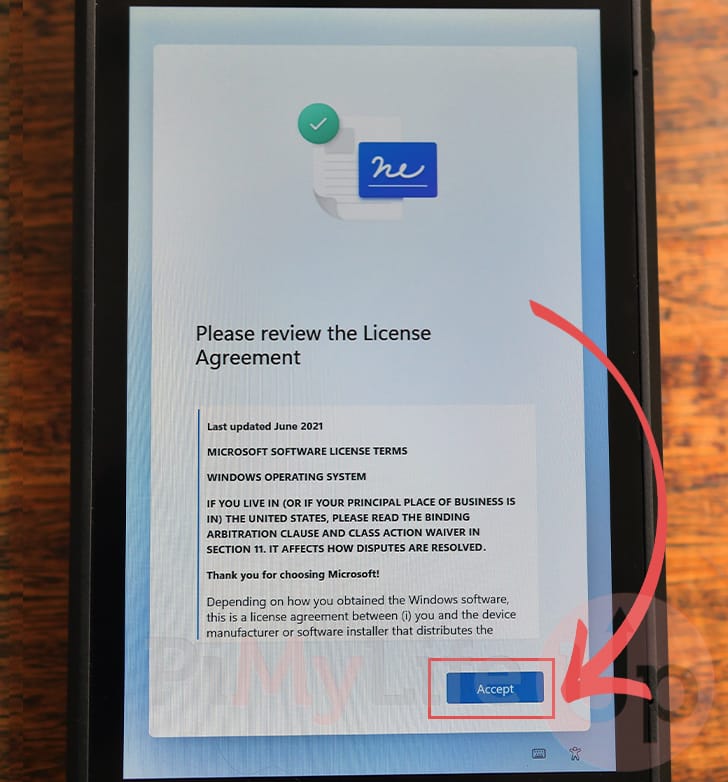
31. To finalize the installation of Windows on your Steam Deck, you must agree to the license agreement.
If you agree with the license, click the “Accept” button.
Changing the Steam Deck to Landscape Mode on Windows
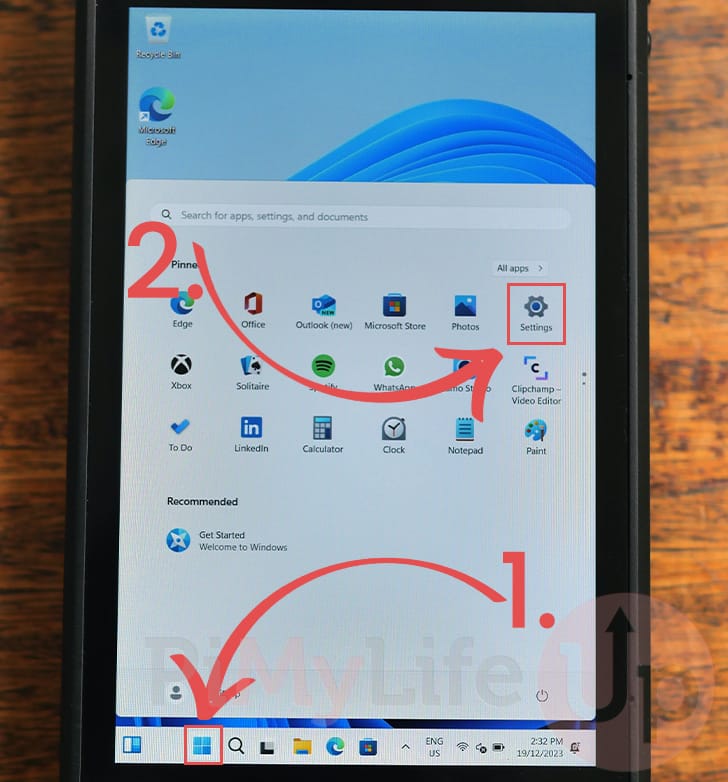
32. Now that you finally have Windows loaded up on your Steam Deck, you will want to change it to landscape mode.
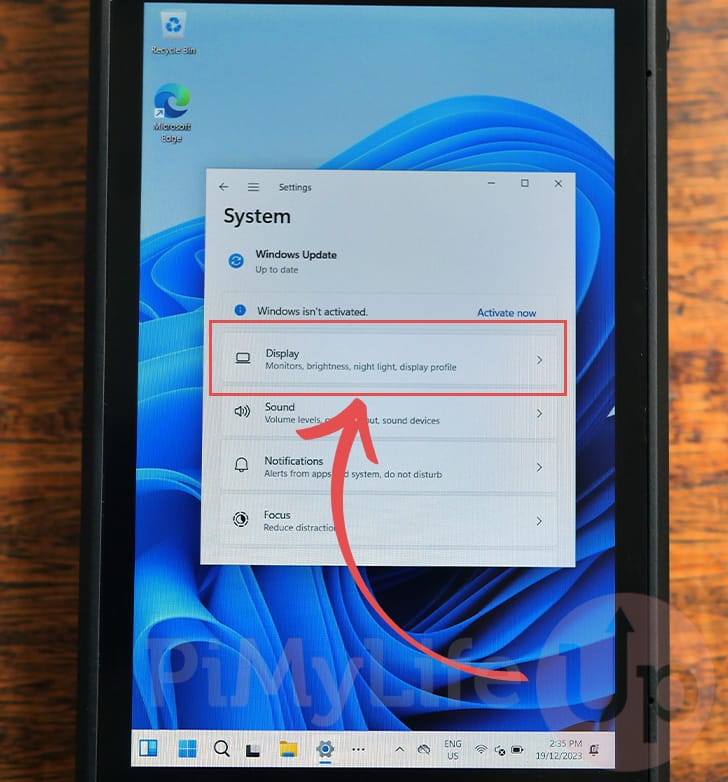
To begin this process, open up the settings by tapping the Windows icon (1.) in the taskbar and then clicking the “Settings” icon (2.).
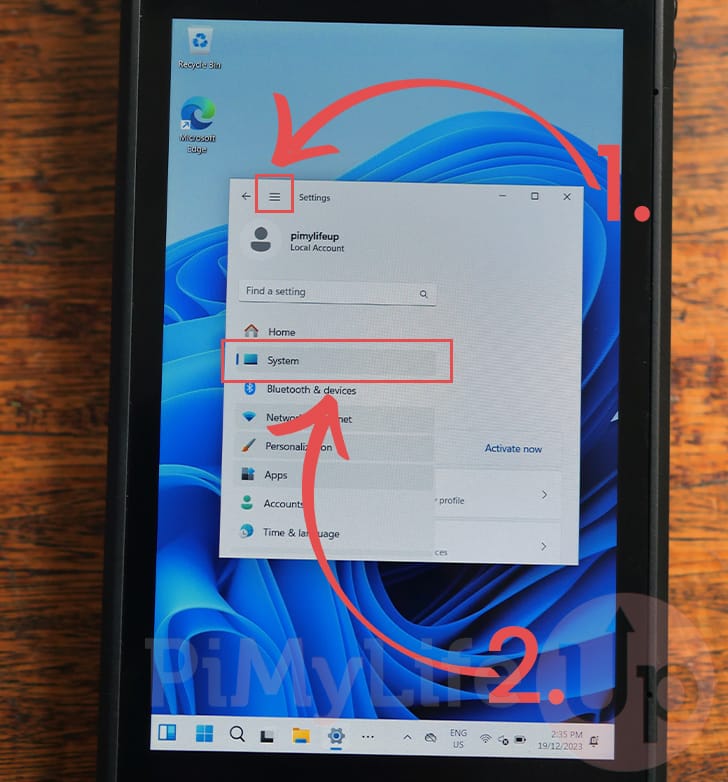
33. With the settings menu open, click the hamburger icon in the top bar (1.) to reveal the sidebar.
In the sidebar, click the “System” option (2.).
34. After swapping to the “System” settings, find and click the “Display” option.
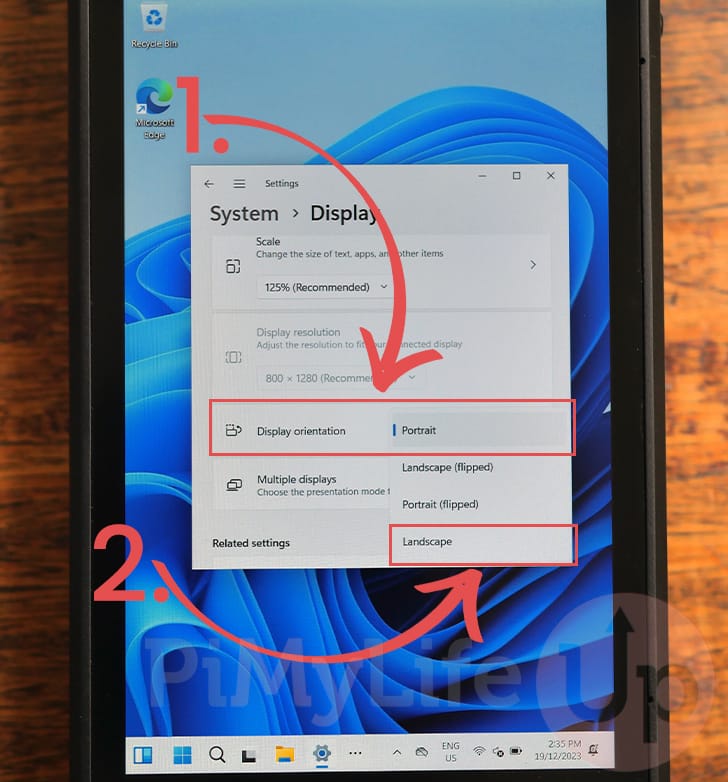
35. Within the “Display” options screen, scroll down till you find the “Display orientation” option and click the select box (1.).
In this select box, click the “Landscape” option (2.).
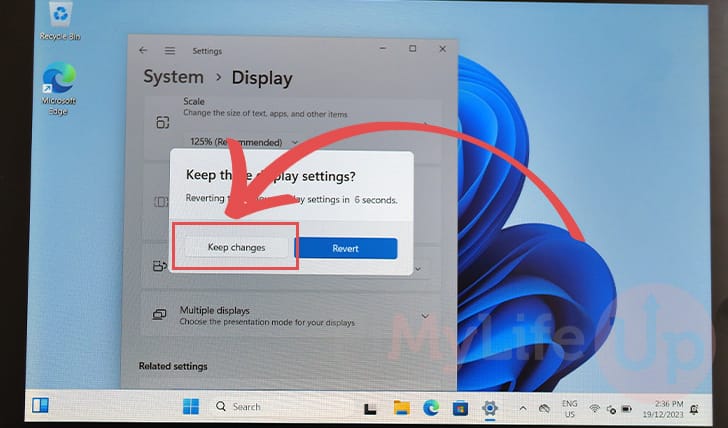
36. Windows should now display in landscape mode on your Steam Deck.
To retain the landscape mode, click the “Keep changes” button.
Installing the Steam Deck Drivers on Windows
37. Now that we have Windows on the Steam Deck in a workable orientation, you must install some drivers.
These drivers allow Windows to use your Deck’s GPU, speakers, and more.
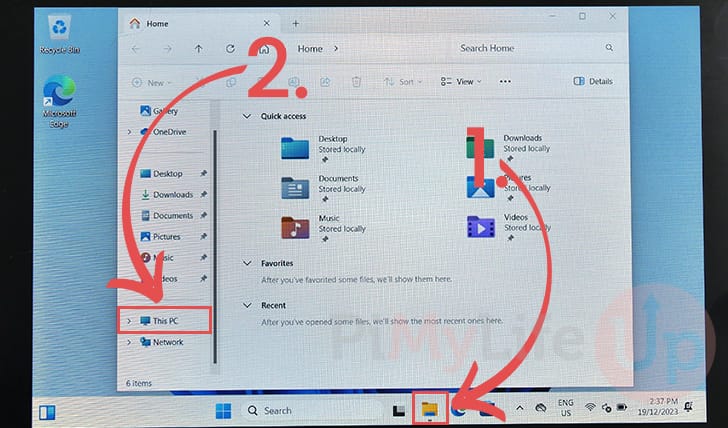
To install these drivers, open the file explorer (1.).
With File Explorer open, use the sidebar and change to the “This PC” folder (2.).
38. Once you swapped to the “This PC” folder, double-click your drive to change to it.

39. You should see the “Steam Deck Drivers” folder we created earlier in this guide.
Swap into the directory, as we will need to install these drivers to get Windows working correctly on our Steam Deck
Install the Steam Deck GPU Driver on Windows
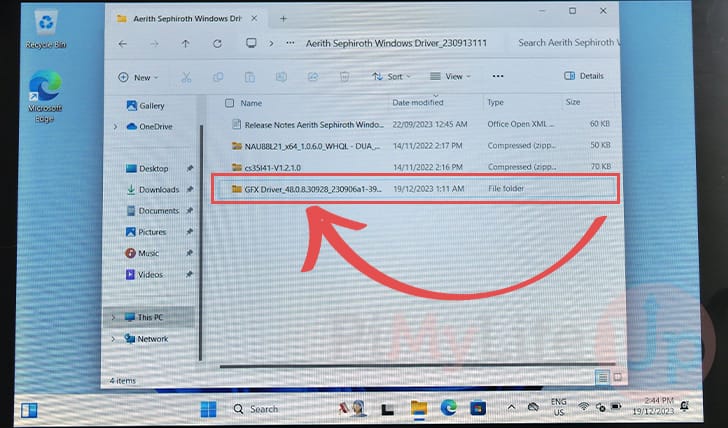
40. The first Steam Deck driver we will install to Windows is the one for the GPUO.
This driver’s folder should start with the name “Aeirith Sephiroth“; double-click the folder to open it.
41. You will need to drill a little further. Swap to the folder that starts with the label “GFX Driver“.
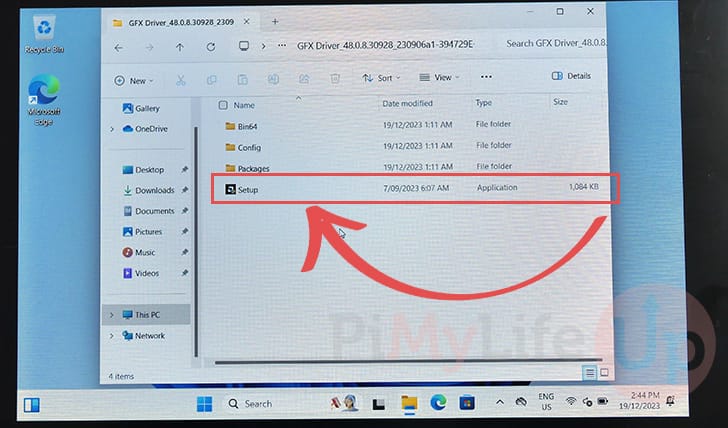
42. Begin installing the Steam Deck GPU driver to Windows by double-clicking the file called “Setup“.
Follow the prompts to install this driver. If asked if you want to restart, select “No“.
Installing the SD Card Slot Driver
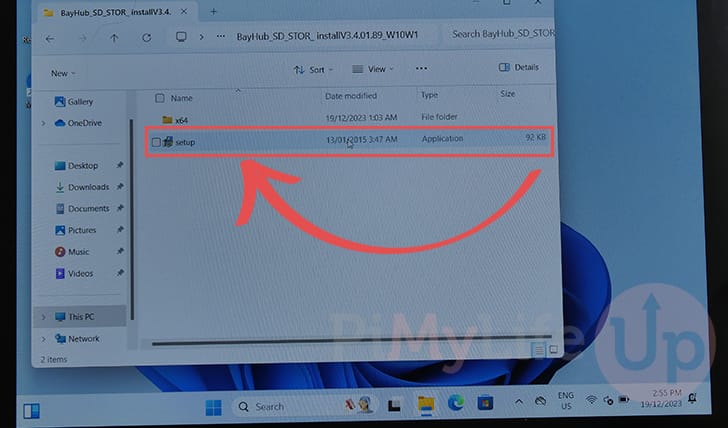
43. The next driver we will install is the one that helps Windows handle the Steam Deck’s SD Card port.
Double-click the directory that begins with the name “BayHub” to continue.
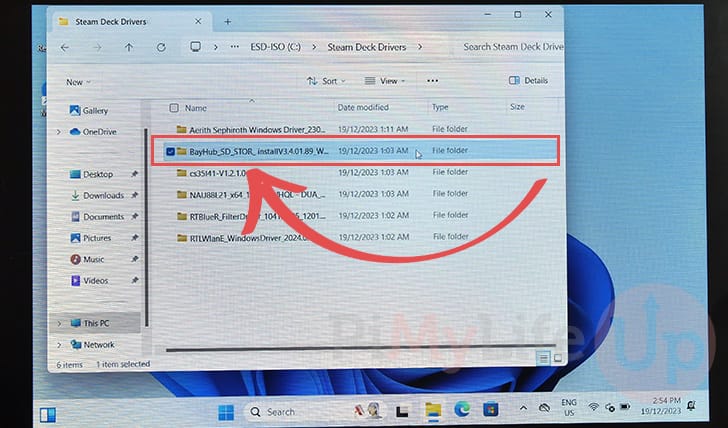
44. Begin installing the SD Card driver by double-clicking the “setup” file and following the prompts.
Installing the Audio Drivers
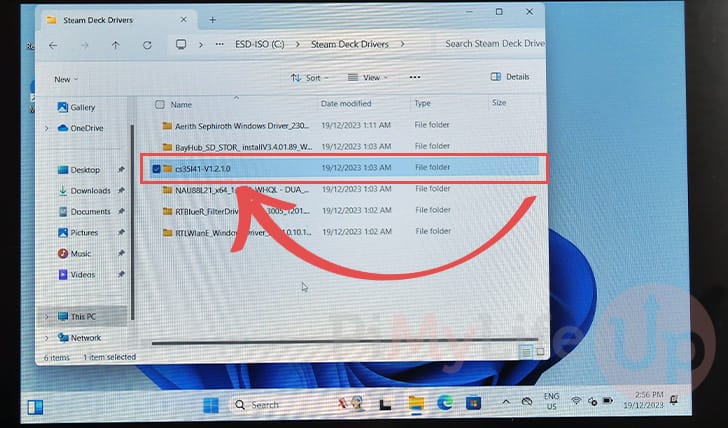
45. The LCD version of the Steam Deck has two separate audio drivers you must install on Windows.
The first of these is located within the folder named “cs35141“.
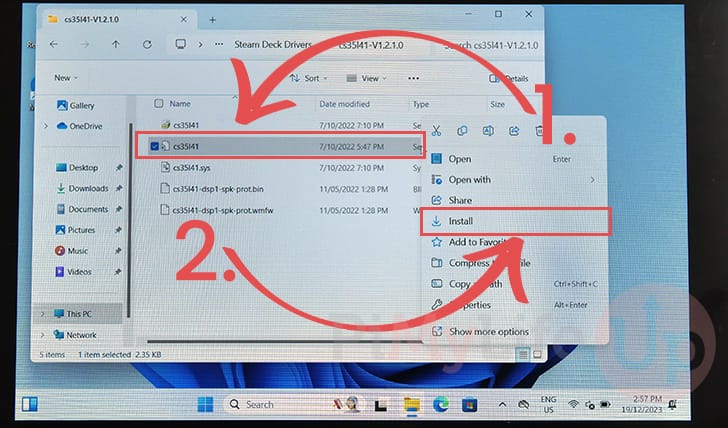
46. Once within this directory, find the file named “cs35l41” and right-click it (1.). You can right-click by using the left trigger of your Steam Deck.
In the context menu, click the “Install” option (2.).
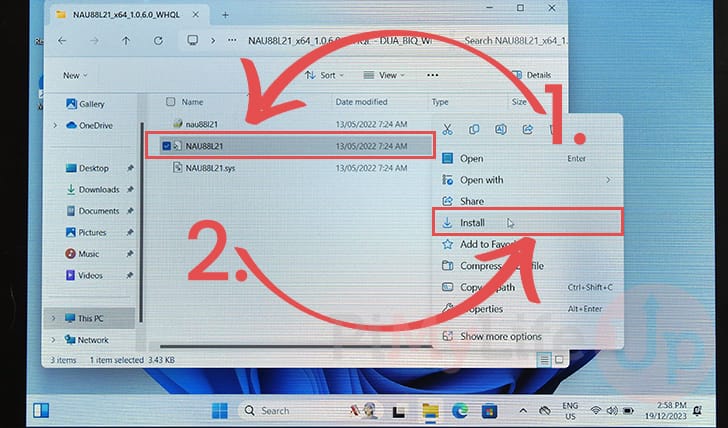
47. We can now move on to installing the second audio driver. Open the folder that starts with “NAU888L21“.
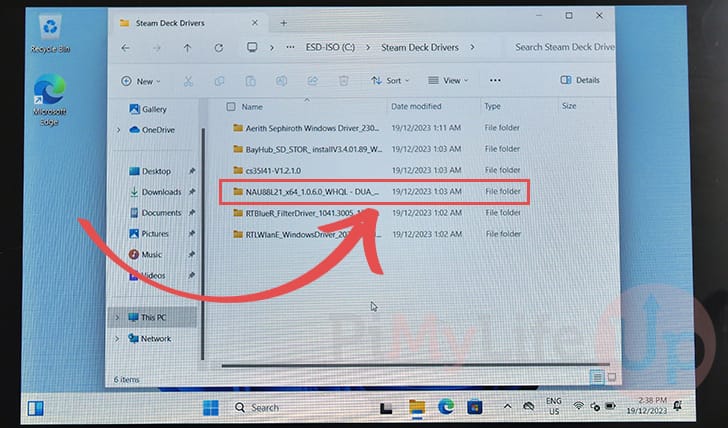
48. Within this directory, find the file named “NAU88L21” (1.) and right-click it.
Install the Steam Deck audio driver to Windows by clicking the “Install” option (2.) in the context menu.
Installing the Bluetooth Driver
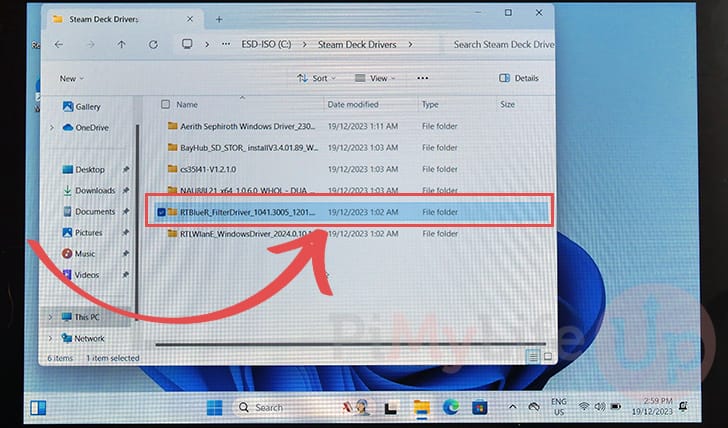
49. The next driver we must install is the one that handles the Steam Deck’s Bluetooth adapter.
Open the folder that starts with the name “RTBlueR” to continue.
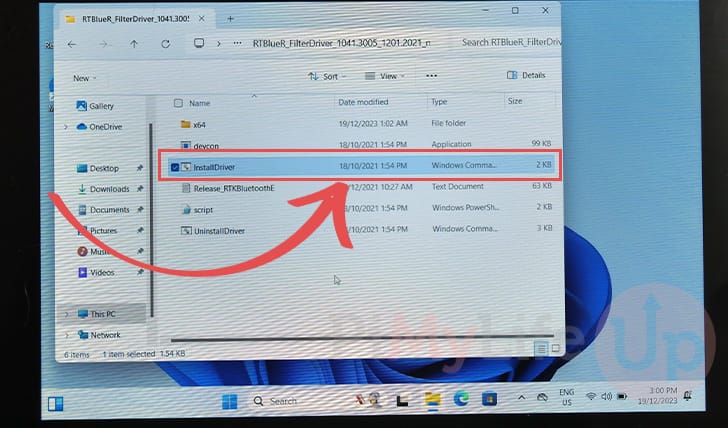
50. To install this Bluetooth driver, you only need to double-click the “InstallDriver” batch file.
Installing the Windows Wi-Fi Driver for the Steam Deck
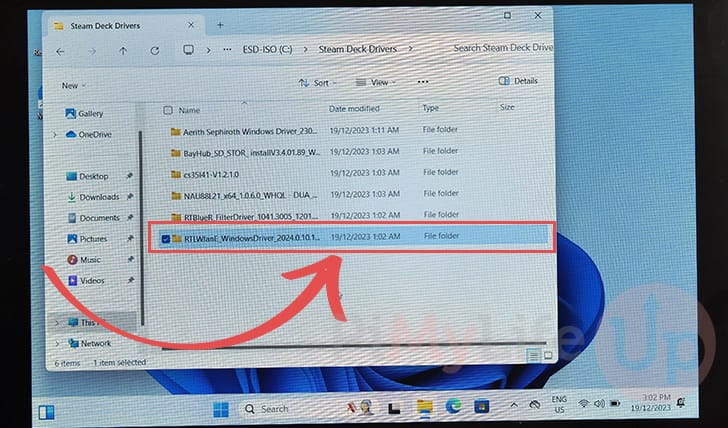
51. The final driver we must install for the Steam Deck on Windows is its Wi-Fi driver. At the moment, Wi-Fi will work, but you will get a subpar network performance.
To begin installing this driver, double-click the folder that starts with “RTLWlanE“.
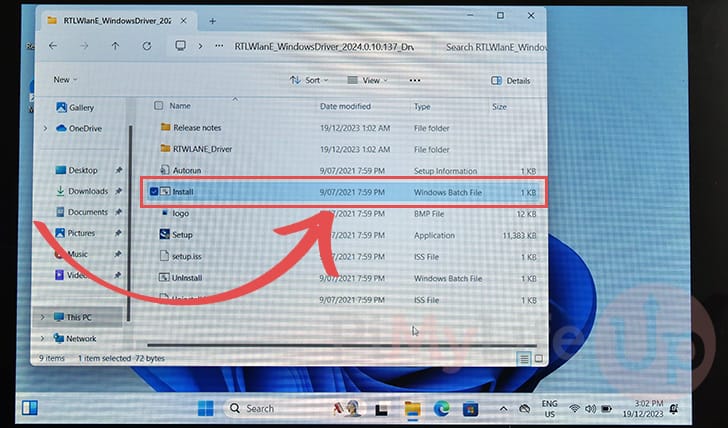
52. All you need to do to install the Wi-Fi driver is to double-click the “Install” batch file.
Conclusion
Hopefully, you should have Windows up and running on your Steam Deck without affecting the base operating system.
We achieve this by installing Windows to a separate SD card or USB device you will boot from instead.
The main reason you will want to use this operating system over SteamOS is games that refuse to run through Proton. Usually these are games where the anti-cheat engine doesn’t like being run through Proton or Wine.
Please feel free to comment below if you have any questions about running Windows on your Steam Deck.
If you found this tutorial to be helpful, we highly recommend checking out our many other Steam Deck tutorials.