In this tutorial, we will be showing you how to install EmuDeck onto your Steam Deck.
EmuDeck is one of the best solutions for getting emulators onto your Steam Deck while integrating seamlessly into gaming mode.
This software acts as an installer for all of the emulators you might want to install to your Deck. It handles the installation process, configuration, and integration of various emulators with your Steam Deck.
Best of all, the team isn’t using its builds of the software. It installs these emulators to your Steam Deck through the same sources you would have used if you did it yourself. This means you will get releases from the developers whenever they push them to Linux.
EmuDeck will even handle the tedious process of setting up Windows-only emulators like Xenia on your Deck.
If you want to emulate games on your Steam Deck, using EmuDeck is the go-to solution. You can check out a list of the consoles EmuDeck supports on your Deck on their official website.
Over these next few steps, we will walk you through every step you need to take to install EmuDeck on your device.
Installing and Using EmuDeck on your Steam Deck
Over these following sections, we will be showing you how to install and use EmuDeck on your Steam Deck.
Before you continue any further, there are a few things that you will want on hand.
- ROMS: To use EmuDeck, you will need ROMS of the games you want to play.
- USB Drive: You will want a USB Drive handy to easily copy ROMS from your computer to your Steam Deck.
- USB-C Adapter or Hub: You will need a way of connecting your USB drive to your Steam Deck if it doesn’t have a USB-C connector.
Change to Desktop Mode
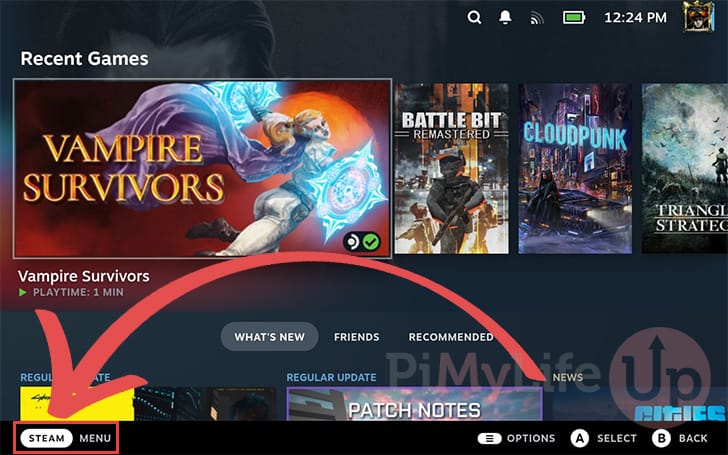
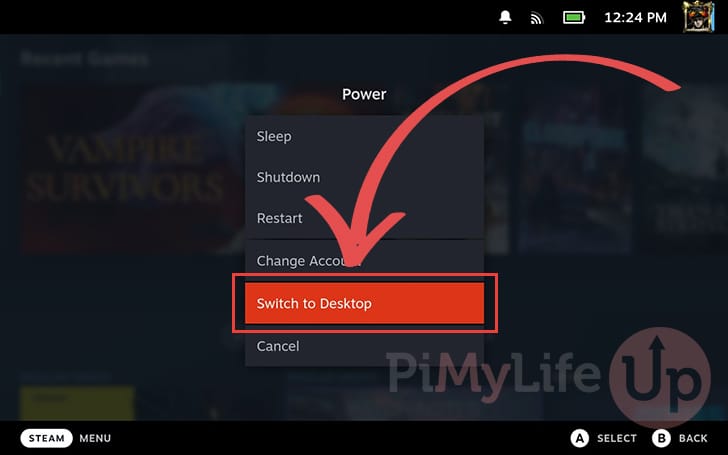
1. To install EmuDeck on our Steam Deck, we must first change to desktop mode.
To get to desktop mode, first open the STEAM Menu. You can open this menu by pressing the STEAM button on your Deck or tapping “STEAM MENU” in the bottom-left corner.
2. With the STEAM MENU open, click the “Power” option.
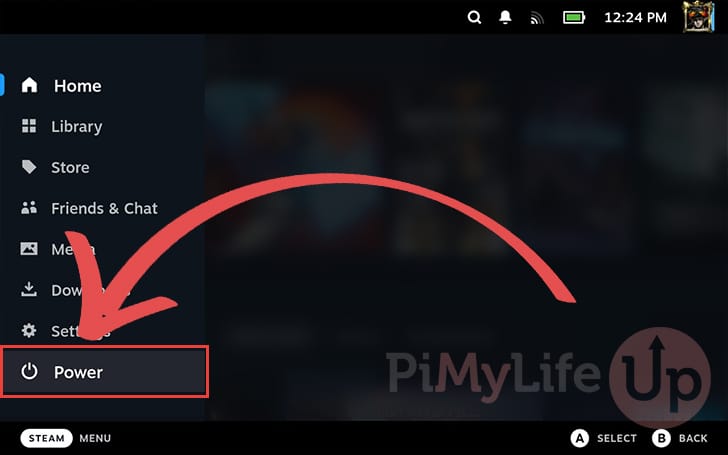
3. You will be greeted with a few different options. The one you must click is labeled “Switch to desktop“.
Downloading the EmuDeck Insstaller on your Steam Deck
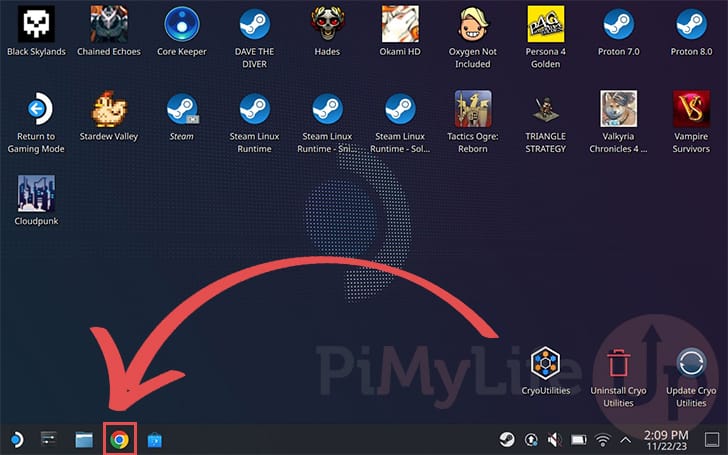
4. Once you have changed to desktop mode, open your favorite web browser.
In our case, we will be using the Chrome browser but any will work.
5. Once your web browser is open, navigate to the EmuDeck homepage on your Steam Deck (1.).
Remember you can bring up the keyboard by pressing the X button on your Deck.
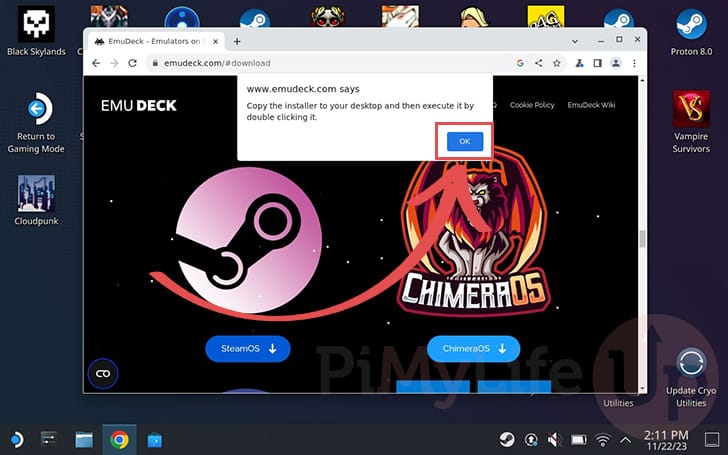
https://www.emudeck.com/#downloadAfter loading up the EmuDeck page, click the “STEAM OS” button to download the EmuDeck installer (2.).

6. Before your browser downloads the installer, you will get a prompt informing you how to use the file. Since you are following this guide, you can ignore this prompt.
To continue, click the “OK” button.
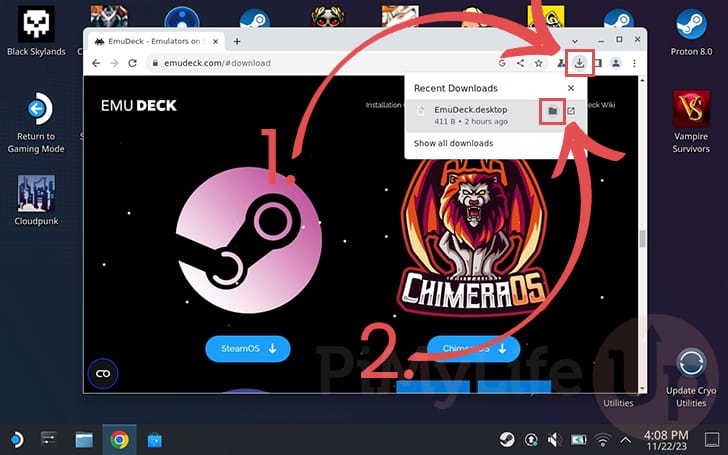
7. After downloading the installer, click the “Download” icon in the top-right of your browser (1.).
In the menu that pops up, click the folder icon next to “EmuDeck.desktop” (2.).
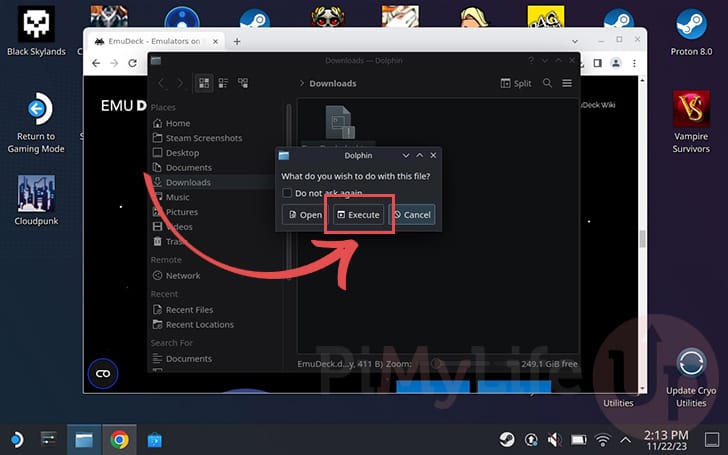
8. Now that you are in the downloads folder, find and double-click the “EmuDeck.Desktop” file.

9. Your Steam Deck will now ask you what you want to do with this file. Click the “Execute” button to continue.
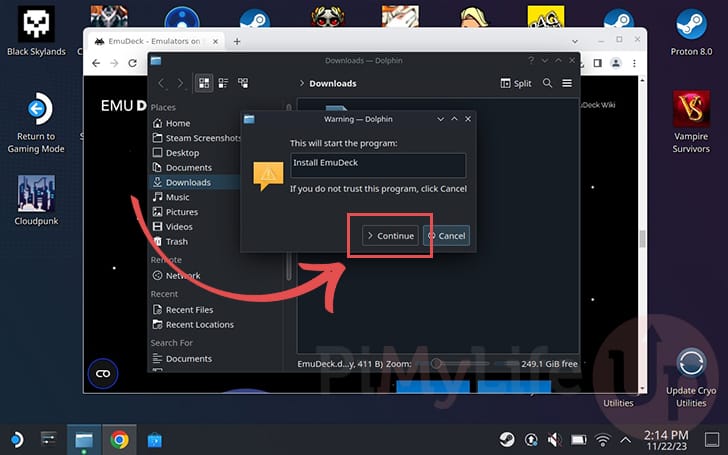
10. You will now see a warning about the file you are about to run on your Steam Deck.
To begin installing EmuDeck to your Steam Deck, click the “Continue” button.
Using the EmuDeck Steam Deck Installer
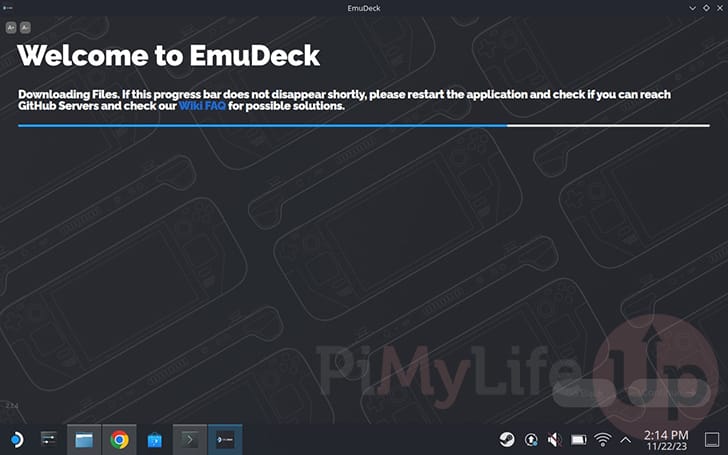
11. Now, wait a few minutes for EmuDeck to download all the files it needs to run. This process may take a few minutes to complete.
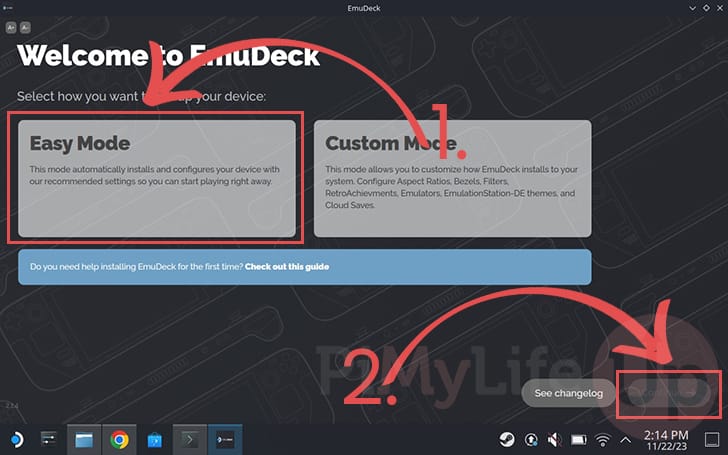
12. Once the download completes, you will be given the choice between “Easy Mode” (1.) and “Custom Mode“. For our tutorial, we will be sticking with “Easy Mode“.
- Easy Mode installs and configures everything using EmuDeck’s recommended settings. For most people, you will want to stick with this option.
You can configure a lot of these settings yourself later if you choose. - Custom Mode allows you to configure how EmuDeck is installed on your Steam Deck. This option is for those who want more fine-tuned control over emulators during installation.
After selecting the mode, click the “Continue” button (2.) in the bottom right corner.
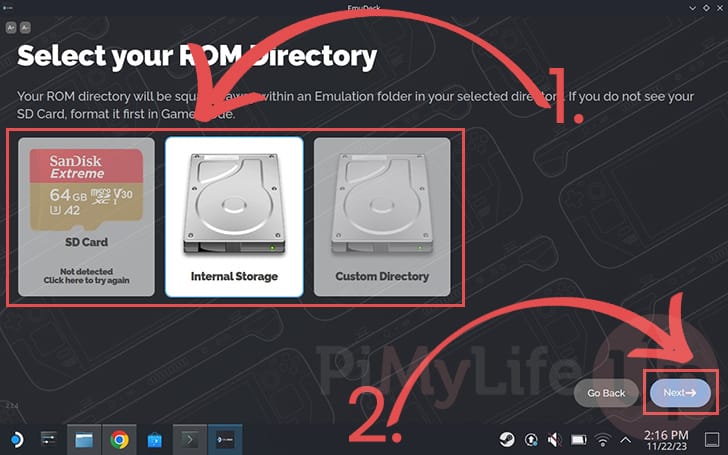
13. This next screen allows you to select where you want the ROMS for the various emulators stored on your Steam Deck.
The two best choices are an “SD Card” or the Steam Deck’s “Internal Storage” (1.). However, you can select a custom directory if you desire.
Once you are happy with your selection, click the “Next” button (2.).
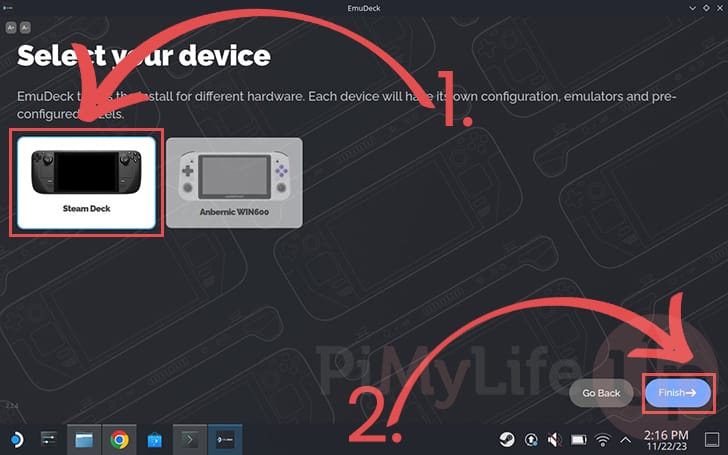
14. You will be prompted to select the device you are installing EmuDeck.
Since we are installing EmuDeck on the Steam Deck, click the “Steam Deck” option (1.).
After selecting your device, click the “Finish” button (2.) to continue.
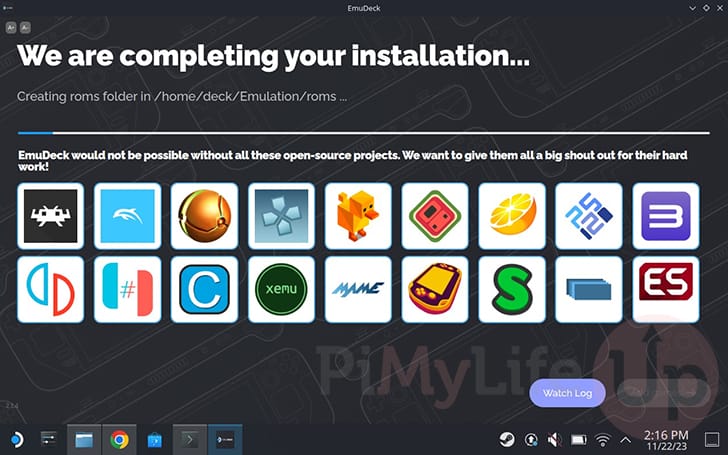
15. EmuDeck will now download and install all of its supported Emulators to your Steam Deck.
This process can take a few minutes to complete.
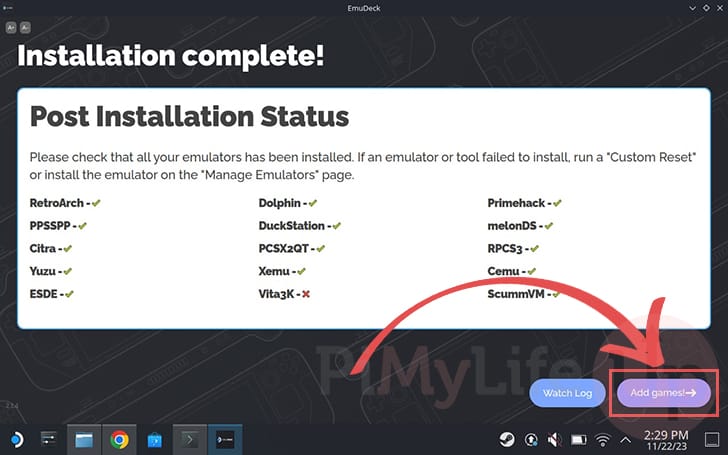
16. Once the installation completes, you will see a list of each emulator and whether EmuDeck successfully installed it.
You can attempt to fix any broken installations later. But for now, click the “Add Games” button.
Copying your ROMS to your Steam Deck
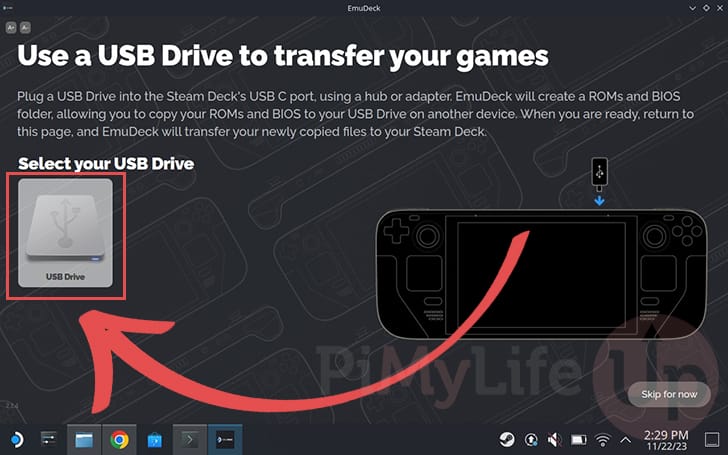
17. At this point, you will want a USB drive plugged into your Steam Deck for EmuDeck to utilize. This can be plugged in through a Dock or directly into the Deck.
You will use this USB drive to copy your ROMS to your Steam Deck. But you need EmuDeck to create the required folder structure before you can copy the games to it.
To begin this process, click the “USB Drive” icon.
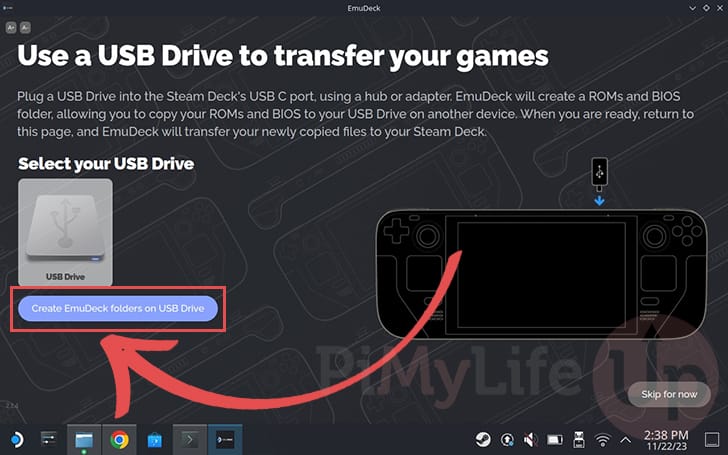
18. A file dialog box will appear on your screen. Navigate to your USB drive (1.) and then click the “OK” button (2.).

19. After selecting the USB drive you want to use to copy your games over, click the “Create EmuDeck folders on USB Drive” button.
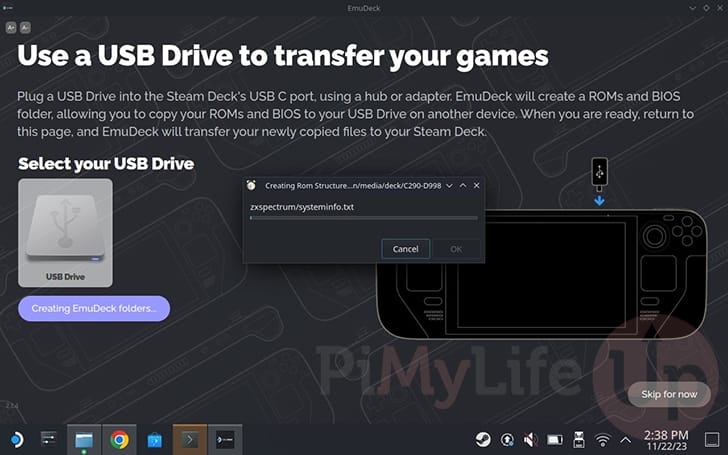
20. EmuDeck will create the required files and folders on your USB. This folder structure will allow you to easily copy your games to your Steam Deck.
This process should only take a few seconds to complete.
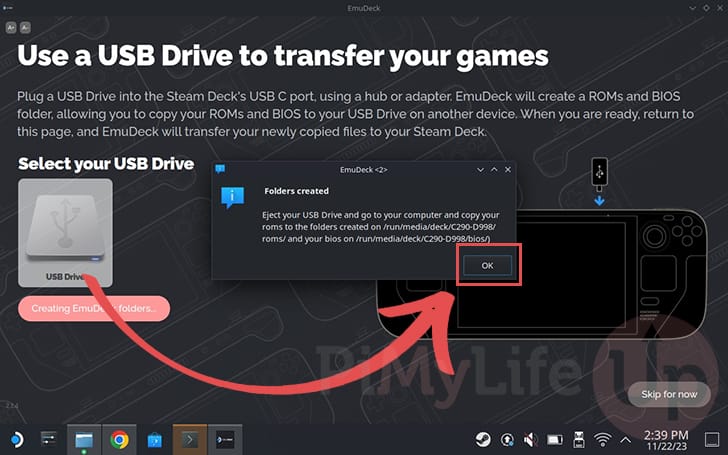
21. Once the folder structure has been set up, you should see a message on your screen saying, “Folders Created“.
You can now click the “OK” button and remove your USB drive from your Steam Deck.
Take your USB back to your computer and copy any games you want to that drive. Just make sure the games go into their relevant folder. For example, a PlayStation 2 game would go into the “ps2” folder.
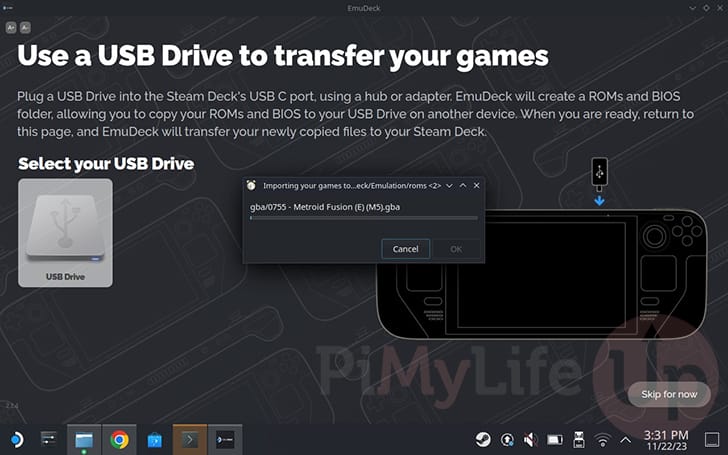
22. After copying all the games you want to your USB, plug it back into your Deck.
EmuDeck will automatically detect the USB drive you plugged into your Steam Deck and copy the games to the directory you set earlier in this guide.
If you selected “Internal Storage“, the path to which the games will be copied is “/home/deck/Emulation/roms“.
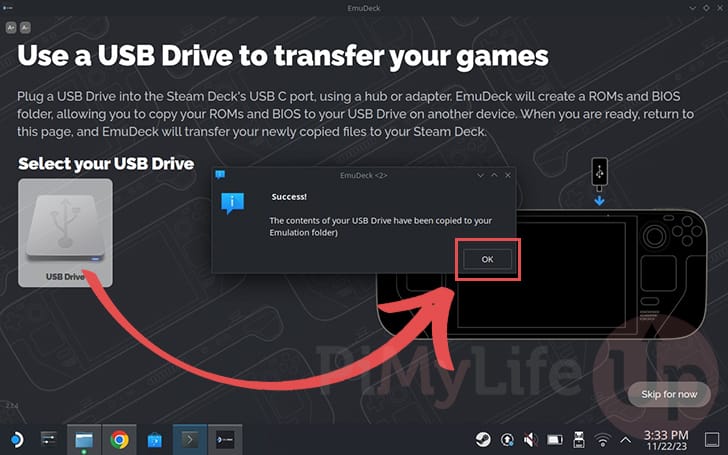
23. After EmuDeck finishes copying the games to your Steam Deck, you will see a message with the text “Success” on it.
To proceed with setting up EmuDeck, click the “OK” button.
Making use of the Steam ROM Manager
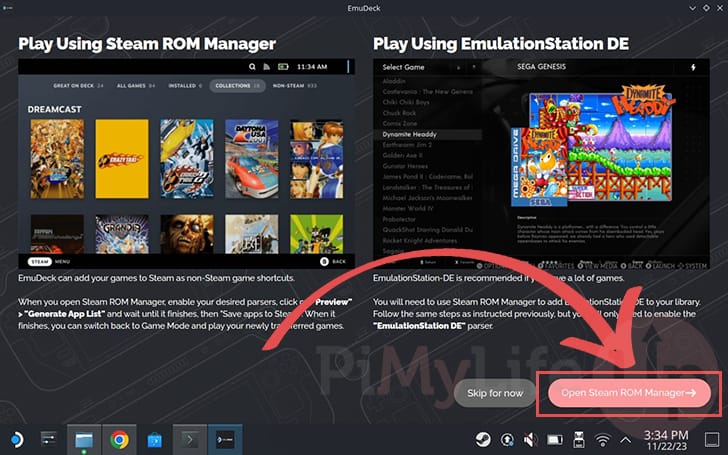
24. At this point, EmuDeck will now move you to launch Steam ROM Manager on your Steam Deck.
This tool will grab all the art for your games so that it will look nice within the Steam Deck library.
Click the “Open Steam ROM Manager” button to launch this tool.
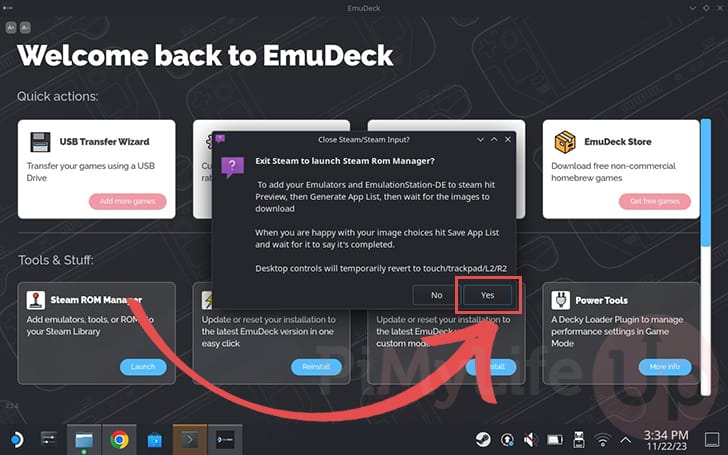
25. Before Steam ROM Manager launches, you will be asked if it can exit Steam. It needs to do this to add entries for your ROMS to your Steam Library.
Click the “Yes” button to close out of Steam and open the Steam ROM Manager,
26. Now that the Steam Rom Manager is open, click the “Preview” button to proceed.
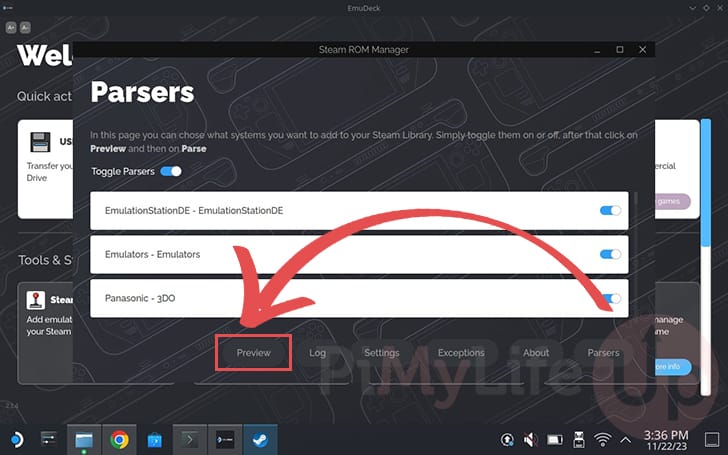
27. The tool will now run you through the steps to add entries from your EmuDeck to your Steam Deck library.
You can now click the “Parse” button to continue.

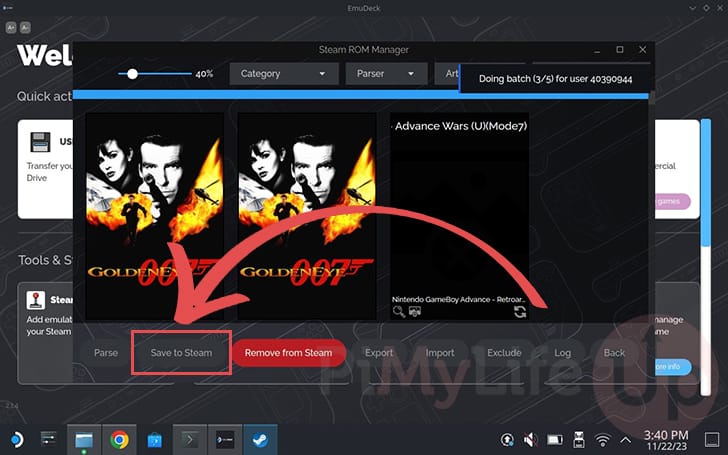
28. You will now find a list of all of your games that the EmuDeck imported and all the art the Steam ROM Manager found for them.
Use this menu to re-adjust any games that haven’t been identified properly. Please note that since Steam is closed, you lose access to its on-screen keyboard.
Once you are happy with everything, click the “Save to Steam” button.
Accessing EmuDeck’s Settings on your Steam Deck
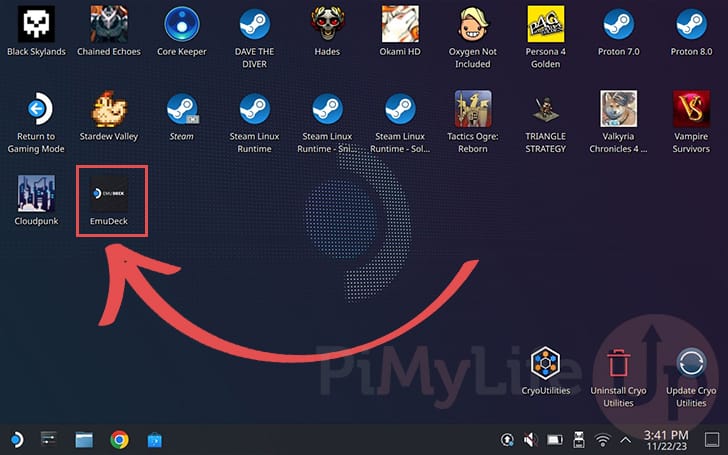
29. Before we hop back into gaming mode and check out everything EmuDeck has set up for us, let us show you how to access its tools and settings.
On your desktop, look for the icon labeled “EmuDeck” and click it.
30. With EmuDeck’s menu now open on your Steam Deck, you can view the various tools. From here, you can access the USB Transfer Wizard you used during setup.
You will want to return to this menu whenever you have added additional ROMS to run on your Steam Deck. For example, you will want to use “Steam ROM Manager” to add these new games to your Steam library.
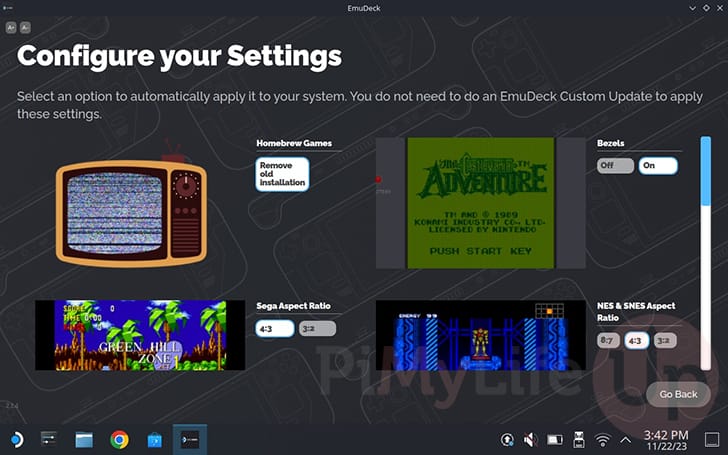
Another menu you will be interested in while you are here is the “Quick Settings“.
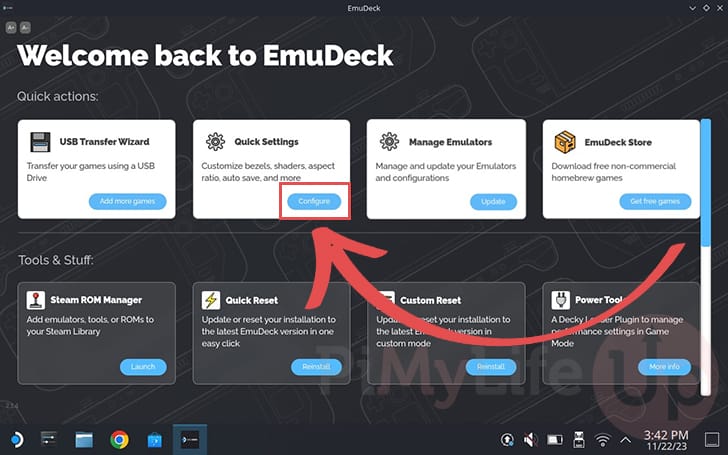
31. Using the quick settings menu, you can easily change settings for particular consoles.
For example, you can turn bezels on or off, or for specific consoles, you can even change the aspect ratio they will be rendered at on your Steam Deck.
Returning to Gaming Mode
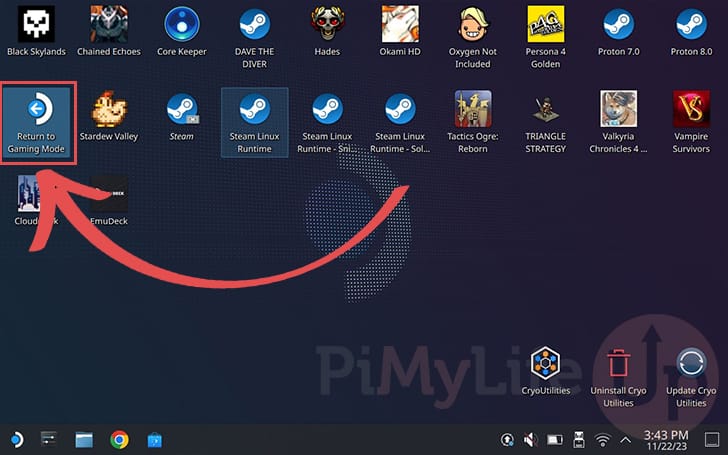
32. Now that you have installed EmuDeck to your Steam Deck, installed all the emulators it supports, and copied over your ROMS, you can finally return to gaming mode.
Double-click the “Return to Gaming Mode” icon to swap back to gaming mode.
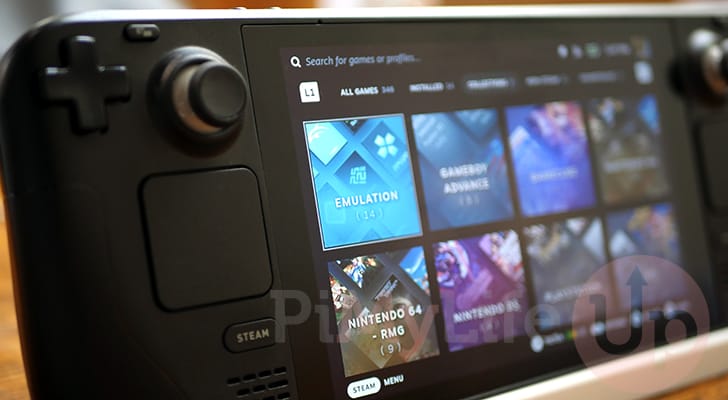
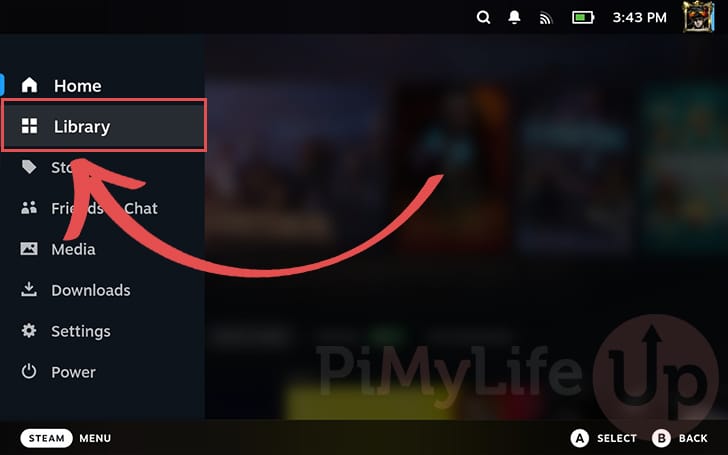
33. Once you are back in gaming mode, let us explore all the games EmuDeck has now allowed you to play on your device thanks to the numerous emulators it installed.
To check these out, open your game library using the STEAM MENU.
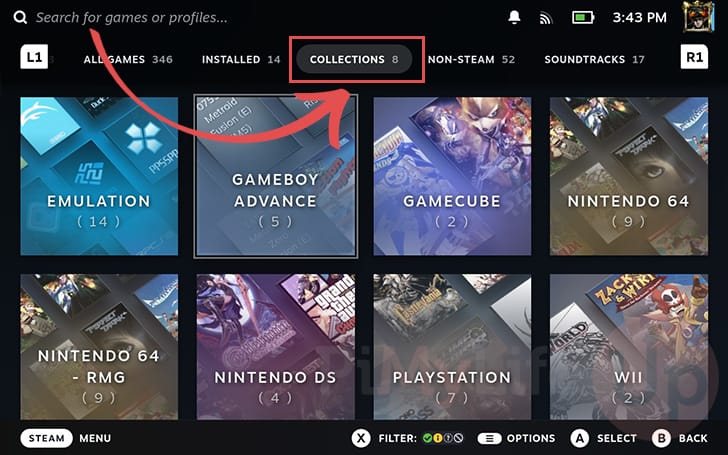
34. After loading the game library, change to the “COLLECTIONS” or “NON-STEAM” tab.
The collections tab is excellent for seeing your games as it breaks these down into each console. You can also load the “EMULATION” collection to open the emulators EmuDeck installed on the Steam Deck.
Conclusion
At this stage, you should now have EmuDeck installed on your Steam Deck.
This software package lets you easily set up numerous emulators on your Deck. It provides every tool to integrate everything nicely into your Steam Deck’s gaming mode.
Please feel free to comment below if you have had any issues with getting EmuDeck installed and working.
If you have found this tutorial to be useful, we highly recommend checking out our numerous other Steam Deck tutorials.