In this quick guide, we will be showing you how to install and use the Vim text editor on the Raspberry Pi.
Vim is a powerful terminal-based text editor known for being packed with functionality and highly configurable. It is also a tricky text editor to start with, especially when considering alternatives such as nano.
What makes Vim so tricky is that it works vastly differently from the vast majority of text-based editors you might be familiar with. It relies heavily on commands and keyboard input for both inserting new text, saving, and more.
Once you get used to using the various shortcuts and commands, Vim can become a super speedy and useful text editor on your Raspberry Pi.
However, for most people, the much simpler nano text editor is more than sufficient for their needs.
In the following sections, we will show you how to install Vim on your Raspberry Pi and walk you through some of the ways you can use this text editor.
Don’t expect to get familiar with Vim immediately, as it has a significant learning curve. But with repetition, you will find you can edit files with ease.
We push people to use the nano text editor in our tutorials as it doesn’t require beginners to learn a significantly different text editor, and it also has much simpler-to-use keyboard shortcuts.
Equipment
Below you can find a list of equipment we used when installing and using the Vim text editor on our Raspberry Pi.
Recommended
Optional
This tutorial was last tested on a Raspberry Pi 400 running the latest version of Raspberry Pi OS Bookworm.
Installing Vim on the Raspberry Pi
Vim doesn’t come pre-installed on Raspberry Pi OS, meaning we must install it. Luckily, it is still included within the official package repository, so installing this text editor is a pretty straightforward process.
In fact, there are only two short steps that you will need to follow to have this text editor installed on your system.
1. Before we can install Vim, we will be required to update the package list cache. While we are at it, we will also upgrade any out-of-date packages.
You can perform both tasks by utilizing the following command within the terminal.
sudo apt update
sudo apt upgrade -yCopy
2. Now, to install Vim to your Raspberry Pi, you will need to use the following command within the terminal.
Using this command will install Vim from the default package repository. It is a relatively small program, so this process shouldn’t take long.
sudo apt install vimCopyUsing the Vim Text Editor on the Raspberry Pi
Installing Vim to your Raspberry Pi was the easiest part of this guide. Over this next section, we will cover editing a file using Vim as well as some of the instructions and keys you will need to utilize.
This isn’t a complete guide but should give you a basic idea of how Vim works within the terminal and enough knowledge to edit basic files.
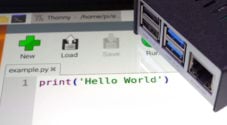
1. Like with other text editors, you can begin writing or editing a file by using the “vim” followed by the file name.
vim FILENAMEFor this example, we will be using Vim to edit a file called “example.py” on our Raspberry Pi.
vim example.pyCopy2. The Vim text editor has two different modes. The first is insert mode, and the other is command mode.
To enter insert mode, you will want to press the I key on your keyboard. After entering insert mode, you should see the following text at the bottom of the terminal.
-- INSERT --3. Now that you are in edit mode, you can type whatever you like into the file.
For our example, we will type in a simple line of Python that prints out the text “Hello World“.
print("Hello World")Copy4. Once you have finished adding text to your file using Vim on your Raspberry Pi, you will want to exit insert mode.
To exit Insert mode while using Vim, press the ESC key and return to command mode.
5. At this point, we can now save and quit out of the file.
To do this, you will need to begin entering a command by typing in the colon symbol (:). After this symbol, you will want to type one of the following to save the file or quit.
Remember that each of these must start with the colon symbol.
w– Saves the file without quitting.q– Quits out of the file if no changes have been made.wq– Saves the file and then quits out of the file.q!– Quits out of the file without saving.
Learning More About Vim
In this guide, we have barely touched on how to use the Vim text editor on your Raspberry Pi. You can check out a Vim cheat sheet to see some of the various options and commands you can use.
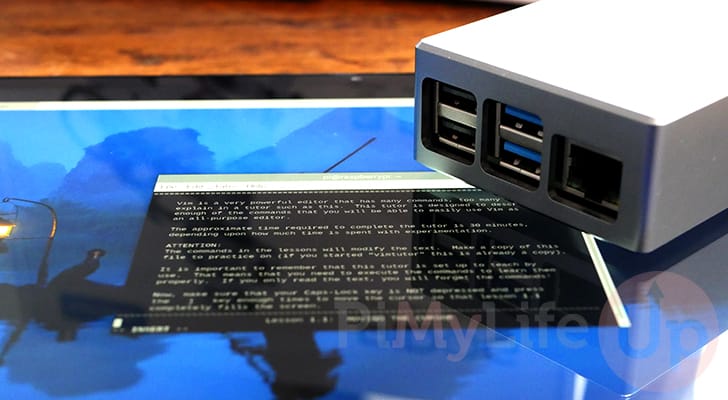
Vim also comes with a built-in tutorial explaining some of the ways you can utilize it.
You can start this guide using the following command within the command line. Of course, you must have Vim installed before you can run the command.
vimtutorCopyThis works as an interactive text file, giving you tasks you need to complete using the Vim editor.
Conclusion
Hopefully, at this stage, you will now have an understanding of how you can use the Vim text editor on your Raspberry Pi.
Vim is a very powerful text editor but is also harder to get started with. Once you get used to how it works, you will find it is a fast, versatile, and configurable text editor.
Don’t worry if you haven’t gotten used to Vim with your first usage, as it is definitely a text editor that requires time.
Please feel free to leave a comment below if you have any questions about using Vim on your Raspberry Pi.
If you found this guide to be helpful, we highly recommend checking out our many other Raspberry Pi projects.


Now I Am Ready without ADS. Hilsen Steen.