In this tutorial, we will be showing you how to install and run the UniFi OS Server on your Raspberry Pi.
UniFi OS Server is one of the best solutions for anyone who wants to self-host the UniFi network controller and is considered the new standard. It has been built from the ground up to provide many of the features of the official UniFi consoles without requiring you to own one.
This new foundation aims to provide you with all the UniFi Network Controller features without the drawbacks of the older solution. It is also designed to introduce new features to your stack over time, with support for other UniFi applications planned.
Best of all, it makes installing and self-hosting your UniFi stack significantly easier on your Raspberry Pi. Everything you need is set up for you, and you don’t have to worry about messing around with your operating system to get the various components working.
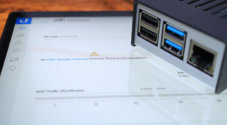
Because the UniFi OS Server supports ARM64 devices, the Raspberry Pi is a perfect candidate. They are relatively cheap devices to keep running 24/7, as they are fairly efficient devices.
Another major advantage of using the UniFi OS Server software on your Raspberry Pi is that it provides unified updates. Meaning you will get improvements as they are made available through the software itself.
Additionally, the older method of setting up the UniFi network controller is now considered legacy, with most users expected to migrate to the new UniFi OS Server.
Please note that you must be using a Raspberry Pi 3 or newer to utilize the UniFi OS Server software. However, for the best experience, we recommend using the latest Pi with the highest memory capacity you can afford. More RAM is always useful, especially for server software.
Additionally, you MUST be running a 64-bit operating system. UniFi OS Server will not install on 32-bit operating systems, which is why older Raspberry Pi’s are not supported.


Equipment
Below is a list of equipment used to set up the UniFi OS Server on our Raspberry Pi.
Recommended
Optional
- Raspberry Pi Case Amazon
We last tested this tutorial on a Raspberry Pi 5 running Raspberry Pi OS Lite Trixie (64-bit edition).
Installing and Running the Unifi OS Server on the Raspberry Pi
In the following steps, we will walk you through installing and running the UniFi OS Server on your Raspberry Pi.
Before you continue with these steps, you will need to perform a fresh operating system installation on your Pi. We highly recommend Raspberry Pi OS Lite. This is a slimmed-down operating system that pairs perfectly with the Pi’s hardware.
Additionally, we recommend assigning a static IP address to your Raspberry Pi. The best way to achieve this is by using DHCP reservation.
Preparing your Raspberry Pi
1. The first thing we need to do before we set up the UniFi OS Server on our Raspberry Pi is to ensure we have an updated operating system.
Luckily, keeping your Pi up to date is as simple as running the following two commands in the terminal. This first command updates the list of packages your system can install. The second reads this list and upgrades any out-of-date packages.
sudo apt update
sudo apt upgrade -yCopy
2. After updating your system, we must now install the two pieces of software we need to set up the UniFi OS Server on our Pi. You can install this software by running the command below in the terminal.
wget: We will use this software shortly to download the UniFi OS server installer on to your Pi..podman: This software is required by the server software for it to actually work. The Ubiquiti team uses this as their various server components are all run as individual containers.
For those who do not know, Podman is an open-source alternative to Docker that uses a different integration model with your Linux system.
sudo apt install wget podmanCopyDownloading the Unifi OS Server Installer to your Raspberry Pi
3. With our Raspberry Pi now all prepared, we can move on to downloading the UniFi OS server installer onto our Raspberry Pi. This installer handles all of the work needed to reconfigure your current operating system as well as setup the UniFi containers.
You can use the wget tool to download the installer by using the following command within the terminal.
The link below will download the installer for UniFi OS 5.0.6 to your Raspberry Pi. You can find newer links by going to the official Ubiquiti downloads page. You will want the one for Linux ARM64.
wget -O unifiosinstaller https://fw-download.ubnt.com/data/unifi-os-server/df5b-linux-arm64-5.0.6-f35e944c-f4b6-4190-93a8-be61b96c58f4.6-arm64Copy4. Once the installer has been downloaded to your system, we need to use the chmod command to give it execute privileges.
This will enable us to run the installer over the next few steps.
sudo chmod +x unifiosinstallerCopyRunning the Installer
5. We are finally at the point that we can run the UniFi Server OS installer on our Raspberry Pi and begin the installation process.
All we actually need to do to start up this installer is to use the following command within the terminal.
sudo ./unifiosinstallerCopy6. Upon running the installer, you will be greeted with the following message. This indicates that you are about to install the UniFi OS Server and the version you are installing.
To run the installer, type in “y” and press ENTER.
You are about to install UOS Server version 5.0.6. Proceed? (y/N):Please note that this installer has a fair bit to do, so depending on your internet speed, it may take some time to complete. During this process, the UniFi network controller will be set up using Podman, as well as other changes to your system.
7. Once the installer has completed, you will see a message like the following appear within the terminal. This provides a couple of additional tips for managing the UniFI OS server on your Raspberry Pi.
However, the most important thing is the URL the tool provided to you at the bottom of the message. Using this URL, you can get access to the UniFi OS Server web interface and finish the setup process.
!!! INSTALLATION COMPLETE !!!
To grant permission for a user to run 'uosserver' commands:
-> Add the user to the 'uosserver' group:
   usermod -aG uosserver <username>
-> Then log out and log back in for the changes to take effect.
To get started with available commands, run:
   uosserver help

UOS Server is running at: https://192.168.0.22:11443/
Accessing the UniFi OS Web Interface
8. To finish setting up the UniFi OS Server on your Raspberry Pi, you will need to access its web interface. This is the crucial last step as there is a few onboarding steps you must complete.
https://192.168.0.22:11443/Please note that when you access the Unifi OS web interface, you will see a warning. This is because the Unifi OS installer generated a self-signed certificate on your Raspberry Pi. This cert enables HTTPS support, but will throw this error because it can’t be verified by a signing authority like Let’s Encrypt as valid.
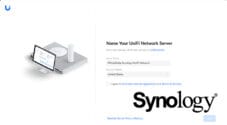
9. The first thing that you will be asked when you access the web interface is to give a name for your new UniFi OS Server.
Fill out the name you want for this setup (1.) and then click the “Next” button (2.).

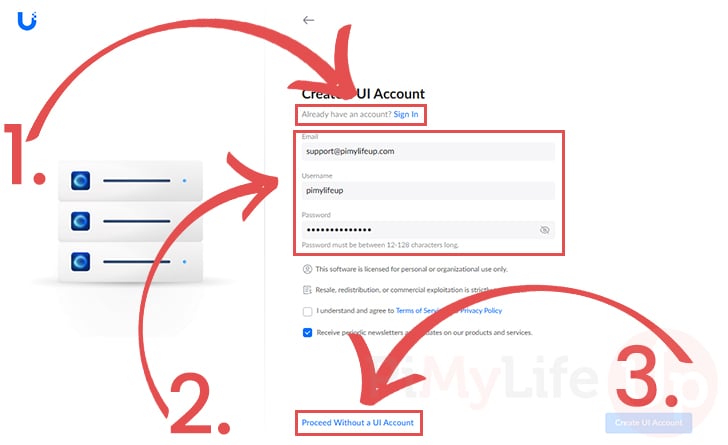
10. Next, you will be prompted with three different options for creating a UI account to access and manage your brand new UniFi OS Server running on your Raspberry Pi. The key advantage of using a UI account is that you can remotely manage your network controller via the UniFi website.
The three options you see here are:
- At the top, you will see an option to log in to an existing UI account. Use this option if you already have an account and don’t want to create a new one.
- The second option is to create a brand new UI account. If you want to use this option, enter your email, username, and password, then click the button in the bottom-right corner.
- Finally, you can still use the UniFI Server OS without a UI account; however, you miss out on some extra features, such as remote management. Select this option if you would prefer not to use a Ubiquiti account.
11. After following the account process, the UniFi OS server will now finish installing and setting itself up on your Raspberry Pi.
This process should only take a couple of minutes to complete.
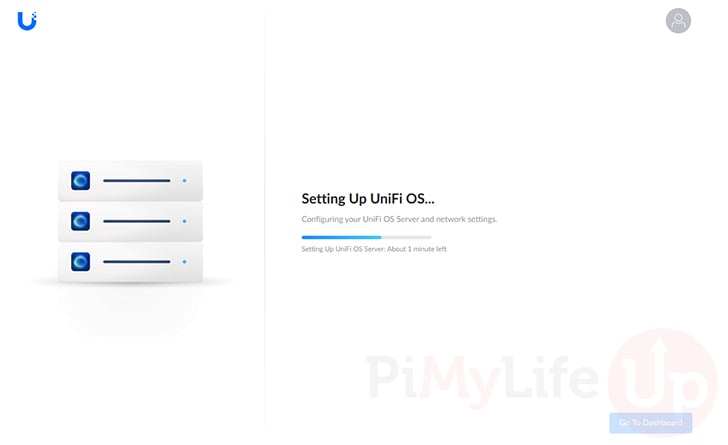
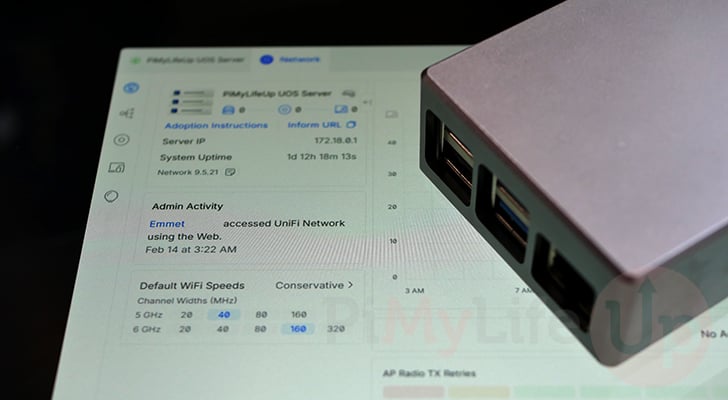
12. Once the server finishes setting itself up you should now have access to the UniFi network controller through the web interface.
You should have access to most of the network features directly through this web interface.
Conclusion
Hopefully, if you have reached this point in the tutorial, you have successfully installed and run the UniFi OS Server on your Raspberry Pi.
The UniFi OS server is intended as a modern replacement for self-hosting the network controller. It makes things significantly easier and introduces many features that were previously exclusive to the official UniFi devices, such as the Dream Machine.
Best of all, this new UniFi OS server still supports ARM64 devices such as the Raspberry Pi.
Please feel free to post a comment below if you have encountered any issues getting this guide to work.
If you liked this tutorial, we highly recommend checking out some of our many other Raspberry Pi projects.


Will installing the Unifi OS wipe the existing install? At the moment, my Pi is running both PeaNUT and the legacy Unifi Controller. If I install this, will PeaNUT be overwritten, or will it run alongside Unifi?
Hi Geoffrey,
Despite its name it doesn’t actually take over your whole system, all of the UniFi systems are actually ran within containers with this method using Podman. It does make some changes to your host system but not that I believe should break any other software, unless that software uses a port that UniFi relies on.
Kind regards,
Emmet
Wonderful, thank you!
Now I just need to figure out how to remove the legacy client so I can set up the new one on the same Pi…