In this tutorial, we will be showing you how you can set up a Raspberry Pi Sense HAT digital clock by utilizing its LED matrix.
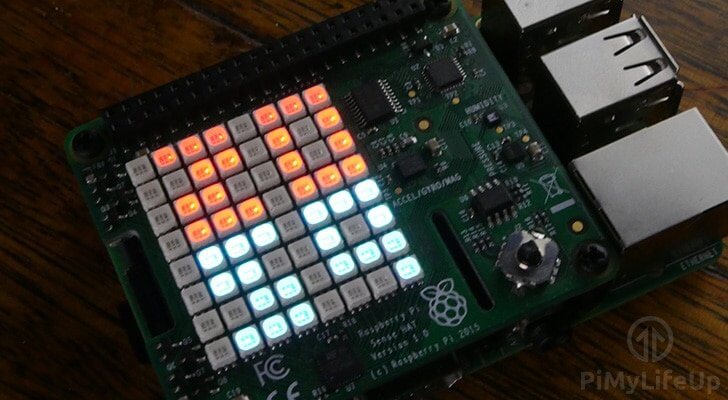
Throughout the tutorial we will be showing you how to write a script on your Raspberry Pi that can grab the current system time and then interpret that into something that we can display on the LED matrix.
This tutorial will teach you how you can utilize arrays and numerical values to print values to the Raspberry Pi’s Sense HAT LED matrix, row by row.
To make the clock more accurate, especially if you don’t plan on having an active internet connection then look at using a real time clock module. The module will ensure that your clock is as correct as it can be.
You can find the full tutorial on how to setup your Raspberry Pi Sense HAT as a digital clock below.
Equipment List
Below is the full list of equipment that you will need to complete this Raspberry Pi Sense HAT as a digital clock tutorial.
Recommended
- Raspberry Pi Amazon
- Micro SD Card Amazon
- Ethernet Cable Amazon or Wi-Fi Amazon
- Power Supply Amazon
- Sense HAT Amazon
Optional
Getting started with the Sense HAT
Now before we start making use of our SenseHAT as a digital clock we must first set it up correctly and test to make sure everything is working.
1. Begin by running the following commands on your Raspberry Pi to update the operating system to the latest version.
sudo apt update
sudo apt upgrade
2. Now that we have updated our Raspberry Pi’s operating system we must install the sense-hat package. This package includes all the libraries that we need to interact with the device.
sudo apt install sense-hat
sudo reboot
3. With the sense-hat libraries downloaded to our Raspberry Pi we need to write a script to ensure that we can actually talk with the device.
We can start writing this script with the following command on the Raspberry Pi.
sudo nano ~/sensehat_test.py4. Now within this script we need to write the following lines of code. We will explain what each section of code does as we go.
from sense_hat import SenseHatThis line imports the SenseHat module from the sense_hat library. This allows us to interact with the Sense HAT through Python itself.
sense = SenseHat()The line instantiates a copy of the SenseHat class to our sense variable. We will be using the sense variable to interact with the SenseHat class and call its functions.
sense.show_message("Hello World")This line simply pushes a text message to the LED matrix on the SenseHAT. This particular call will make the text “Hello World” appear across the device.
5. Now save the file by pressing CTRL + X, then Y and finally ENTER.
6. Now that we have saved the file, run it by using the following command within the terminal.
sudo python ~/sensehat_test.pyYou should now see the text “Hello World” scroll across the LED Matrix on the Sense Hat.
If nothing appears on your Sense HAT, it is likely that the Sense HAT has not been properly pressed down on top of the GPIO pins, or the device is faulty.
If it is still not working, try restarting the Raspberry Pi by running the following command on it.
sudo rebootTurning your Sense HAT into a Digital Clock
Next, it’s time to write out the code for the Sense Hat digital Clock. This code is inspired by Steve Amor’s work on a Raspberry Pi digital clock using the Sense Hat.
We use a lot of Python code in this tutorial, so I highly recommend going through our introductory guide to Python if you’re new to this language.
1. Now that we have installed everything that we need for our script and tested that our Sense Hat is working. We can proceed to write the script.
Before we get too far ahead though, let’s create a folder to keep our new script in. We will name this folder digitialclock and keep it in our Pi users home directory.
Run the following command in the terminal to create this folder.
mkdir ~/digitalclock2. With the folder now created we will change into the directory and begin writing our script by running the following two commands.
cd ~/digitalclock
nano digitalclock.py
3. Now write the following lines of code to the file. We will explain each section of the code, so you get a good understanding of how everything works.
#!/usr/bin/env python

from sense_hat import SenseHat
import time

sense = SenseHat()
The very first line tells the operating system how to interpret the file, in our case we are using it to tell the operating system to use Python to run the file.
The next line imports the SenseHat module from the sense_hat library, this is the library that we installed during the first section of this tutorial.
We utilize the SenseHat module within this script to talk with the Sense Hat device and display our time to the 8×8 LED matrix by switching on specific LEDs on the matrix.
On the next line, we import another library, this time we import the time library. We utilize the time library to retrieve the current time directly from the operating system itself.
By getting these values, we can choose from our arrays to decide what pixels need to be switched on or off.
Next, we create a copy of the SenseHat object, we will be utilizing this object throughout the script to control the Sense Hat. We only need this to be able to pass our array to the device that tells it which pixels need to be switched on or off.
You will see in the next couple of sections of code how we utilize these libraries.
number = [
[[0,1,1,1], # Zero
[0,1,0,1],
[0,1,0,1],
[0,1,1,1]],
[[0,0,1,0], # One
[0,1,1,0],
[0,0,1,0],
[0,1,1,1]],
[[0,1,1,1], # Two
[0,0,1,1],
[0,1,1,0],
[0,1,1,1]],
[[0,1,1,1], # Three
[0,0,1,1],
[0,0,1,1],
[0,1,1,1]],
[[0,1,0,1], # Four
[0,1,1,1],
[0,0,0,1],
[0,0,0,1]],
[[0,1,1,1], # Five
[0,1,1,0],
[0,0,1,1],
[0,1,1,1]],
[[0,1,0,0], # Six
[0,1,1,1],
[0,1,0,1],
[0,1,1,1]],
[[0,1,1,1], # Seven
[0,0,0,1],
[0,0,1,0],
[0,1,0,0]],
[[0,1,1,1], # Eight
[0,1,1,1],
[0,1,1,1],
[0,1,1,1]],
[[0,1,1,1], # Nine
[0,1,0,1],
[0,1,1,1],
[0,0,0,1]]
]
This very large array is what we will be using to grab the numbers for our clock. Each number for the clock is split into its own list, then is split again into four individual sections.
We split the array into these lists to make it easier to output to the LED Matrix. You will see shortly how we utilize the array to push these numbers to the device.
noNumber = [0,0,0,0]We also have a small array that just has four zero values. We will use this array to fill in spots in the LED matrix where we want no number to be displayed.
hourColor = [255,0,0] # Red
minuteColor = [0,255,255] # Cyan
empty = [0,0,0] # Black/Off
These three variables are used to declare the RGB values of the LEDs for the hour, minute and empty slots.
If you want to change the color for the hour, you just need to change the three values of the array to the relevant RGB value.
clockImage = []

hour = time.localtime().tm_hour
minute = time.localtime().tm_min
In this section of code, we first create an empty array called clockImage. We need this empty as we will be pushing all our numbers from our large array to it.
Next, we retrieve the current hour and minute and store it in our variables. We will be utilizing these to decide what number needs to be displayed.
for index in range(0, 4):
    if (hour >= 10):
        clockImage.extend(number[int(hour/10)][index])
    else:
        clockImage.extend(noNumber)
    clockImage.extend(number[int(hour%10)][index])

for index in range(0, 4):
    clockImage.extend(number[int(minute/10)][index])
    clockImage.extend(number[int(minute%10)][index])
Here is where we do most of our magic. We run two different for loops, the first loop is for the top hour numbers, the second loop handles the minutes that are displayed at the bottom of the LED matrix.
For each loop we use Pythons .extend function for lists, using this we insert a row of 4 elements from each number in a single call, this saves us having to run two concurrent loops.
To get the correct number from the array, we make use of some simple math. In a two-digit number, we use a division by 10 to retrieve the first number. For instance 12, we would get 1 from a division by 10.
To get the second digit we make use of modulus which returns us the remainder from a division, so in the case of our previous number (12) we will get the return of 2.
for index in range(0, 64):
    if (clockImage[index]):
        if index < 32:
            clockImage[index] = hourColor
        else:
            clockImage[index] = minuteColor
    else:
        clockImage[index] = empty
Now our final loop goes through the entire clockImage array, this loop is designed to swap out every number with our RGB values.
We achieve this by just checking whether there is a number 0 or 1 in that index. If it’s 0 we output our empty variable value to that number.
Otherwise, we check to see if we are dealing with the first 32 pixels (the top half of the LED matrix), if we are in the top half we grab the RGB values from our hourColor variable. Otherwise, we utilize the RGB values from the minuteColor variable.
sense.set_rotation(90) # Optional
sense.low_light = True # Optional
sense.set_pixels(clockImage)
Now here are our final 3 lines of code.
The first of these lines set the rotation of the LED matrix, you can change this based on which direction you want your digital clock to be displayed.
The second line sets the low light mode on the Sense HAT on, this basically dims down the LED’s so they aren’t nearly as bright. Comment this line out or remove it if you have your Sense HAT in an area that’s in constant bright light.
Finally, the last line outputs our clockImage array to the Sense HAT, this is the line that finally displays our time on the Sense HAT’s led matrix.
4. Below we have included a copy of what the final script should look like.
Once you are happy with all the code, you can save the file by pressing CTRL + X then Y and finally ENTER.
#!/usr/bin/env python

from sense_hat import SenseHat
import time

sense = SenseHat()

number = [
[[0,1,1,1], # Zero
[0,1,0,1],
[0,1,0,1],
[0,1,1,1]],
[[0,0,1,0], # One
[0,1,1,0],
[0,0,1,0],
[0,1,1,1]],
[[0,1,1,1], # Two
[0,0,1,1],
[0,1,1,0],
[0,1,1,1]],
[[0,1,1,1], # Three
[0,0,1,1],
[0,0,1,1],
[0,1,1,1]],
[[0,1,0,1], # Four
[0,1,1,1],
[0,0,0,1],
[0,0,0,1]],
[[0,1,1,1], # Five
[0,1,1,0],
[0,0,1,1],
[0,1,1,1]],
[[0,1,0,0], # Six
[0,1,1,1],
[0,1,0,1],
[0,1,1,1]],
[[0,1,1,1], # Seven
[0,0,0,1],
[0,0,1,0],
[0,1,0,0]],
[[0,1,1,1], # Eight
[0,1,1,1],
[0,1,1,1],
[0,1,1,1]],
[[0,1,1,1], # Nine
[0,1,0,1],
[0,1,1,1],
[0,0,0,1]]
]
noNumber = [0,0,0,0]

hourColor = [255,0,0] # Red
minuteColor = [0,255,255] # Cyan
empty = [0,0,0] # Black/Off

clockImage = []

hour = time.localtime().tm_hour
minute = time.localtime().tm_min

for index in range(0, 4):
    if (hour >= 10):
        clockImage.extend(number[int(hour/10)][index])
    else:
        clockImage.extend(noNumber)
    clockImage.extend(number[int(hour%10)][index])

for index in range(0, 4):
    clockImage.extend(number[int(minute/10)][index])
    clockImage.extend(number[int(minute%10)][index])

for index in range(0, 64):
    if (clockImage[index]):
        if index < 32:
            clockImage[index] = hourColor
        else:
            clockImage[index] = minuteColor
    else:
        clockImage[index] = empty

sense.set_rotation(90) # Optional
sense.low_light = True # Optional
sense.set_pixels(clockImage)
5. Now we can go ahead and test run the code, just run the following command on your Raspberry Pi.
python ~/digitalclock/digitalclock.pyIf everything is running correctly, you should now see the current time appear on your device.
If you’re having trouble, you can download the code off of our GitHub.
Of course, having a clock that never updates is useless. In the “Automating your Sense HAT Digital Clock” section we will show you how to make use of crontab to run the script every minute.
If you want to expand this script so that you can show times that are in different time zones, then you can follow the next section that details on how to deal with timezones for our Raspberry Pi digital clock.
Dealing with Time Zones for your SenseHAT Digital Clock
In this section, we will be showing you how you can modify your SenseHat Digital Clocks script so that you can show times from different time zones and not just the one defined by the operating system.
1. Before we begin changing our script to handle different time zones we must first make sure that the Python pip package is installed to the Raspberry Pi, we use this package to install our required python libraries.
We can do this by first updating the package list and then using apt-get to install pip, run the following command to do this.
sudo apt update
sudo apt install python-pip
2. To handle different timezones, we will be utilizing a Python package called Arrow.
This package greatly simplifies the process of retrieving the time in a specific timezone and doesn’t involve having to string together several different packages.
Let’s install the library to our Raspberry Pi using pip by running the following command.
sudo pip install arrow3. With the Arrow Python packaged now installed we will need to go ahead and modify our script so that it will utilize this package instead of the time library.
Type in the command below to begin modifying our SenseHAT digital clock script.
nano ~/digitalclock/digitalclock.py4. Now that we are modifying the script lets start by first replacing our time import with an import for the newly installed Arrow package.
Find the following:
import timeReplace with:
import arrow5. With the time package now replaced, we need to go ahead and change up a bit of our actual script logic as we now need to retrieve the time using the Arrow package.
Find the following section of code:
hour = time.localtime().tm_hour
minute = time.localtime().tm_min
Replace with the following.
time = arrow.now('Asia/Tokyo')

hour = time.hour
minute = time.minute
If you take a look at this new section of code, we have changed it to no retrieve the time from Arrow utilizing their “now” function. To this “now” function we are passing in the timezone that we want to get the current time for, in our case, we are utilizing the ‘Asia/Tokyo‘ timezone.
The Arrow package uses the timezones from the tz database that is provided by the dateutil package. You can find a list of these timezones by going to the TZ Database Wikipedia page. This web page makes it easy to find the timezone you are after.
6. That is all that we need to do to change the script to use the Arrow package instead, the time displayed on your SenseHAT should now be appearing in the timezone that you defined in the arrow.now(”) function.
Once you are happy with the changes, save the file by pressing CTRL + X then Y then ENTER.
7. With the changes now made to the script lets go ahead and run it to test that our changes are working correctly.
python ~/digitalclock/digitalclock.pyIf everything is working correctly, then you should now see the time for the timezone you specified appear on your SenseHAT.
In the next section we will walk you through the process of having your Sense HAT Digital clock automatically update.
Automating your Sense HAT Digital Clock
1. The first thing we must do before we add our script to the crontab is to make it executable.
We can do this by using the following command on the Raspberry Pi. This command will use chmod to add execution rights to the script.
chmod +x ~/digitalclock/digitalclock.py2. Now that we have given our digital clock script execution privileges we can now go ahead and begin editing the crontab.
Run the following command on your Raspberry Pi to edit the crontab.
sudo crontab -eIf you are asked what editor you want to utilize to edit the crontab file, we recommend that you choose Nano as its one of the most straightforward editors to use.
3. Add the following line to the file. This line will basically tell the operating system that it needs to run this file every minute.
* * * * * /home/pi/digitalclock/digitalclock.pyIf you want to adjust how often the digital clock updates we recommend using a service such as our cron job generator.
4. With that change made to the file, you can save it by pressing CTRL + X then Y and finally ENTER.
The system will now automatically load in the new crontab and begin processing it.
5. You should now see the time on your Sense HAT update every minute.
Conclusion
I hope by the end of this tutorial you will now have successfully set up your Raspberry Pi’s Sense HAT as a digital clock.
This tutorial is just one of the many examples of what you can do with the Raspberry Pi Sense Hat. A project that is also worth checking out is the weather station using the Raspberry Pi Sense HAT.
If you have any feedback on this Raspberry Pi Sense HAT digital clock tutorial, then please feel free to leave us a comment below.


Dear Guys
I just went through the tutorial and it works great, but my time is stuck at the time, where tiped in the command
python ~/digitalclock/digitalclock.py
I would love to have an answer and see more of your creations
Hi Peter,
The way the code is written to work it will only fire once and not continually update. You could change this to operate in a loop or alternatively just use the crontab to fire the script every minute.
Cheers,
Emmet
I just ran through this tutorial and everything works great!
One quick question…how can change the clock to a use a 12 hour clock display only?
Great tutorial! Thank you!
I haven’t tested the following change, but in theory, it should work.
Replace:
with
Hi Emmet!
Just a note to say thanks for figuring this one out! Works like a charm!
Best,
Mike
Works really well, thank you for going into the trouble of putting together comprehensive instructions and also explaining what everything means!
I have a question: how would you need to change the code to set it to display another time zone? I’m trying to set it up to show the local time in Tokyo so that I know when it’s night time and I shouldn’t bother friends there 🙂
If it’s difficult, I guess I could just change the time zone of the OS, given that I’m not really using the pi zero this runs on for any other things that would require local time.
Thank you!
Mike
Hi Mike!
Great idea on improving the script to allow different timezones to actually be specified instead of having to change the OS’s time zone.
We have actually gone ahead and updated the guide to include a new section on using the Arrow library to do just what you are after!
Drop a comment if you end up running into any issues.
Cheers,
Emmet
You legends! Thank you!
It works, but for some reason it stops updating every minute – any idea why?
Making the changes:
This bit worked like a treat. The only thing that might be useful to add is that pip isn’t installed by default (at least not on raspbian lite), so if you don’t have it installed yet, you might have to. Luckily it was just a quick google search away. In case you want to add it to the instructions, I used the following commands:
sudo apt-get update
sudo apt-get install python-pip
and then you need to confirm (y + enter) once. Took me about 2-3 minutes to install on my pi zero.
Updating every minute:
It doesn’t want to update the time any more. I commented out the changes and added back the original code, which resulted in it working again, but of course showing my local time here in Berlin. Can you think of a reason why this might be happening?
Thank you again for including this!
Best,
Mike
Hi Mike!
Thank you for your response, I have worked out why it wont update every minute as it should be and it turns out to be a slight mistake in the instructions.
When installing the Arrow package I wasn’t utilizing sudo which meant that it was not made available to the entire system, so when cron went to fire the script it would throw an error about being unable to import arrow.
For safety i first removed arrow by running the following command.
Then re-installed it again using sudo by running the following.
Let me know if that fixes you issue!
Also thank you very much for pointing out that bit about pip not being available in Raspbian Lite, I have gone ahead and added those extra steps for those that are running different versions of Raspbian.
Cheers,
Emmet