In this tutorial, you will learn how to install the Proxmox Virtual Environment on the Raspberry Pi.
Proxmox Virtual Environment is an open-source virtualization platform that has an incredibly powerful and useful web interface.
You can easily manage virtual machines and containers on your Raspberry Pi using the built-in web interface.
This web interface even allows you to set up software-defined storage, network, and more. If you want to run VMs on your Raspberry Pi, Proxmox is one of the go-to solutions.
Thanks to recent advancements in Proxmox VE, it now supports ARM systems. The downside is that the team does not provide any builds for ARM64. Luckily, we can use a third-party fork of Proxmox that adds support for ARM systems like our Pi.
The fork that we are relying on is called Pxvirt. This fork maintains feature parity with Proxmox VE but features many additional optimizations that help Proxmox run even better on ARM.
The version of the Promox Virtual Environment that you will be installing in this guide depends on the version of Raspberry Pi OS you are running. If you are running Bookworm, then you will get Proxmox 8. If you are running Raspberry Pi OS Trixie, you will be running Proxmox 9.
Remember that while running virtual machines on your Raspberry Pi, avoid using anything too heavy. The Raspberry Pis aren’t the strongest machines, but they should be able to handle a few little VMs. You will have a better experience using the newer Pis with Proxmox, such as the Raspberry Pi 5.
Please note that for this tutorial to work, you must be running the 64-bit version of Raspberry Pi OS Lite Bookworm or Trixie. Using other operating systems is not guaranteed to work and is likely to cause issues.


Equipment
Below is a list of the equipment we used when setting up the Proxmox Virtual Environment on our Raspberry Pi.
Recommended
Optional
This tutorial was last tested on a Raspberry Pi 5 running the latest version of Raspberry Pi OS Lite Trixie 64-bit.
Installing Proxmox on the Raspberry Pi
Over the following sections, we will walk you through installing the Promox virtual environment on your Raspberry Pi.
We highly recommend that you follow these steps using a clean installation of Raspberry Pi OS Lite. In particular, you should be using the 64-bit version.
A non-clean version of the operating system may cause the Proxmox installation process to break.
If you prefer video, you can follow our video guide embedded below. Otherwise, continue to see our full written guide on installing Proxmox to the Raspberry Pi.
Preparing your Raspberry Pi for Proxmox
1. Our first task before installing Proxmox onto the Raspberry Pi is to update the package list cache and upgrade any out-of-date packages.
You can perform both tasks by using the following two commands within the terminal.
sudo apt update
sudo apt upgradeCopy
2. Your next step is to ensure that curl is installed on your Pi. We will be using curl to grab the GPG key for the PXVirt repository that we will be relying on to install Proxmox.
You can install this package by using the following command within the terminal.
sudo apt install curlCopy3. Before proceeding with this tutorial, you must set up your Raspberry Pi to use a static IP address.
The best way to do this is using DHCP reservation in your router. However, we have a guide that shows you how to do this through your Raspberry Pi if you don’t have access to your router.
Modifying your Hosts File for Proxmox
4. After setting up a static IP address, we must now edit the hosts file. Proxmox expects your hostname to point to the IP address of your Raspberry Pi.
You can begin editing the hosts file on the Raspberry Pi using the nano text editor by running the following command.
sudo nano /etc/hostsCopy5. With the hosts file open, you should see a line similar to the one below. Our hostname is set to the default “raspberrypi“, but yours might differ.
127.0.0.1 raspberrypiAfter finding this line, you will want to replace “127.0.0.1” with the local IP address of your Raspberry Pi.
In our case, our Pi’s IP is “192.168.0.32” so we changed the line to look like the following.
192.168.0.32 raspberrypi6. After making these changes, save and quit by pressing CTRL + X, Y, and then the ENTER key.
7. To verify that our changes are working, we can use the hostname command to output the IP address of our Raspberry Pi.
hostname --ip-addressCopyIf you have configured everything properly, the static IP of your Pi should be returned.
192.168.0.32Stopping Cloud Init From Managing the Hosts File
8. Recent versions of Raspberry Pi OS now have Cloud-init set up. As part of that setup, it will now automatically update the hosts file and remove our changes.
Luckily, we can switch off this functionality by modifying the “cloud.cfg” file and disabling a particular option.
sudo nano /etc/cloud/cloud.cfgCopy9. Within this file, you will want to find the following line. This will be under the “cloud_init_modules” header.
- update_etc_hostsOnce you have found this line, all you need to do is add a hashtag (#) to the front of it. This comments out that line and will mean Cloud-Init will not override our changes when you restart.
# - update_etc_hosts10. After making this change, you will want to save and quit by pressing CTRL + X, Y, and then ENTER.
Set a Password for the root User
11. The next thing we must do to use Proxmox on our Raspberry Pi is set a password for the “root” user. If we don’t set a password for this user we will be unable to login through the Proxmox web interface.
You can set a password for the root user using the command below within the terminal.
sudo passwd rootCopy12. To set a password, you must enter it twice, as shown below. We recommend that you set a strong password for this.
A password manager such as NordPass (Affiliate Link) makes generating and storing strong passwords significantly easier.
New password:
Retype new password:
Adding the Proxmox Port Repository to your Raspberry Pi
13. We are finally at the stage where we can begin adding the PXVirt repository to our Raspberry Pi. This repository is managed by a third party but allows us to install versions of Proxmox that can run on the Raspberry Pi’s hardware.
Our first step in this process is to add the GPG key for the repository. This key helps verify that the packages legitimately come from the PXVirt repository.
curl -L https://mirrors.lierfang.com/pxcloud/lierfang.gpg | sudo tee /usr/share/keyrings/lierfang.gpg >/dev/nullCopy14. Before we add the repository itself that enables us to install and run Proxmox, we should use the “source” command to read in the “/etc/os-release” file. This will enable us to easily get and print the current OS codename.
You can read in this file by running the command below.
source /etc/os-releaseCopy15. With the GPG key added, we can now add the repository itself to our sources list.
Use the command below to save the repository link into a file called “pveport.list“.
echo "deb [arch=arm64 signed-by=/usr/share/keyrings/lierfang.gpg] https://mirrors.lierfang.com/pxcloud/pxvirt $VERSION_CODENAME main" | sudo tee /etc/apt/sources.list.d/pveport.listCopy16. Since we made changes to the sources list, we must update the package list cache again by running the following command.
If we don’t do this, the package manager will be unaware of the repository we just added.
sudo apt updateCopyPreparing your Pi’s Network for Proxmox
The next couple of sections will ensure that your network will continue to function once Proxmox has been installed. Without these steps, you will lose network connection later.
Preventing Network Manager from Managing your Network
17. By default, Raspberry Pi OS comes with Network Manager installed and set up to start at boot. We must disable this service to prevent it from automatically managing and breaking Proxmox’s own networking.
The first step in this process is to disable the “networkmanager” service so it will not automatically start when your Raspberry Pi boots.
sudo systemctl disable NetworkManagerCopy18. Next, we can stop NetworkManager from running by using the command below in the terminal.
This will stop the service immediately, saving you from having to restart your Raspberry Pi.
sudo systemctl stop NetworkManagerCopy19. Finally, for good measure, we will also apply a mask to the NetworkManager service. Applying a mask prevents this service from being re-enabled without the mask first being removed.
sudo systemctl mask NetworkManagerCopyInstalling ifupdown2 and Resolvconf
20. With everything in place, we can finally begin installing Proxmox on the Raspberry Pi.
The first two packages that must be installed on our system is “ifupdown2“. Proxmox uses the “ifupdown2” package to handle the network.
sudo apt install ifupdown2CopyPlease note, if you run into an error that says the following, there are a couple of extra
If you see the following error message when installing “ifupdown2” then you will need to follow steps “a” and “b” below. Otherwise, skip straight to step 21.
error: Another instance of this program is already running.a. To work around the “already running” error, we will need to do some workaround steps to get ifupdown2 running.
This step involves deleting a temporary file that the ifupdown2 package is searching for during installation
sudo rm /tmp/.ifupdown2-first-installCopyb. With the temporary file removed, we need to re-run the install process for ifupdown2 again by using the following command.
This will ensure that the final setup steps are properly executed.
sudo apt install ifupdown2CopyModifying Your Network Interfaces
21. Our next step is to make some adjustments to the interfaces file. If we don’t make these changes, Proxmox will break when your Raspberry Pi restarts.
With these changes we will be setting our “eth0” interface to manual and create a new network interface that will bridge your connections and be used by your virtual machines.
You can begin to write this file by using the following command.
sudo nano /etc/network/interfacesCopy22. Within this file, you will want to add the following lines to the bottom of the file. There is a chance some of these interfaces are automatically specified, delete them and replace them with the values we have specified here
While filling out this file you must replace two values.
<IPADDRESS>: Change this placeholder with the IP address of your Raspberry Pi. This must be the local IP that it is accessible on.<GATEWAY>: Replace this placeholder with the IP address of your gateway. Typically this will be the IP of your router.
In a lot of cases this will actually be “192.168.0.1“.<DNSSERVER>: Swap this placeholder with the IP address of a DNS resolver of your choice. For example, if you wanted to use Cloudflare’s DNS service, you would replace this placeholder with “1.1.1.1 1.0.0.1“.
Another popular choice is Google’s, which in that case you would use “8.8.8.8 8.8.4.4“.
auto lo
  iface lo inet loopback

auto eth0
  iface eth0 inet manual

auto vmbr0
iface vmbr0 inet manual
        address <IPADDRESS>
        gateway <GATEWAY>
        dns-nameservers <DNS>
        netmask 255.255.255.0
        bridge-ports eth0
        bridge-stp off
        bridge-fd 0
Below is an example of what this file might look like after you have finished filling it out
auto lo
  iface lo inet loopback

auto eth0
  iface eth0 inet manual

auto vmbr0
iface vmbr0 inet manual
        address 192.168.0.200
        gateway 192.168.0.1
        dns-nameservers 1.1.1.1 1.0.0.1
        netmask 255.255.255.0
        bridge-ports eth0
        bridge-stp off
        bridge-fd 0
23. Once you have filled out this file, save and quit by pressing CTRL + X, Y, and then ENTER.
24. To ensure these network changes are working, restart your Raspberry Pi by running the following command in the terminal.
sudo rebootCopyInstalling Proxmox on the Raspberry Pi from the Repository
25. Finally, you can install Proxmox VE and a few required packages by typing the following command in the terminal.
This installation process can take a few minutes, so be prepared to wait a few minutes. Additionally, there are a few prompts you will have to go through during installation.
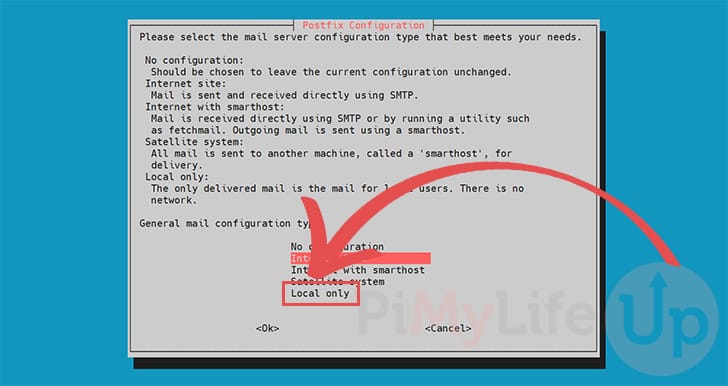
sudo apt install proxmox-ve postfix open-iscsi pve-edk2-firmware-aarch64Copy26. During installation, you will be asked to configure Postfix. You can navigate this menu using the ARROW keys to move and ENTER to select.
If you are unsure what you are doing here, select the “Local only” option.
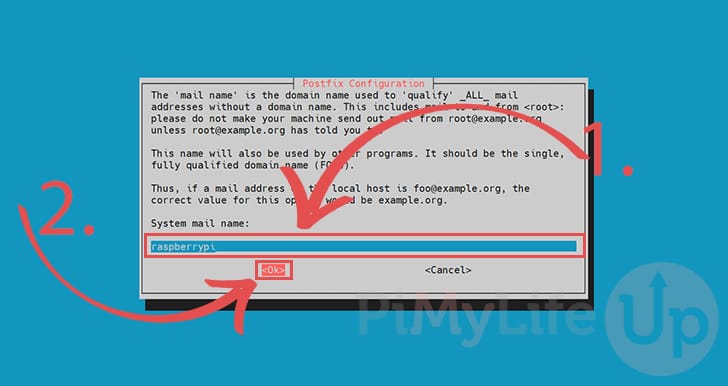
27. Next, you will be asked to set the mail name for Postfix to utilize (1.).
Again, if you don’t know what you are doing here, leave the default name and press ENTER to continue (2.).
28. Please note that if you run into an error message after installing with a message like the following, just try re-running the install command again.
Errors were encountered while processing:
 pxvirt-spdk
Accessing the Proxmox Web Interface
29. Once Proxmox finishes installing on your Raspberry Pi, it should be safe to access its web interface.
All you need to access the web interface is the IP address of your Raspberry Pi.
hostname -ICopy30. With your IP address in hand, you will want to go to the following address in your favorite web browser. Please note if you can’t connect, try restarting your Raspberry Pi and waiting a few minutes.
Ensure that you replace “<IPADDRESS>” with the IP of your Raspberry Pi.
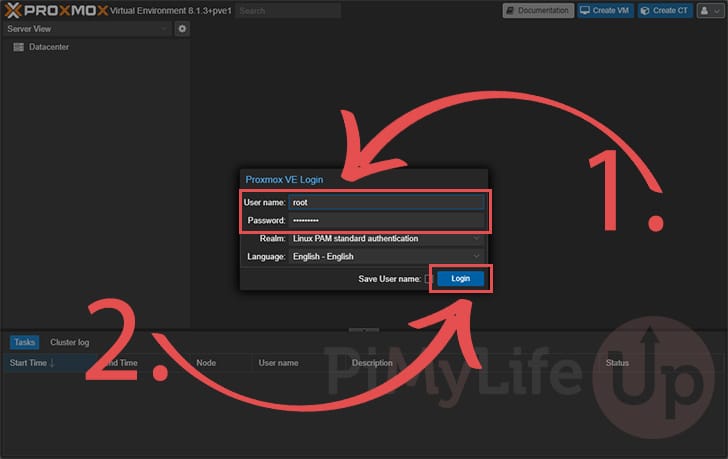
https://<IPADDRESS>:800631. With the Proxmox web interface now open in your web browser, you must log in to your account.
Start by typing in the username as “root” and then use the password you set earlier for this user (1.).
Once you have filled in your information, click the “Login” button (2.).
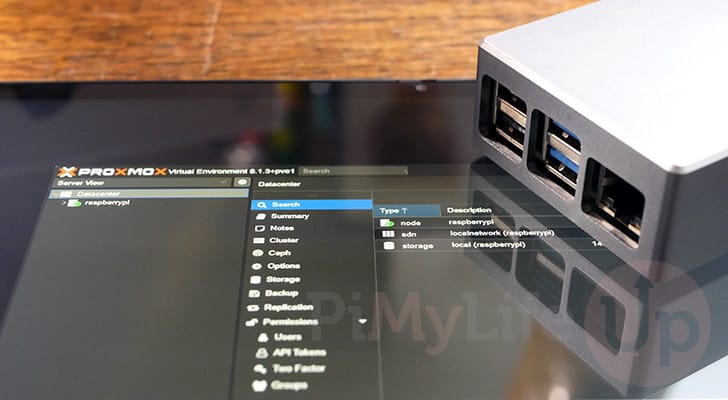
32. You should now have access to the Proxmox web interface.
You can begin to set up new VMs through this interface as well as configure Proxmox VE itself.

Conclusion
Hopefully, at this stage in the tutorial, you will now have Proxmox VE installed on your Raspberry Pi.
You can utilize this tool to set up and manage virtual machines on your Pi. It is a powerful hypervisor, especially for those dealing with multiple virtual machines.
Please feel free to leave a comment below if you have run into any issues with getting this software to work on your device.
If you found this tutorial to be helpful, we highly recommend checking out our many other Raspberry Pi projects.


What an incredible tutorial! Thank you so much. It has made my life so much easier. I didn’t encounter a single error/issue (likely due to your well structured steps) but it’s brilliant to see additional steps on what to do if I had experiences problems.
One tiny, practically insignificant mistake; in step 20 it says “Otherwise, skip straight to step 14.” I assume this should now read 21.
Thanks again for your time and effort putting this together.
Just works great tutorial 🪸 now I can use VMs. Instead of soley relying on docker, kubernetes. Also if I still have resources left I can distrohop desktop Linux, compartmentalize for personal privacy. Even if I can’t use Qubes OS on arm. Danke! 😃
Great tutorial. Complete and not left wondering what to do in any of the steps
Thanks
TomC
Ben bezig met het installeren van Proxmox op Raspberry Pi 4B
Ziet er heel mooi uit, heb er vertrouwen in maar loop nu tegen een paar problemen aan:
De eerste valt wel mee denk ik: in punt 7 werkt : hostname –ip-adress niet, wat wel werk is hostname en hostname -i dus dat is opgelost.
Ten tweede: IN punt 8 werkt nano /etc/cloud/cloud.cfg niet, diverse zaken geprobeerd het bestand cloud.cfg bestaat wel heb ik gezien maar kan er bij komen.
Nu vraag ik me af of ik wel werk met het goede OS: Bookworm heb namelijk niet Lite ook niet Full maar die andere (zonder toevoeging lite of Full)
Dit is met desktop environment.
Kan Proxmox wel op deze versie.
—- ADMIN EDIT ENGLISH TRANSLATION USING GOOGLE TRANSLATE _—
I’m installing Proxmox on a Raspberry Pi 4B.
It looks great, I’m confident, but I’m running into a few problems:
The first one isn’t too bad, I think: in step 7, the following command: hostname –ip-adress doesn’t work, but what does work is hostname and hostname -i, so that’s solved.
Second: IN step 8, nano /etc/cloud/cloud.cfg doesn’t work. I’ve tried various things, but I’ve seen that the cloud.cfg file does exist, but I can’t access it.
Now I’m wondering if I’m using the right OS: I don’t have Bookworm Lite, nor Full, but the other one (without the suffix “lite” or “full”).
Hi Reijer,
From memory you should be using the “Lite” variant of Raspberry Pi OS for this tutorial to work properly as the Proxmox repository we use does make some pretty drastic changes upon setting itself up and will likely break a desktop environment if it was present. Also you probably wont want that extra overhead of a desktop environment on top of Proxmox anyway.
I’m not sure why you are having issues with either of these commands, I have quickly tested both and they should work without any hitches, and you are using “sudo” so its weird your hitting permission issues on the cloud.cfg file. So my biggest question is are you running Raspberry Pi OS?
kind regards,
Emmet
So many useless PiPVE guides before finding yours. .. .danke!
Thanks a lot for the holy bible, if everyone have making so good guide even my son on 4 will handle it. Very very good job mate! With both video and descipten and boxes with code, perfect for my adhd brain 🙂
Cheers from norway
I followed this guide to install Proxmox 9 (PXVIRT) on a Raspberry Pi with Debian Trixie. VM networking worked, but LXC containers had no network connectivity when using a Linux bridge (vmbr0), including VLAN-tagged setups.
The root cause turned out to be NetworkManager. When enabled, NetworkManager auto-manages veth* interfaces created for LXC containers, repeatedly detaching them from the Proxmox bridge and attempting to do it’s own thing with them. This breaks container networking entirely — especially with VLAN-aware bridges — even though everything looks fine at first glance.
PXVIRT’s own documentation explicitly requires disabling NetworkManager, but that step isn’t mentioned here. The fix was to add in a couple of systemctl commands to take NetworkManager out of the picture:
sudo systemctl disable NetworkManager
sudo systemctl stop NetworkManager
# for good measure, prevent it from being re-enabled
sudo systemctl mask NetworkManager
After a reboot, LXC containers immediately attached correctly to the bridge and VLAN networking worked as expected.
It would be really helpful if this article called out the need to disable (and ideally mask) NetworkManager when running Proxmox on Raspberry Pi, as missing this cost me several hours of debugging.
Hi Michael,
Thank you very much for alerting us to this issue and providing the steps to solve it. I have updated the tutorial to include this as part of the networking setup process.
Kind regards,
Emmet
Hey Emmet thanks for adding this to the guide, the issue with disabling network manager is that the pi disconnects and doesn’t connect anymore if you are installing it headless (over ssh).
After my first fail, I did the disabling NetworkManager part just before the “Install proxmox”. This worked (at least for me).
Hi Emmet,
Very well documented! Kudos!
The first try went wrong; the second worked like a charm.
Installed on a Pi5 4GB (really enough for two containers?), which previously functioned for 1 year flawlessly running Debian Bookworm, OpenMediaVault, Docker, and 2 perfectly running Compose -> Files with Plex and LMS (Lyrion Media Server). After a buggy update, it stopped working, so a fresh SD card got Trixie and your above scripts.
Now I hope that I can run both again with teh use of PXVIRT, either as a VM or LXC container.
I previously used ProxMox Helper Scripts on an AMD64 to get me started.
Is there an ARM64 Scripts Helper site that I can use that has both Plex and LMS scripts?
Can/will both Plex and LMS run smoothly on a 4GB Pi?
Kind Regards,
Fred,
a now very happy puppy from the Netherlands 😉