In this quick guide, we will show you how to change from a 16k page size to 4k on your Raspberry Pi.
Starting with the Raspberry Pi 5, the kernel shipped with the Raspberry Pi uses a 16K page size by default.
This increased page size has a few benefits, one of the biggest being improved performance. The larger the page size, the fewer reads the processor will need to perform.
However, there is one huge drawback to increasing the page size, and that is software support. Quite a bit of software is not built to handle a page size bigger than 4k. This can lead to errors such as segmentation faults, or simply the software refusing to launch.
Luckily, the Raspberry Pi foundation still ships the 4k page size kernel in the same distribution, so swapping between the 16K and 4K page sizes is a relatively straightforward process.
At the time of publishing, these steps are only relevant to the Raspberry Pi 5. Older versions of the Pi are still set to use the older 4k page size.


Equipment
Below is a list of equipment we used when changing our Pi from an 18k page size to a 4k size.
Recommended
Optional
This tutorial was last tested on a Raspberry Pi 5 running the latest version of Raspberry Pi OS Bookworm.
Using a 4K Page Size Kernel on the Raspberry Pi
Over the following steps, we will walk you through the quick process of changing your Raspberry Pi from a 16k page size to a 4k page size.
These steps will be run entirely within the terminal, but they are all relatively easy to follow.
Getting your Current Page Size
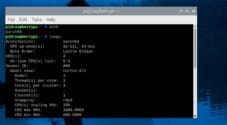
1. Before swapping to a 4k page-size kernel on your Raspberry Pi, you should check the current page size.
You can get the page size by simply running the following command within the terminal.
getconf PAGESIZECopyIf you see a value similar to the one shown below, then your Pi currently uses the 16k page size kernel.
16384Changing the Page Size on the Raspberry Pi
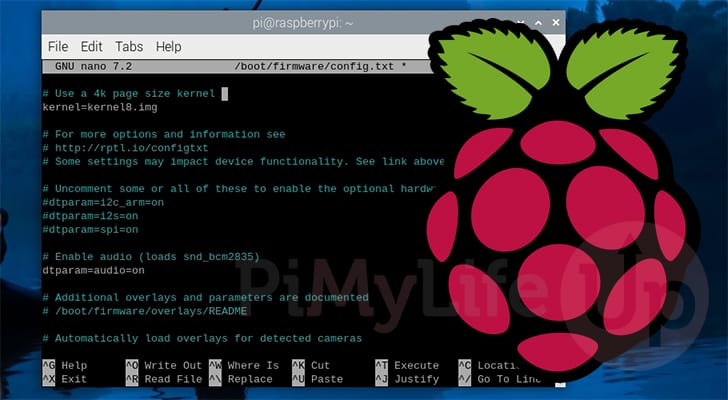
2. To change which kernel version your Raspberry Pi is using, we will want to modify the boot configuration file. We can easily adjust this file from your Pi as the boot partition is automatically mounted.
You can begin to edit the boot config file by using the following command in the terminal. We are using Nano to edit the file here, but you can use whichever text editor you feel comfortable with.
sudo nano /boot/firmware/config.txtCopy3. With the config file now open in your text editor, we can change your Raspberry Pi to a 4k page size instead of 16k.
As mentioned, this is made pretty simple since the Pi foundation keeps both kernels on the boot partition. All we need to do is add the following line to the top of the boot configuration file.
This line tells the firmware that it should load the “kernel8.img” when booting. This overrides the default behavior of the firmware, which would normally load the 16k page kernel on your Raspberry Pi.
kernel=kernel8.imgCopy4. With that line added to the config file, you can save and quit by pressing CTRL + X, Y, and then ENTER.
5. For the 4k page size kernel to be loaded, you must restart the device.
Using the reboot command, you can easily restart your Pi from the terminal.
sudo rebootCopyVerifying the Page Size Updated
6. Once your Raspberry Pi finishes rebooting, you can verify that you have a 4k page size using the following command.
getconf PAGESIZECopyIf everything has worked properly, you should see that your value equals the one below.
4096Conclusion
Hopefully, at this point in this quick guide, you will understand how to switch to a 4k page size on your Raspberry Pi.
More modern Raspberry Pis are moving to a 16k page size to help improve performance, but this can cause numerous compatibility issues until the software catches up. Luckily, as you will have seen from this guide, changing to use an 8k page size just requires us to add a single
Please feel free to comment below if you have had any issues with this guide.
If you found this quick guide helpful, we recommend exploring some of our other Raspberry Pi tutorials.