In this project, we will show you how to self-host your own Hytale server on a Raspberry Pi.

Hytale is a sandbox game focused on adventure and creativity. It draws heavily on Minecraft but adds a ton of its own flavour, making something that is still very unique.
On top of the extra features, Hytale has been built from the ground up with a heavy focus on moddability, so anyone can expand the game even further with custom content.
One of the core features of Hytale is the ability for you to play it with other people, and luckily, right out of the gate, the team has made self-hosting your own servers a very simple process.
The Hytale server can even be run on a Raspberry Pi, allowing you to set up a pretty affordable server that you can keep running 24/7 without breaking the bank.
Please note that if you want outside access to your Hytale server, you will need to either port forward port 5520 or use a service like Tailscale or Pangolin.
Please note that to self-host a Hytale server on a Raspberry Pi, there are three things that you will require.
- First, you must have a 64-bit operating system.
- Secondly, you must have at least 4GB of RAM; the server will not function correctly with less.
- Third, you MUST have a Hytale licence. During the setup of your server on the Raspberry Pi, the software will ask you to log in to your account to authenticate. Hytale at the time of publishing, does not allow running the server without owning the game.


Equipment
Below is a list of equipment we used when setting up and running the Hytale server on our Raspberry Pi.
Recommended
Optional
- Raspberry Pi Case Amazon
This tutorial was last tested on a Raspberry Pi 5 running the latest version of Raspberry Pi OS Trixie (64-bit).
Installing and Running the Hytale Server on your Raspberry Pi
In the following steps, we will walk you through the entire process of setting up and running a Hytale server on your Raspberry Pi.
Before you get started, we highly recommend that you use Raspberry Pi OS Lite (64-bit) for these steps. It will help reduce the number of issues you could potentially run into.
Preparing the Needed Software
1. The first thing we need to do before we begin to set up the Hytale server is to ensure that our Raspberry Pi’s operating system is up-to-date.
You can update the package list cache and upgrade any out-of-date packages by using the following two commands.
sudo apt update
sudo apt upgrade -yCopy
2. With everything now updated, we must install the software that we will require to run the server. You can install all of the needed software by using the command below
openjdk-25-jdk-headless: The Hytale server is written in Java, so we will require the runtime to be on our system to actually run it.
If you are running an older release of Raspberry Pi OS, Java 25 may not be available out of the box, and you will have to follow our separate installing Java guide.wget: We will be using this tool to grab the Hytale server downloader.unzip: This will be used to extract said downloader.screen: With this package, we will be able to keep the server running in a separate terminal window. It enables us to easily interact with the server’s command line interface if we ever need.
sudo apt install openjdk-25-jdk-headless wget unzip screenCopyAdding amd64 Emulation to Run the Hytale Downloader
3. At the time of publishing this guide, the Hytale server downloader does not natively support the ARM architecture the Raspberry Pi uses. Luckily, we have a workaround for this that is pretty simple.
All we need to do is install the “binfmt-support” and “qemu-user-static” packages. These packages will enable us to run the amd64 software on our Raspberry Pi.
sudo apt install binfmt-support qemu-user-staticCopyIf you are wondering why we aren’t using the much faster Box64, the reason comes down to support. Qemu works fine with the statically linked binary that is the Hytale Download, Box64 does not.
4. With this package now installed, we need to run the “update-binfmts” command so that the system will be aware that it can now run amd64 software through the emulation layer.
sudo update-binfmtsCopy5. Next, we must also tell the package manager that it can install the amd64 version of an application if it requires.
sudo dpkg --add-architecture amd64Copy6. Finally, we should now run a quick update and upgrade again to ensure everything is now where we want it.
sudo apt update
sudo apt upgrade -yCopy
Creating a User to Run the Hytale Server on our Raspberry Pi
7. Our next step is to create a separate user that will run the Hytale server on our Raspberry Pi for us. This is an important step as it is typically good practice to help isolate a server from other parts of your system.
For this guide, we will be creating a user called “hytaleserver“. We can create this account by using the useradd command within the terminal. By using the “-m” option we will also be creating a new home directory for this user.
sudo useradd -m hytaleserverCopy8. We next will want to add your current user to the new users group. This will enable us to easily access and edit files within this new user’s home directory.
You can add your current user to the new “hytaleserver” group by using the usermod command. The “a” option stands for add, and the capital “G” tells us that we are adding a new group to our user.
sudo usermod -aG hytaleserver $USERCopy9. To ensure our new group changes take effect, you must log out of your account and then log back in.
Assuming you are using the terminal or SSH to interact with your Raspberry Pi, you should be able to log out by just typing the following command.
logoutCopyAlternatively, you can restart your system entirely by running the command below
sudo rebootCopy10. Next, we need to modify the permissions for our new user’s home directory so that anyone in its group can read, write, and execute files within this directory.
We can make this change by applying the permissions 770 using the chmod command.
sudo chmod -R 770 /home/hytaleserverCopyDownloading the Hytale Server Downloader
11. We are finally at the point that we can move on to setting up the first major piece of the puzzle, that piece being the Hytale server downloader. This software will make managing your server much simpler by helping you get the latest release.
Before we start this process, however, we must change to the directory we created in the previous step using the cd command.
cd /home/hytaleserver/Copy12. Once we are in the correct folder, we can download the archive containing the Hytale server downloader directly to our Raspberry Pi by using the command below.
wget https://downloader.hytale.com/hytale-downloader.zipCopy13. After the download has completed, we will want to extract this zip archive by using the unzip command.
unzip hytale-downloader.zipCopy14. With the downloader now sitting on our Raspberry Pi, there is no need to have that archive sitting around anymore, so let’s delete it by using the rm command.
rm hytale-downloader.zipCopyRunning the Hytale Server Downloader on the Raspberry Pi
15. Finally, we are at the point where we can actually get the Hytale server downloaded onto our Raspberry Pi by utilizing the “Hytale Downloader” that we just extracted.
To use this tool, all you need to do is use the following command within the terminal. We specify a download path when running this tool
./hytale-downloader-linux-amd64 -download-path server.zipCopy16. The first time that you run this tool, you will be required to authenticate yourself using your Hytale account. This is required for two reasons: Hytale does not allow unauthenticated access to its API, and second, you must own Hytale to be able to host a server for it.
To proceed, you must use the URL provided by the tool. One requires you to manually enter the authorization code; the other will pre-fill it for you. The downloader will automatically continue once you have authenticated yourself.
Please visit the following URL to authenticate:
https://oauth.accounts.hytale.com/oauth2/device/verify?user_code=XXXXXX
Or visit the following URL and enter the code:
https://oauth.accounts.hytale.com/oauth2/device/verify
Authorization code: XXXXXXX
If you see the following error, that means you may not actually own Hytale and will be unable to download the required assets.
error fetching manifest: could not get signed URL for manifest: could not get signed URL: HTTP status: 403 Forbidden17. Once authenticated, the downloader will automatically fetch the latest version of the Hytale server and save it as a zip archive to your Raspberry Pi.
You will know it’s completed once you see the following message appear in the terminal.
successfully downloaded "release" patchline18. Now that we have the Hytale server file archive, we will need to extract it so that we can get all the bits that we ar actually want.
To extract this archive, simply use the unzip command followed by “server.zip“. This process shouldn’t take very long.
unzip server.zipCopy19. After the files have all been extracted, we will want to move the “Assets.zip” file into the same location as the server by using the mv command.
While not necessary, having everything in one place makes things a little easier.
mv Assets.zip ./Server/CopyRunning your Raspberry Pi Hytale Server for the First Time
20. We are finally at the point where we can start up the Hytale server on our Raspberry Pi for the first time.
To start this server, let us first change into the “/Server/” directory that was extracted from the server archive earlier.
cd ./Server/Copy21. To start up the server on your Raspberry Pi, all you need to do is use the following command. One thing you will notice is that we pass in the “Assets.zip” folder that we moved in earlier.
Please note that the server can take a little bit to start up.
java -jar HytaleServer.jar --assets Assets.zipCopy22. Once the server has finished starting up on your Raspberry Pi, you will get a message indicating that no server tokens have been configured. These must be configured so people can actually join your server.
As mentioned earlier, at the time of publishing, you must actually own the game to be able to host it.
[HytaleServer] No server tokens configured. Use /auth login to authenticate.23. To authenticate your new Raspberry Pi Hytale Server, you will need to run the following command while the server is still running. This will begin the authorization process.
/auth login deviceCopyAfter running the above command, you should see something like the following appear within the terminal. Follow the URL’s to authenticate your server.
===================================================================
DEVICE AUTHORIZATION
===================================================================
Visit: https://accounts.hytale.com/device
Enter code: XXXXXX
Or visit: https://accounts.hytale.com/device?user_code=XXXXXX
===================================================================
Waiting for authorization (expires in 900 seconds)...
24. After authenticating successfully, you should see a message similar to the one below.
This message also has a warning that credentials are currently set to only be stored in memory meaning they will be lost upon restart. Luckily, the Hytale Server does provide a workaround for this issue.
Authentication successful! Use '/auth status' to view details.
WARNING: Credentials stored in memory only - they will be lost on restart!
To persist credentials, run: /auth persistence <type>
Available types: Memory, Encrypted
25. To get your authorization to persist between multiple restarts, you must run the command below within the Hytale command line interface.
This tells the server to store your authorization data in an encrypted copy locally, rather than just in memory. Next time the server starts up, it will be able to read this information from the local copy.
/auth persistence EncryptedCopyIf this worked correctly, you should see the following message appear in the terminal.
Credential storage changed to: EncryptedTesting your New Hytale Server
26. With the Hytale Server now up and running on our Raspberry Pi, we can quickly test it to make sure everything is working properly.
Of course, for this stage, you must have the IP Address of your Raspberry Pi handy. We have guides on how to get this if you don’t already know it.
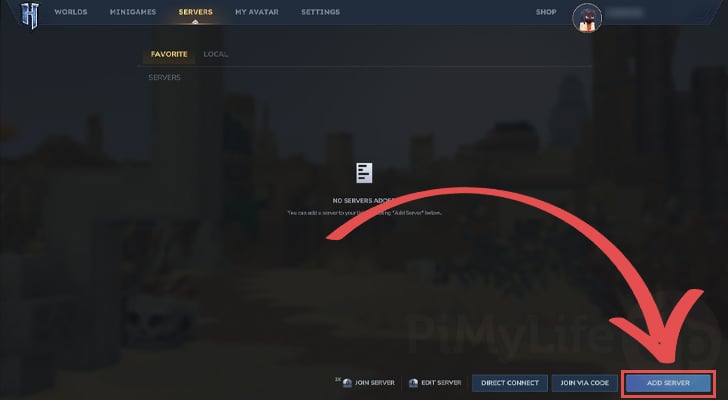
Once you are ready, start up Hytale on your chosen device, and click the “Servers” option.

27. Within the servers page, you will want to click the big “ADD SERVER” button in the bottom-right hand corner of the screen.
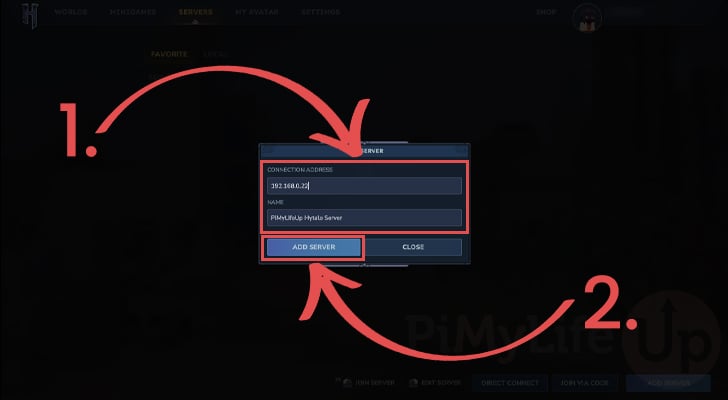
28. First, you must enter the IP address of your Raspberry Pi where you are hosting your Hytale server (1.). This can either be a local IP address or, if you have port forwarded port 5520, an external IP address.
Next, you will also want to give this a name so you can easily remember it. In our example, we named our server “PiMyLifeUp Hytale Server“.
Once you are happy you have entered the correct details, click the “ADD SERVER” button (2.).
29. You should now see your server appear as an option within the “FAVORITE” tab. To join your serverm, all you need to do is click it.
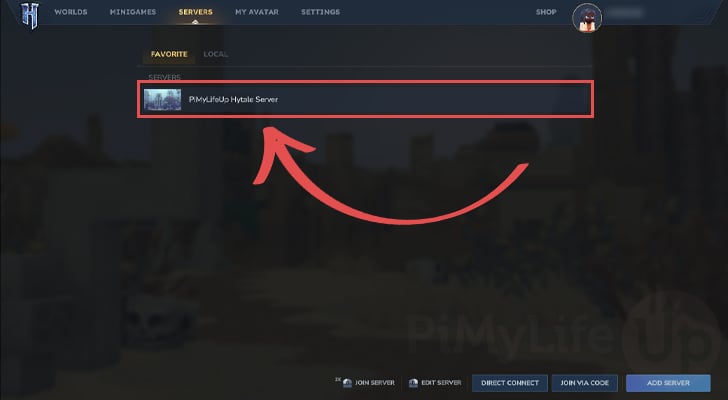
30. You should now be able to successfully play on your self-hosted Hytale server that is running off of a Raspberry Pi.

Getting your Raspberry Pi Hytale Server to Start on Boot
31. To get the Hytale Server to start up on our Raspberry Pi when it boots, we will need to create a service file. This service will be responsible for starting up and managing the server.
Before we do that, we must stop the currently running server by returning to the terminal and pressing CTRL + C.
Creating a Script to Launch your Server
32. The first thing we will want to do is write a very short bash script that will start up the Hytale server on your Raspberry Pi within a screen.
By starting the server within a screen, we will still be able to interact with its command line interface.
You can begin writing this script by using the command below within the terminal.
sudo nano /home/hytaleserver/start_server.shCopy33. Within this script, type out the following lines.
These lines start up the screen session and immediately start up the Hytale Server using the “Assets.zip” file.
#!/usr/bin/env bash

SERVER_PATH="/home/hytaleserver/Server"

/usr/bin/screen -dmS hytaleserver /bin/bash -c "
cd \"$SERVER_PATH\"
exec java -jar HytaleServer.jar --assets Assets.zip
"

/usr/bin/screen -rD hytaleserver -X multiuser on
/usr/bin/screen -rD hytaleserver -X acladd rootCopy
34. After filling out this script, save and quit by pressing CTRL + X, Y, and then ENTER.
35. With the startup script now written, we will want to ensure that it is executable by using the command below.
sudo chmod +x /home/hytaleserver/start_server.shCopyWriting a Script to Stop the Hytale Server on your Raspberry Pi
36. Next, we need to write a script that will help safely stop the Hytale server from running on our Raspberry Pi. This should give it the best chance for everything to save properly instead of just terminating the session.
Start writing this script by using the following command.
sudo nano /home/hytaleserver/stop_server.shCopy37. Fill this script out with the following lines. These lines are very simple and will just send a “shutdown” command to the Hytale command line interface.
#!/usr/bin/env bash

/usr/bin/screen -Rd hytaleserver -X stuff "shutdown \r"Copy
38. Once you have finished filling out the stop script, save and quit by pressing CTRL + X, Y, and then ENTER.
39. Like the start script, we must also ensure that this script has execute privileges by running the following command.
sudo chmod +x /home/hytaleserver/stop_server.shCopyWriting the Service File to Start your Hytale Server at Boot
40. Up next, we will want to create the service itself that will actually start our Hytale server up when our Raspberry Pi starts.
You can begin to write this service file by using the following command in the terminal.
sudo nano /etc/systemd/system/hytaleserver.serviceCopy41. Within this file, type out the following lines to define a service for your Hytale server.
With this service, we ensure that it will be run under the “hytaleserver” user we created, while also using the “start” and “stop” scripts that we wrote earlier.
[Unit]
Description=Hytale Server
Wants=network-online.target
After=network-online.target

[Service]
Type=forking
User=hytaleserver
Group=hytaleserver
ExecStart=/usr/bin/bash /home/hytaleserver/start_server.sh
ExecStop=/usr/bin/bash /home/hytaleserver/stop_server.sh
WorkingDirectory=/home/hytaleserver/Server
Restart=always
TimeoutStartSec=600

[Install]
WantedBy=multi-user.targetCopy
42. Once the service has been filled out, you can now save and quit by pressing CTRL + X, Y, and then ENTER.
Cleaning up Permissions
43. Since we have been creating everything with our original user, we will need to use the chown command to ensure the entire “/home/hytaleserver/” directory is owned by the “hytaleserver” user.
sudo chown -R hytaleserver: /home/hytaleserver/CopyStarting up your Server using the new Service
44. We are finally at the point where we can enable the new Hytale server service on our Raspberry Pi. Enabling the service is what will allow the system to automatically start it when your Pi powers on.
Enabling the service is as simple as using the command below.
sudo systemctl enable hytaleserverCopy45. Finally, start up the server itself by using the following command.
If everything has gone smoothly, you should now be able to connect to your server.
sudo systemctl start hytaleserverCopyControlling your Server through the Screen
46. One of the key things we set up earlier is the Screen utility. This is very crucial to managing your Hytale server on your Raspberry Pi, as it gives you access to the server’s command line without needing to be in the current active terminal session.
Please note there is one caveat to this method. Once you are done with these steps, you must press CTRL + A and then CTRL + D to detach the screen again.
To restore that screen and access the command line interface, you will want to
sudo screen -r hytaleserver/hytaleserverCopy47. You should now see all of the output from the Hytale server, and you should also be able to issue any commands.
Remember, once you are done with this screen, you must press CTRL + A and then CTRL + D to properly detach the screen.
Updating your Hytale Server on the Raspberry Pi
In this section, we will walk you through the steps to update to the latest release of the Hytale server. A bunch of these steps are essentially re-following what we did when installing the server so we won’t be explaining them to much.
These steps will also assume that you went to the extra lengths of setting up the service.
1. Before we can update the Hytale Server on your Raspberry Pi, you will need to stop it from running by using the following command.
It shouldn’t take long for your server to safely shut down.
sudo systemctl stop hytaleserverCopy2. Once the server has stopped, change into the directory where we set up the server originally.
cd /home/hytaleserverCopy3. The first part of the update process is to ensure we have the latest version of the Hytale Downloader. This tool helps make grabbing the latest assets much easier.
You can download the archive for the latest release by using the command below.
sudo wget https://downloader.hytale.com/hytale-downloader.zipCopy4. Now extract the contents of the archive to the current directory. We use the “-o” command to overwrite any of the original files.
sudo unzip -o hytale-downloader.zipCopy5. Now run the Hytale Downloader again. This will grab the latest asset files, as well as the latest copy of the Hytale server.
Please note that this tool may require you to authenticate yourself again before continuing.
sudo ./hytale-downloader-linux-amd64 -download-path server.zipCopy6. Once the download has completed, extract the contents of the “server.zip” archive that we just got. We use the “-o” command again to ensure we overwrite any existing files.
sudo unzip -o server.zipCopy7. Next, move the “Assets.zip” file back into the “Server” directory. Here, we use the “-f” option so that it will overwrite the out-of-date version.
sudo mv -f Assets.zip ./Server/Copy8. Our final task is to ensure all of these files and folders belong to the “hytaleserver” user that we created.
sudo chown -R hytaleserver: /home/hytaleserver/Copy9. Finally, you should now be able to start up the Hytale Server again by using the command below.
If everything has worked properly, you should now have the latest release running on your Raspberry Pi.
sudo systemctl start hytaleserverCopyConclusion
If you have reached this stage in the tutorial, you should have successfully installed and run the Hytale server on your Raspberry Pi.
The Pi has just enough power to self-host and manage a Hytale server, making it perfect for those who only want to play with a couple of other people.
Please feel free to leave a comment below if you have run into any issues with getting this game server running on your Pi.
If you found our tutorial to be helpful, we do recommend taking some time to explore some of the many other Raspberry Pi projects we have on offer.


I’m having trouble with the setup. I’m using a Raspberry Pi 5 with 8GB of RAM. I don’t know much about Linux and just copied and pasted the commands. The server starts, but I’m experiencing latency issues, which are also displayed in the top left corner – even though I’m connected from my home network. The Pi is directly connected to the router via Ethernet cable. Any tips?
Hi D.,
Sorry to hear that you are having issues with this setup. If you remain in one spot for a little while does the warning go away? I am wondering if it’s being caused by the world generating tons of the world still and the Pi can’t keep up.
There is a solution we can potentially use that should help with performance and that is to use a little mod put together by Nitrado.
1. The first thing you will want to do is stop the currently running server by running the following command.
2. Now change into the mods directory.
3. Once in this folder, we can use wget to download the Nitrado performance saver plugin for the Hytale Server.
4. We next need to ensure that this new mod file is owned by our hytaleserver by running the following command.
5. Finally, you can bring back up your Hytale Server by using the command below.
Kind regards,
Emmet
I am also hosting on a Pi5 8GB with a NVME SSD Hat with Gen3 enabled. PiOS-64, Java25, Ethernet-to-Router. Server starts no issue but the latency is so bad I can’t even connect 9/10 times.. it times out. I tried both the out-of-box binaries in your guide, and aarch64 just to try and not emulate Netty ( even tried the nitro-perf-saver) but there seems to be an issue with QUIC or something. Unfortunately, everything keeps timing out.. and the few times I do manage to connect I can’t open the spawn room door due to the latency.
I forgot to add, I have been at this for a couple days now and have let the Pi generate the world for many minutes before trying to do anything just to rule that out.
I am sorry for the series of comments, but after 4hrs of beating my head against this brick wall, I resolved the issue. If you are on a Windows machine trying to connect to your Pi-Hytale-Server you need to: “try disabling Recv. Segment Coalescing” via powershell. IT’S Working Now!!!
Hi Emmet,
I set up everything as you described and everything seems to work on the Pi side. However, when I try to connect from my client on windows I have an unexpected error : “Connection handshake was canceled due to the configured timeout of 00:00:10 seconds elapsing”.
I set the server up on a Pi 5 16GB and on the pi side, it says that the server is booted.
Have you experienced this issue ?
Best regards,
Stéphane
PS: I tried the mod nitrado performance saver but I still have the same problem.
Hi Stephane,
I haven’t run into that same issue at all, are you certain you are utilizing the correct IP address? Additionally, is this from a local network, or external network?
Kind regards,
Emmet