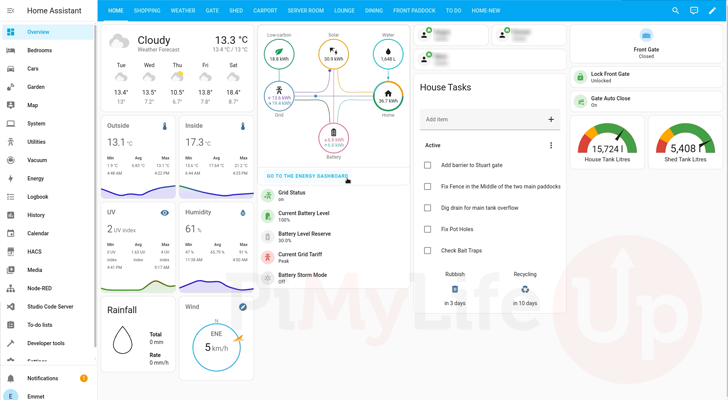
In this project, we will set up our Raspberry Pi to act as a Home Assistant kiosk.
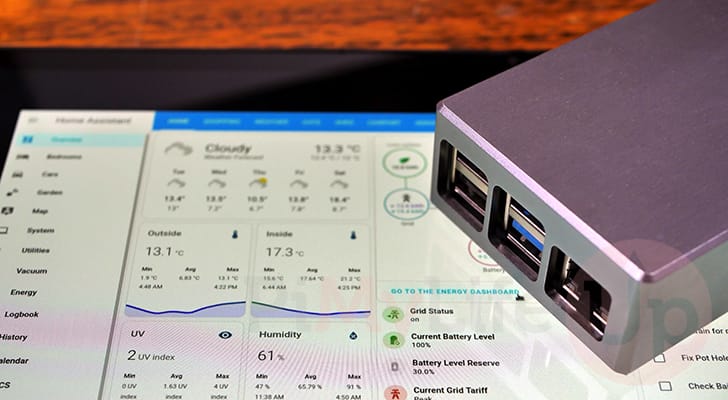
A kiosk is a great way of interacting with your Home Assistant setup. It can give the user access to a wealth of information on a single screen, or with the addition of a touch screen, it can actually be used to control things around your home.
There are many different ways that you can set up a kiosk for the Home Assistant software. However, many of these end up feeling either incredibly unstable, buggy, or just super unresponsive.
For example, we used to use a couple of Android tablets to act as our kiosks, but there were just continual, random, and unexplained issues. You would walk away for the tablet to randomly get stuck on a lock screen that you have previously disabled.
Needing something more reliable and with more control, we decided to grab one of our Raspberry Pis and use it as a kiosk instead. This setup lets you easily lock your kiosk to the Home Assistant web interface.
Best of all, thanks to the Raspberry Pi being a low-powered device, we don’t have to stress about it adding too much to the power bill if we were to keep them running 24/7.
For this guide, we are assuming that you already have Home Assistant set up on a device.


Equipment
Below is a list of equipment we used to set up our Raspberry Pi powered Home Assistant Kiosk.
Recommended
- Raspberry Pi Amazon
- Micro SD Card Amazon
- Power Supply Amazon
- Ethernet Cable Amazon or Wi-Fi Amazon
- Touch Screen Amazon
Optional
We last tested this tutorial on a Raspberry Pi 5 running the latest version of Raspberry Pi OS Bookworm Lite Edition.
Building a Home Assistant Kiosk with your Raspberry Pi
Over the following sections, we will show you how to easily set your Raspberry Pi to act as a Home Assistant Kiosk.
For this guide, we will be expecting you to be running the lite version of Raspberry Pi OS. The advantage of the lite edition is that it has significantly less overhead to worry about. Also, with less apps installed by default, there is simply less to go wrong.
Additionally, you must have your Raspberry Pi configured to use an SSH connection. With the way we are configuring the Pi, you won’t be able to access the terminal properly after setting up the kiosk.
Preparing your Raspberry Pi’s Operating System
1. Before we can begin to set up our Raspberry Pi as a Home Assistant kiosk, we should ensure that we are running an updated operating system,
You can update the package list cache and upgrade any out-of-date packages by running the following command.
sudo apt update
sudo apt upgrade -yCopy
2. Your next step is to install the three main packages we require to set up our kiosk for Home Assistant.
xserver-org: Since we are using the lite version of Raspberry Pi OS, it is missing a window system. XServer is great, as it is still well-supported and has fewer issues than Wayland.lightdm: On top of needing a window system, we must install a desktop manager. LightDM is a great choice for this as it is super lightweight and doesn’t require us to be running a full desktop experience.chromium: The final piece of the puzzle is the Chromium web browser. This is one of the best browsers for the choice because it is incredibly well-supported and has a kiosk and app feature built directly into it.onboard: Onboard is a virtual keyboard that we can use to allow you to type into your Home Assistant Kiosk without needing to attach a keyboard to your Raspberry Pi.sed: The “sed” package will allow us to easily replace text within configuration files. Saving you from having to open it with a text editor.
Please note that this installation process can take some time. There is a considerable number of packages your Raspberry Pi will need to install.
sudo apt install xserver-xorg lightdm onboard chromium sedCopyConfiguring your Pi to Launch a Light Desktop
3. Now that we have installed all the required packages, we need to configure a few more things.
The first of these tasks is to get our system to start up LightDM when it boots. This is as simple as setting the default behaviour of our system to start any service with “graphical.target“.
sudo systemctl --quiet set-default graphical.targetCopy4. To stop you from having to log in to your account every time you want to use the Home Assistant kiosk on your Raspberry Pi, we will use the following line to add the current user to the “autologin-user” option.
We can make this whole process straightforward by using sed to search and edit the “/etc/lightdm/lightdm.conf” config file.
sudo sed /etc/lightdm/lightdm.conf -i -e "s/^\(#\|\)autologin-user=.*/autologin-user=$USER/"Copy5. Our next task is to get our Home Assistant kiosk to use the right screen resolution on our Raspberry Pi. Due to how we have set up this kiosk, we currently rely on the Pi to pick the right resolution correctly every time.
To make the next step easier, set a bash variable called “RESOLUTION” which holds your screen resolution using the width-by-height format. These values are in pixels.
RESOLUTION=<WIDTH>x<HEIGHT>CopyFor example, since we are using a screen with a resolution of 1920 by 1080, we would use the following on our machine.
RESOLUTION=1920x1080Copy6. With the resolution environment variable set, we can use the sed tool to again adjust the settings for LightDM.
This time, the following command will reconfigure your system to set your screen resolution on boot.
sudo sed /etc/lightdm/lightdm.conf -i -e "s/^\(#\|\)display-setup-script=.*/display-setup-script=xrandr -s $RESOLUTION/"Copy7. With the resolution now set, our next step is to disable the screen blanking functionality. Screen blanking is a protocol for stopping the video output of your Raspberry Pi, which will put your monitor on standby.
All you need to do to ensure this occurs is use the following command. This adjusts the command to start the X Server to include the “-s 0 DPMS” option. Simply put, we are ensuring screen blanking is disabled before the server even starts.
sudo sed /etc/lightdm/lightdm.conf -i -e "s/^\(#\|\)xserver-command=.*/xserver-command=X -s 0 dpms/"Copy8. For all of these changes to take effect, we will need to restart our Raspberry Pi, which you can do by running the following command.
sudo rebootCopyConfiguring the On-Screen Keyboard for your Kiosk
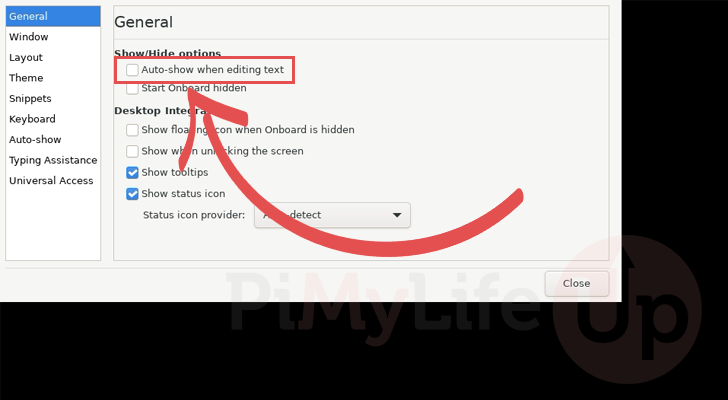
9. If you use a touchscreen for your Raspberry Pi powered Home Assistant Kiosk you will want to configure Onboard.
Onboard is one of the few virtual keyboards we found to work properly on the Raspberry Pi, Chromium, and Home Assistant.
To make this keyboard useful, we need to open its settings by running the following command.
DISPLAY=:0 onboard-settingsCopy10. With the Onboard setting open, toggle the “Auto-show when editing text” option to allow Onboard to open within the Home Assistant interface.
The screen might look a bit weird due to the way we are handling the desktop on our kiosk.
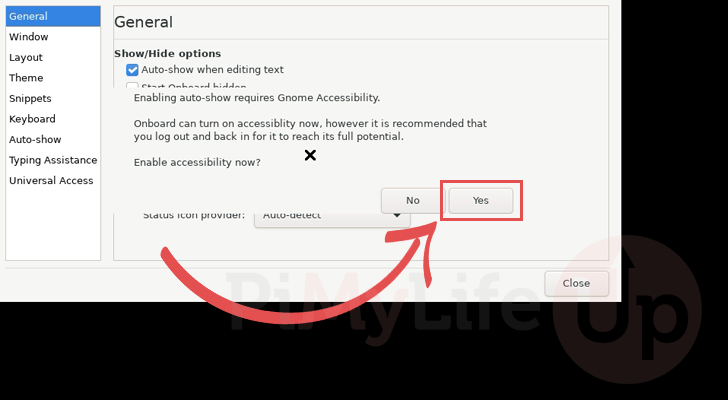
11. You will see a warning that for the auto-show functionality to work, Gnome Accessibility will need to be enabled.
To proceed, click the “Yes” button to continue.
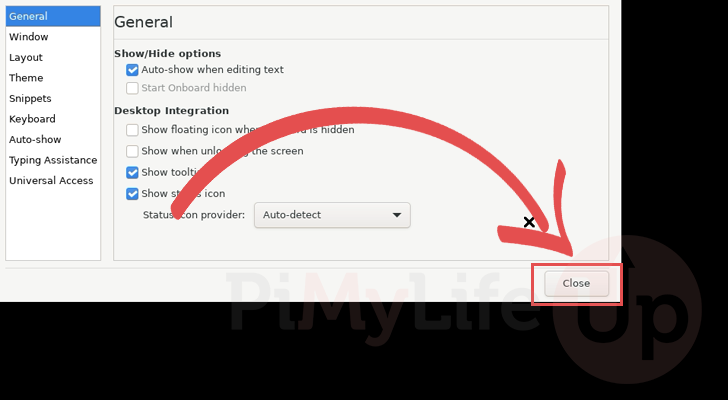
12. To save this settings change, you simply need to click the “Close” button.
13. We must restart the Raspberry Pi again to ensure that Onboard is working correctly.
You can restart your Pi by running the following command in the terminal.
sudo rebootCopyWriting a Script to Run your Home Assistant Kiosk on the Raspberry Pi
14. We next need to write a small script to launch your Home Assistant Kiosk on your Raspberry Pi.
The first part of this process is using the mkdir command to create a directory to store our script.
sudo mkdir -p /opt/kiosk/Copy15. With the directory created, we can move on to write a script called “kiosk.sh“.
You can begin writing this script using Nano by running the following command within the terminal.
sudo nano /opt/kiosk/kiosk.shCopy16. Within this script, you must type out the following lines.
While filling out this file, you must fill out some key details.
<HOMEASSISTANTURL>: Replace this with the URL to where you access your Home Assistant dashboard.<WIDTH>: With this value, you must specify your screen resolution width in pixels. For example, with a 1080p screen you would set this to1920.<HEIGHT>: Here you must set the screen resolution height in pixels. If you are using a 1080p screen, this will likely need to be set to1080.
#!/bin/bash
/usr/bin/dbus-run-session /usr/bin/onboard &
/usr/bin/chromium --app=<HOMEASSISTANTURL>  --noerrdialogs --disable-infobars --kiosk --window-position=0,0 --window-size=<WIDTH>,<HEIGHT>Copy
If you don’t want the on-screen keyboard to help control your Raspberry Pi Home Assistant keyboard, remove the script’s line that starts Onboard.
17. After filling out the file’s contents, save and quit by pressing CTRL + X, Y, and then ENTER.
18. Since we want our standard user to be able to use this script to start up the Home Assistant kiosk, you will want to give it execute privileges by using the chmod command in the terminal.
sudo chmod +x /opt/kiosk/kiosk.shCopySetting up your Raspberry Pi Home Assistant Kiosk Service
19. To ensure that your Home Assistant dashboard is loaded on your Raspberry Pi Kiosk at boot, we will write a service file. The other advantage of using a service is that it will automatically be restarted if the system crashes for any reason.
You can begin to write this service file using Nano by running the following command.
sudo nano /lib/systemd/system/kiosk.serviceCopy20. You will want to add the following lines within this service file. These lines tell the service to run the “kiosk.sh” script we wrote earlier. This is also where we will get your Home Assistant kiosk working on your Raspberry Pi.
While filling out this file, you will be required to replace “<USER>” with your username. For example, if your user is called “pi“, you would type in “pi” in place of “<USER>“.
[Unit]
Description=Home Assistant Kiosk
Wants=graphical.target
After=graphical.target

[Service]
Environment=DISPLAY=:0
ExecStart=/usr/bin/bash /opt/kiosk/kiosk.sh
Restart=always
User=<USER>
Group=<USER>

[Install]
WantedBy=graphical.targetCopy
21. After filling out this file, you can save and quit by pressing CTRL + X, Y, and then ENTER.
22. With the service now written, we will want to enable it so that our Raspberry Pi will boot straight into the Home Assistant Kiosk.
Enabling the service is as easy as using the following command.
sudo systemctl enable kioskCopy23. After enabling the service, you can start your Home Assistant kiosk immediately by running the following command within the terminal.
sudo systemctl start kioskCopy24. If everything has worked correctly, you should now have a Home Assistant Kiosk up and running on your Raspberry Pi.
Everything should work just like how you would expect it to. Remember that if you are setting up a kiosk you will want to ensure that you tick the “Keep me logged in” checkbox.
Conclusion
If you have got this far in the project, you should now have successfully set up your Raspberry Pi to act as a versatile Home Assistant Kiosk.
The Raspberry Pi makes a great device to power your home assistant kiosk, especially when you pair it with a touch screen. You have significantly more control over many other solutions, such as using an Android tablet.
Please feel free to post a comment below if you have had any issues with setting up this kiosk on your Pi.
If you liked this project, we recommend you check out our many other Raspberry Pi projects. We also have plenty of guides covering improving your Home Assistant setup.


Boom!! Dashboard up in 20 mins. This is why I love the Pi community, thanks.
Thanks for this great write up :-).
However i had same login loop issue others mentioned above. I’m using reaspberry pi 3 b which i think is reason for problem. with the help of google i resolve this by changing your step 2 from
to
all other steps the same and it worked perfectly. Thanks again !!!
I have been planning on doing this for a while and just came across this great write up.
One issue I think I may have is displaying camera feeds. My home page has 4 RTC feeds and another page has 7. Do you think the pi5 8gb would display all these without buffering?
I have a Samsung A9+ that works well for this and also on my Google pixel 6 pro. Samsung S5e struggles a bit with buffering.
Thanks
Hi Imran,
Hmm that is definitely a tough one. I would need to know the quality of the streams to make a proper judgement but the Pi might struggle a bit trying to process 7 streams at once, especially since the Pi 5 dropped most of their hardware decoders so all the processing is handled directly by the CPU.
Kind regards,
Emmet
Iman:
I have set up go2rtc on a Docker box and stream all my cameras from there. I have a NVR, HA and VLC all pulling from go2rtc without delay.
I’ve found that if you try to stream from each device directly, the cameras suffer a performance loss and drop packets. Currently I have 8 cameras feeds streaming from go2rtc to HA without issue.
But as they say, your mileage might vary .. but it might be worth a shot ..
Switched monitors, got onboard to work, sort of. Have use Bullseye, and not Bookworm. Onboard does not seem to ork with Bookworm. Also, after the pi reboots, everything is in the top left 1/9th of the screen. The screne I have is 1024×600. Trying all sorts of different dimentions to see if I can get it right. 1920×1080 causes the little top in the top corner.
Any ideas?
Hi Gregory,
The Raspberry Pi’s graphics drivers can sometimes struggle a little bit with different resolutions. Does everything work fine with a clean install or Raspberry Pi OS? Like the normal desktop version?
Typically setting the resolution within the LightDM settings should make it render properly. Does it make much different setting your resolution as 1024×600 within that file?
Kind regards,
Emmet
Got everything to work a-OK. Yes lots of little issues with screen res on a Pi. I did notice running the kiosk, that sometimes the screen refresh just stops. I have two cam’s and a clock on the kiosk. These just stop dead, any thought on a way to force a screen refresh from time to time?
I am having an odd-ish issue with getting this up. I have one copy working on a normal HDMI monitor. The other monitor I would like to get this to work on is in my kitchen and it has a resolution of 1366×786. I can get raspbian to work with the following lines in my config.txt:
disable_overscan=1
overscan_left=30
overscan_right=30
overscan_top=30
overscan_bottom=30
hdmi_force_hotplug=1
hdmi_group=1
hdmi_mode=4
Have not figure out a way to do the same thing with this kiosk set up. Any hints?
Greg
Just noticed a difference between the web page (here) and the PDF file.
Web page:
sudo sed /etc/lightdm/lightdm.conf -i -e “s/^\(#\|\)autologin-user=.*/autologin-user=$USER/”
PDF File:
sudo sed /etc/lightdm/lightdm.conf -i -e “s/^\(#\|\)autologin-user=.*/autologinuser=$USER/”
The difference being the second “autologinuser” one has a – the other does not.
I went off the PDF file and am left with the pi stopping on a login screen.
Hi Gregory,
Sorry to see that you have been running into issues with the PDF variant. I have attempted to make some changes to the PDF generator to help resolve this issue but I will need to work on rewriting it to ensure this doesn’t happen.
Kind regards,
Emmet
This was great! Thank you.
Also added the screen timeout function (also working great), and used “xserver-command=X -nocursor” in the lightdm.conf to hid the cursor.
Any ideas on how to show a clock and date instead of blanking the screen after 10 minutes?
Hi Cspline,
Really glad that the tutorial worked out well for you. My first thought with the clock and date idea was to just cycle the tab if there was no activity for 10 minutes, the second tab would then be a screen with a clock and date.
The key difficulty here would be to check for activity and automatically switch back.
Kind regards,
Emmet
Try the Wallpanel add-on to add this functionality in Home Assistant.
https://community.home-assistant.io/t/wallpanel-addon-wall-panel-mode-for-your-home-assistant-dashboards/449857
I believe I followed all the instructions correctly, but mine launches the chrome web store instead of home assistant. Any advice?
Hi Kyle,
Sorry to hear that you are having issues with this tutorial. My main thought is that the Home Assistant URL hasn’t been set properly within the “kiosk.sh” script that we write in this guide.
Double check to ensure that your URL is set correctly, might help to open it up in a random web browser on your local machine just to verify it is reachable.
Below is an example of what a valid call to chromium within the “kiosk.sh” may look like.
Kind regards,
Emmet
You are correct! That’s where the error was at.
It was missing “http://”. Once I added that it worked.
Also, I did get a SSL_PROTOCOL_ERROR when I initially used “https”.
Thanks for the help and such a quick response.
Awesome. I’m glad to hear that it’s all working now!
Kind regards,
Emmet
Hello
Thank you…. a really ingenious instruction that works on the first try.
How can I have the display dimmed automatically so that it is not fully lit for 24 hours? It should only light up fully when the screen is touched and then go back to minimum 10 minutes after the last touch.
Hi Reto,
Glad to hear that the tutorial worked well for you!
On the note of having the screen go to sleep, try using the following command. This command replaces the “xserver-command” option within the lightdm config. In theory it should tell the system to active the screensaver after 10 minutes.
Please let me know if this solves your issue.
Kind regards,
Emmet
After 10 minutes, the screen went dark. Unfortunately, I couldn’t activate it via the touchscreen. I had to connect a mouse to wake the screen with a click.
Another interesting idea would be to use a USB camera (connected to the Raspberry Pi) to activate the screen when movement is detected.
Hmm, this may be something I need to try and think on further. Using like a USB camera /Raspberry pi camera for presence detection could be a great solution though and I like that concept.
It was my understanding and potentially poor understanding that a tap on a touch screen should be simulated as a mouse click within the OS. May I ask what touchscreen you are using?
Kind regards,
Emmet
https://de.aliexpress.com/item/1005006827629161.html
This monitor is absolutely top-notch. High resolution, very good and clear picture.
Extremely thin.
With the click of the mouse, I wake up the screen, so to speak. Comparable to a normal computer, where the screen goes into energy-saving mode… by clicking on the mouse or pressing a key, the image reappears.
Hi Reto,
Definitely looks like a pretty great screen, especially for the price. I’m unsure why touchscreen input wouldn’t wake up the screen.
Using a camera to perform presence detection would probably work better in general but it does have its downsides and would rely on you to use something like OpenCV unless you make it purely motion based.
Alternatively, you could use something like a mmWave radar to do the same thing, probably use less power and be more computationally cheaper. I have one sitting around that I am planning to do a guide on at some point.
Kind regards,
Emmet
Do you think you could do this project with a simple Raspberry Pi Zero 2W? I would like to keep this as small and simple as possible.
Hi Tom,
I believe while it would be possible it may not be the best experience. The problem largely comes down to the miniscule amount of memory on the Pi Zero 2W and Chromium being fairly memory hungry.
I would be intrigued to hear if you do end up going ahead with it. I’m currently using a Raspberry Pi 5 but being able to swap it out with a Zero 2W would help much it much slimmer.
Kind regards,
Emmet
Now that I have my kiosk set up (thank you!), does anyone have a way to make it turn off the display at night and back on during the day? That would make my setup complete!
Hi Deelizzle,
There is a few ways that you could achieve this with your Raspberry Pi powered home assistant kiosk. The easiest way I can think of is to write a script that re-enables DPMS and screen blanking during the night and then another to disable it during the day.
I havent had the chance to test this myself as I’m away from my Raspberry Pi’s at the moment. However, these steps should hopefully all work. Please let me know if it functions or you have any issues and I’ll try my best to solve them.
1. For this example, lets start by writing a script called “display-off.sh” by using the following command.
2. Within this file enter the following lines.
The second line sets it so the screen will sleep after one minute if it is woken up.
The third line re-enables DPMS so the Pi can send a sleep signal to the screen.
The fourth and final line tells the screen to turn off immediately
3. Once you have written this script, save and quit by pressing CTRL + X, Y, and then ENTER.
4. Next write a script that restores the original behavior of the kiosk called “display-on.sh”.
5. In this file, enter the following lines.
The first line should work the screen back up, the second should disable screen blanking and disable the DPMS signalling.
6. Save and quit again.
7. Next give both of these files execute privileges by using the chmod command.
8. Finally, modify your crontab by using the command below. If asked what editor you want to use, I always recommend Nano.
9.Within this file, you will want to add two lines to the bottom. These are simple cron jobs that will fire each of the scripts at certain points in the day.
With these examples we are turning the screen back on at 7 in the morning and then turning it off at 8 at night.
10. Once you have created these new jobs, save and quit by pressing CTRL + X, Y, and then ENTER.
Kind regards,
Emmet
Thanks! I tinkered around over the least few days and came up with almost the exact same thing so this is good corroboration!
One additional thing is that I had to turn off the auto power off feature of the monitor, or else dpms force on wouldn’t work after three minutes of being off!
Thanks so much!
Hi Emmet,
I think I have figured out how to do it for my setup. Hopefully this may help others that come along. I can’t format it like you can. I had to change slightly what your original guide had…
Command:
Content:
Command:
Content:
Command:
Contents:
Then the same crontab as you. You can delete my other pending post. Thanks.
This is great, but I have one problem: my touchscreen display is mounted in vertically (portrait). I managed to get the screen to render correctly by changing the xrandr to add “-o right”, but the cursor from the touchpad doesn’t rotate with it.
How do I map the touchscreen correctly?
I figured it out. I added xinput with “sudo apt install xindex”.
Then I figured out the correct input, which in my case was “xinput set-prop “Weida Hi-Tech CoolTouch® System” –type=float “Coordinate Transformation Matrix” 0 1 0 -1 0 1 0 0 1″ (Weida being the controller for my touchscreen, and 0 1 0 -1 0 1 0 0 1 being the sequence to rotate the input correctly). I put that xinput call in the kiosk.sh file described here, and it worked!
Now the question is how do I make it so the screen turns off at night and turns on again in the morning?
This guide is fantastic. Got my touch screen kiosk working great.
I also wanted to rotate my screen into portrait mode. To do this, I took the following steps:
1. Create a startup script:
Open the terminal and create a new script file:
2. Add the xinput command to the script:
Add the following lines to the script to rotate the touch input:
Replace with the actual ID number of your touch device, then save and exit.
3. Make the script executable:
4. Edit the lightdm.conf file to run the script:
Save and exit.
5. Reboot your Raspberry Pi to apply the changes:
Hope this helps something else.
Hi I get as far as step 9 – open ONBOARD settings. I get this…
Invalid MIT-MAGIC-COOKIE-1 key
Invalid MIT-MAGIC-COOKIE-1 key
Invalid MIT-MAGIC-COOKIE-1 key
(onboard-settings:942): Gdk-WARNING **: 22:26:47.193:
Can you suggest any way to rectify this please
Hi Phil,
I’m unable to reproduce this issue on my end. Are you running this over SSH or running this locally on the terminal of your machine?
You can try seeing what the “DISPLAY” value is set to by default by using the following command.
Kind regards,
Emmet
Thanks for this article.
I cannot seem to get autologin to work, I just get a prompt on the screen and even if I input my account details screen goes blank and then login reappears.
Any ideas?
Thanks in Advance
Hi 4ordy,
That is definitely unusual. Can you please try editing the “lightdm.conf” configuration file directly by using the following command.
Within this file, you should see an option called “autologin-user”. It should be set to your username and the hashtag on it should have been removed. Can you please verify this?
Kind regards,
Emmet
Same issue here.
I can confirm that /etc/lightdm/lightdm.conf has autologin-user=myname and it still does not login
Hi Phil,
Maybe we might have to try doing this the long way (Even though in theory i’m just replicating what this script does).
1. Launch the Raspi-config tool by using the following command.
2. Go to “
System Options”3. Select “
Boot / Auto Login”4. Finally choose “
Desktop Autologin Desktop GUI“.5. Press “ESC” to exit out of the tool.
6. Finally restart your Raspberry pi using the following command
Please let me know if this solves your issue.
Kind regards,
Emmet
Same issue. After completing the above instructions, boots to login, enter my login credentials, screen turns black, then back to a login prompt.
Fresh download of rasp-pi lite yesterday installed on a rasp pi 3.
Hi Phil,
Can you please try running the following two commands and let me know if it resolves the issue for you.
Kind regards,
Emmet
Sorry for the delayed update. I purchased a raspberry pi 5 and followed the instructions and it worked perfectly. It has something to do with attempting it on a raspberry pi 3 that has the issues.
Continuous loop just like 4ordy
Followed the instructions to the letter, ps -ef shows onboard running, but tapping in any box that reqires a text input does not bring the onboard keyboard to the front to use.
Hi 5ft24dave,
Could you please re-run the “
DISPLAY=:0 onboard-settings” command again and verify that the “Auto-show when editing text” option remained on? I have one weird situation where this randomly turned off on me.Another thing to possibly change is to re-adjust the Kiosk bash script so that onboard is launched after Chromium.
Please let me know if this resolves the issue.
Kind regards,
Emmet
Hi Emmet,
I came here because of the same issue. All the onboard settings are correct, but no pop-up for login when the chromium kiosk mode is active.
The switch of the startup order of the two processes seems not to work.
In fact the onboard startup actually shuts down or crashes the chromium kiosk process and thus the service fails.
Was able to figure out what was going on.
In the Onboard settings, under Window, check “Force window to top”.
Worked for me when Chromium was full screen and in kiosk mode.
I just wanted to jump on and also thank Emmet for the guide. I had to do the same as above to get the keyboard working:
1) Re-enable “Auto-show when editing text” by running the “DISPLAY=:0 onboard-settings” command
2) In the Onboard settings, under Window, check “Force window to top”.
3) Reboot