This quick guide will show you how to enable SSH on Raspberry Pi OS without a monitor.
Since 2016 Raspberry Pi OS has had its SSH server disabled by default. This change was done to help the security of recently set up devices, preventing bad actors from abusing open devices.
While you can easily enable SSH through the terminal or the desktop interface, this process changes when you don’t have a spare monitor and keyboard.
Over the following few sections, we will show you a couple of different ways to enable SSH on the Raspberry Pi without a monitor.
These methods are all relatively straightforward as long as you have a computer capable of reading a micro-sd card.
Equipment
Below is a list of the equipment we used when we enabled SSH without a monitor on our Raspberry Pi.
Recommended
- Raspberry Pi Amazon
- Micro SD Card Amazon
- Power Supply Amazon
- Ethernet Cable Amazon or Wi-Fi Amazon
- Micro SD Card Reader Amazon
Optional
- Raspberry Pi Case Amazon
We test this method using the latest version of Raspberry Pi OS. However, these steps should work on all releases of Raspberry Pi OS since 2016.
Enabling SSH on a Raspberry Pi without a Monitor using the Boot Directory
This section will show you how you can enable SSH on a Raspberry Pi without a monitor by adding a file to its boot partition.
When the Raspberry Pi foundation changed the operating system not to have SSH enabled by default, they added a backup method. This method allows you to create a file within the boot partition to tell the operating system to enable SSH.
If you are using a fresh install, it will be far easier to flash the operating system again using Raspberry Pi Imager and enable SSH within that tool.
1. Before beginning, ensure your Raspberry Pi is powered off and that you have removed the SD card from the machine.
You then need to plug the SD Card into your computer’s SD card reader, if it has one.
2. With the SD Card plugged into your device you will need to find where the system mounted the boot partition.
- On Mac OS this partition will likely be mounted to the “
/volumes/boot/” directory. - On Linux, this depends on the operating system, but drives are often mounted within the “
/mnt/” directory. - On Windows, the easiest way to find out is to open “
My Computer” or “This PC” and note the drive letter as shown below.

3. Once you know where the SD card was mounted, open up your device’s terminal.
You can open the terminal on Windows by pressing WINDOWS KEY + R, typing in “cmd“, then pressing the ENTER key.
On Mac OS, press COMMAND + SPACE BAR to open spotlight, then type in “terminal“, then press the ENTER key.
On Linux systems, you can typically open the terminal by pressing CTRL + ALT + T.
4. With the terminal open you can now navigate to your Raspberry Pi’s boot directory so that you can enable SSH without a monitor.
On Linux and Mac OS, you can navigate to the mounted boot partition using the cd command as shown below.
cd /volumes/boot/CopyOn Windows, you simply need to type in the drive letter where the operating system mounted the boot partition.
H:Copy5. Now that we are in the boot partition, we can create our SSH file that will enable SSH on our Raspberry Pi. This method saves you from finding a monitor to attach to your device.
On Linux and Mac OS, we can use the handy touch command that allows us to create an empty file. Using the following to create this empty “ssh” file.
touch sshCopyTo create this empty file on a Windows system, you will want to use the following command.
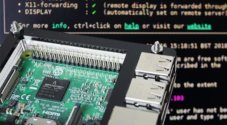
type nul > sshCopy6. You have now successfully enabled SSH on Raspberry Pi OS without a screen attached to the device. Plug your SD card back into your Pi and power it on.
During startup, it will run through the process of starting up the SSH service.
Enabling SSH Through the Raspberry Pi Imager
The easiest way to enable SSH on your Raspberry Pi without a monitor is to use the official Raspberry Pi Imager tool.
Before you write Raspberry Pi OS to an SD card, this application allows you to enable SSH and set the username and password you want to use. This solves all of the hassles of going into the boot partition and changing things yourself.
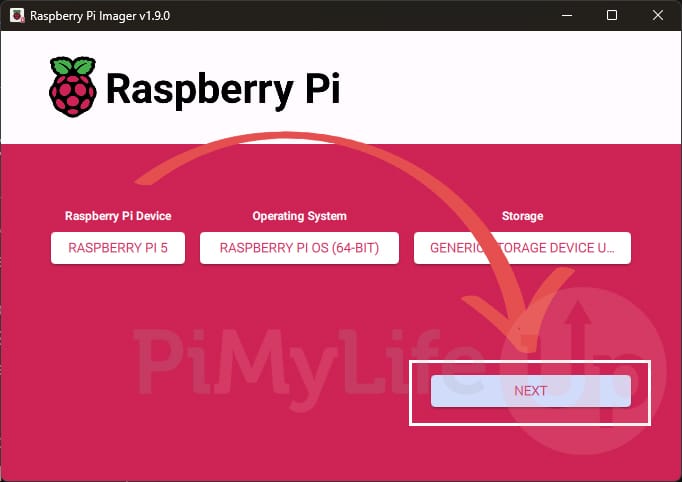
1. With the Raspberry Pi Imager open, you will need to have your chosen OS and storage device selected, as we have below.
Once you have everything selected, click the “Next” button to proceed.
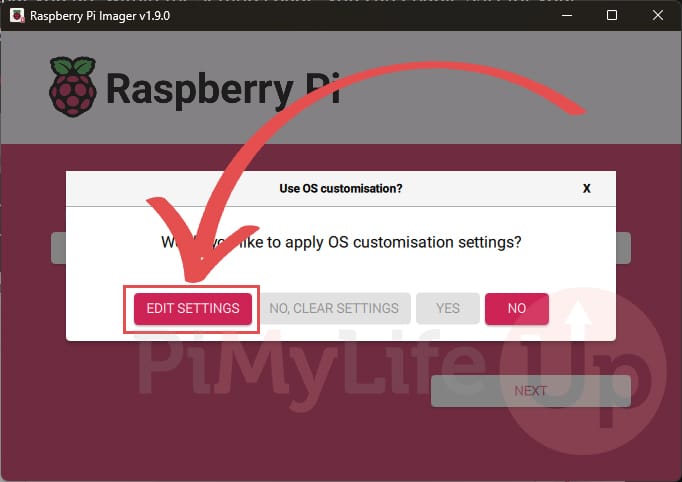
2. If the operating system you have chosen has the ability for OS customization to be applied, you will see a message similar to the one we have shown below.
To enable SSH on your Raspberry Pi using this customization, you will want to click the “Edit Settings” button.
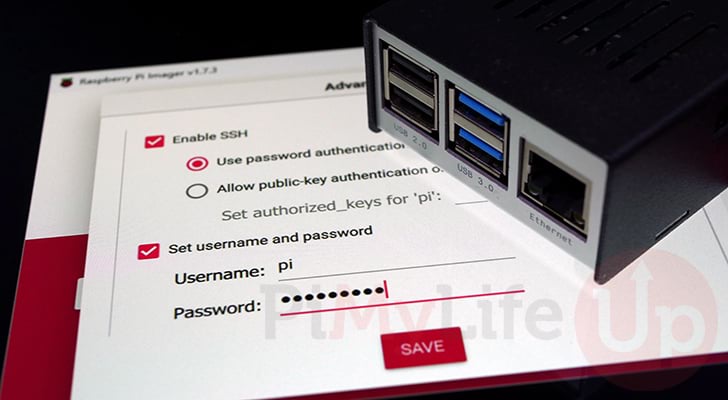
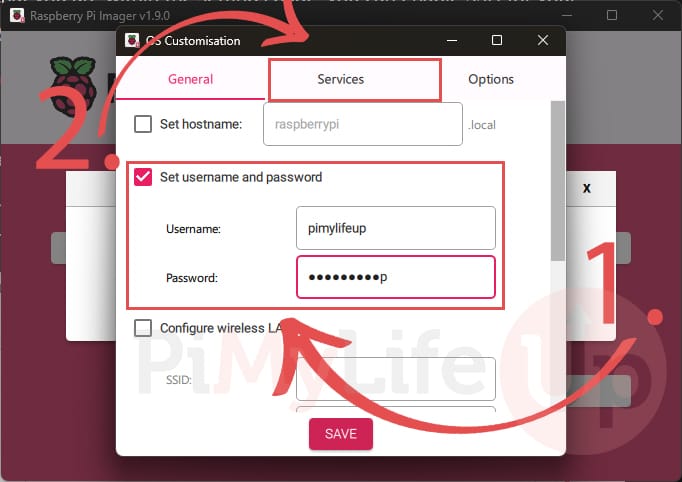
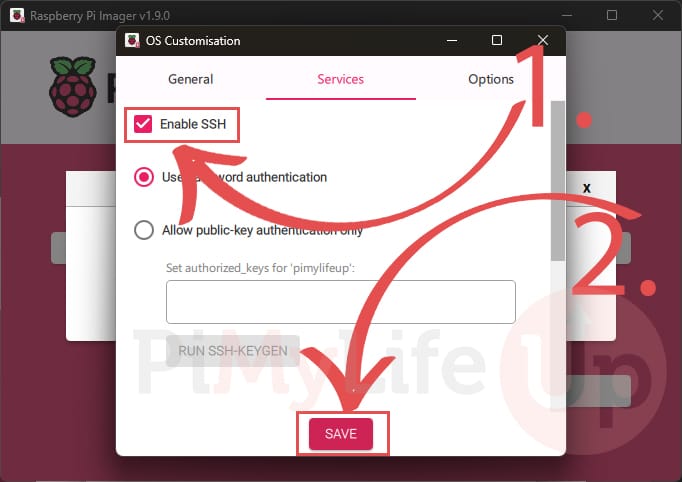
3. Now before you enable SSH for your Raspberry Pi, you will want to set both a username and password (1.). These are the details you will use to login to your Pi over SSH. If you don’t set these, Raspberry Pi OS will ask you to set them when it first boots, which is something that is hard to do when you don’t have a monitor attached.
Once you have set a username and password, change to the “Services” tab (2.).
4. Now that you are within the service page, you can enable SSH for your Raspberry Pi without attaching a monitor. All you need to do is tick the checkbox next to the “Enable SSH” label (1.).
Finally, once SSH is enabled and you have set a username and password, click the “Save” Button (2.)
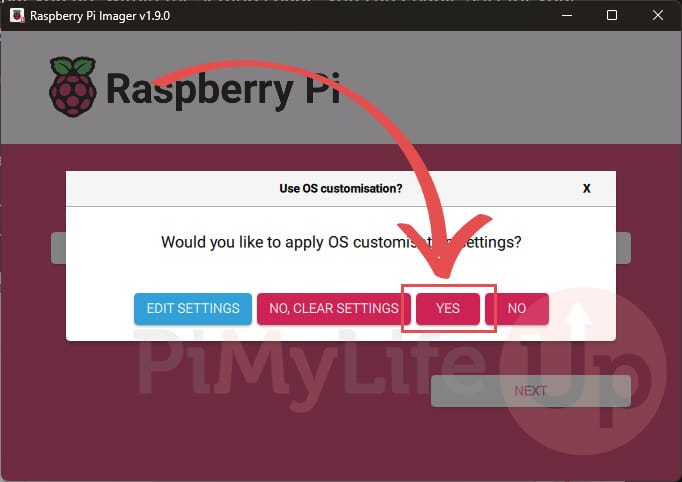
5. With the OS customization settings now set, you will want to click the “YES” button to apply these changes to the operating system you are about to install for your Raspberry Pi.
The Raspberry Pi imager will remember your settings, so if you ever need to set up another image without SSH, all you need to do is click the “YES” button again when prompted.
6. Once the image has been written, you should be able to plug your storage device into your Raspberry Pi, power it on, and then connect to it over SSH, all without ever needing to have a monitor plugged into it.
Conclusion
Hopefully, at this point, you will have managed to enable SSH on Raspberry Pi OS without using an attached monitor.
These steps are relatively straightforward and will work as long as you are using the official Raspberry Pi operating system.
Please comment below if you have any issues with getting SSH to enable.
We also have many other Raspberry Pi guides that will help you set up your device.


Thank you so much,
I used a Mac and RaspberryPi Imager.
I pre-set the hostname when setting up on the Imager, and used that to ssh in with ssh [username]@[hostname].local, and then hostname -I (capital i here) to get the IP address.
how do you find the ip address of the pi so you can ssh into it?
Hey,
The easiest way would be to check through your router. Most routers provide a list of devices alongside the IP address its assigned to it.
Without this things do become a bit more difficult without a monitor.
Cheers,
Emmet