This Raspberry Pi email server tutorial will take you through the steps on how to set up your very own email server that is both low cost and relatively versatile.

One of the many reasons to set up a personal server on the Pi is its low cost. The initial cost is low, and the ongoing expenses are also relatively low due to the Raspberry Pi’s low power usage.
There are several other advantages for setting up a Raspberry Pi email server such as being able to utilize a custom domain name and having full control over your own personal communications.
Since your emails are stored on your own personal server, you will have no one scanning them so they can to try and present you with better advertisements. You can run this alongside an Apache web server for a complete setup.
Another great reason for setting up your own email server is that it’s a great learning experience when it comes configuring everything correctly. It can be hard setting this up as there are quite a few things that can go wrong and if you’re a beginner, then troubleshooting may be a bit frustrating.
The software itself is super easy to install but can be hard configuring it to work perfectly the first time, so I have marked this project as intermediate difficulty.
If you plan on sending emails, you will need to make sure your ISP is not blocking port 25. This block is quite common but can usually be unblocked if requested.
Equipment List
You can find all the pieces of equipment that I recommend for this Raspberry Pi email server tutorial. You really do not need much so it should be a nice cheap project.
Recommended
- Raspberry Pi Amazon
- Micro SD Card Amazon
- Ethernet Cable Amazon or Wi-Fi Amazon
- Domain Name Namecheap
Optional
Installing the Citadel Email Server
As with almost every tutorial, I am running the default install of Raspbian. If you need to install it, then be sure to check out my guide on installing Raspbian.
There are a few ways to install an email server on the Raspberry Pi, one of the most complicated ways is to install Postfix and Dovecot separately then installing a web frontend. Each of these components will then have to be individually configured and can become quite time-consuming to set up correctly.
However, in our tutorial, we will be utilizing a software package called Citadel. It is an easy to set up, powerful yet versatile mailing server. It heavily simplifies the process of setting up an email server and does not require extensive configuration to get it up and running. Best of all it is a 100% open source software.
1. First, let’s update and upgrade all the packages on our operating system by running the following two commands.
sudo apt update
sudo apt upgradeCopy
2. Next, let’s install the packages that we will need to compile the Citadel software on our Raspberry Pi.
We are going to compile Citadel locally as there can be various issues with the build provided from the Raspbian repository.
sudo apt install build-essential curl g++ gettext shared-mime-info libssl-dev zlib1g-dev Copy3. It’s now time to start the installation process of Citadel, and we can do that easily with the following command.
curl https://easyinstall.citadel.org/install | sudo bashCopyThis command will run a script provided by the Citadel development team.
This script will download, install, and configure everything we need to run the Citadel software on our Raspberry Pi.
If you want to view this script for yourself, you can go directly to the Citadel Easy Install website.
4. When prompted to accept the terms and conditions, press Y then ENTER to continue.
5. Next, you will be asked if you want the script to install any additional packages Citadel might need.
Again, press Y, followed by ENTER to continue.
The installation process will take some time so now is a good time to go take a coffee while your Raspberry Pi works away
6. After Citadel has finished being installed, you will now need to configure the software.
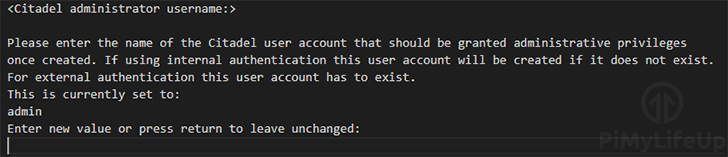
You will first be asked to set a username for your admin user. By default, this user will be called admin.
If you want to use a different username for the admin, you can enter it at this stage. Otherwise, you can press the ENTER key to continue.
7. You will now be asked to enter a password for your admin user.
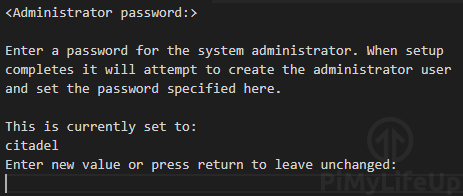
The default password for this is citadel. We highly recommend that you change this to something more secure.
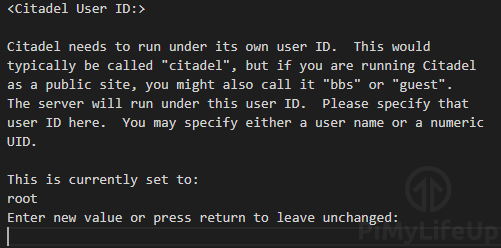
8. Next, we will need to specify the user for the Citadel software to run under.
By default, Citadel will try and run under the root user if none are specified.
For this option, make sure that you type in “citadel“. Press the ENTER key to confirm this option change.
9. In this step, you can enter an IP address for the Citadel server to listen on.
This option is useful if you only want Citadel to be accessed through a specific IP address. By default, Citadel will listen on all addresses.
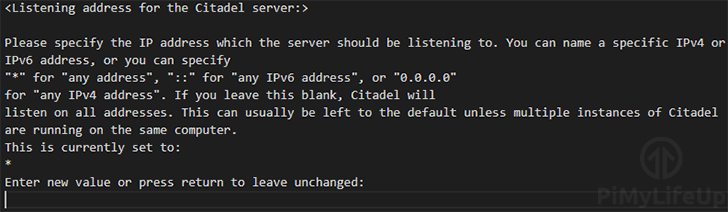
For this option, we will be pressing ENTER to keep the default settings.
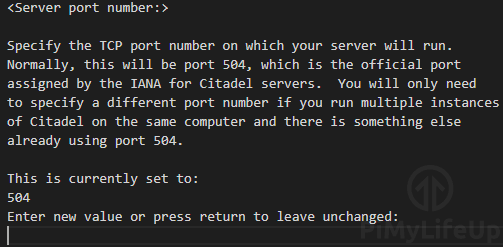
10. The next step is to specify the port you want Citadel to run under.
You should only change this from the default port of 504 if you are running multiple instances of Citadel on the one server.
11. Now you will be asked to define the authentication method.
Unless you have a specific need for the other three options, it is safest to leave this set to the default 0 option.
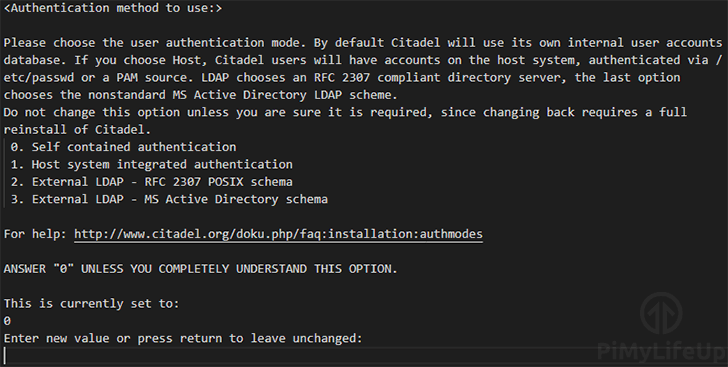
Press the ENTER key to continue to the final step.
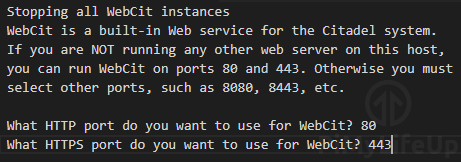
12. In these final steps, we are going to define the ports for the Citadel web interface on our Raspberry Pi.
If you are not running another web server such as Apache, it is best to set HTTP to port 80, and HTTPS to port 443.
Alternatively, if you are running a web server, try setting the HTTP port to 8080, and the HTTPS port to 8443.
Extra Steps
Sometimes the steps above will throw errors and not create the admin account we need to set up the email server correctly. If this is the case with you, then you will need to do a few extra steps.
1. First, we need to create the “netconfigs” folder and set the owner and group to citadel.
sudo mkdir /etc/citadel/netconfigs
sudo chown citadel:citadel /etc/citadel/netconfigsCopy
2. Next, we need to restart Citadel, so the previous changes are applied correctly. We also want to rerun setup so that we can set up the admin account if it wasn’t created the first time correctly.
sudo systemctl citadel restart
sudo /usr/lib/citadel-server/setupCopy
3. When you run the set up it will take you through a series of questions with the first being the name of admin. Set this to the username you wish to have for your admin account.
4. Next, it will ask you to set a password for the administrator account. Set this to something secure, so you’re not easily hacked.
5 You can now skip through the rest of the questions. Simply press enter to skip the questions and not change anything.
Setting up the Citadel Email Server
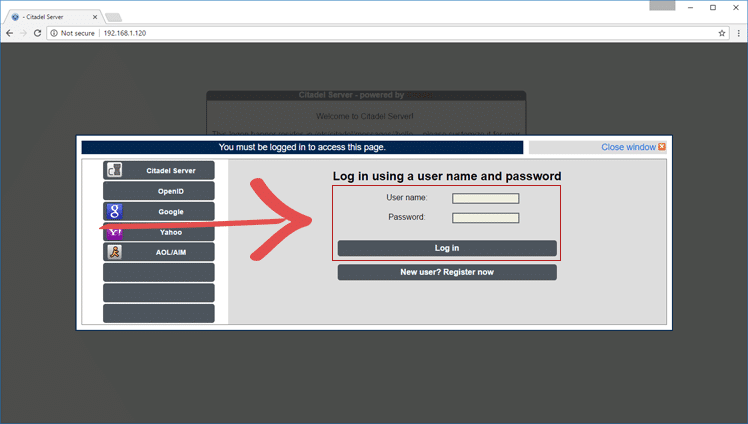
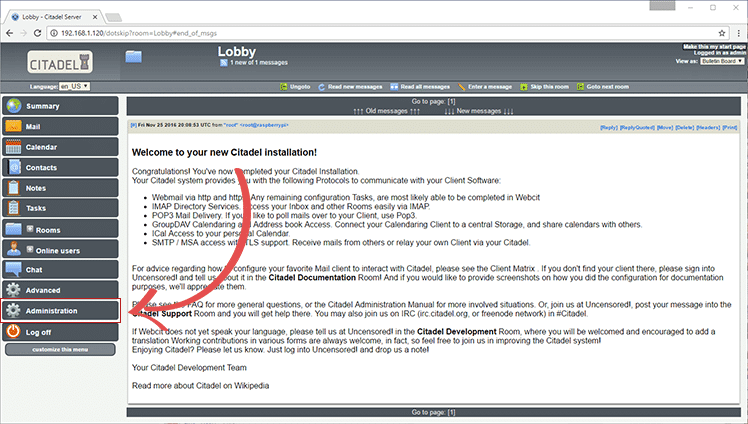
1. Now we need to load up Citadels web interface, to do this go to your Raspberry Pi’s IP address in your favorite web browser. In my case, I would go to http://192.168.1.105/.
If you don’t have the Raspberry Pi’s IP address on hand then you can type hostname -I into the Raspberry Pi’s terminal to get your local IP address.
Login by using the admin username and the admin password you set during the installation process.
2. You should now be seeing the default dashboard, and you can change the homepage by opening another page and clicking “Make this my start page” located in the top right-hand corner.
For now, just click on “Administration” in the sidebar.
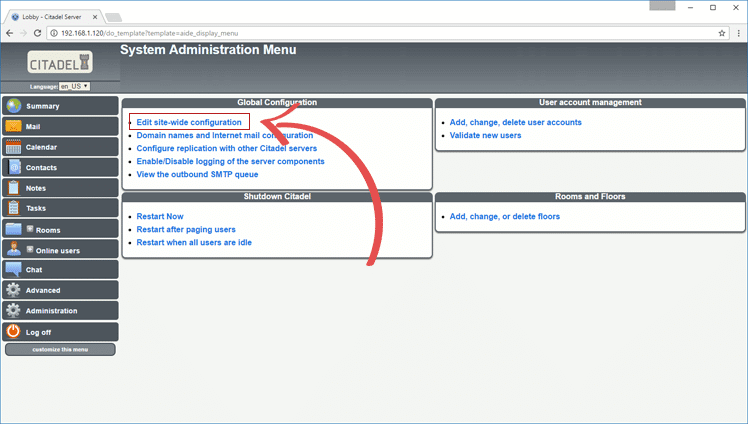
3. Now we are in the system administration menu, there’s a wide variety of different options in here but what we are after is “Edit site-wide configuration“, so click on that.
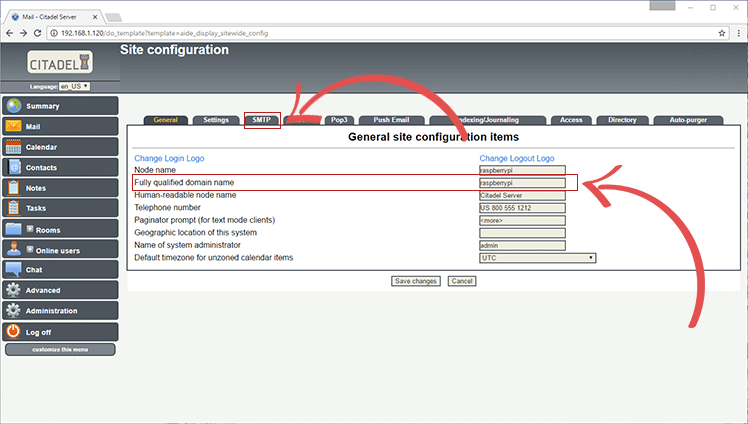
4. Now on this screen, we will have to make a few changes to get everything working.
Here we need to change the “Fully Qualified Domain Name” to the custom domain we plan to use for our email.
In our case, we will set this to “mail.pimylifeup.com“.
Once done, click on the “SMTP” tab.
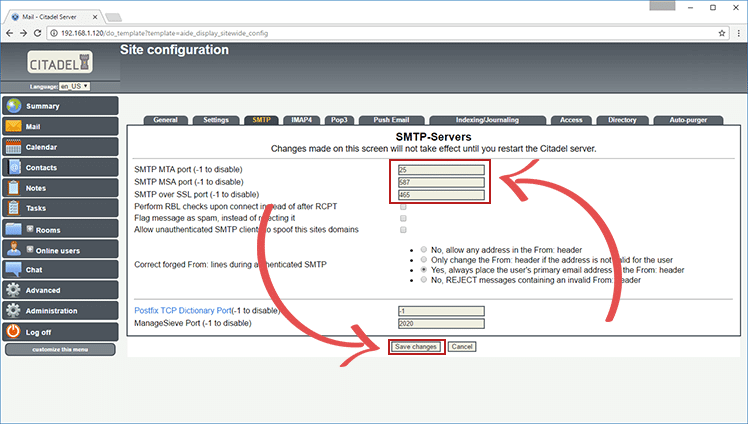
5. Now on this screen make a note of the ports mentioned here, we will need to port forward these to allow the server to receive emails over SMTP.
Once done, click the “Save Changes” button, then click on “Administration” in the sidebar.
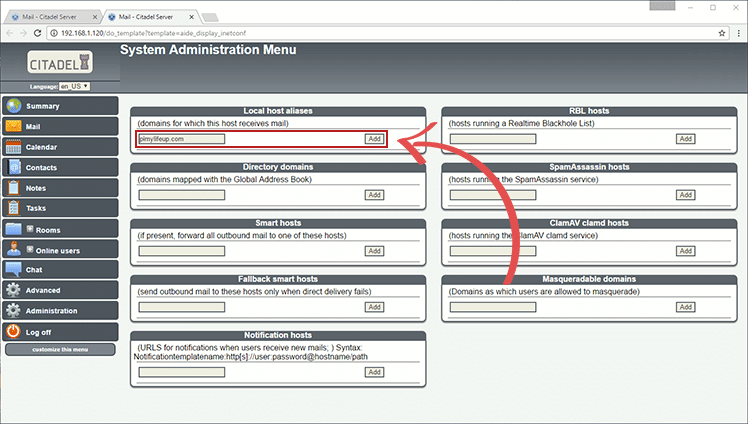
6. Now back in the “System Administration Menu“, click on “Domain names and internet mail configuration“.
This option will take us to the menu that we will be using to add additional domain names to Citadel.
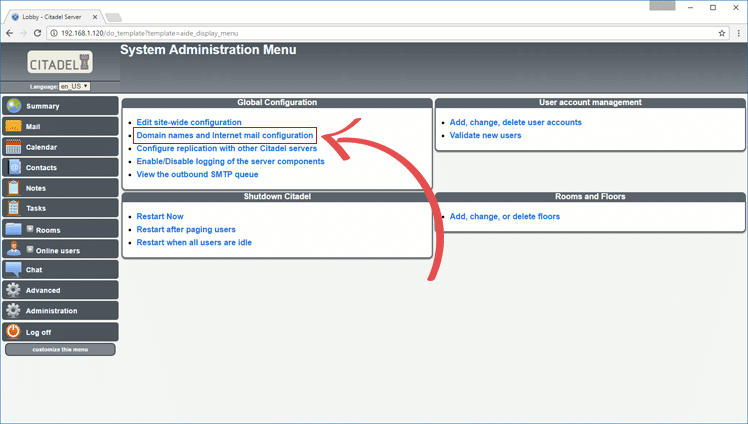
7. Now on this screen, under “Local host aliases” type in the domain name you want to use then click the “Add” button.
Once done, click on “Administration” in the sidebar.
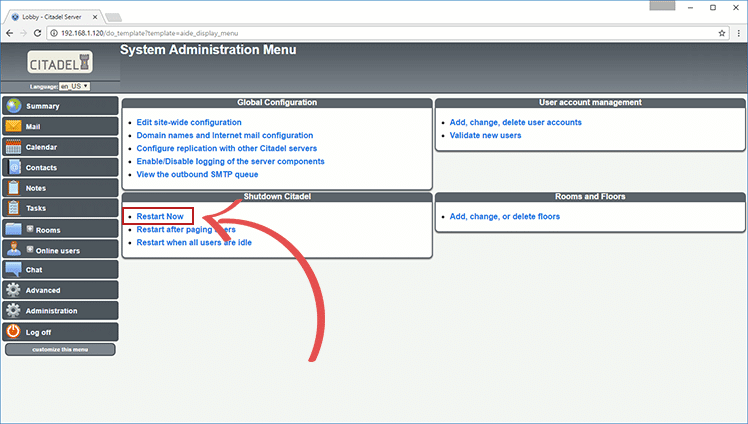
8. Now we are back on this screen, and need to click “Restart Now” under “Shutdown Citadel” this ensures that all our settings changes will now be loaded in.
Setting up DNS for your Raspberry Pi Email Server
The easiest way to set up your DNS is to utilize a service like Cloudflare. Cloudflare offers a stable and redundant DNS service that can also be easily set up to also act as a dynamic DNS service which is incredibly useful for anyone that is behind a dynamic IP address.
An added advantage is that it also makes it incredibly easy to modify the DNS records, and updates are propagated much faster than most DNS services.
1. Go to your domain name on Cloudflare, then go to the DNS tab.
2. In here you need to add an A name record that points towards your network’s public IP address. This record will allow you to access your webmail client after you port forward. It is also needed so we can point the MX Record to it.
3. Now add an MX record that points towards the domain name that you set up as an A record in the previous step.
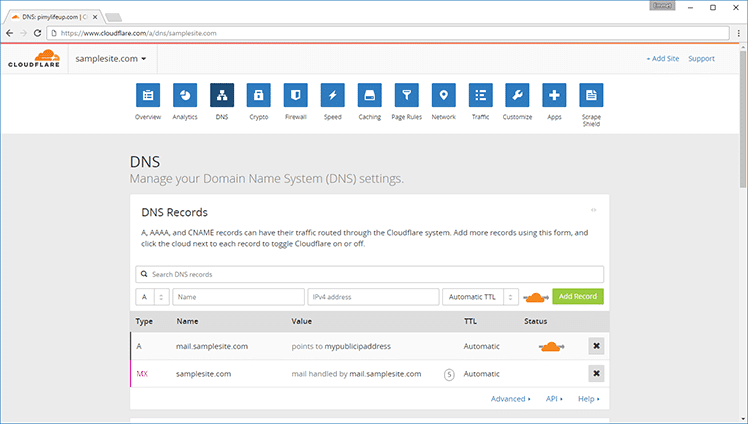
4. With that all done, you will now need to port forward the various ports from earlier. If you didn’t make any changes, then you will need to port forward the following ports 80, 25, 587 and 465.
The last 3 of these ports should be your SMTP ports mentioned in the SMTP settings page from earlier.
If you’re unsure on how to port forward on your router, you can try following our generic port forwarding guide that you can find on this website. Otherwise look up your router at the port forward website.
Also, if you have a dynamic IP address you will need to set up a dynamic DNS client, you can follow our guide on setting this up. Make sure you follow the steps on setting it up to work through Cloudflare.
Setting up SpamAssassin for your Raspberry Pi Email Server
Now we will go through setting up Spamassassin, this is a tool that handles sifting through SPAM. It is a crucial tool to have installed on any private email server. It will add a bit more workload to the Raspberry Pi but it should be able to handle it just fine.
1. First, let’s install Spamassassin from the official packages by running the following command.
The installation process of Spamassassin can take some time as it has to compile several things.
sudo apt install spamassassinCopy2. After Spamassassin has installed, we now need to make some changes to its configuration, run the following command to edit the first configuration file.
sudo nano /etc/spamassassin/local.cfCopy3. Update the lines mentioned below so that they match what we have written if any of these lines have a # in front of it, then remove it. We will explain what each line does and why you should enable them.
This line makes Spamassassin modify the subject header of spam e-mails to include SPAM and the spam score that the Spamassassin system has assigned to it.
rewrite_header Subject [***** SPAM _SCORE_ *****]This line tells Spamassassin only to modify the headers of an email and not make any changes to the actual body.
report_safe 0Setting the required score low means you will initially get lots of false positives, but it will help you teach Spamassassin to know what emails are good and what emails are bad.
required_score 2.0This next line sets Spamassassin to use a Bayesian filter. Bayesian is a way of estimating the probability of whether an email is Spam or not. It is a commonly used method that improves as the sample size increases.
use_bayes 1The following line turns on the automatic learning for the Bayesian filtering.
bayes_auto_learn 1Once you’re all done, simply save and exit out of the file by pressing CTRL + X and then Y and then pressing ENTER.
4. Now there is one final file we need to edit to finish setting up Spamassassin, run the following command.
sudo nano /etc/default/spamassassinCopyThis line allows a cron job to update the Spamassassin rules automatically.
CRON=1Saves and exit out of the file by pressing CTRL + X and then Y.
5. The next command will enable the spamassassin service to start up at boot.
sudo systemctl enable spamassassin6. We can now start the Spamassassin daemon with the following command.
sudo systemctl start spamassassin7. We now need to go to Citadels web interface and go back to the Administration screen.

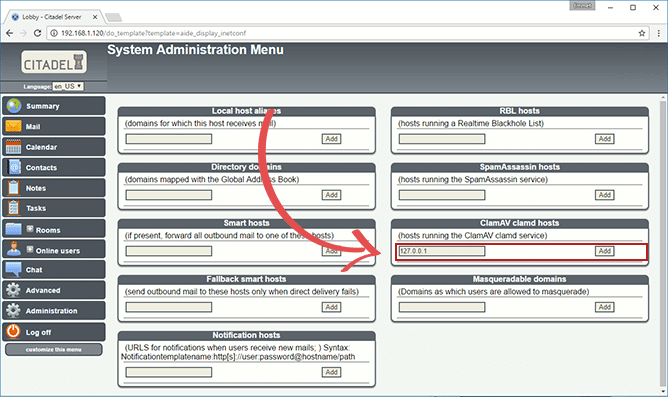
8. Once we are back in here, we need to go to “Domain names and Internet mail configuration”.
9. Now that we are in here, we need to type in the IP address, 127.0.0.1 under “SpamAssassin Hosts”. Once you have typed it in, we can just press the “Add” button.

Setting up ClamAV for Citadel
Now onto the final part of our Raspberry Pi email server installation guide, we are going to be setting up and installing the ClamAV software. This software will scan all your incoming emails for viruses and helps protect your Raspberry Pi from becoming infected.
1. Installing ClamAV is incredibly easy as it’s already included in the Debian packages, and we can just run the following command to install it.
sudo apt install clamavCopy2. Now we want to get ClamAV to download the latest version of its virus databases, we can do this by running the following command.
sudo freshclamCopyYou may run into the error below, but we can deal with that:
ERROR: /var/log/clamav/freshclam.log is locked by another processTo deal with this error, we need to stop clamav, and we can do this by running the following command. Then rerun sudo freshclam.
sudo systemctl stop clamav-freshclam3. After the update has completed, run the following command.
sudo systemctl start clamav-freshclam4. Now enable ClamAV with systemctl, so it is ensured to start on bootup.
sudo systemctl enable clamav-freshclam5. We now need to go to Citadels web interface and go back to the Administration screen.
6. Once we are back in here, we need to go to “Domain names and Internet mail configuration”.
7. Now that we are in here, we need to type in the IP Address, 127.0.0.1 under “ClamAV clamd hosts”. Once you have typed it in, we can just press the “Add” button.
Hopefully, by now, you will have a fully functional email server that you’re able to connect to successfully .
Updating your User Account’s Email Address
If you need to update your user accounts email address, then this can be found in the advanced menu when you’re logged into your chosen user.
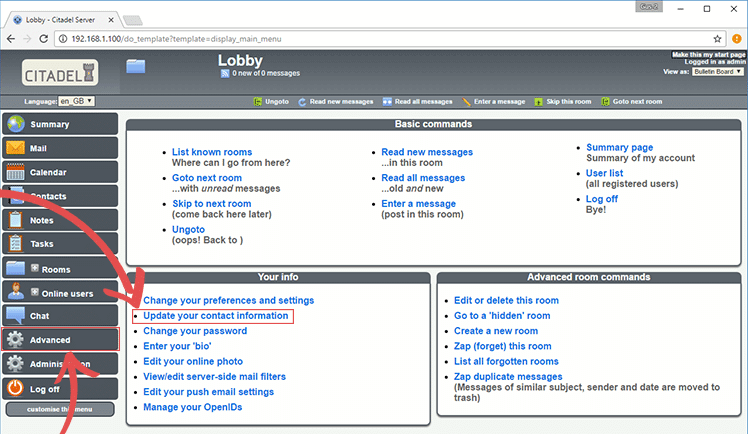
1. Go to advanced and on this screen select “update your contact information”.
2. Update your email address under “primary internet email address”, you can also update other things such as your display name and other email addresses you want to be connected to for this account (Internet email alias).
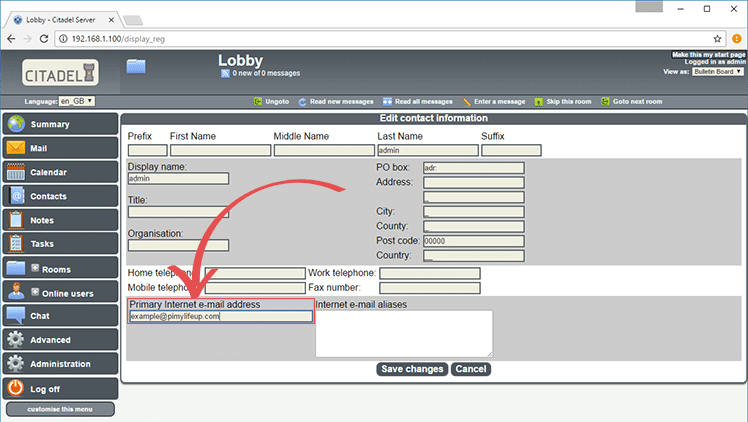
3. Once you’re done, select save changes.
Troubleshooting
There are quite a few issues that you might run into while doing this tutorial with some being an easy fix and others a bit more difficult.
- Some ISPS will be blocking port 25 which means when you send emails they will fail. To get around this, you will need to either get the port unblocked or setup citadel to use the ISP’s SMTP server. You can find more information on outbound email being stuck here.
- If you’re not receiving emails, then this likely means your DNS has not been configured correctly. Go back to where your DNS is being managed and review the information.
Conclusion
I hope that this tutorial has shown you how to set up a Raspberry Pi email server and that you haven’t run into any issues.
It’s certainly a great project for anyone who wishes to set up a cheap email server that you have full control over.
If you have some feedback, tips or have come across any issues that you would like to share, then please don’t hesitate to leave a comment below.


Excuse the NOOB question 🙂
I looked thru the steps and have a question:
Step 4 in the Section “Setting up the Citadel Email Server” you have entered a FQDN. Do we need to own a domain name to enter it or can we just create any domain that does not exists ?
Your prerequisite don’t list “domain” as a requirement or how to get one.
Hi Tiwo,
I can see where you would have got confused with tihs guide. You do require a domain name to set up your own email address. For example, if you wanted to have emmet@pimylifeup.com. You would need to own the “pimylifeup.com” domain name.
Explaining exactly how to sign up for a domain name is probably a little bit too much to include within this tutorial. However, there are several places that sell them at a somewhat affordable rate. We personally use Cloudflare Domainsbut we have also used Namecheap previously.
Hopefully that clears this up.
Kind regards,
Emmet
Thanks.
Great tutorial, easy to follow.
All up and running, I can receive emails but sending is a problem as I have a dynamic IP address, dynamic IP’s tend to get blocked and mine is no exception. 🙁
For this reason I have found a free SMTP relay service, but so far I haven’t been able to make it work, most likely reason is the syntax I’m putting the smtp server relay field.
Does anybody know what the correct syntax is?
I have tested this service using Telnet and know it works with the credentials I’m using however not been able to set this up in the GUI.
I tried several times to get citadel up and running and this tutorial is the first one to help me do that successfully, as previous poster said – best one out there so thanks for that. Sent successfully just waiting for me DNS MX record to migrate for receiving. Quite snappy on a pi2B with Apache alongside
Update:
5 years later, and my little citadel server is still running, on the very same hardware, except the disk, which crashed horribly again and threw a lot of my mails (although not the configuration) into the void, together with 2TB of other data. My fault, that I did never check the mail backups, which partly failed to restore, because i had tried to do them on a running system.
Lesson learned: Today, I shut down the citadel server at night and do the backups during that time.
easy install aborts with this :
/usr/bin/ld: cannot find -liconv
collect2: error: ld returned 1 exit status
gmake: *** [Makefile:21: citadel] Error 1
any idea on how to correct?
Hi Jeff,
Can you please try installing “
libiconv” by running the command below.Please let me know if this fixes your issue.
Cheers,
Emmet
I have followed the steps but i am unable to send any mail it always returns with
504 (504 5.5.2 : Sender address rejected: need fully-qualified address )
I am guessing there must be a change in the recipient address.
The only variations I made was using 8080 and 8443.
Citadel also didn’t provide me with the primary email address field in edit contact information room.
Thanks in advanced
Rohith
i was able to work around this by editing the primary email address under the User account management and edit the account needed and enter “iamadmin@xxxx.xx”.
Thanks so much to the author of this tutorial, just brillant.
The command “
curl http://easyinstall.citadel.org/install | sudo bash” is kicking back some errors. They are as follows:bash: line 1: html: No such file or directory
bash: line 2: syntax error near unexpected token `<'
'ash: line 2: `301 Moved Permanently
I’m kinda new and don’t really know if I’m doing something wrong.
Hi Todd,
Thank you for alerting us to this issue. This was caused by Citadel changing their website to use and enforce an SSL connection (HTTPS).
As curl by default doesn’t follow redirects, it was getting stuck on the 301 page.
We can resolve this by just adjusting the curl command to use https instead like so.
I have corrected this in the tutorial as well.
Cheers,
Emmet
Thanks for the instruction.
I am trying to install citadel on a raspbian buster.
I get the following error message after “sudo /usr/lib/citadel-server/setup”
>>>>>>>>>>>>>>>>>
Setup could not connect to a running Citadel server.: Datei oder Verzeichnis nicht gefunden /var/run/citadel/citadel-admin.socket
Can you give me an indication where to look for the problem?
Apache is running fine, and I set up citadel as described above as
Hi Hendrik,
We have just updated the tutorial to use an alternative installation method. This method should install the latest available version of the Citadel software from scratch and be a bit more reliable.
Let me know if you have better luck with the new steps.
Cheers,
Emmet
Thanks for the update the new instructions work.
I did not, and think it is not necessary, create:
sudo mkdir /etc/citadel/netconfigs
sudo chown citadel:citadel /etc/citadel/netconfigs
It seems to work, but I am now learning and configuring citadel.
I also think that the IMAP and POP ports need to be forwarded in the router. At least I want to be able to pick up my mail with my iPhone and laptop.
I already have an apache2 webserver with a no-ip adress. After following all the steps it seems to be working, except it hasn’t successfully sent or received any mail.
Hey,
So I set it up, but I get from emails @mail.domain.com instead of @domain.com. However, sending directly to @domain.com works.
If I send an email to my GMail account, it complains it’s not encrypted by “virginm.net” (Virgin Media) who is my ISP, and they give everyone a hostname ending in .virginm.net
Received: from [192.168.0.10] (MYHOSTNAME.cable.virginm.net [MY_IP]) by mail.domain.com; Wed, 07 Jun 2017 01:03:56 -0000Is that due to my ISP?
Thats because the reverse DNS of your Internet connection is MYHOSTNAME.cable.virginm.net. It isn’t just Virgin but all ISP’s have reverse DNS set up like this and there is no way to resolve it except to use a business internet connection which allows you to change the DNS PTR record.
See my post above, its one of the many reasons why you can’t set up a mailserver at home.
I mean I don’t mind having that in my emails, because not all email providers show that, and I doubt many people care.
Everything else works, and I solved my
@mail.domain.comissue.And I will talk to my provider about switching to a business connection, or I could host it in my office (I run a small 17 people company, we already have a business connection)
Hello
Thank u for such hard work and great tutorial I’m wonder to add google MX to on pi thanks
During initial stup I changed the default ports 80 to 8081 and 443 to 4443 but now the server works on port 80, where can I change the ports?
thanks.
I know it’s old question, but might help others that have the same problem.
sudo nano /etc/default/webcitHello Gus,
Thank you for your ADC tutorial for RPi. It is the best I encountered and worked flawlessly.
I cannot code in python yet (I am 83) so I would be grateful for additional lines of code to monitor two more LDRs, total of three LDRs.
Thanks, Zach
This is an excellent guide to setting up Citadel but unfortunately in today’s Internet it won’t work reliably on a domestic (non-static) internet connection due to modern spam filtering techniques. Essentially your outgoing email will regularly get blocked or spam binned by other mail servers.
The reason for this is two fold:
Firstly most mailserver spam filters make use of IP block lists, which contain lists of servers known to send spam. These lists usually also contain all the domestic IP ranges that are handed out by ISPs since email being sent from those addresses is almost always from a virus on someone’s computer. That’s the reason why ISP’s block outgoing email.
Secondly for a mailserver to be considered genuine the reverse DNS for its IP address (PTR record) needs to match it’s forward address. In your example this would be mail.pimylifeup.com. But if you are using a domestic internet connection this reverse DNS will be set by your ISP and will be named after their network not your mailserver.
Unfortunately the only way this can be resolved is if you relay your mail through a mailserver which is hosted in a proper datacentre on a real IP address (such as your ISPs mailservers), or you have a static IP address from your ISP and have requested they set up reverse DNS (and it’s not a blacklisted IP).
Saying all this though, setting it up on a Pi would be a good way to practice before you get a real server (for example you could get a virtual server from Digital Ocean) and set it up on there.
Agreed. The times you could use an SMTP server on a dynamic IP are long since over. Therefore, I use my provider’s mail server as smarthost. I let my citadel forward the mails to it, use fetchmail to gather the mails the smarthost has received, every 15 minutes on various accounts, and distribute them to their final destination inhouse with citadel. Thus, I can use the spam filter and virus checker my provider provides, and do not need to install them by myself on the Pi, I have a central management for filtering and distributing within citadel, and I am able to backup my mails (which was the main reason to set up this thing), which is necessary for business mails.
Thats definitely the best way to do it…
Hey Gus..! Im Jhonathan Chicas from Adelaide and I was wondering how to continue with this amazing tutorial but instead of using cloudflare I have a enhanced account with noip.
Thank you for your time, hopefully you can help me with this one.
Kind Regards
Jhonathan Chicas
Yes that is possible however I am not sure if there are any limitations of noip but entering the DNS records should be roughly the same as you would with cloudflare. A name record that points to the IP of your network, MX records for email to be directed to that IP.
If you have a dynamic IP you will need to setup Dynamic DNS to make sure your A record is always correct.
Can you use a Raspberry pi 1 Model b
You should be able to but I haven’t tested it.
Yes. I did that several years ago, when the more powerful models were still to arrive. I didn’t use Citadel from the repository, though, but from the Citadel website, because that was much more recent, and builts easily (well, the build tool is not called “Easy Install” without reason). I did not add ClamAV and Spamassassin, but there is enough RAM left to do that, even with the 512MB the old B has. You should reduce memory for graphics as much as possible, though.
Instead of using the SD Card as data tomb, I recommend to add a USB disk and put all the data and logs there, to reduce writing on the SD. This setup is running since nearly 5 years now 24/7 without issues except a disk crash – it’s better to actively cool the USB disk, like I do now (It’s a rather fast 3.5″ server disk – a slower but cooler 2.5″ mobile surely would do the trick as well). The Pi, even the old one, likes a little flow of fresh air for cooling as well, while running 24/7. Without active cooling, the Pi Shows a quite stable temp of about 50°C with housing and heatsinks on the main chips.
BTW, the tutorial is great! Thanks, Gus!