In this tutorial, we will show you how to set up and use the Inky eInk screen with a Raspberry Pi.
There is a wide variety of eInk screens on the market for the Raspberry Pi, some of the best and easiest to use are those made by Pimoroni. The one, in particular that we will use in this guide is the black-and-white Inky pHAT.
There are many reasons why you may want to use an eInk display for your Raspberry Pi. You can use them to display information you want easy access to, such as the IP address of your Pi, or even status information about a service such as Pi-Hole.
Thanks to the technology of an eInk display, they consume very little power when in use. There is only any noticeable power usage when you refresh the screen with something new to display. With how eInk technology works, you could even disconnect the display from your Raspberry Pi, and it will continue to show what you last output to it.
With this done, you can use a Raspberry Pi as an easy and quick way of updating an eInk name tag or nameplate.
Of course, eInk displays aren’t without their own problems. For example, they are super slow at refreshing what is displayed. The process can take up to 15 seconds and even longer on larger displays.
The other caveat with using an eInk display is that you will have to purchase very specific ones if you need color. And the number of colors able to be displayed on the screen at any one time is still fairly minimal. For example, with the Pimorioni Inky Impression, you have access to a maximum of 7 colors.
However, with that said, using a larger color eInk display and a Raspberry Pi can make a really neat photo frame. It can also make a great dashboard, especially if you only need updates every few minutes.


Equipment
Below is a list of the equipment we used when setting up our Pimoroni eInk display with our Raspberry Pi.
Recommended
- Raspberry Pi Amazon
- Micro SD Card Amazon
- HDMI Cable Amazon
- Monitor Amazon
- Pimoroni Inky pHAT Pimoroni
Optional
This tutorial was last tested on a Raspberry Pi 5 running the latest version of Raspberry Pi OS Bookworm.
Setting up and using an eInk Display with your Raspberry Pi
Over the following sections, we will show you how to set up and use an Inky-based eInk display with your Raspberry Pi. In particular, we will be using the Pimoroni Ink PHat. However, these steps should work with any of Pimoroni’s Inky displays.
Preparing your Raspberry Pi
1. The first thing you will want to do is connect your eInk display to your Raspberry Pi. How your display connects differs depending on what one you purchased.
Most of the eInk displays Pimoroni sells for the Raspberry Pi are designed to slide straight over the GPIO pins. This makes the whole thing easier to use but definitely lends itself more to the Pi Zero form factor than the mainline Pi’s.
2. Once connected, you will want to power on your Raspberry Pi and open up the terminal or connect to it using SSH.
If you haven’t yet decided on what operating system to use, we highly recommend sticking with Raspberry Pi OS or Raspberry Pi OS Lite. These two operating systems will yield the best performance and compatibility with both the Pi and Pimoroni’s eInk displays.
3. Once you have the terminal open, you will first want to update and upgrade any out-of-date packages on your operating system.
Even with a fresh installation of Raspberry Pi OS, there is a big chance that key packages will already be out-of-date.
you can update the package list and upgrade any out-of-date packages by running the following command.
sudo apt update
sudo apt upgrade -yCopy
4. Once the upgrade has been completed, we can now install the Git packages to your Raspberry Pi by using the command below.
We will be using git to clone the Inky library to your device. This library will enable us to talk with and update the eInk display using Python.
sudo apt install git -yCopySetting up the eInk Display Library on your Raspberry Pi
5. We are now at the point where we can clone the Inky library to your device. This library will allow your Raspberry Pi to talk with the eInk display and draw elements on it.
You can clone this library by using the git tool that we installed earlier on in this guide.
git clone https://github.com/pimoroni/inkyCopy6. Once the library has been cloned, we must change into the new directory using the cd command.
cd ~/inkyCopy7. Once you are in the cloned directory, you will want to run the “install.sh” script. This script simplifies using the Pimoroni eInk display with your Raspberry Pi.
It will install all of the required Python modules needed to talk with the display, enable I2C and SPI connections so the Pi can actually talk with the screen, and handle the annoying part of setting up a Python virtual environment.
./install.shCopy8. When you first run the install script, you will see a warning about how it should be run within a virtual Python environment.
As Python modules that aren’t from the package repository should be run within one, so you will want to type “y” and press ENTER.
If you don’t say yes to this option, you will likely run into the dreaded Python externally managed environment error.
This script should be run in a virtual Python environment
Would you like us to create and/or use a default one? [y/N]
9. After a little bit, you will run into another prompt asking if you want to copy over the example scripts. These scripts are useful for verifying that your eInk display is working, so type in “Y” and press ENTER.
Would you like to copy examples to /home/pi/Pimoroni/inky? [y/N] 10. The final question you will be asked is to determine whether you want documentation generated for this eInk python library.
As it is always handy to have a place where you can check to see how things work, we recommend typing in “Y” and pressing ENTER.
Would you like to generate documentation? [y/N]11. During installation, this script made some core changes to your Raspberry Pi’s settings requiring you to reboot it. Failure to reboot your system will mean the Raspberry Pi won’t be able to interact with your eInk display.
To restart your Pi, you only need to run the command below.
sudo rebootCopyActivating the Virtual Environment
12. You are now ready for your Raspberry Pi to start communicating with and talking with your eInk display.
We will first run one of the example scripts to test that everything is working properly. However, before you can do that, we must change the shell to use the Python virtual environment that was generated by the install script.
You can enter this virtual environment by running the following command within the terminal. Remember that you must repeat this step every time you want to run your code.
source ~/.virtualenvs/pimoroni/bin/activateCopyInstalling Some Additional Python Libraries for your eInk Display
13. If everything has worked properly, you should now see “(pimoroni)” displayed at the start of the line. This indicates we are now within the Python virtual environment and can begin to run the example scripts.
Before we proceed, let us install a bunch of extra Python modules that will allow us to run the example scripts and program our own later.
Out of all of the Python libraries we are installing, the following are the more useful ones you are more likely to incorporate into your code.
pillow: This library is a super useful way to assemble the text or images you want displayed on your Raspberry Pi’s eInk display. This is the one you will need to use out of all the packages.requests: The requests package is a popular one that enables you to make web requests. You will want to use this if you want to get things from the web and display its results on your display.beautifulsoup4: If you have plans to interpret web content then you will want to use beautifulsoup4. This Python library enabels you to take HTML or other web data, and then turn that into data that can actually be used.seaborn: The final useful Python library we are installed is Seaborn. This library enabels the easy generation of things such as graphs. If you want to display graph data to your eInk screen, this is the library you will want to utilize.
pip install pillow requests beautifulsoup4 fonts font-source-sans-pro font-source-serif-pro font-fredoka-one font-hanken-grotesk font-intuitive geocoder seaborn wikiquotesCopyTesting your Raspberry Pi’s eInk Display
14. With these Python libraries installed, lets finally test that your Raspberry Pi’s eInk display works by running one of the example scripts.
Start this process by changing into the folder where these examples were saved on your system.
cd ~/Pimoroni/inky/examplesCopy15. Once you are in the right directory, we will now use the “name-badge.py” script to update what is currently being shown on your eInk display.
This particular example changes the look of your screen so that it looks like a name tag and will use the name you provide it.
You can run this script by using the following command. Ensure that you replace “<NAME>” with the name you want shown on your display.
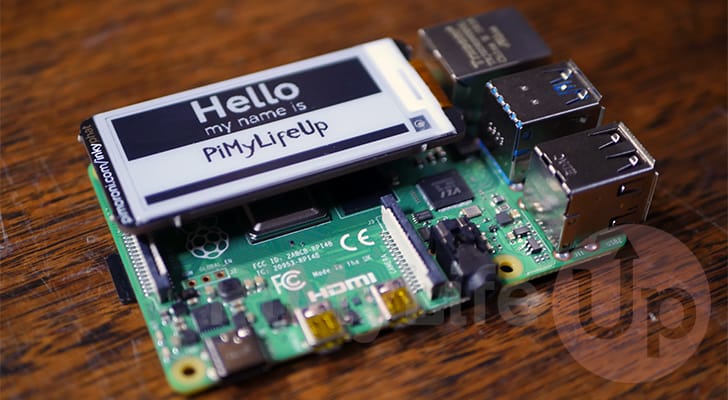
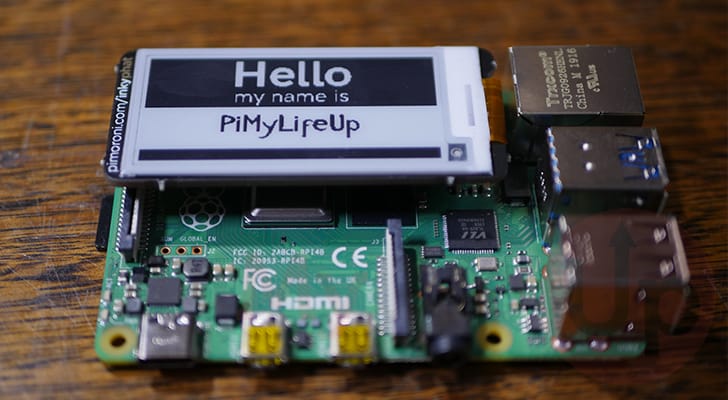
python name-badge.py --type "auto" --colour "black" --name "<NAME>"Copy16. The photo below shows that the eInk display we have connected to our Raspberry Pi is now displaying the name tag with the name “PiMyLifeUp“.
Writing your Own Script to Display to your Raspberry Pi’s eInk Display
17. At this point, we can move on to creating our very own script that will display both your local and external IP addresses on your connected eInk display.
This particular use case is useful when you are running a headless Raspberry Pi as it can be frustrating sometimes to remember or get the IP address of a device, especially if you don’t have the ability to set a static IP.
You can begin to write this script by running the command below.
sudo nano display_ip.pyCopy18. If you are interested in how this code works, be sure to read over the next few steps. Otherwise skip straight to step 19 for a fully commented version of this script.
a. We start off this script by importing all of the libraries that we need for displaying our IP to the Raspberry Pi’s eInk display
socket: The socket library will enable us to get the local IP address. We will basically use this to create a fake connection, from which we will get the local IP.requests: Getting your external IP is even easier than a local one as we can simply use the requests module to grab the response from a page that outputs the connecting IP.inky.auto: With this, we are importing the Inky library to our Python script. This library will enable us to update what is being displayed on the eInk display.PIL: Finally, we import the pillow library. This library is super important as it enables us to assemble an image that is output to the eInk display.
import socket
import requests
from inky.auto import auto
from PIL import Image, ImageDraw, ImageFontCopy
c. We next define our first function called “get_local_ip”. With this function we utilize the sockets library we imported earlier to create a connection between our Pi and the IP 8.8.8.8.
We then grab the local IP that this new socket will have grabbed during connecting and then save it to the variable called “local_ip“. The connection is then immediately closed, and the local IP is returned.
def get_local_ip():
    try:
        s = socket.socket(socket.AF_INET, socket.SOCK_DGRAM)
        s.connect(('8.8.8.8', 1))
        local_ip = s.getsockname()[0]
        s.close()
        return local_ip
    except Exception as e:
        return f"Error: {str(e)}"Copy
d. Our next helper function called “get_external_ip” is super simple and just uses the request library to grab your external IP address.
It achieves this by making a get request to the “ipify” website.
def get_external_ip():
    try:
        response = requests.get('https://api.ipify.org')
        return response.text
    except Exception as e:
        return f"Error: {str(e)}"Copy
e. These next three lines begin our “main” function. This is the function that will be run when the script is run.
Upon starting, we use the two functions we created previously to get and store both the local and external IP addresses. We will use these two variables later on in the function to display this information to our Pi’s eInk display.
def main():
    local_ip = get_local_ip()
    external_ip = get_external_ip()
Copy
f. After getting and storing the IP address, we will want to set up the connection to the Pimoroni eInk display.
We do this by instantiating the library using the “auto()” function that we imported from the Inky library. This runs the “auto()” script and creates a link to the display that we can utilize by using the “inky_display” variable
After starting up the connection to the display, we then set the border color to white.
    inky_display = auto()
    inky_display.set_border(inky_display.WHITE)Copy
g. We now begin by creating a new image that will act as our base. This image is what we will draw our text to, or any other elements that we want.
This image will be sized to be the exact width and height of our Raspberry Pi’s eInk display. We will also set the background color to be “white.”
With the image created, we then create an instance of the “ImageDraw” library. This is what will allow us to actually interact with the image we created and draw to it.
    img = Image.new("P", (inky_display.WIDTH, inky_display.HEIGHT), inky_display.WHITE)
    draw = ImageDraw.Draw(img)Copy
h. With this next step, we are loading two different versions of the font DejaVu Sans. First, we will load our default font, the “bold” variant, and set its size to 14.
For our smaller text we are loading in the standard version of the font and setting its size to 12.
    font = ImageFont.truetype("/usr/share/fonts/truetype/dejavu/DejaVuSans-Bold.ttf", 14)
    small_font = ImageFont.truetype("/usr/share/fonts/truetype/dejavu/DejaVuSans.ttf", 12)Copy
i. Finally, let us draw our information to the image to be output onto our Raspberry Pi’s eInk display.
With each line, we specify four bits of information, each of which is super important to what is being displayed on our screen.
(5, 5): With this first parameter we set the X and Y positions of where this text should be displayed on your eInk screen. You may need to re-adjust these to ensure everything is displayed where you want it.f"Local IP:": Next, we can set the text that should be displayed. We are using the text “Local IP:” for this first line.inky_display.BLACK: With the third parameter, we can control the color that will be displayed on the eInk HAT. With our example, we want the text to be black as the background is white. Remember that eInk displays have a very limited number of colors.font=small_font: With the final parameter we are setting the “font” option to one of the fonts that we grabbed earlier on. By using the “small_font” font, the text for this header will be slightly smaller.
    draw.text((5, 5), f"Local IP:", inky_display.BLACK, font=small_font)
    draw.text((5, 20), f"{local_ip}", inky_display.BLACK, font=font)

    draw.text((5, 40), f"External IP:", inky_display.BLACK, font=small_font)
    draw.text((5, 55), f"{external_ip}", inky_display.BLACK, font=font)Copy
j. Finally, once you have finished drawing the image and have whatever you want displayed ready, you will need to get the Inky eInk display to show it.
This is where Pimoroni makes things super easy, as all we need to do is use the “set_image” function from our “inky_display” variable and pass in the image that we created that is currently stored in the “img” variable.
Once you have told the library what it should display, you will then need to run the “.show()” function.
    inky_display.set_image(img)
    inky_display.show()Copy
k. At the end of this Python script, you will want to add the following two lines. Essentially, these ensure the “main()” function is only executed when this script is ran directly.
if __name__ == "__main__":
    main()Copy
19. Below is an example of what the full version of this script should look like with the addition of some extra comments to make it easier to understand what is going on here.
If your file looks somewhat like this, then you are all done and ready to test it out.
#!/usr/bin/env python3
# This is a shebang line that tells the system to use Python 3 to run this script when executed directly

# Import required libraries
import socket  # For network connections and getting local IP address
import requests  # For making HTTP requests to get external IP address
from inky.auto import auto  # Inky is a library for e-paper displays that auto-detects your display type
from PIL import Image, ImageDraw, ImageFont  # PIL (Python Imaging Library) for creating and manipulating images

def get_local_ip():
    """Get the local IP address of the machine"""
    try:
        # Create a socket connection to determine the local IP
        s = socket.socket(socket.AF_INET, socket.SOCK_DGRAM)
        # Doesn't need to be a real connection - we just use it to figure out
        # which network interface would be used to reach Google's DNS (8.8.8.8)
        s.connect(('8.8.8.8', 1))
        # s.getsockname() returns (ip_address, port) - we only want the IP
        local_ip = s.getsockname()[0]
        s.close()  # Always close sockets when done
        return local_ip
    except Exception as e:
        # Return error message if something goes wrong
        return f"Error: {str(e)}"

def get_external_ip():
    """Get the external IP address of the machine"""
    try:
        # Use a public API (ipify.org) to fetch the external IP
        # This is the IP address that the internet sees for your connection
        response = requests.get('https://api.ipify.org')
        return response.text  # The response contains just the IP address as text
    except Exception as e:
        # Return error message if something goes wrong (e.g., no internet)
        return f"Error: {str(e)}"

def main():
    # Get IP addresses by calling our functions
    local_ip = get_local_ip()
    external_ip = get_external_ip()

    # Initialize the Inky display using auto detection
    # This will automatically identify which Inky display is connected
    inky_display = auto()
    # Set the border color to white
    inky_display.set_border(inky_display.WHITE)

    # Create a blank canvas with the same dimensions as the display
    # "P" means we're creating a palette-based image (limited colors, good for e-paper)
    # We set the background to WHITE
    img = Image.new("P", (inky_display.WIDTH, inky_display.HEIGHT), inky_display.WHITE)
    # Create a drawing object to draw on our image
    draw = ImageDraw.Draw(img)

    # Load fonts for displaying text
    # Bold font for the IP addresses (more prominent)
    font = ImageFont.truetype("/usr/share/fonts/truetype/dejavu/DejaVuSans-Bold.ttf", 14)
    # Regular font for the labels
    small_font = ImageFont.truetype("/usr/share/fonts/truetype/dejavu/DejaVuSans.ttf", 12)


    # Draw IP addresses with tighter spacing for small display
    # Format: draw.text((x, y), text, color, font)
    # First draw the "Local IP:" label
    draw.text((5, 5), f"Local IP:", inky_display.BLACK, font=small_font)
    # Then draw the actual local IP address below it
    draw.text((5, 20), f"{local_ip}", inky_display.BLACK, font=font)

    # Do the same for external IP
    draw.text((5, 40), f"External IP:", inky_display.BLACK, font=small_font)
    draw.text((5, 55), f"{external_ip}", inky_display.BLACK, font=font)

    # Update the display with the image we created
    inky_display.set_image(img)
    # Show the image on the display - this actually updates the physical screen
    inky_display.show()

if __name__ == "__main__":
    # This is a common Python pattern that checks if this script is being run directly
    # (as opposed to being imported as a module in another script)
    # If it's run directly, execute the main() function
    main()Copy
20. Once done, save and quit by pressing CTRL + X, Y, and then ENTER.
21. All we need to do to run this script is to use the following command and display our IP addresses to our Raspberry Pi’s eInk display.
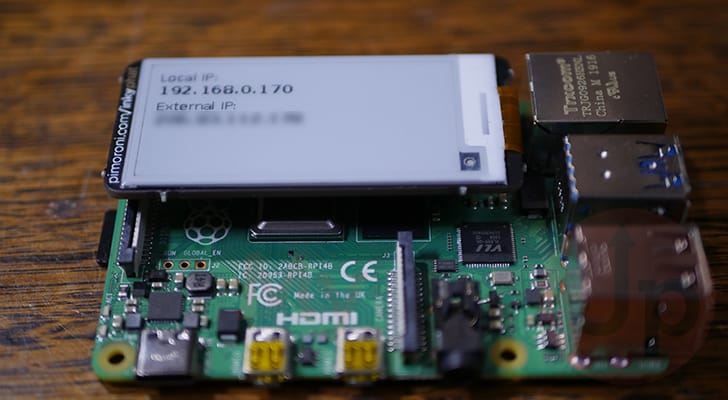
python display_ip.pyCopy22. If everything has worked properly, you should now see your IP’s on your eInk display, just like ours have been shown below.
Conclusion
Hopefully, at this point, you will now have a good idea of how you can use an eInk display with a Raspberry Pi and how useful they can be.
One of the key advantages of an eInk display is that they function using very little power and can continue to display what was last on them even after there is a loss of power.
This ability to keep functioning after power loss means it can be combined super well with something like a NAS to display stuff like it’s status, battery over time and more.
If you found this project to be helpful, check out our rather extensive list of Raspberry Pi projects.