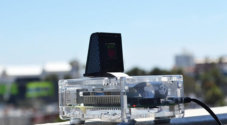
In this Raspberry Pi DSLR camera control project, we will be showing you how you can set up and utilize your DSLR with the Raspberry Pi.
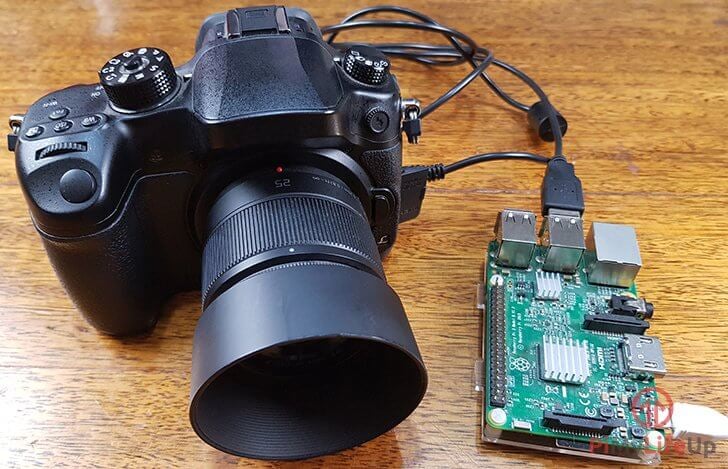
Utilizing the gphoto2 software, we will be able to talk with your Raspberry Pi to control the camera to perform actions such as taking photos, downloading files from the camera and setting configuration on the camera.
In this tutorial, we will be showing you the process of compiling the very latest version of the gphoto2 software and installing it to your Raspberry Pi.
Compiling from the latest source code ensures that we will have the best available compatibility but of course is a lot more complicated than just installing from the package repository.
Before you follow this tutorial, you should ensure that the gphoto2 software supports your DSLR camera. You can do this by checking out their official support list on the Gphoto2 website.
There are many camera projects that you can do with the Raspberry Pi. Personally, I love to use the cheap Pi camera in a bunch of camera but being able to control a DSLR is very handy.
You can find the full tutorial on how to set up your Raspberry Pi to control a DSLR below.


Equipment List
Below is the full list of equipment that you will need in order to control your DSLR using a Raspberry Pi.
Recommended
- Raspberry Pi Amazon
- Micro SD Card Amazon
- Ethernet Cable Amazon or Wi-Fi Amazon
- DSLR Camera Amazon (Compatibility list)
- Power Supply Amazon
Optional
Installing gPhoto2 to talk with the Digital Camera
1. Before we begin installing and setting up the software that we will need to talk with the digital cameras, we must first ensure that both our package list and our packages are entirely up to date.
We can do this by running the following two commands on the Raspberry Pi.
sudo apt-get update
sudo apt-get upgrade
2. Now that we have everything up to date we will need to download the packages that we need for compiling the gphoto2 software that we will be utilizing.
While there is a version of gPhoto2 available from the package repository it is an out of date version that doesn’t support as many cameras.
Run the following command to install all the packages that we will be needing.
sudo apt-get install git make autoconf libltdl-dev libusb-dev libexif-dev libpopt-dev libxml2-dev libjpeg-dev libgd-dev gettext autopoint3. Once all the packages have finished installing we can proceed to grab the libgphoto2 source code and compiling it. Libgphoto2 is the library that the gphoto2 is built upon.
We can grab the latest available version straight off their Github by running the following command to clone it.
git clone https://github.com/gphoto/libgphoto2.git4. With the libgphoto2 source code now on our Raspberry Pi, we need to compile it.
To do this, we will have to run the following series of commands. These commands can take some time to execute so be patient.
The commands that we are going to run will configure the makefile script based on all the packages and software that we have available on our Raspberry Pi.
We will then compile the library itself based on this makefile that we generate.
cd ~/libgphoto2
autoreconf --install --symlink
./configure
make
sudo make install
5. Now that we have compiled the libgphoto2 library we now need to follow that same process for the actual gphoto2 software.
Let’s clone the gphoto2 source code to our Raspberry Pi by running the following two commands.
cd ~
git clone https://github.com/gphoto/gphoto2.git
6. Now like the glibphoto2 library that we compiled we need to run several different commands. Each of these commands will configure the gphoto2 software for compilation then compile it.
Run the following series of commands to compile and install the gphoto2 software to your Pi.
cd ~/gphoto2
autoreconf --install --symlink
./configure
make
sudo make install
7. With the gphoto2 software now compiled we need to ensure that it can find the library that we compiled in the previous steps.
To start , we will first ensure that the configuration file referencing the “/usr/local/lib” folder exists.
Open up the file by running the following command on your Raspberry Pi.
sudo nano /etc/ld.so.conf.d/libc.confInside this file, you should find the following text, if it does not exist already then enter it.
# libc default configuration
/usr/local/lib
Once you are sure that the correct text is now there you can exit out of the file by pressing CTRL + X. If asked to save, make sure you type in Y followed by pressing ENTER.
8. Now that we have ensured that the “/usr/local/lib” directory is being included we need to refresh the config cache so that the directory will be searched by the operating system when linking libraries.
To do this, we need to run the ldconfig tool by running the command below.
sudo ldconfig9. In the next few steps, we have to generate the udev rules for the cameras that you might be connecting. Without this, the gphoto2 application may not be able to talk with your camera.
Let’s generate the required udev list by running the following command. We will pipe the command directly into a rules file that the udev service will automatically read.
/usr/local/lib/libgphoto2/print-camera-list udev-rules version 201 group plugdev mode 0660 | sudo tee /etc/udev/rules.d/90-libgphoto2.rules10. Finally, we need to generate the hardware database file for udev.
We can do this by running the following command. This command will automatically create the file in the correct location.
/usr/local/lib/libgphoto2/print-camera-list hwdb | sudo tee /etc/udev/hwdb.d/20-gphoto.hwdb11. Now run the following command to test that gphoto2 is setup correctly, if it returns the version we are free to continue on with this Raspberry Pi DSLR camera control tutorial.
gphoto2 --versionUsing gphoto2 to talk with the Camera
1. At this point in the tutorial, you need to connect your DSLR to the Raspberry Pi using a USB-cable.
Once you have it attached, we can then proceed to try to detect it with the gphoto2 software by running the following command.
gphoto2 --auto-detectFrom this command, you should see the following text, followed by both the detected model and the port that the camera is connected to.
If you don’t see any mention of your camera ensure that it is properly connected and powered on.
Model                          Port
----------------------------------------------------------
Canon PowerShot G2             usb:
2. If your camera has been successfully detected then you can proceed to talk with the device through the gphoto2 software.
Below we will run into a few commands that you can utilize with the gphoto2 software and what those commands do.
gphoto2 --capture-imageThis command will get the gphoto2 software to tell your camera to take a photo and capture it to its internal memory.
Using “--capture-image” will not save the picture to the Raspberry Pi itself.
gphoto2 --capture-image-and-downloadThe command above is similar to the previous one in that it gets your connected camera to take a photo.
However, it goes one step further by downloading the image from the camera to the Pi straight away.
gphoto2 --summaryThe --summary command retrieves a summary of your camera device.
The result of this command will differ from camera to camera as it is entirely dependent on what information the camera exposes.
gphoto2 --list-filesThis command lists all files on the camera that the gphoto2 software can see.
3. There is plenty more that you can do with the gphoto2 software, you can find out more about how to utilize the tool and to master its command line by checking out the official documentation on their website.
There are many different projects that you can do by using gphoto2 and a DSLR. If you want to go something a little more budget then you might be interested in our time lapse project or learning more about the two types of Raspberry Pi cameras.
I hope that this guide has taken you through all the steps on how to control the DSLR with the Raspberry Pi. If you have any feedback on this tutorial, then please don’t hesitate to leave a comment below.


Great tutorial!!! Thank you for your efforts!!!
I connected a Nikon Coolpix L310 which is not on the list of cameras that work with gphoto2, but it works perfectly.
Great tutorial, many thanks !
Thank you very much for this tutorial.
I have just managed to capture an image with my Sony a6500.
Uh, oh. At Step 2, (running “sudo apt-get install git make autoconf libltdl-dev libusb-dev libexif-dev libpopt-dev libxml2-dev libjpeg-dev libgd-dev gettext autopoint”) I got a boatload of “File has unexpected size …” and “Failed to fetch [BAD REPOSITORY SNIP]” errors.
My PI 3B+ is brand new with 2020-05-27-raspios-buster-lite-armhf.img etched today.
Any idea(s) as to what might be the cause(s)?
Hi Kapix,
It looks like the repository you ar etrying to update from has issues. This i think is the seccond time I’ve seen someone complaining about that particular mirror.
I reccomend to get around this to set the mirror yourself and not rely on the Raspberry Pi Foundations mirror directory for now.
You can change the repository you are downloading from by following our guide.
It might also help to report the issue to the foundation itself but I can’t seem to find a place to report it myself.
Cheers,
Emmet
Thanks Emmet. That was my suspicion but I felt it wise to defer to someone who is much less ‘noob-ish’ than I.
Hi has anyone coded a .py Gui for this to run with start, stop, and shoot buttons with interval options for a long-term timelapse unit?
Thank you very much, it works great. A lot of fun using it in a photobooth.
Hi , I followed the tutorial, connected my Canon SX260HS, which is auto detected , then when I try to capture image I get
gphoto2 –capture-image-and-download
*** Error ***
An error occurred in the io-library (‘Could not claim the USB device’): Could not claim interface 0 (Device or resource busy). Make sure no other program (gvfs-gphoto2-volume-monitor) or kernel module (such as sdc2xx, stv680, spca50x) is using the device and you have read/write access to the device.
ERROR: Could not capture image.
ERROR: Could not capture.
*** Error (-53: ‘Could not claim the USB device’) ***
For debugging messages, please use the –debug option.
Debugging messages may help finding a solution to your problem.
If you intend to send any error or debug messages to the gphoto
developer mailing list , please run
gphoto2 as follows:
env LANG=C gphoto2 –debug –debug-logfile=my-logfile.txt –capture-image-and-download
Please make sure there is sufficient quoting around the arguments.
The camera I think is going into USB mode, but can’t find a setting to disable this. Just wondering if you could advise where I am going wrong please
Hi Alasdair,
Could you please try running the following few commands, it looks like a program on the Raspberry Pi is mounting it and not allowing the program to gain control of it..
sudo rm /usr/share/dbus-1/services/org.gtk.Private.GPhoto2VolumeMonitor.servicesudo rm /usr/share/gvfs/mounts/gphoto2.mount
sudo rm /usr/share/gvfs/remote-volume-monitors/gphoto2.monitor
sudo rm /usr/lib/gvfs/gvfs-gphoto2-volume-monitor
Cheers,
Emmet
Just trying to install on a fresh image of Raspbian Stretch on a Pi 3A+. At stage 4 of the installation guide, I get an error regarding “autopoint”…
pi@Pi3Aplus:~/libgphoto2 $ autoreconf –install –symlink
Can’t exec “autopoint”: No such file or directory at /usr/share/autoconf/Autom4te/FileUtils.pm line 345.
autoreconf: failed to run autopoint: No such file or directory
autoreconf: autopoint is needed because this package uses Gettext
Can you please advise…?
Hi Andrew,
Could you please try running the following command, looks like theres is potentially a missing package.
sudo apt-get install gettext autopointCheers,
Ennet
This sounds great however it would be nice to use this in the field for specific photography. Can this implementation work on a Pi Zero? That would be nice as it is much smaller and can run for a long time on a power cell.
Hi Bill,
There is no real reason why this shouldnt work on a Pi Zero, you will need to of course have an adapter to plug your cable into the micro-usb port but other then that it should all work fine. Only thing you have to watch out for is the potential performance limitations of the Pi Zero.
Cheers,
Emmmet