In this tutorial, we will be showing you how to use the Dropbox software on the Raspberry Pi.
Dropbox is a popular cloud file hosting service that allows synchronizing files between Dropbox’s servers and other devices.
While quite popular, Dropbox has not released an ARM client for the Linux operating system.
To make Dropbox possible on the Raspberry Pi, we will be making use of a little script that works by utilizing Dropbox’s API.
Throughout this tutorial, we will be showing you how to set up the Dropbox script on your Raspberry Pi and show you how to make use of it.
Before beginning this guide, make sure that you have already signed up for a Dropbox account as we won’t be covering that process within this guide.
Equipment List
Below is a list of the equipment that you may need to set up Dropbox on your Raspberry Pi.
Recommended
Optional
This tutorial on setting up Dropbox was tested on a Raspberry Pi 4 running the latest version of Raspbian Buster.
Installing the Dropbox Script on your Raspberry Pi
This section will show you how to set up your Raspberry Pi for use with the Dropbox script. This process is relatively straightforward and can be completed in a couple of minutes.
1. Before we go ahead and download the Dropbox script that we will be using, we need first to update and upgrade our operating system.
To upgrade everything on Raspbian, we just need to run the following two commands.
sudo apt update
sudo apt upgrade
2. With our Raspberry Pi up to date, we need to make sure curl, and git is installed.
Curl is the only package that the Dropbox uploader script that we will be using requires.
Git is what we will be using to download the script to our Raspberry Pi. While you can just use curl or wget, using get will allow us to update the script easier.
Ensure that curl and git are installed by running the following command on your Raspberry Pi.
sudo apt install curl git3. Now that we have everything we need, let’s clone the Dropbox uploader script to our Raspberry Pi.
This script was written by Andrea Fabrizi and is what we will be using to download and upload files to Dropboxes servers.
Clone this script to the Raspberry Pi by running the following command.
git clone https://github.com/andreafabrizi/Dropbox-Uploader.git4. Now move into the newly cloned folder by running the following command.
cd ~/Dropbox-Uploader/5. We need to give the dropbox_uploader.sh script execution privileges.
To change this privilege, we need to make use of the chmod command.
sudo chmod +x dropbox_uploader.sh6. Finally, let’s run the dropbox_uploader.sh script by running the following command.
./dropbox_uploader.shUpon running this script, you will be asked to enter your Dropbox access token to configure the script.
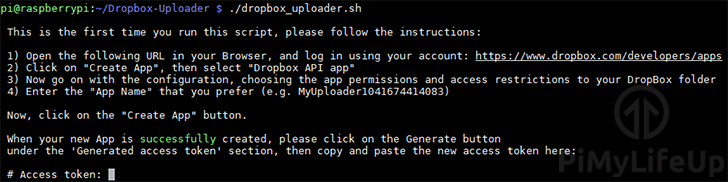
At this point, you can now move on to the next section of the tutorial. The next section will show you how to get your Dropbox access token.
Getting your Dropbox API Key
In this section, we will be showing you how to retrieve the access token for the Dropbox Uploader script. Remember that you will need to have a Dropbox account.
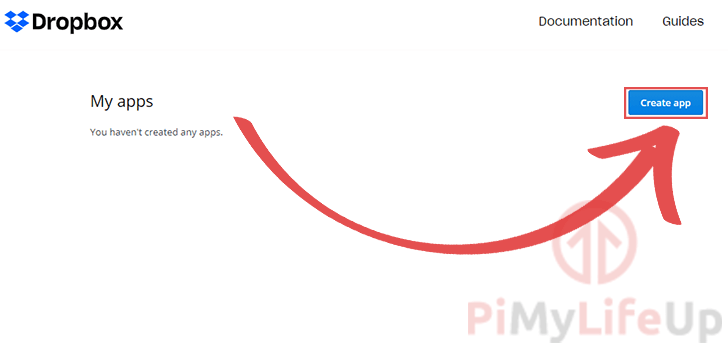
1. To start this section, go to the Dropbox developers page.
On this page, you need to click the “Create app” button.
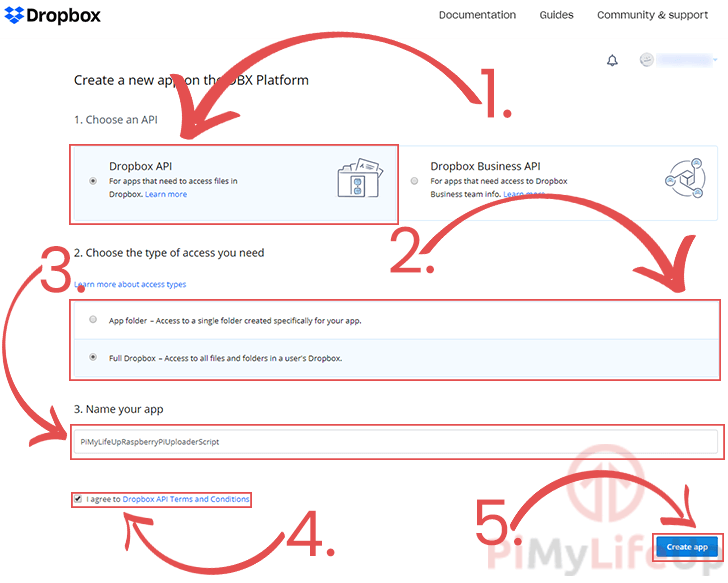
2. On this page, you need to set up some of the details of your app.
Under the “1. Choose an API” header you will need to select the Dropbox API option (1.)
Next, you will need to select the type of access you want to give to this application. You can either give it full access to your Dropbox account or only a specific folder created for the app (2.).
For security and privacy, the best option to select would be the App folder option. For this guide however we are just going to go with the “Full Dropbox” option.
Next, you need to specify a name for your app. (3.) This name must not contain the word dropbox.
Now we need to tick the box saying that you agree to Dropbox’s API terms and conditions (4.).
Finally, click the “Create app” button to finalize all of your settings (5.).
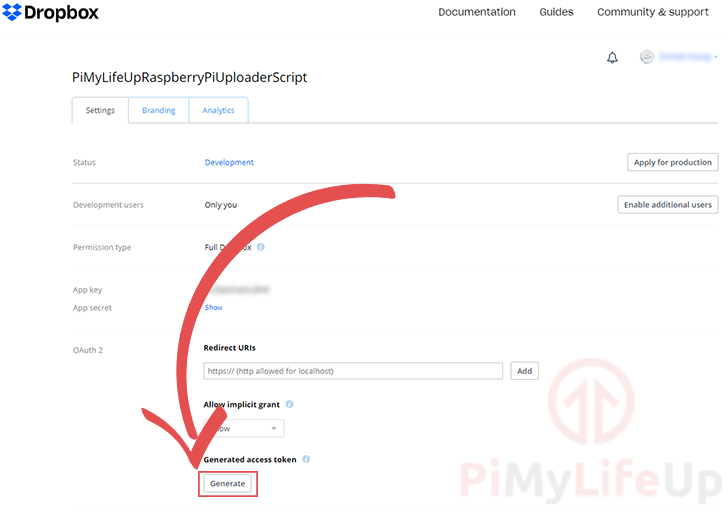
3. Finally, we are on a page where we can retrieve our access token.
On this page, you need to click the “Generate” button.
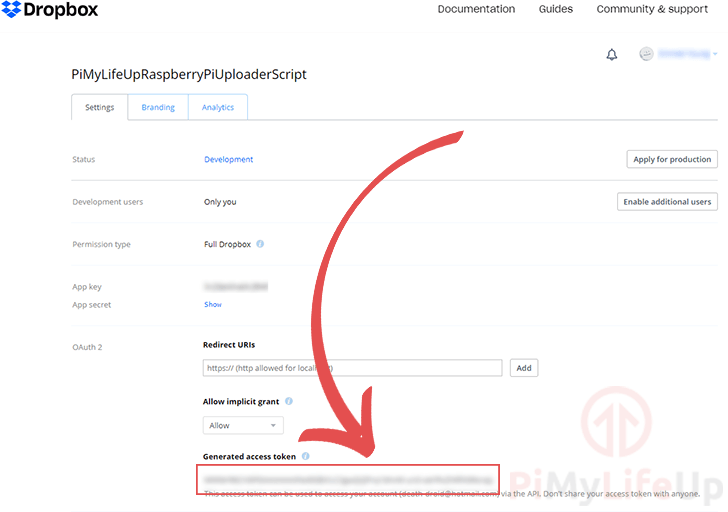
Clicking this button will generate the access token that we need for the Dropbox script.
4. Now copy and paste the generated access token to your Raspberry Pi’s command line and press ENTER.
5. Once you have copied the access token into the dropbox_uploader.sh scripts prompt, you will be asked to confirm it by pressing Y then ENTER.
Your access token should now be saved, and we can now begin to use Dropbox on our Raspberry Pi.
Making use of Dropbox on your Raspberry Pi
In this section, we will be showing you some of the ways that you can make use of the Dropbox software on your Raspberry Pi.
Listing Files within a Directory on Dropbox
Using the script on your Raspberry Pi, it is possible to list the files and directories available within a directory.
To do this, we make use of the list command, followed by the directory you want to scan.
./dropbox_uploader.sh list <DIRECTORY>By using this command, you will retrieve a list of all files and directories within the specified directory.
Example of Using the List Command
For example, if we made use of the following command to retrieve the files and directories available within the root directory.
./dropbox_uploader.sh list /You will then get a result like what we have below. Each entry will be prefixed by either [D] or [F].
The [D] identifier specifies that this entry is a directory.
The [F] identifier defines that the entry is a file.
 > Listing "/"... DONE
 [D]         Public
 [D]         Camera Uploads
 [D]         Electronics
 [D]         Littlebigbyte
 [D]         Screenshots
 [F] 287043  pimylifeup.ai
 [F] 23785   dropbox.docx
Uploading a File or Directory to Dropbox
You can also use this script to upload a file or directory from your Raspberry Pi to Dropbox.
To be able to upload a file, we make use of the upload command.
./dropbox_uploader.sh upload <LOCAL_FILE/LOCAL_DIR> <REMOTE_FILE/REMOTE_DIR>To upload a file, we specify upload, followed by the location of the local file or directory, followed by the location we want to upload the file or directory to.
This command will automatically try to create a directory if it does not already exist.
Example on How to Use the Upload Command
Uploading a file from the Raspberry Pi using the dropbox_uploader.sh script is a simple process.
To showcase this, we are going to upload a file called pimylifeup.zip to the root directory of our Dropbox.
./dropbox_uploader.sh upload pimylifeup.zip /Once the text, “DONE” has appeared, your file has now been successfully uploaded.
Downloading a File or Directory from Dropbox
Downloading a file to your Raspberry Pi from your Dropbox account is a simple process.
./dropbox_uploader.sh download <REMOTE_FILE/DIRECTORY>This command is fairly simple to use and involves you using download, followed by the remote location of the file or directory you want to download.
Example on How Download Files from Dropbox
Below we are going to give you an example of how to use the download command.
For this example, we are going to download a file called pimylifeup.zip that is stored in our /example/directory/ directory on Dropbox.
./dropbox_uploader.sh download /example/directory/pimylifeup.zipOnce the download has completed, you will see the message “DONE” appear.
Dropbox Uploader Script Documentation
There are a variety of other commands that you can make use of with the Dropbox uploader. Above, we have only touched on a few of the commands that the script has to offer.
You can find out more about how to make use of the dropbox_uploader.sh script by checking out the official documentation.
Hopefully, at this stage, you will now have an idea of how to make use of Dropbox on your Raspberry Pi.
If you have run into any issues with using Dropbox, feel free to leave a comment below.


Thank you for this. It was clear, helpful, and invaluable to my project!
Another THANK YOU, Emmet, from a long-time card-carrying dropbox fan. It’s not the full-fledged sync client i went looking for a few hours ago, but it’s nicer than having to always use the web interface for uploads/downloads of individual files.
This is awesome! Thank you so much! This helped me a ton!! 🙂
When I move to a newer RPi, as I soon will, can I just copy the Dropbox-Uploader directory and contents to the new Pi and use the script as before, or will I need to go through the whole thing again, i.e., creatong a new Dropbox app, getting a new token, etc.?
Hi Steve,
You should just need to copy the dropbox directory containing the script as well as the
.dropbox_uploaderfile that sits on your users root.For example if you set this up for the
piuser the configuration file will sit at/home/pi/.dropbox_uploader.Cheers,
Emmet