This project will show you how to install and run Android TV on the Raspberry Pi.
Android TV is a special version of the popular mobile operating system. It features a redesigned interface that works better with the horizontal nature of TV screens.
To get Android TV to run on a Raspberry Pi, we will be using a special build of LineageOS. This build is maintained and developed by the hard work of KonstaKANG and the Android-rpi team.
With the OS being more optimized for large horizontal screens and remotes, it makes it the perfect choice when connecting the Pi to your TV. You can even get access to the vast number of available apps through the Google Play store.
These builds of Android TV for the Raspberry Pi have support for hardware-accelerated graphics, hardware-accelerated decoding, and encoding. This support allows this operating system to turn your Raspberry Pi into a powerful TV streaming box.
Please note to run this operating system, you will require a Raspberry Pi 4 or 5.
If you would prefer to stick with the normal version of Android we also have a guide on installing that.
Equipment List
To install Android TV on our Raspberry Pi, we used the following list of equipment.
Recommended
- Raspberry Pi Amazon 4, 400, CM4
- Micro SD Card Amazon
- Power Supply Amazon
- Ethernet Cable Amazon or Wi-Fi Amazon
- Monitor Amazon
- HDMI Cable Amazon
- USB Drive Amazon
- USB Mouse Amazon
Optional
We tested this build of Android TV on a Raspberry Pi 4 and a Pi 400.
Installing Android TV on the Raspberry Pi
In the following sections, we will be showing you how to install Android TV on the Raspberry Pi using a build of the operating system by KonstaKang.
On top of installing the operating system, we will be also showing you where to find and get the Google Apps package. Without this package, you won’t have access to the Google Play Store on your Raspberry Pi Android TV.
Obtaining Android TV for the Raspberry Pi
1. Our first step is one of the most important, and that is to download the Android TV image for our Raspberry Pi.
Depending on the version of your Pi, you will need to download a different version of the operating system. A version built for the Pi 4 won’t work on the Pi 5 and vice versa.
You can see all the versions available for your device by going to the main device page on Konstkang’s website. Alternatively, we link specific versions below. You may want to double-check these links to ensure you’re using the latest version.
- For the Raspberry Pi 4, you can get a compatible build from KonstaKang’s website.
https://konstakang.com/devices/rpi4/LineageOS22-ATV/- If you are using a Raspberry Pi 5, then go to the download page for the Pi 5 release of Android TV.
https://konstakang.com/devices/rpi5/LineageOS22-ATV/If you like the developers’ work, consider donating through their website to help contribute to the development of Android TV for the Pi.
2. After downloading the operating system from the previous link, you will end up with a zip file called something along the lines of “lineage-22.0-20240216-UNOFFICIAL-KonstaKANG-rpi5-atv.zip“.
We will install this image shortly, but there are a few additional tasks we must complete.
Downloading GApps for Android TV
2. Google does not allow other Android operating systems to bundle their apps without a license.
Luckily, we can work around this thanks to the MindTheGapps project. Using the packages provided by this team, we can gain access to Google Play on our Raspberry Pi while running this custom version of Android TV.
In your favourite web browser, go to the GitHub releases page for MindTheGapps. This link should take you to the latest version of GApps for Android TV 14.0.
https://github.com/MindTheGapps/14.0.0-arm64-ATV/releases/latest3. Once on this page you will want to download the version of Gapps labeled “arm64-ATV-full“.
At the time of publishing the zip file we downloaded was named “MindTheGapps-14.0.0-arm64-ATV-full-20240523_192016.zip“. You won’t need this zip file till later on in the guide.
Writing the Android TV Image to your Raspberry Pi
Now that we have everything we need to run Android TV on our Raspberry Pi, you can continue with our setup guide.
In the next few steps, we will guide you through flashing the Android TV operating system to your device.
To write the Android TV image to our Raspberry Pi, we will be using the Etcher image writer. However, you can use whatever one you feel comfortable with.
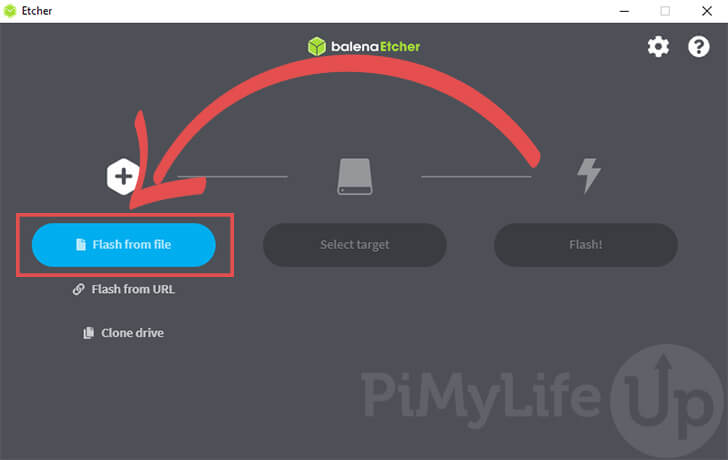
1. When you first open up the Etcher software, click the “Flash from file” button.
This button will bring up a file dialog box that you will use to select the Android TV image you downloaded earlier.
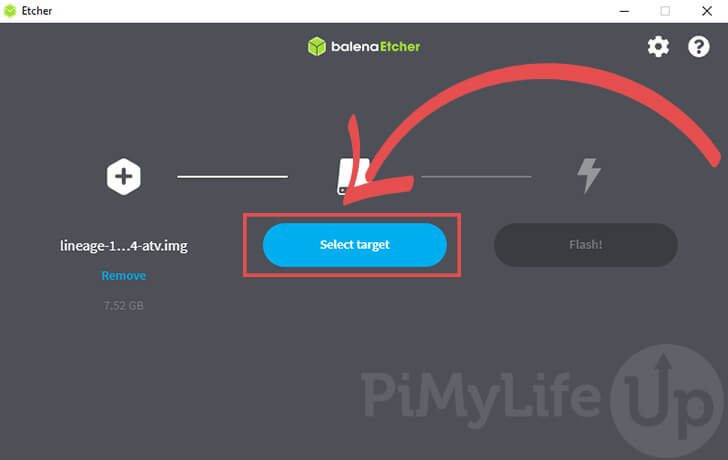
2. With an image selected, our next step is to select the drive we want to write it to.
At this point, you should have your SD card plugged into your computer.
You need to click the “Select target” button to proceed with the flashing process.
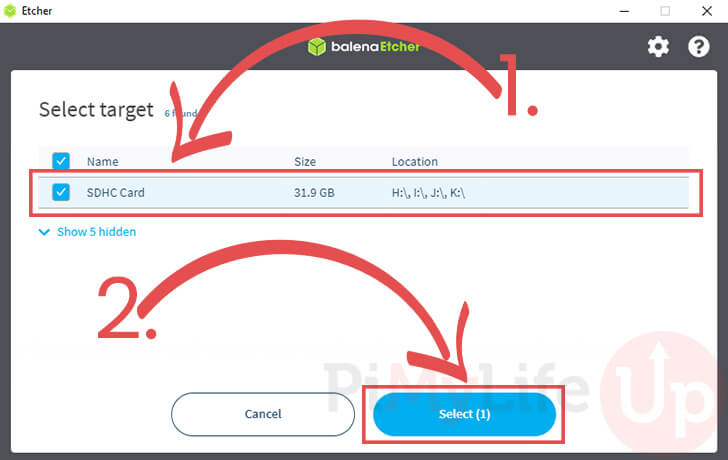
3. Using this menu, you need to identify and select the drive you want to write the image to (1.).
Once you have your SD Card selected, you need to click the “Select” button (2.).
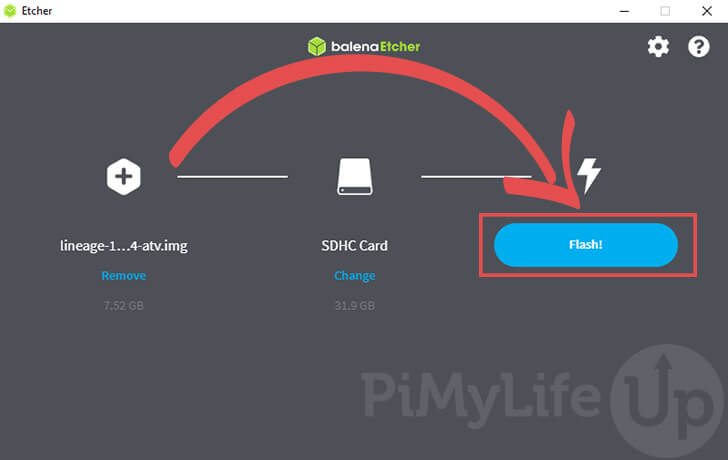
4. Finally, with both the drive and image selected, we can start the flashing process.
All you need to do to start the process is click the “Flash!” button.
5. Once the Android TV OS has been flashed to your Raspberry Pi’s SD card, you can plug it back in and turn the Pi on.
In the next section, we will walk you through the initial setup experience.
First Setup Experience of Android TV on the Raspberry Pi
When you first start up Android TV on your Raspberry Pi, you will need to do some initial setup steps.
The following guide will walk you through these steps so that you can get up and running in no time.
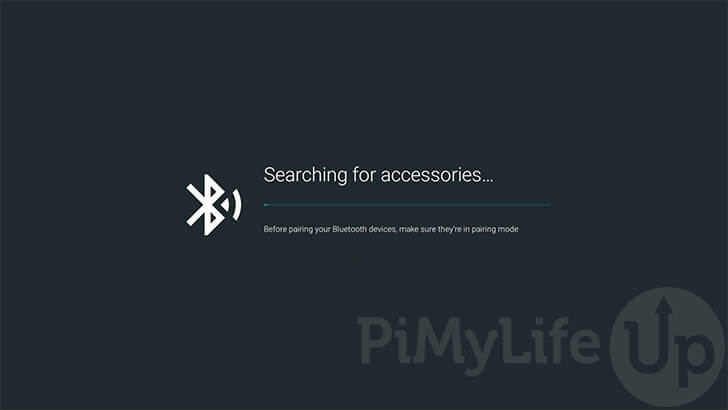
1. The first screen that you will see is one saying that the Android TV OS is searching for accessories.
It can take a little while for the Raspberry Pi to finish this process, so please be patient.
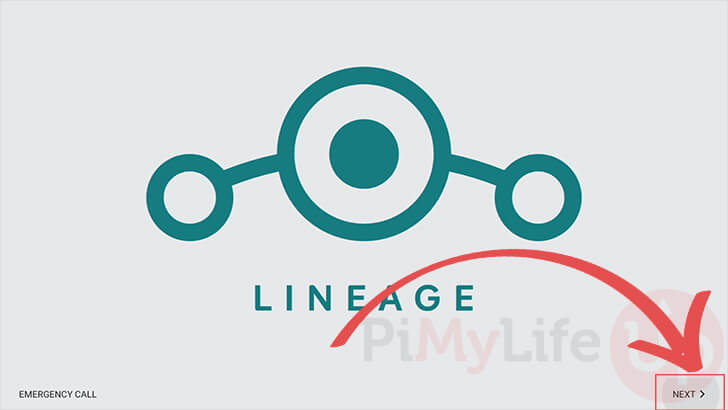
2. Once the searching process completes, you will be greeted by the initial welcome screen of LineageOS.
You can begin the setup process of Android TV on your Raspberry Pi by clicking the “Next >” button.
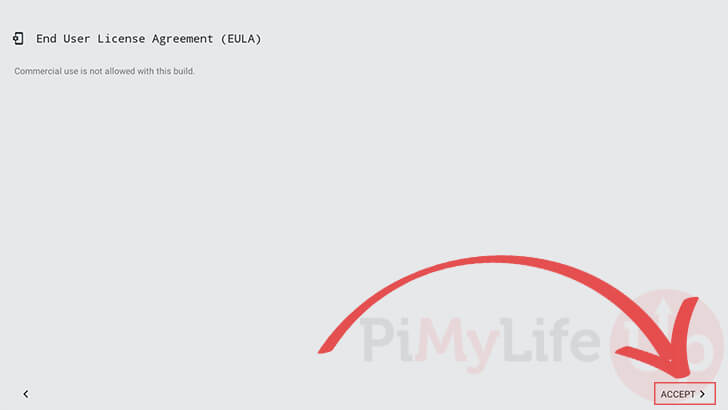
2. This build of Android TV for the Raspberry Pi comes with a EULA that prevents commercial use.
To proceed, you need to accept these conditions by clicking the “ACCEPT >” button.
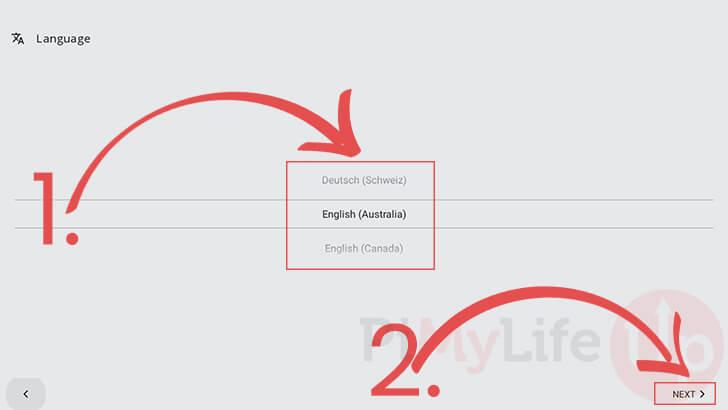
3. We are finally at the first setting that you will need to define, which is an important one.
Use the select wheel in the middle of the screen to find and choose your native language (1.). For our example, we will be sticking with English.
When you have your language selected, click the “Next >” button (2.) to continue.
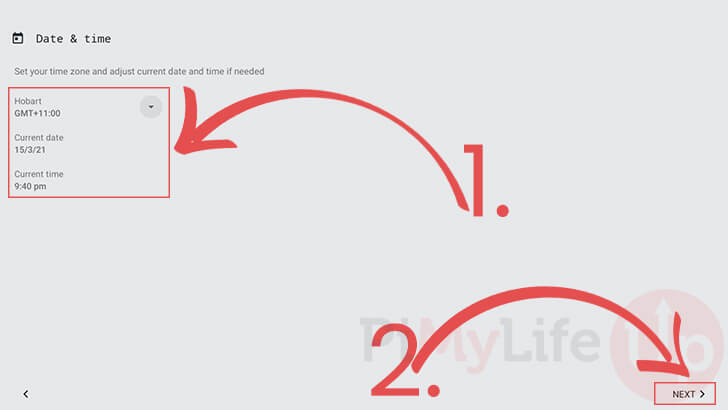
4. You can now adjust the date and time settings for Android TV running on your Raspberry Pi.
If you have an ethernet connection, the Raspberry Pi may have already synchronized the time and date. However, in our case, the time zone was wrong, so we set that to “GMT+11:00“
Use the three options on the left hand of the screen to make sure the time and date is correct (1.).
Once you have verified all three values, click the “Next >” button (2.) to confirm the settings.
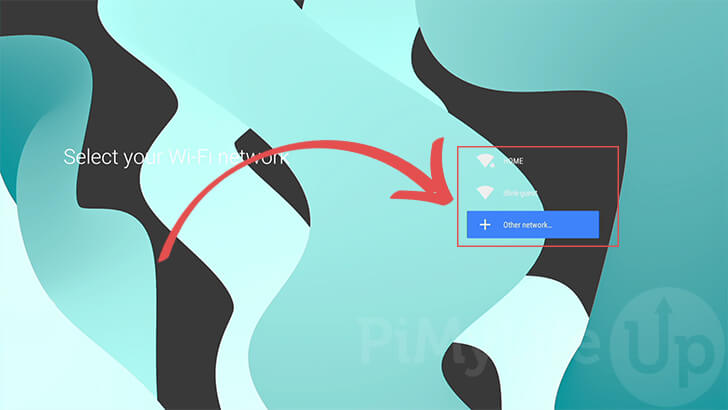
5. At this point, you will be greeted with two possible screens.
The Android TV operating system will try to detect if your Raspberry Pi has an Ethernet connection automatically. If it does, Android TV will show you a screen that allows you to proceed without issue.
If you rely on a Wi-Fi internet connection, you will be greeted with the screen we have below. Use this dialog to choose your Wi-Fi network and connect to it.
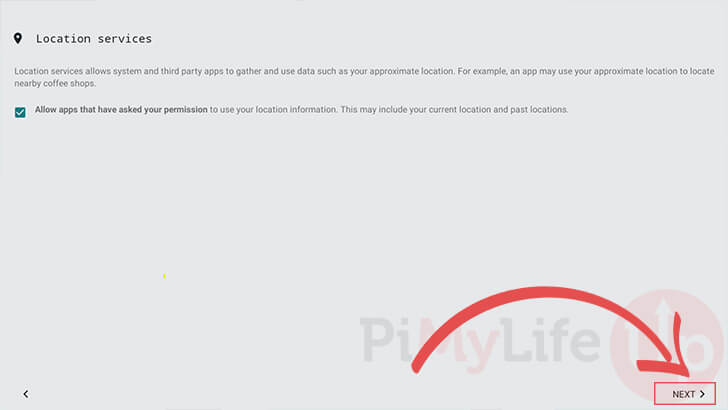
6. This screen will allow you to control the location services that LineageOS makes available to applications.
If you want to outright block any apps from ever using your location, you can use this setting.
Once you have made your choice, click the “Next >” button to confirm it.
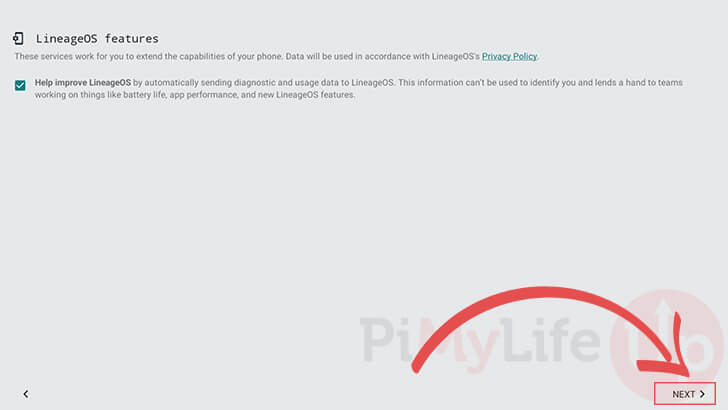
7. We are also able to switch off certain features of LineageOS.
The only one currently shown within this interface is LineageOS’s diagnostic and usage data. By default, the operating system will automatically report back information to improve the Android TV operating system.
You can disable this if you would prefer no data being sent back to the team.
With this setting enabled, or disabled, click the “Next >” button to proceed.
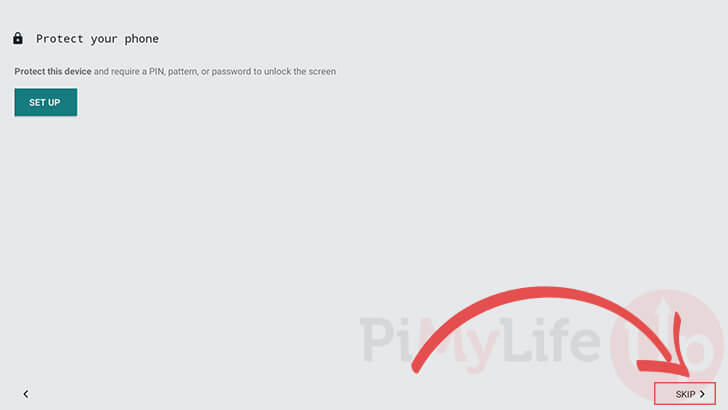
8. You can also set a PIN to protect your device from unwanted access.
To use Android TV on your Raspberry Pi, the user will have to enter the provided password, PIN, or pattern.
As we aren’t too worried about access, we clicked the “SKIP >” button in the bottom right.
9. The last thing you will be asked is if you want to restore your apps and data.
If you have a previous LineageOS backup, you can click the “RESTORE FROM BACKUP” button to start the restoration process.
Alternatively, you can finish the Android TV setup experience by clicking the “SKIP >” button.
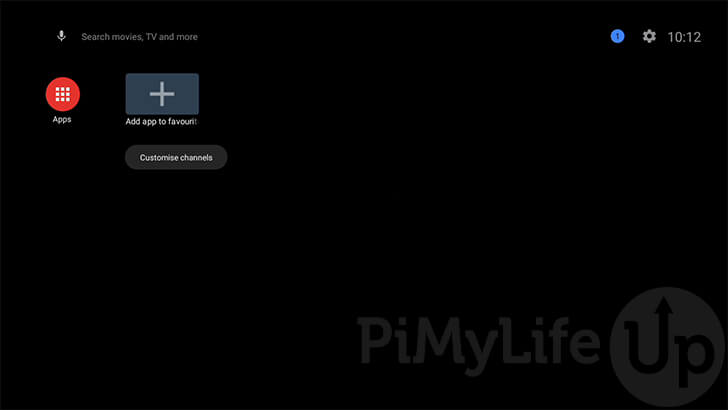
10. At this point, you should now have Android TV up and running on your Raspberry Pi.
You will notice that the interface is almost empty at the moment. This is because most of Android TV’s services are provided through Google’s apps.
Don’t worry, installing the Google Apps is not that complicated of a process.
Recovery Mode on Android TV
At the moment, our setup of Android TV on the Raspberry Pi is looking a bit barebones.
To get around this and to install extra packages like the Google Apps, we will need to make use of the built-in recovery mode.
The recovery mode is helpful for sideloading system applications as well as expanding the filesystem.
Enabling Developer Mode
To access the recovery mode of Android TV on our Raspberry Pi, we will need to activate the developer mode.
The developer mode allows us to change more advanced options that are usually hidden within the interface.
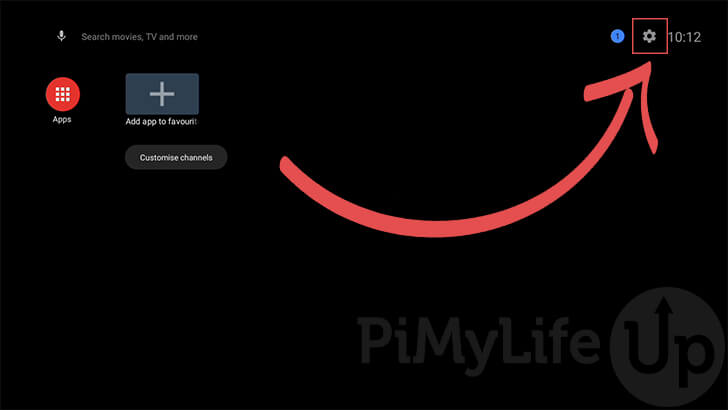
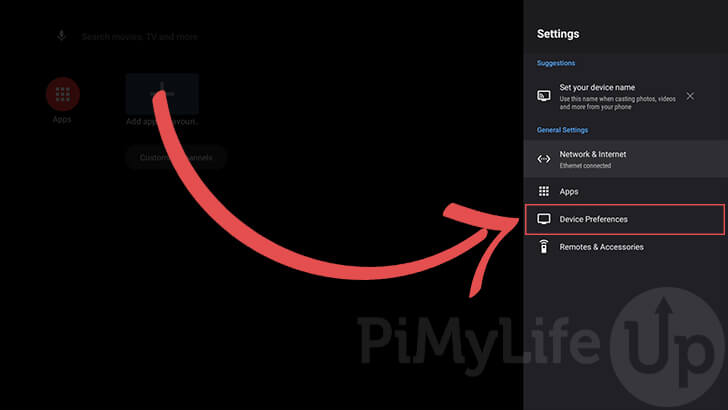
1. To get started, we need to open up the settings interface of Android TV.
You can access this by clicking the cog that is located on the top right of the screen.
2. A menu should now have popped up on the right side of your screen.
To proceed, you need to click the “Device Preferences” option.
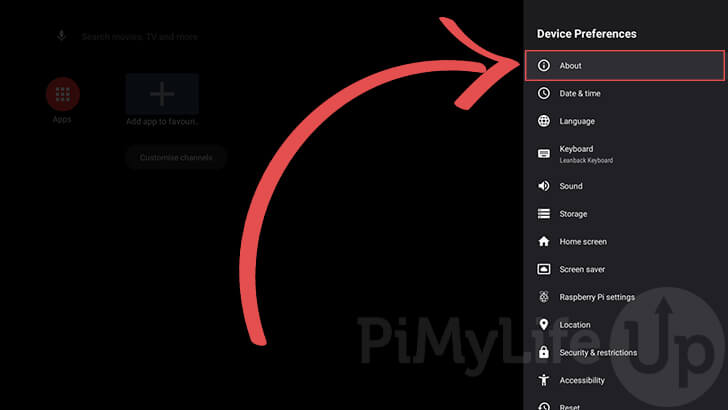
3. Within the device preferences screen, you should see a heap of different submenus.
Find the “About” option at the top of the page and click it.
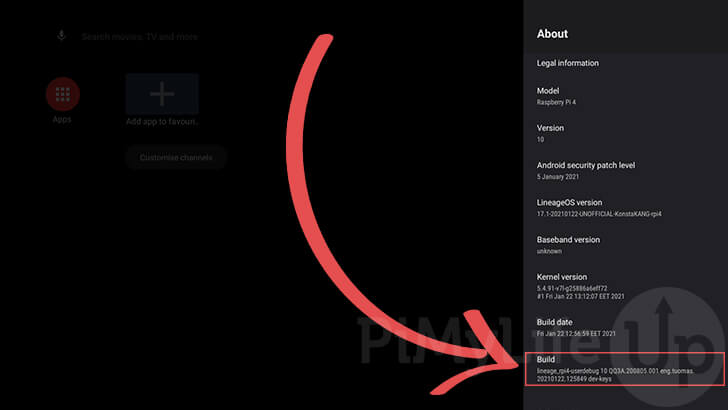
4. Scroll down the side menu until you find the option labeled “Build“.
You will need to click this option six times to activate developer mode.
Once the mode has been activated, you should see a message appear on the screen notifying you that developer mode is now active.
Turning on Advanced Reboot
With the developer mode active, we can enable the advanced reboot feature of this Android TV build for the Raspberry Pi.
This feature will allow us to boot directly into recovery mode without relying on using the terminal.
1. We need to return to the “Device Preferences” options page.
If you are on the about page from the previous section still, you can press the F2 key to go back.
2. Once you are back in the “Device Preferences” menu, look for the “Developer options” menu.
Once you find this menu you need to click it.
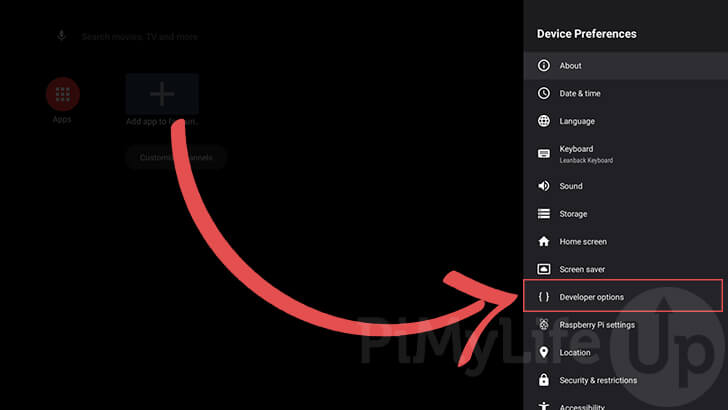
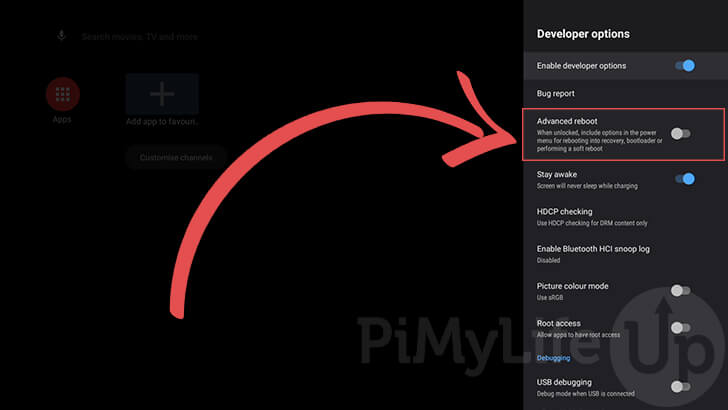
3. You should now be in the “Developer options” menu.
You will see a list of advanced features, but the one we are after is called “Advanced reboot“.
Once you find this option, you need to toggle it on by clicking it. The toggle should turn a blue color once it has been successfully enabled.
Rebooting into Recovery Mode
With both the developer mode and advanced reboot options enabled, we can finally boot into recovery mode.
The process of booting your Raspberry Pi into Android TV’s recovery mode is straightforward now that those options have been enabled.
1. We need to return to the “Device Preferences” menu.
If you are still in the “Developer options” menu, you can go back to this menu by pressing the F2 key.
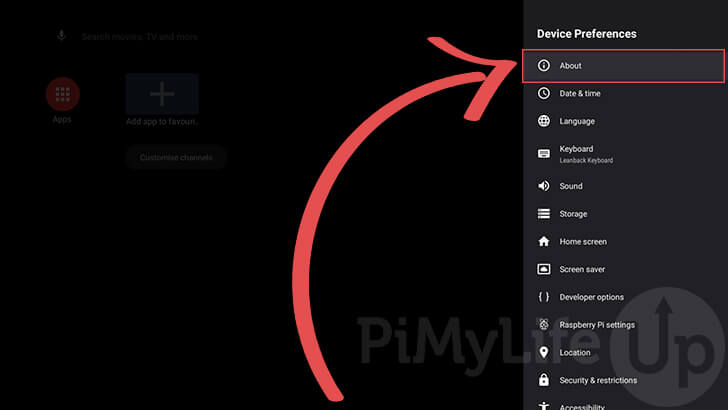
2. Once you are back in the “Device Preferences” menu, you can safely proceed.
Find and click the “About” option that you should locate at the top of the sidebar.
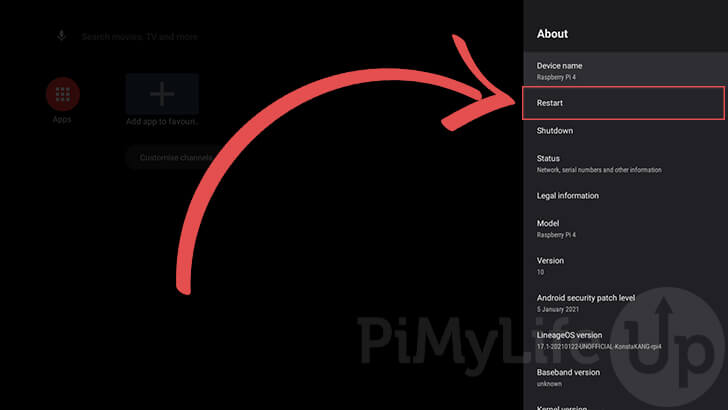
3. Within the “About” menu, you should see the “Restart” option.
You need to click this option as it is what will allow us to reboot into recovery mode.
4. Thanks to us enabling the “Advanced reboot” option earlier, you should have some additional options on this page.
Find and click the recovery option to boot your Android TV device into recovery mode.
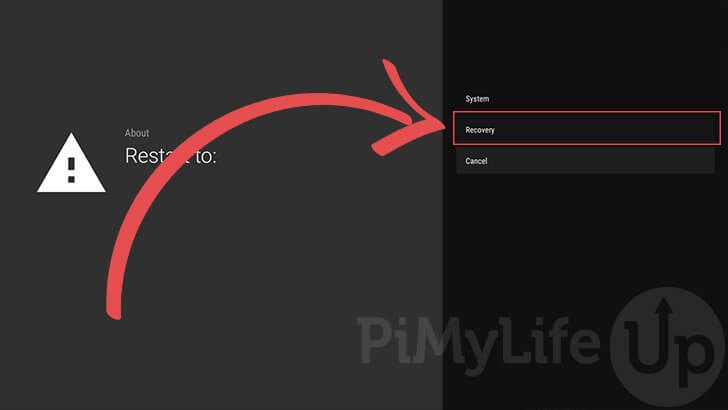
Please note, before rebooting, make sure you have the USB with the files you want to flash plugged into your Raspberry Pi.
Running GApps on Android TV with the Raspberry Pi
Now that you have recovery mode enabled on your Raspberry Pi’s Android TV installation, we can get the Google Apps installed.
We will split this into two sections. One that covers installing the GApps package itself, and another shows you how to complete the initial setup experience.
Installing GApps using Recovery Mode
At this point, you should now be booted into your Raspberry Pi’s recovery mode for Android TV.
Using this recovery mode, we will install the Google Apps to your Android TV installation.
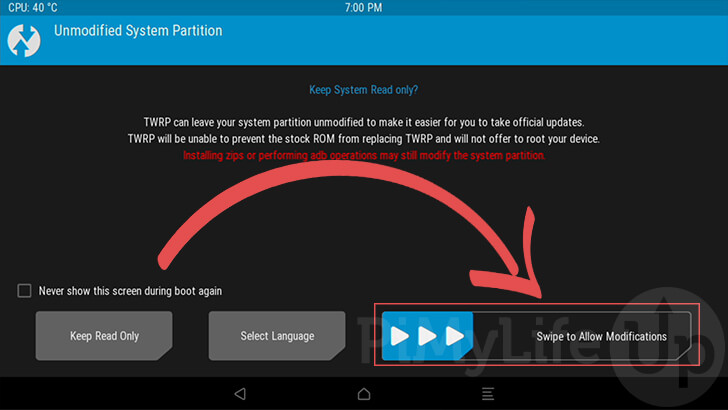
1. As installing the GApps changes the system partition, we will need to allow it to modify the system partition.
You can do this by swiping the “Swipe to Allow Modifications” option to the right.
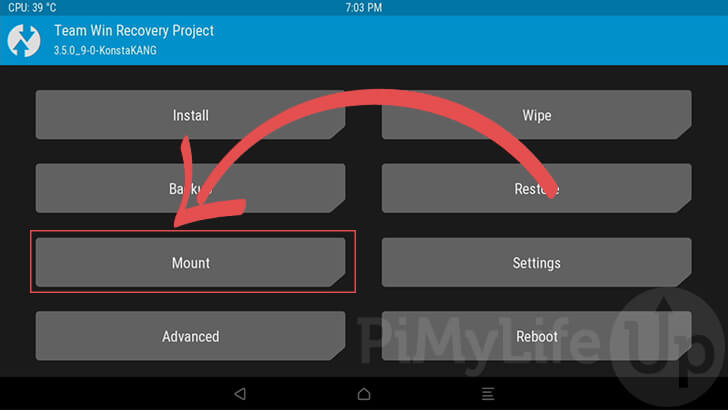
2. We will now need to make sure we have everything mounted so that GApps can be installed.
To do this, we will need to switch to the mount menu by clicking the “Mount” option.
3. Within this menu, there are four partitions that you need to make sure are selected (1.). Boot, System, Data, and USB should all have their checkboxes ticked.
Once you have all the correct options selected, click the “Select Storage” button (2.).
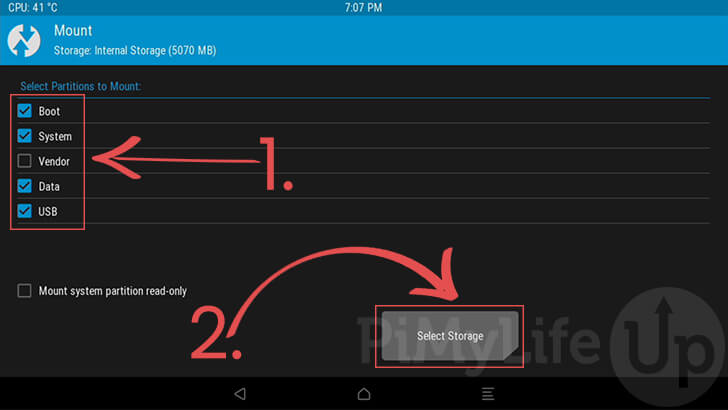
4. Within this dialog box, ensure that your USB storage has been selected and not the internal storage (1.).
If you have the USB option selected, click the “OK” button to proceed.

5. Now, return to the main menu of the recovery tool.
The easiest way to do this is to click the home icon at the bottom of the screen.

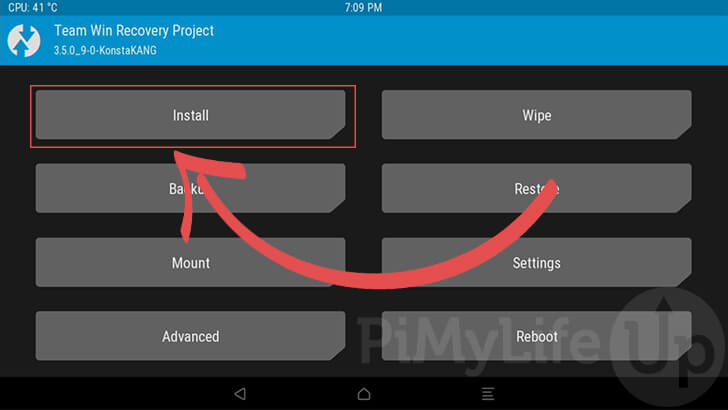
6. Now click the “Install” menu option.
This option should be the one located in the top right.
7. You should now see a list of all the files on your USB.
Within this list, look for the “open_gapps” Zip file and click it to begin the install process.
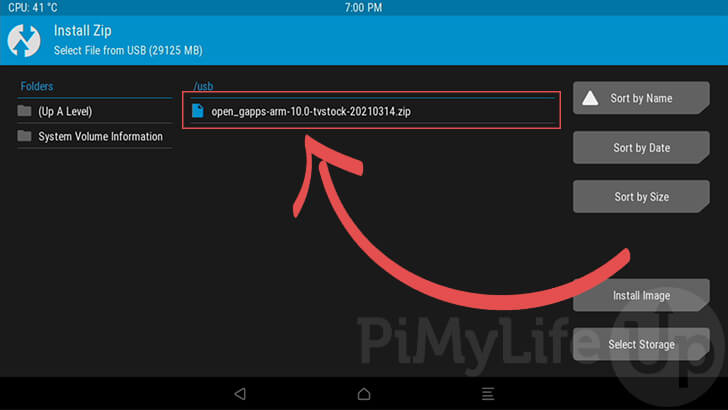
If you don’t see the ZIP file on your USB device, you may have to restart your device, then boot back into recovery mode.
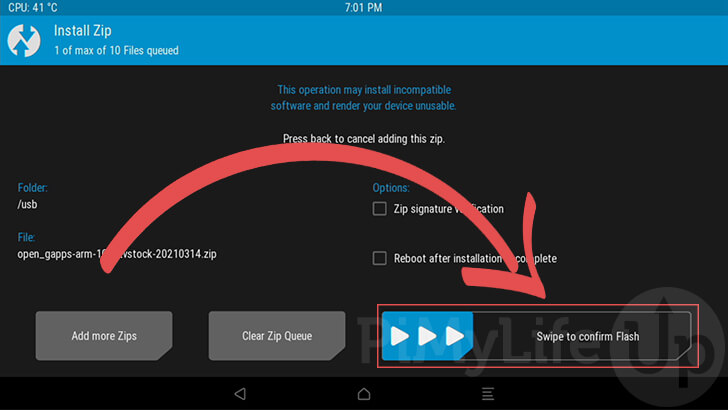
7. To flash the GApps to your Raspberry Pi’s Android TV system, you need to swipe the bottom-right option.
After you swipe this option, the recovery tool will begin to flash the Google apps to your device.
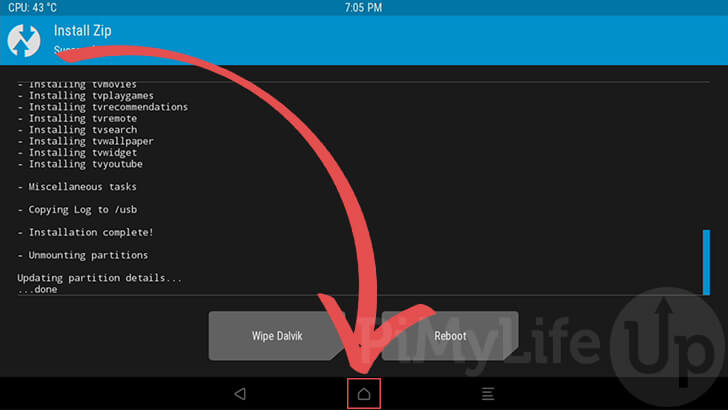
8. Once the GApps has been written to the Android TV operating system, we need to return to the homepage.
You can go back to the home menu by clicking the home icon at the bottom of the screen.
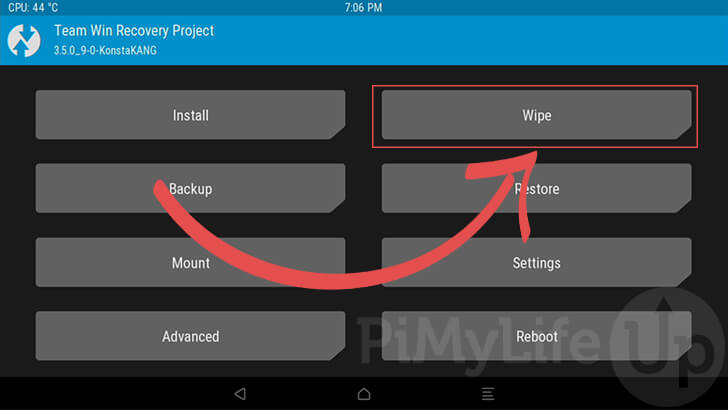
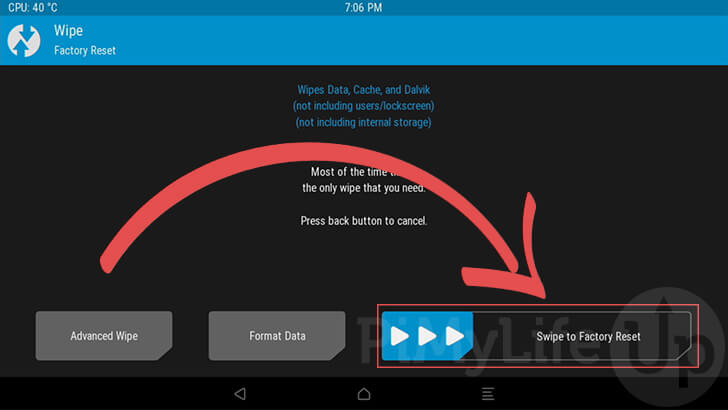
9. We are almost done. The last thing we need to do is perform a factory reset on the device.
Within the home menu, click the “Wipe” option located on the screen’s top right.
10. Now, swipe the “Swipe to Factory Reset” option.
Swiping this option will wipe your data, cache, and dalvik files. Not doing this can lead to issues with running the Google Apps.
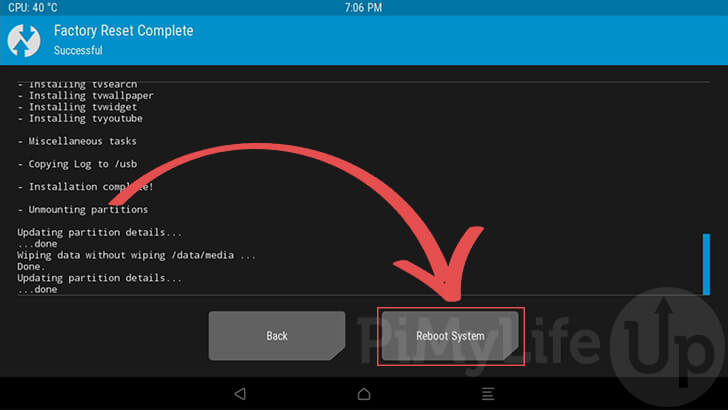
11. Once the Raspberry Pi finishes wiping the required files, you can boot back into Android TV.
All you need to do to reboot into the normal operating system is click the “Reboot” button.
First Boot of Android TV with GApps
When you first start up your Raspberry Pi after installing the Google Apps to Android TV, you will need to complete a few steps.
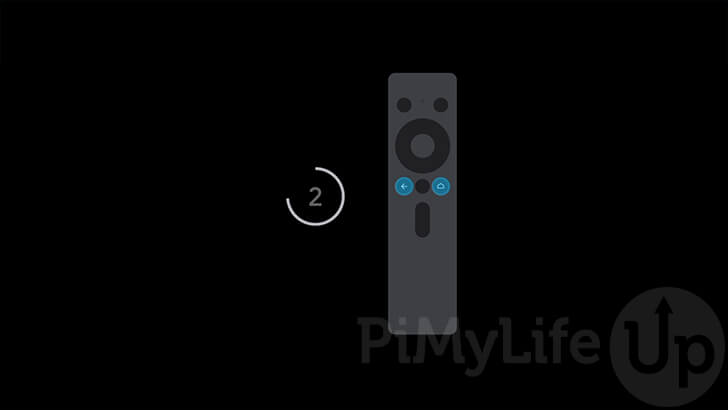
1. The first screen will have a picture of a remote and a countdown timer.
You should be able to press the F1 key to skip past this screen.
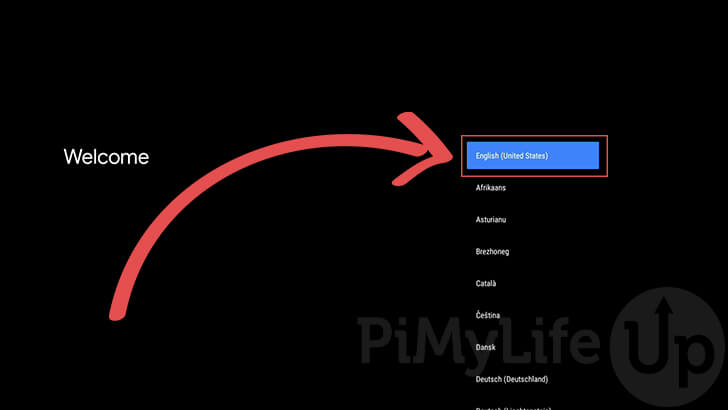
2. Next, you need to select the language you want to use for the Google Apps.
Scroll through this menu until you find the correct language.
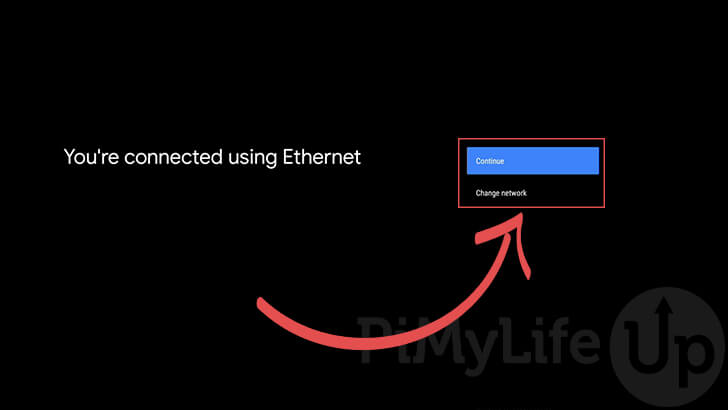
3. At this point, you will be asked to connect to your network.
We were already connected using ethernet, but you can also use this interface to connect to a Wi-Fi network.
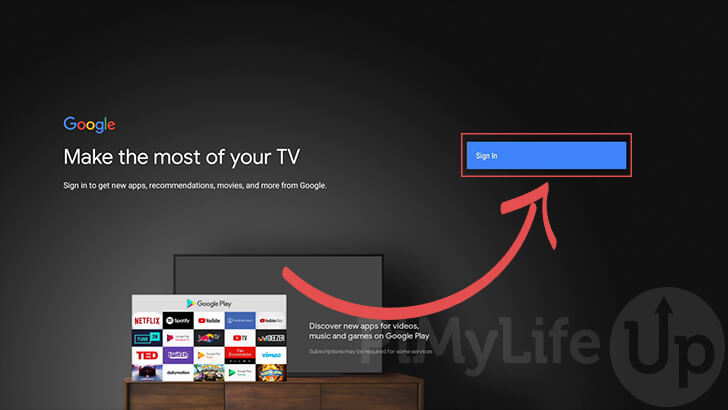
4. You will now be required to login to your Google account.
You can begin the login process by clicking the “Sign In” button.
5. You can choose the method that you want to use to login to your Google account.
We had issues with the “use your phone or computer” method, but it is still worth trying as it is typically faster.
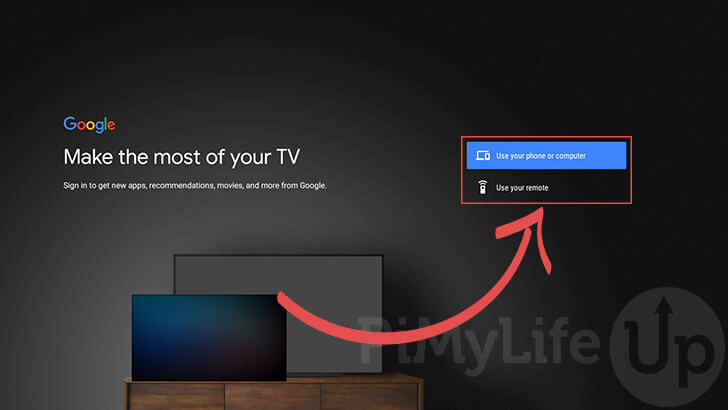
Follow the following prompts to login to your Google account.
6. After logging in, you will need to agree to Google terms of service.
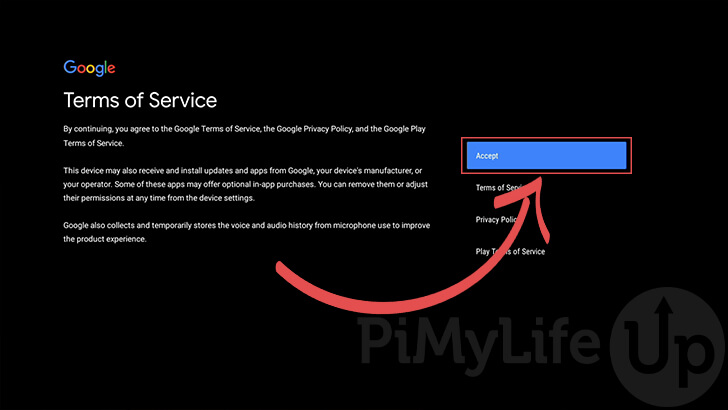
You can use this screen to read each of the three terms. Once you are done, you can click the “Accept” button to agree to the terms.
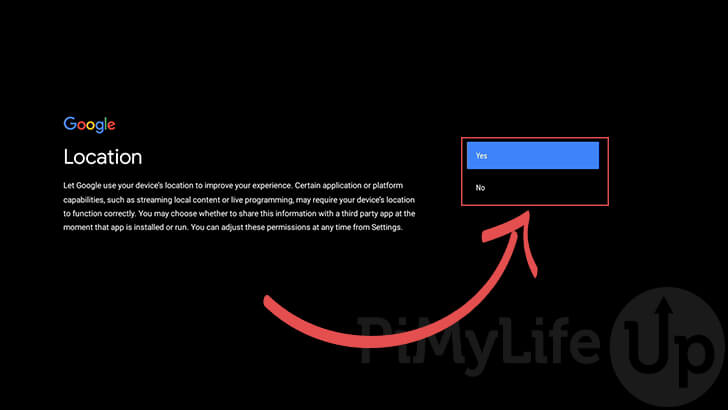
7. Google will also want you to choose whether they can use your location.
Either select the Yes or No option to finish up the setup process.
8. You will be welcomed to your Android TV-powered Raspberry Pi.
You can click to move to the next part of the slide.

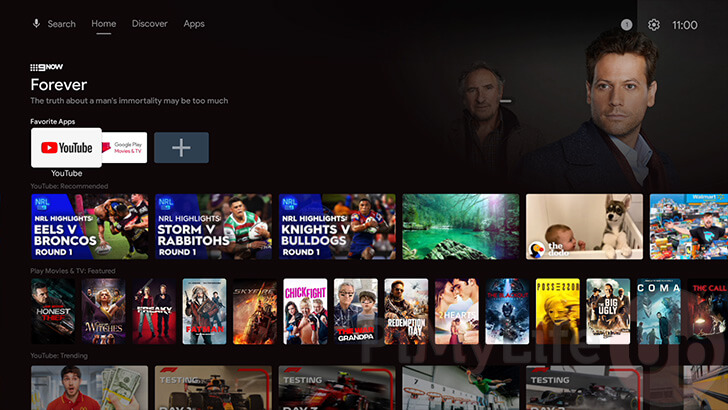
9. Finally, you will now have Android up and running on your Raspberry Pi with the Google Apps.
You should now see that the interface has been populated with data from Google’s services.
Expanding the Data Partition for Android TV on your Raspberry Pi
By default, when you install Android TV on your Raspberry Pi, it will not use up the full size of your SD Card.
Thanks to KonstaKANG, there is a way around this by flashing a special package they have written using the recovery mode.
If you appreciate their work, consider donating through their website, as this tutorial wouldn’t be possible otherwise.
There are two main things this package contains. First is a compiled version of fdisk for ARM. This binary is used to calculate the size of the storage device.
The other is a batch script that handles the whole process. The script will detect the required size needed for the partitions then automatically resize them to fill out the entirety of your SD card.
1. First, you need to download the resize package for Android TV.
Once downloaded, you need to copy it over to a USB drive, then plug that drive into your Raspberry Pi.
2. Your next step is to get back into recovery mode.
If you have just installed the GApps package, that means you will have to follow all of the steps in the “Recovery Mode on Android TV” section.
3. Once you have booted back into the recovery mode, you can proceed.
As we need to flash this package, we will need to click the “Install” menu option.
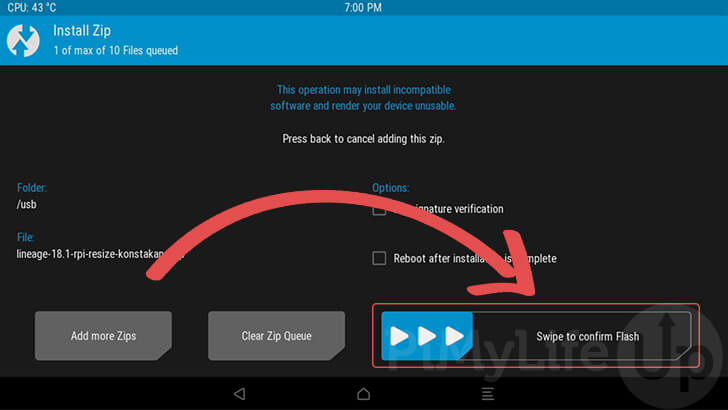
4. Within the file list on this page, find the package called “lineage-18.1-rpi-resize-konstakang.zip
Once you have found it, click the file to begin the installation process.

5. You will have one last final chance not to run the resizing script.
Swipe the toggle in the bottom right-hand corner to begin the resizing process.
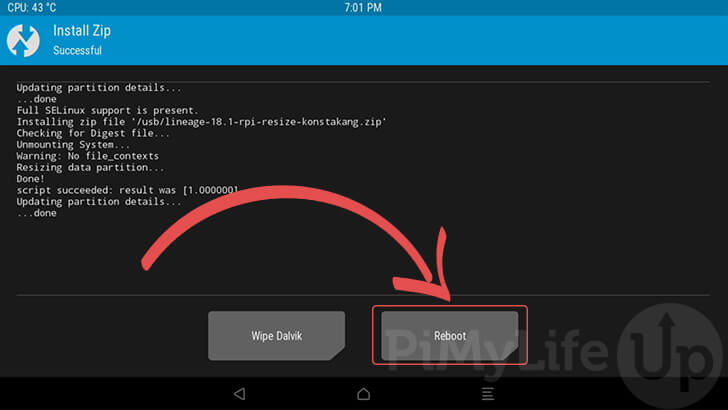
6. Once the script has finished resizing the data partition to fill out the SD card, you can reboot your device.
To do this, all you need to do is click the “Reboot” button.
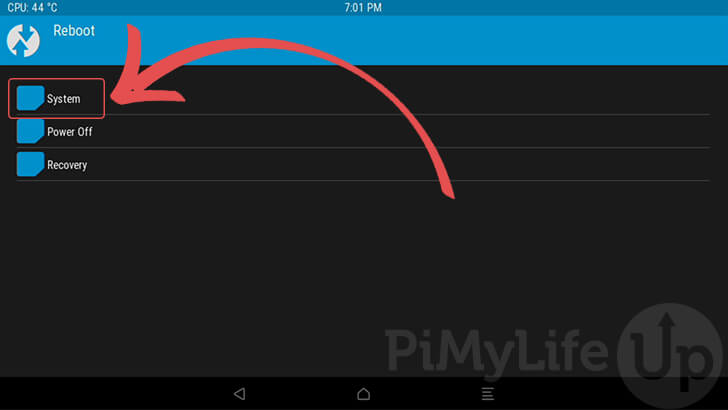
7. When rebooting your device, you may be given a few options.
To get back into your Android TV powered Raspberry Pi, click the “System” option.
8. Once your Raspberry Pi finishes rebooting, you should now have access to the entirety of your SD card’s space.
Conclusion
Hopefully, this guide will have shown you how to install and set up Android TV on a Raspberry Pi.
Android TV is a version of the Android operating system that has been optimized for TVs. It uses a different interface and allows apps to target a different form factor easily.
To make your life easier when using this operating system, there are a couple of key binds you might want to remember.
F1 = Home, F2 = Back, F3 = Multi-tasking, F4 = Menu, F5 = Power, F11 = Volume Down, and F12 = Volume Up.
We have also walked you through the steps to enable the recovery menu and install the Google Apps.
If you have had any issues with installing Android TV, please leave a comment below.
You can also check out some of the other operating systems that you can run on the Raspberry Pi.

Hi, thanks for this information. I have the problem that with Open Gapps cant find Netflix app.
Hi Emma,
Netflix actively blocks installation of their app on non certified devices. You will have to work around this by sideloading the Netflix app.
Cheers,
Emmet
Thank you for this tutorial. It was very helpful. I just have one question: I used a P400 and I’m not getting any sound. Could it be because of the MicroHDMI to HDMI cable? Is there any hints you can give me? Not super importnat, I will keep toying with it and see if I can figure it out.
Thanks gain for this.
You can disregard this. I figured it out. The volume of the TV was fine. It was the volume setting of Android that were too low. Pressing F12 a few times fixed that.
Cheers.
P.
Is it possible to have a monitor without a touchscreen on recovery mode?
Hi PiStream,
Yes of course! We have ran this tutorial without using a touch screen several times.
Just use a mouse instead. Where it asks to “touch / swipe” just use your mouse.
Cheers,
Emmet
Thanks alot. It worked perfectly well even with new builts.lineage-18.1-20210720-UNOFFICIAL-KonstaKANG-rpi4-atv,open_gapps-arm-11.0-tvstock-20210130-TEST.
Your website is too good.
Thanks for the tutorial! A couple of notes that may help some users:
– Yes, both a mouse and keyboard is needed to follow most of these steps.
– If you’re having pairing issues on the initial Bluetooth Devices search, press back [F2 on your keyboard] to exit the search. In my case, this issue only appeared during the initial setup. Once setup was completed, I went to Settings and paired my keyboards with no issues.
– If your screen goes black after Step 9 of the setup, you may want to wait 1-2 minutes. I was about to unplug my Pi, but then the homescreen appeared out of nowhere. For context, I used a Samsung 4K HDR TV to test this. If it still persists, a comment [posted by Jean] recommended deleting the resolution.txt file. Haven’t tried that myself though.
Thank you for the tutorial. I am having an issue where I cannot install OpenGapps – it says ‘corrupted zip file’ when I select it from the USB and attempt to flash it. I have tried multiple versions of OpenGapps, including the one you mentioned in the comments (tvstock-20210626.zip/download). Any advice? Thank you.
Hi Dan,
Have you tried using a different USB drive? Or tried downloading from a different mirror (Click the “Problems Downloading?” button on the download page to be able to select the mirror)
Either the zip file is somehow getting corrupted when your downloading it, or its getting corrupted on the USB somehow.
Cheers,
Emmet
Thank you a lot for you incredible job. Mostly for your upload of June 26th. I tried many times following the explanations of different post, but always I was stucked at this point. Finally I have been able to install Android TV.
Just one question. I have read in other posts that Pi4 of 4gb can only use 3gb of ram.
In your post, in “Downloading GApps for Android TV”, point 3. 4) there is the option to download ARM or ARM 64. It’s better to choose ARM 64?
Thank you in advance!
Hi Lluís,
The build of Android tv that we are using for the Raspberry Pi is compiled for 32-bit systems. Which means that we must use the 32bit version of the Google Apps.
The 3GB RAM limit is per application and not an overall system limitation. So one application can consume up to 3GB of RAM (A limitation of only having 32-bit support). But another program can still consume that remaining 1GB of memory.
Cheers,
Emmet
Thanks for this wonderful tutorial – I was able to get my RasPi set up with very little difficulty. I am curious – does this build of AndroidTV not have the “Ambient Mode” to allow slideshows from Google Photos, or is that a separate app I need to sideload?
same here, at 9 screen goes blank, have delete resolution.txt
Do I need a mouse to be able to use/navigate TWRP? Or can I just use a keyboard?
Hi Chewy,
From my understanding and from how I have used TWRP you are required to use a mouse to navigate it.
I will add a note to the section saying you will require a mouse to complete it.
Cheers,
Emmet
Really appreciate this guide. How long should the Gapps reboot take…I am seeing the linage loading screen (hill with a dot traveling right to left) for over 20 min now.
Thought maybe it was slow write to SD but this seems a bit excessive.
Hi Jontux,
This seems to be an issue a fair few people are running into.
I will hopefully get a chance to look into this over the next couple of days and provide a solution if I can replicate it.
Cheers,
Emmet
Hi JonTux,
After looking into this further there appears to be issues with the GApps build that is currently being recommended by their website.
I have updated the tutorial to recommend and link to a known good build (20210626) that I have personally tested.
You can find this build of the OpenGapps by going to the link I have provided below.
https://sourceforge.net/projects/opengapps/files/arm/20210626/open_gapps-arm-10.0-tvstock-20210626.zip/download
Let me know if this sorts out the issues you are running into as well.
Thank you for all your work. it’s been simple enough for me to follow all this steps, but after installing GApps, i’m stuck. After the reboot it won’t go pass the LIneageOS screen (doesn’t even show the LineageOS logo). I have a Raspberry PI 4b 4gb, and a Sandisk Ultra 128gb sdxc formated on Fat32. Do you have any ideas?
Hi Dino,
This is an issue caused by a bug in the current release of OpenGapps.
I have updated the tutorial to recommend downloading a known good release that I have tested to work correctly.
Cheers,
Emmet
Hmmm. Right after setting up the GApps, doing the wipe and rebooting to the system, I get stuck at the boot animation. No matter what I try, this is where I get stuck. Any ideas?
Hi P.Jay,
Sadly there is currently a bug in the release of OpenGapps that the website is recommending.
I’ve updated the guide to include a link to a known good release of the Gapps that worked fine on my Raspberry Pi 4.
Please let me know if this solves the issues you were facing.
Cheers,
Emmet
At several points in this sequence it is necessary to ‘swipe right’ to activate. But with no touchscreen, how do you swipe right from a keyboard and mouse?
Hi Ian,
You just need to click and drag the slider to the right.
Cheers,
Emmet
Thanks for the confirmation. It must be because I was using a combined keyboard and trackpad, works OK with a separate mouse.
Thank you for this awesome tutorial, I finally had my Pi 4 running androidtv!
Hi, thanks for your excellent guide. I have set up Android TV successfully on a Pi4. But I have a problem. It is unable to read the files in a USB drive. For example, VLC can’t see the video files in a USB drive formatted in FAT32.
Hi, navigate to Developer Options and look at the end of this menu to tick an option called +/- “Allow to use external storage” .
Does it work now ?
This also happen to me, but i wait for a minute or so then i displays the next step. U should be okay too.
After #9 screen goes black and the TV has no signal from HDMI.
No idea what to do if anyone has an idea let me know. Thanks.
It happened to me too. Probaly your TV is not FullHD, so just delete resolution.txt file from boot volume in your SD card.