In this quick tutorial, we will show you how to add a user to a group on Linux while using the terminal.
Every user on a Linux-based operating system can be a part of multiple groups. Most new users will be automatically added to a group that has the same name as their username.
These groups are a key component of how the permission system works on Linux. A file or folder can be set to give users who are a part of the owner’s group-specific permissions.
Linux even uses groups to handle group certain functions together. One such example of this is the superusers sudo group. Users added to the sudo group on Linux will be able to escalate to being a superuser without being the root user.
If you are a superuser, adding a user to a group on Linux is incredibly simple, especially if you are using the terminal.
If you happen to be following this guide on a system with a desktop interface, you can often bring up the terminal by use the CTRL + ALT + T keyboard shortcut.


Adding a User to a Group from the Linux Terminal
In this section, we will show you how easy it is to add a user to a group using the Linux terminal. In particular, we will be using the usermod command.
The usermod command is an incredibly powerful tool that allows you to modify various aspects of a user, including what groups a user is a part of.
With this command, there are two options that you will want to use to enable you to add your Linux user to a group.
-a: This first option is super important not to miss out on. It tells the usermod command that we want to add the user to an additional group without removing it from its existing set of groups.
If you forget this option, the usermod command will replace your user’s additional groups with the specified one. There is no warning about this, so ensure that the “-a” option is present.-G <GROUPS>: With this option, we can tell the command which groups to append to our users’ supplementary groups rather than replacing it.
Be careful to use an uppercase “G” when typing this out. A lowercase “g” will set your user’s main group reg.
The syntax for this command is as what we have shown below. The first thing you will specify after these options is the group (<GROUP>) that you want to add your user to.
The next thing you will need to fill out is the username (<USERNAME>) of the user you want to add this group to on Linux.
sudo usermod -a -G <GROUP> <USERNAME>CopyOne thing to note is that when you adjust a user’s groups, that user will need to either log back out and back in or have the system restarted for it to be aware of its new group.
Example of Adding a User to a Group
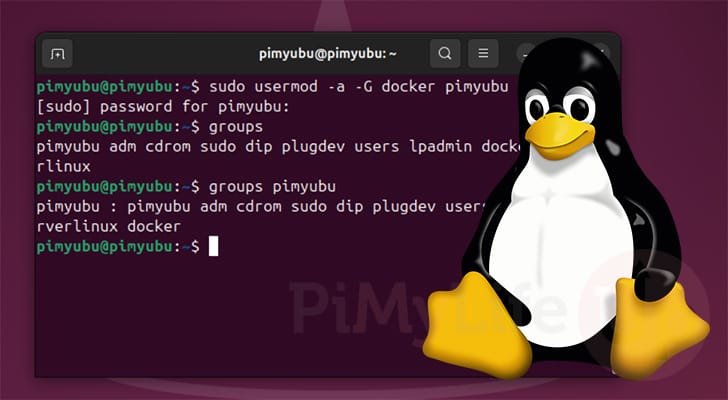
To give you an example of how you can add a user to a group on Linux, we will be adding our “pimyubu” user to the “docker” group. In this case, we want to add this group to our user so that we can interact with Docker without
1. To achieve this, we use “usermod“, followed by the “-a” and “-G” options. We then specify the “docker” group, and finally our users name “pimyubu“.
If everything worked, you won’t see anything output into the terminal.
sudo usermod -a -G docker pimyubuCopy2. To verify that you successfully added a group to your user, you can use the groups command. This command will output all groups to which your user has been added.
To get this to output your groups, simply type “groups” followed by your username. For example, we can use the command below to output the groups of our “pimyubu” user.
groups pimyubuCopyIf everything has worked correctly, you should see the group you added to your user listed here.
pimyubu : pimyubu adm dialout cdrom sudo audio video plugdev games users input render netdev spi i2c gpio dockerConclusion
If you have reached this point in the guide, you should now have a good idea of how to add a user to a group on Linux easily.
Groups are critical to how the Linux permission system works. Knowing how to add a user to a group is super important.
Please feel free to comment below if you have had any issues with adding your user to a group.
If you liked this quick guide, we recommend taking some time to explore our many other Linux tutorials.