In this guide, we will take you through the steps to install HACS (Home Assistant Community Store) to your Home Assistant installation.
The Home Assistant Community store or more commonly known as HACS is a powerful UI that you can add to your setup. Using the store, you can easily install custom third-party elements such as custom devices via integrations, themes, custom cards, and other Lovelace user interface elements.
You will likely need to install this add-on at some point, as plenty of smart devices are not supported by the official packages. However, I recommend learning more about Home Assistant before installing HACS.
This tutorial will go through all the methods to install HACS to your Home Assistant installation. You will need to be aware of the type of Home Assistant you are using as it will impact how you install HACS. We will explain this below.
If you need to install Home Assistant, we have a tutorial that will take you through how to install Home Assistant on the Raspberry Pi.
Installing HACS
Installing HACS is a straightforward task, but you will need to know the type of Home Assistant you use on your system. We will explain the difference between each version below. Once you are confident of the version you are using, follow the relevant instructions.
The most likely version you will be running is the Home Assistant operating system. This version is a minimal operating system that contains everything that you need. It allows the installation of add-ons. It is the recommended installation.
Home Assistant container is a container-based installation commonly used in applications such as docker. This version is slightly different and does not support add-ons.
Supervised and Core installations are typically done by experienced users, so you will likely know that you are running either of these setups. Core uses the Python Virtual Environment, and Supervised is simply a manual installation of the supervisor.
You can confirm the version you are using by navigating to the about page located within your Home Assistant installation. You may need to replace homeassistant.local with your server’s IP.
http://homeassistant.local:8123/config/infoOS or Supervised
If you are running either the OS or Supervised installation of Home Assistant, you can follow the instructions below. Please confirm you are running either of these installations before proceeding.
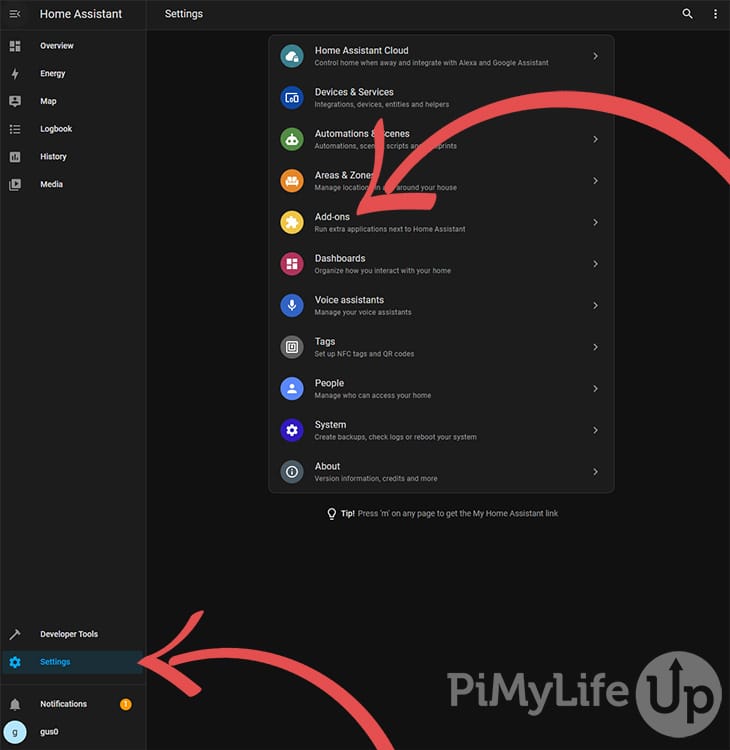
1. Click on the settings option on the sidebar inside your Home Assistant installation. On this page, click on Add-Ons. If you cannot find this setting, it is likely you do not have the correct installation for these instructions.
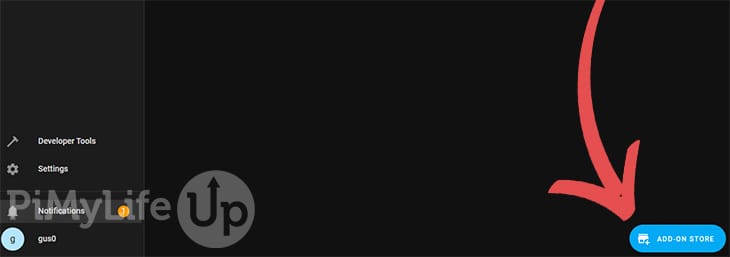
2. On this page, click on the add-on store button.
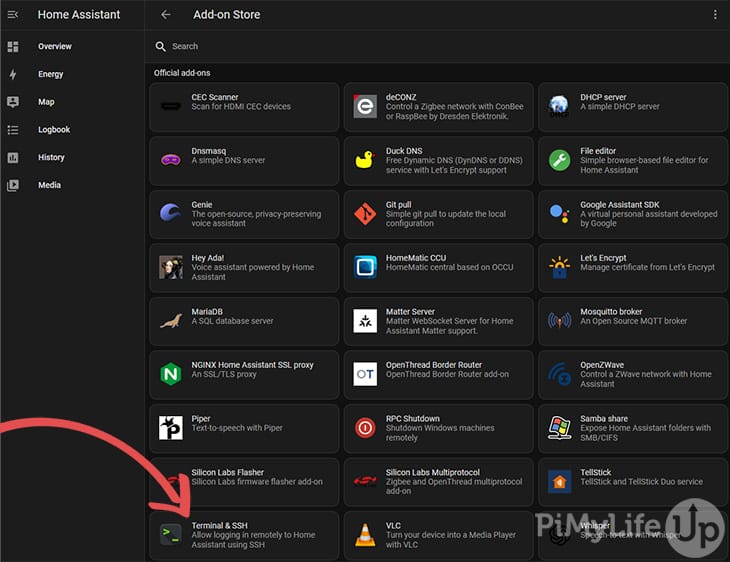
3. Inside the add-on store, locate Terminal & SSH inside the official add-ons section. If you cannot see it, go to your user profile page (click on your username in the sidebar) and turn on Advanced Mode.
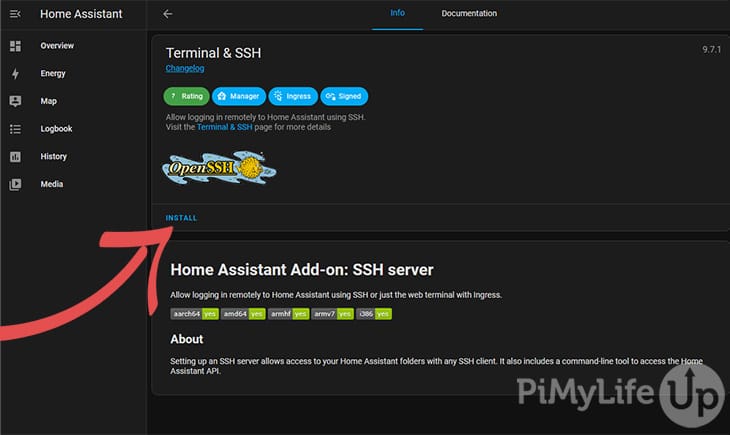
4. On the next page, click on install.
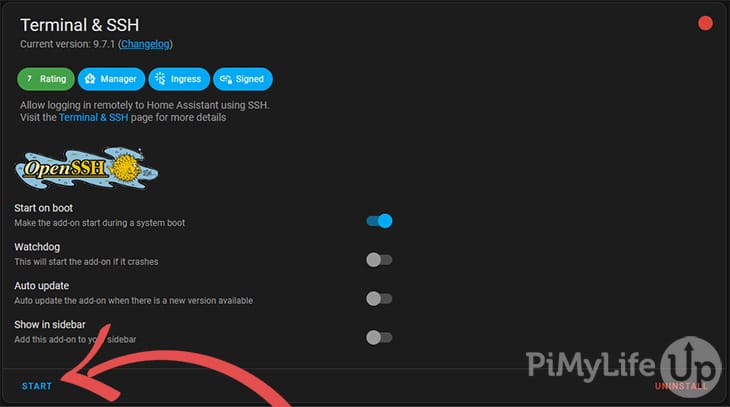
5. Once installed, you should now see a start button. Click on it.
4. Once the add-on has started, click on Open Web UI.
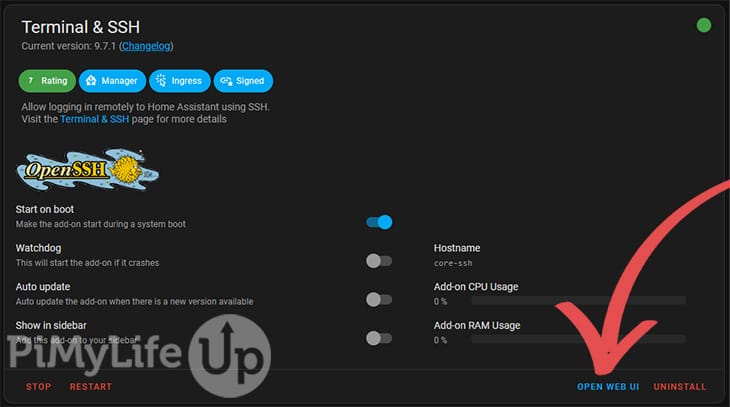
5. You should now see a terminal that accepts commands. Type the following command into the terminal and run it.
wget -O - https://get.hacs.xyz | bash -Copy6. Now that HACS installed, you can move on to the getting started section.
Container or Core
Installing HACS is slightly different if you run the container or core version. These versions typically do not support add-ons and are often referred to as non-supervised.
1. First, open a terminal on the computer running the non-supervised version of Home Assistant.
If you are running a docker container, you may need to run the following command to enter the Home Assistant docker. You do not need to do this if you are already inside your docker container.
docker exec -it homeassistant bashCopy2. Navigate to the home-assistant directory by entering the following change directory command. Replace {username} with the username of your user. You can use the ls command to see the different directories in the home directory.
cd /home/{username}/docker/home-assistantCopy3. Now run the following command to install HACS.
wget -O - https://get.hacs.xyz | bash -Copy4. Lastly, reboot the system to ensure the HACS is installed correctly.
sudo rebootCopy5. You can now move on to the getting started section. You should be able to skip step 1.
Using HACS
Using HACS is relatively straightforward, so it shouldn’t take very long to familiarise yourself with its processes and settings.
Getting Started
You will only need to do the following steps on a fresh installation of HACS.
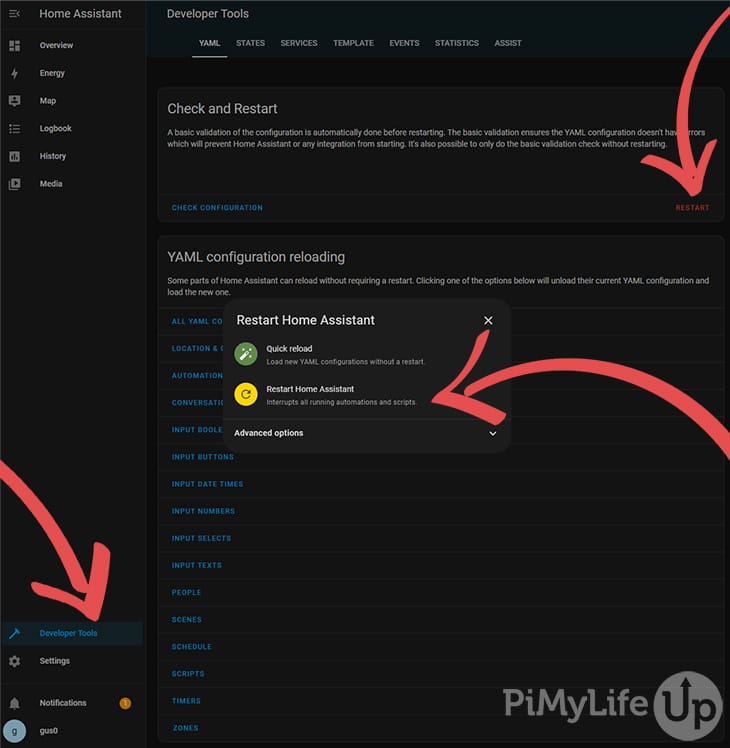
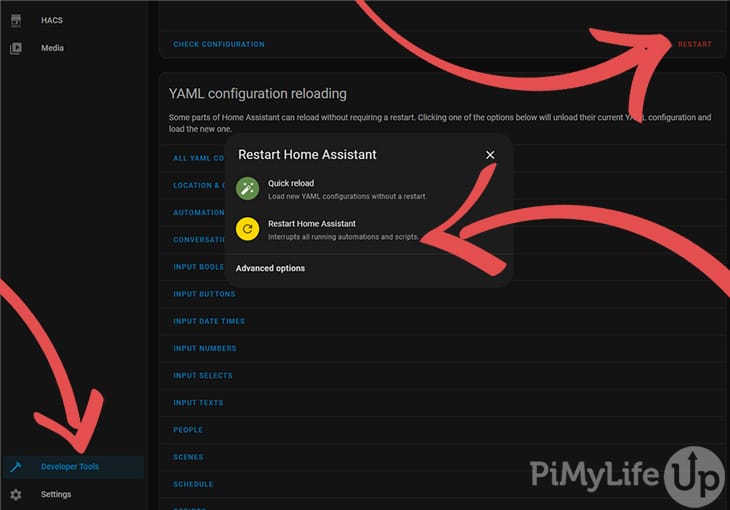
1. Click on developer tools in the sidebar of your Home Assistant installation. On this page, click on restart and select Restart Home Assistant.
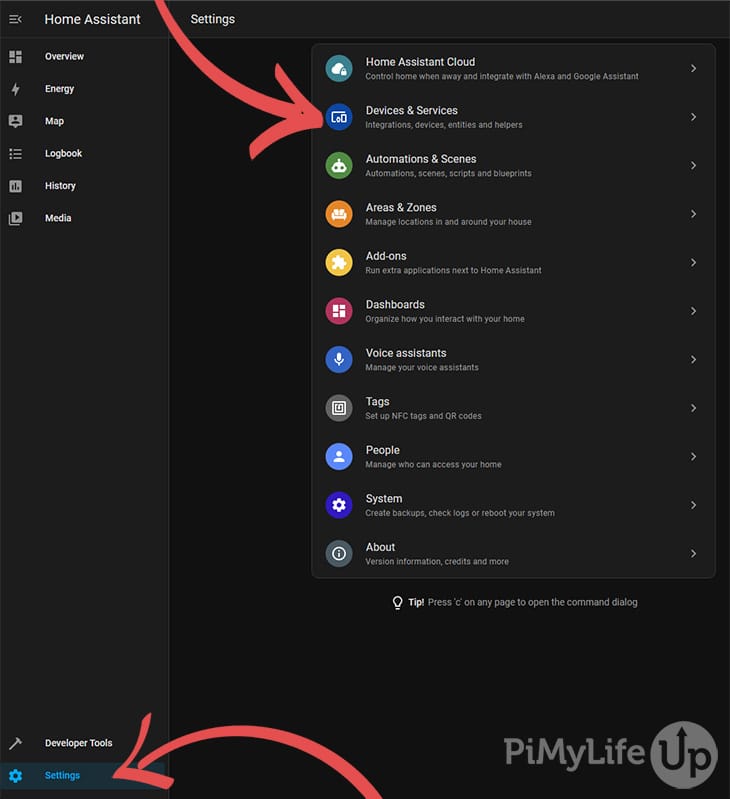
2. Once Home Assistant has restarted. Go to Settings and click on Devices and Services.
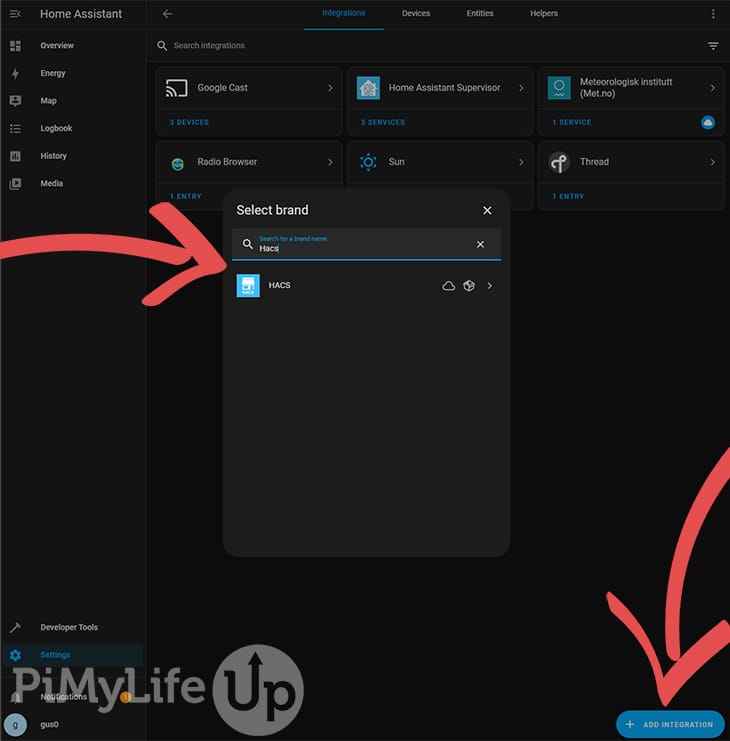
3. At the bottom of the screen, click on add Intergration. Inside the pop-up, search for HACS and click on it.
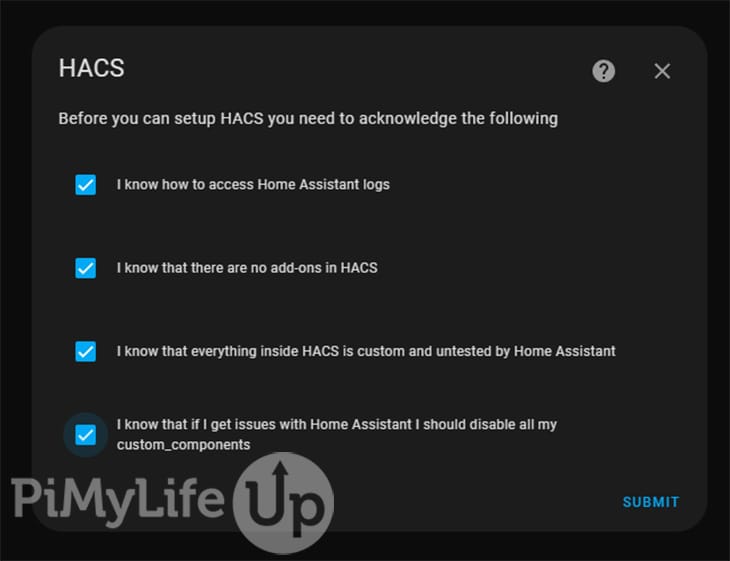
4. Tick all of the boxes. Make sure you understand each knowledge piece that you are ticking. Afterward, click on submit.
5. Next, you will need to authorize HACS to access GitHub. Simply follow the prompts on the screen.

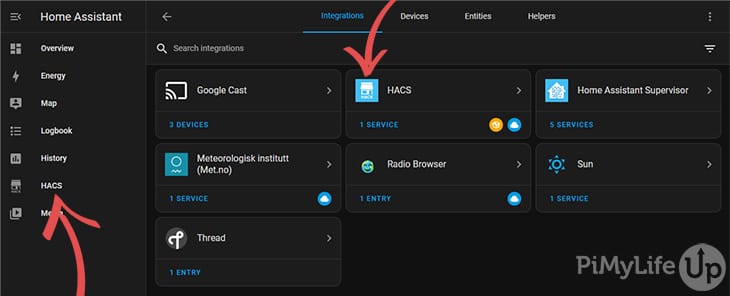
6. HACS should now be ready and viewable in the sidebar and the integrations page.
Installing Repositories
Installing repositories is very straightforward and is the perfect way of extending Home Assistants’ capabilities. The steps below will show you how to install an integration.
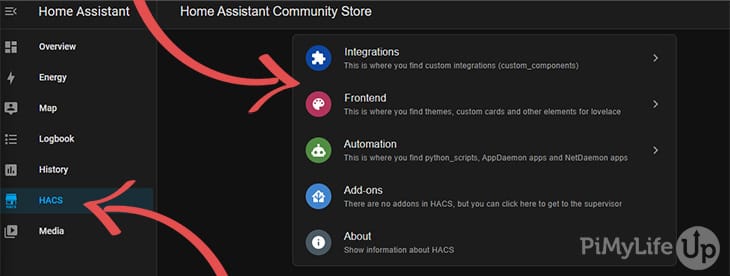
1. In the sidebar, click on HACS and select integrations on the next screen. If you want a custom frontend card or theme, select frontend instead.
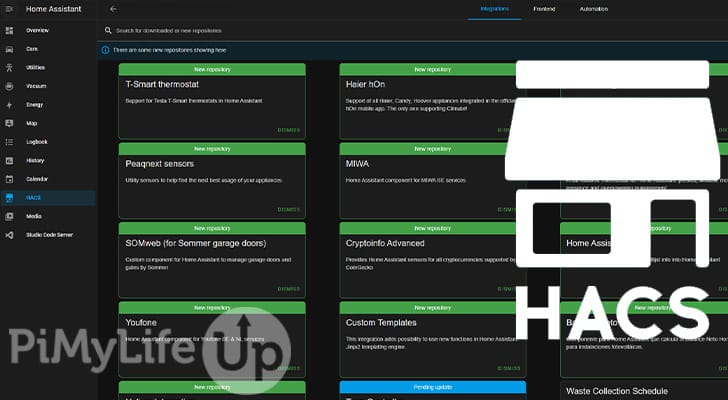
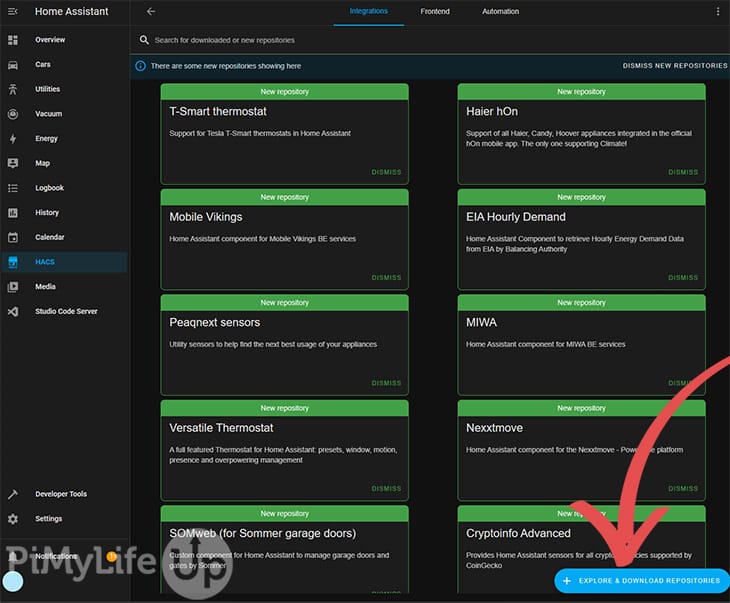
2. On this page, click on Explore & Download Repositories.
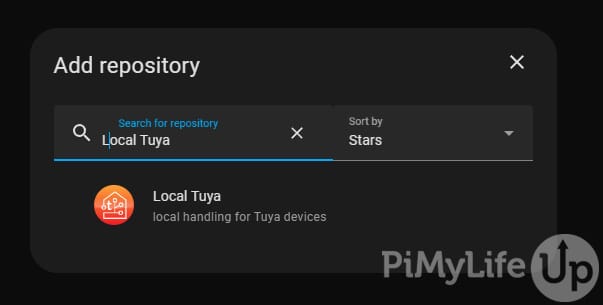
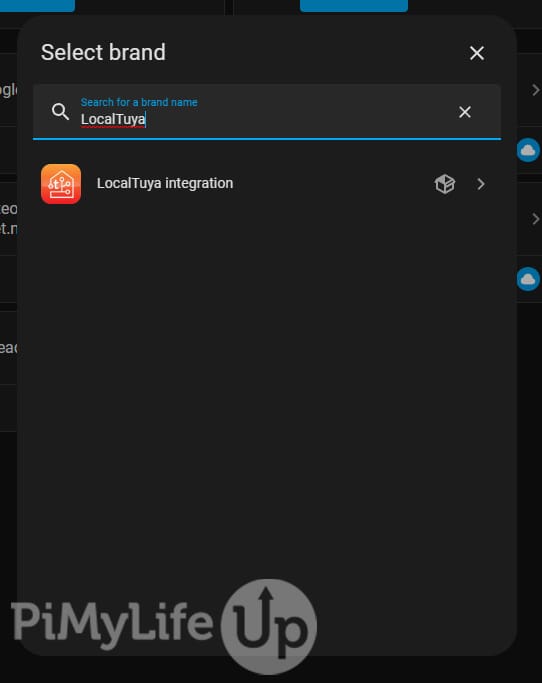
3. Inside the popup, search for the repository you wish to install. For example, Local Tuya is great for adding some Tuya devices to your Home Assistant.
4. The next screen will show you all the details for the repository. To proceed with installing the repository, click on the download button.
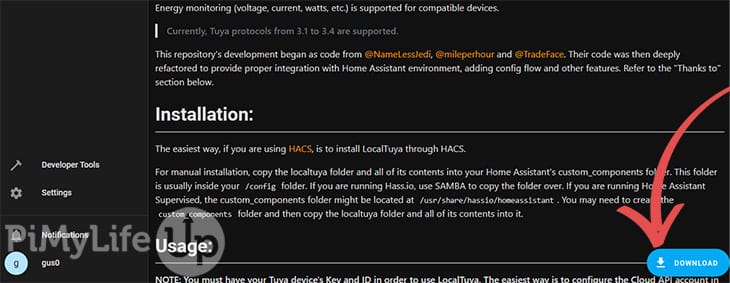
5. In the pop-up window, confirm the version you wish to install and click on download. It may take some time to download the repository.

6. Once the pop-up window has disappeared, you will likely need to restart Home Assistant to activate the integration. Navigate to Developer Tools and click on Restart. In the pop-up window, select Restart Home Assistant.
7. After Home Assistant restarts, go to Settings, then Devices and Services. On this page, click Add Integration and search for our newly added integration. In our case, it is Local Tuya. Follow the prompts to set up the integration.
You can repeat these steps for as many integrations as you want.
8. If you have found a repository, that is not included in the HACS library, you can install it using the custom method.
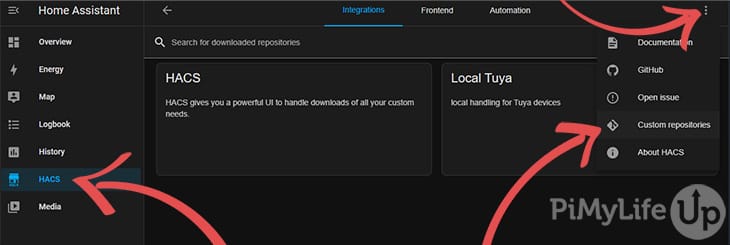
First, go to the HACS, then to integrations. On this page, click on the three dots in the screen’s top right corner and select Custom Repositories.
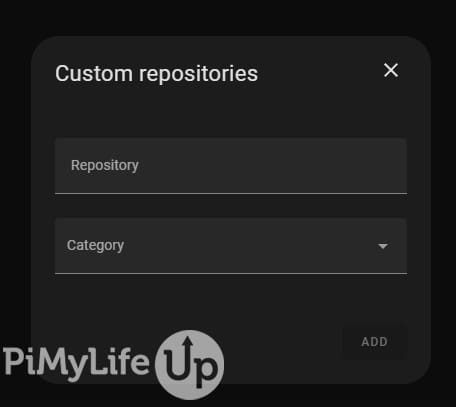
9. Inside the pop-up, add the link to the repository in the repository field. Next, assign the relevant category for the repository. For example, Lovelace and theme are frontend integrations.
10. Follow step 1 onwards to install the custom repository to your Home Assistant installation.
Conclusion
I hope you have HACS set up on your Home Assistant installation and it is working correctly. It is important to remember that any repository installed via HACS is third-party and may not work as intended. Please do your best to research each repository before adding it to your installation.
We are constantly working on more Home Assistant tutorials, so if you want to learn more, be sure to check them out.
If you have any issues or ideas to share, feel free to leave a comment below.