In this guide, we will be showing you how to use the nslookup utility on the Ubuntu operating system.
nslookup stands for name server lookup and is a tool that allows you to easily make a query to a domain name system (DNS).
A DNS, if you don’t know what that is, is a server that your device contacts to resolve a domain name to an IP address. Devices don’t connect with domain names. They connect using IP addresses.
By using the nslookup utility on Ubuntu, you can quickly check the IP address that is being returned from a DNS server for your chosen domain name.
This tool can be very useful for debugging issues that you might be having connecting to a website. Using this you can easily see the IP address your DNS server is handing you for a given website. You can even use this tool to see if other DNS servers are giving out a different IP address.
If the IP address differs from one DNS server to another, there is a good chance that you are having issues connecting to a particular domain name. Some services can change their IP address more often than you would normally expect.
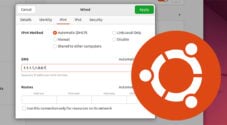
If you end up discovering issues with your current DNS server, it is very easy to change the DNS server on Ubuntu.
Using nslookup on Ubuntu
In this section, we will show you exactly how to use the nslookup tool on your Ubuntu system.
We will also be giving you a quick explanation of the data that this tool returns so that you can understand it better.
For these following steps, you will need to be using the terminal. If you use Ubuntu desktop, you can bring up the terminal by pressing CTRL + ALT + T.
Installing nslookup on Ubuntu
1. The nslookup utility may not be pre-installed on your Ubuntu system. The following steps will walk you through the process of installing this software.
To gain access to nslookup, you will need to install a special package that gives you access to various DNS-related tools.
Before you install this package, you must update the package list by using the command below
sudo apt updateCopy2. Once the package list update has completed, we can move on to installing the “dnsutils” package to our device.
This package contains a variety of tools, including the one that we are after, “nslookup“.
To install this package, run the following command within the terminal.
sudo apt install dnsutilsCopySyntax of the nslookup Command
Let us start by exploring the actual syntax of the nslookup command on Ubuntu.
It is very simple tool to use, and its most basic usage just requires you just to use the “nslookup” command followed by the domain name you want to look up.
nslookup [-option] [name | -] [server]Copy- options: Here, you can specify any options for the nslookup tool. By using these options, you can control what you are querying for from the DNS server.
For example, you can tell nslookup to return particular records such as the nameserver. - name: With the second parameter, you can specify the domain name or IP address you want to look up.
By specifying a domain name, the tool will request the IP addresses that the DNS server has for that domain.
If you specify an IP address the nslookup tool will perform a reverse IP lookup. - server: By default, nslookup will use whatever DNS server your Ubuntu device is configured to use. Typically this will be the one handed to your device by your router.
However, this tool allows you to specify the DNS server you want to perform the query against. Specify the IP address or domain name you want to use for the DNS query as the last element.
Basic Usage of nslookup on Ubuntu
Let us now explore the most basic usage of nslookup on Ubuntu. For most quick lookups, this is the way you will want to use this utility.
All you need to do, is use “nslookup” followed by the domain name you want to query. The command will return the IP addresses that the DNS server returns.
nslookup <DOMAINNAME>For example, if we wanted to check for the IP addresses assigned to the domain name “pimylifeup.com“, we would use the following command.
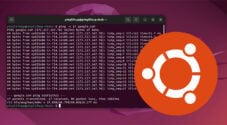
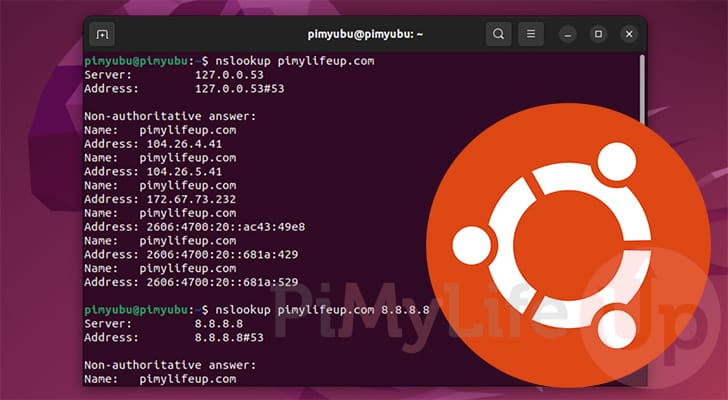
nslookup pimylifeup.comCopyBelow, you can see the sort of data that you would get returned after running the above command.
The “server” and “address” values are the places nslookup sent its DNS query. In our case, this is a local DNS cache running on our router.
After this, you will see a heading labeled “Non-authoritative answer:“. Under this heading is a list of the IP addresses that the DNS holds for this particular domain name.
Websites can have multiple IP addresses due to how modern servers. Especially with the implementation of IPv6. To accept IPv6 traffic a web server must also have an IPv6 address.
Server:         192.168.0.1
Address:        192.168.0.1#53

Non-authoritative answer:
Name:   pimylifeup.com
Address: 104.26.4.41
Name:   pimylifeup.com
Address: 104.26.5.41
Name:   pimylifeup.com
Address: 172.67.73.232
Name:   pimylifeup.com
Address: 2606:4700:20::681a:429
Name:   pimylifeup.com
Address: 2606:4700:20::681a:529
Name:   pimylifeup.com
Address: 2606:4700:20::ac43:49e8
Querying a Different DNS Server
You don’t have to stick to using nslookup on the DNS server your Ubuntu device is set to use.
First you specify your options, followed by the domain name, and then finally the DNS server you want to perform the DNS query.
nslookup <DOMAINNAME> <DNSSERVER>For example, to look up “pimylifeup.com” with Google’s DNS server (8.8.8.8) we would use the following command.
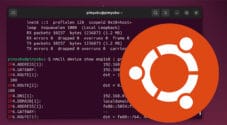
nslookup pimylifeup.com 8.8.8.8CopyBelow, you can see how the first two values are pointing to the “8.8.8.8” DNS instead of our local DNS server that was located at “192.168.0.1“.
With that we can tell that this request was made to Google’s DNS Server. It produced basically the same result as our local DNS cache which is a good thing.
Server:         8.8.8.8
Address:        8.8.8.8#53

Non-authoritative answer:
Name:   pimylifeup.com
Address: 172.67.73.232
Name:   pimylifeup.com
Address: 104.26.4.41
Name:   pimylifeup.com
Address: 104.26.5.41
Name:   pimylifeup.com
Address: 2606:4700:20::681a:529
Name:   pimylifeup.com
Address: 2606:4700:20::ac43:49e8
Name:   pimylifeup.com
Address: 2606:4700:20::681a:429
Checking the Name Server Records using nslookup on Ubuntu
Using the nslookup tool on Ubuntu, you can look up the nameserver that your chosen domain name is utilizing.
This is useful for finding out where a domain name is registered and the name servers that are broadcasting that particular domain name.
To do this, we need to utilize the “nslookup” tools “type” option. By setting this option to “ns” we will list the nameservers associated with the chosen domain name.
You can use the “type” option to look up other records to such as the “mx” records.
nslookup -type=ns <DOMAINNAME>CopyFor example, to check the name servers that we are using for “pimylifeup.com” we can use the command below.
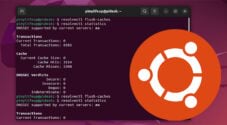
nslookup -type=ns pimylifeup.comCopyBelow, you can see the two name servers that our domain name is utilizing. This is the server that other DNS servers will contact to get information about your domain name.
Server:         192.168.0.1
Address:        192.168.0.1#53

Non-authoritative answer:
pimylifeup.com  nameserver = uma.ns.cloudflare.com.
pimylifeup.com  nameserver = matt.ns.cloudflare.com.

Authoritative answers can be found from:
Conclusion
Hopefully, at this point in this guide, you will have a good understanding of how to use nslookup on Ubuntu.
Throughout this guide, we have shown you how to install nslookup to Ubuntu if it wasn’t already installed. This is surprisingly not the most obvious process as it is bundled within another package.
Using nslookup you can very quickly get more details about any domain name. It can help debug whether your computer is connecting to the right IP when accessing a domain name.
Please feel free to leave a comment below if you have any questions about using this DNS tool.
If you found this tutorial to be helpful, we highly recommend you check out our many other Ubuntu guides.