In this guide we will show you how to use the Home Assistant Wake-on-LAN integration.
Wake-on-LAN is a protocol for waking up devices over the local network. When enabled on a device, its network adapter will await a specially formatted packet that is often called the “magic packet“.
When your network adapter receives this specially formatted packet, it wakes your device. This behavior is super helpful when you have a computer that you don’t need running all the time but need it to wake up to perform tasks periodically.
One thing to note is that not all devices have support for Wake-on-LAN. Network adapters need to implement support for the magic packet for this to work flawlessly. However, enabling this through your operating system is also possible, but this is less reliable.
By using the Wake-on-LAN integration in Home Assistant, you can use your smart home server to wake up devices. You can achieve this through automation or by adding a switch to your dashboard.
In the following sections, we will show you how to configure and use the Wake-on-LAN integration.
Typically, Wake-on-LAN will only work over an ethernet connection. This is because when a device goes to sleep, it usually disconnects from the Wi-Fi network.
Enabling Wake-On-LAN on your Device
As mentioned at the beginning of this guide, Wake-On-LAN is a protocol that allows you to wake up your device remotely.
You must enable this functionality on your device before it can work. We will only be diving a little into how you can do this, as it can differ heavily per motherboard.
Enabling Wake-On-LAN through the BIOS
If your motherboard supports Wake-On-LAN, then the best way to enable it is through the BIOS. This will allow your Home Assistant installation to wake your device without relying on the OS to run in any form.
To enable this, boot into your device’s BIOS screen and look for one of the following options. Motherboard manufacturers, for some reason, like to name this differently.
- WOL (Wake-On-LAN)
- Power On By PCIE/PCI
- Wake On LAN/WLAN
- Wake Up On LAN
You might have to dig through a few menus within your BIOS to find these options. Sometimes, they are under sections you wouldn’t expect them to be.
Turning on Wake-On-LAN on your Operating System
The alternative way to use Wake-On-LAN is to enable it through the operating system. Again, this will only work with some network adapters, but is an alternative way to enable this functionality.
If you are running Ubuntu, we have a guide that shows you how to enable Wake-On-LAN.
On a Mac, you will want to find and enable the “Wake for network access” option.
Finally, for Windows, you must open the properties screen for your network adapter. Within this menu, you will want to swap to the “Power Management” tab and enable the “Allow this device to wake the computer” and “Only allow a magic packet to wake the computer.”
Using the Home Assistant Wake-on-LAN Integration
This section will show you how to enable and use the Wake-on-LAN integration that is built into Home Assistant.
You will find that setting up and using this integration is a super straightforward process.
We will split this into two sections that will implement the Wake-on-LAN functionality in different ways.
- If you only want to add a button to send the Wake-on-LAN packet to your device, we can use helpers and automation.
This is the easiest way to send the Wake-on-LAN packet and is helpful if you want to avoid adding shutdown functionality. - Alternatively, if you want a switch with an on and off state, you can implement the Wake-on-LAN integrations “
switch“.
While we won’t cover how to shut down a computer from Home Assistant in this guide, this will get you halfway. Shutting down a device requires you to implement additional functionality such as RPC or SSH.
Finding the Mac Address of your Network Adapter
The first thing you must do is find the MAC address of the network adapter of the device you want to wake up. This address differs to your IP and is unique to that specific network adapter.
You can find this address by looking through your router or using your operating system.
If you are taking the OS route, we have guides for Mac OS and Ubuntu
You can find the MAC address on Windows using “ipconfig /all” within the command line. You will want the value next to “Physical Address“. For example, the MAC address of our ethernet network adapter was “00-FF-A8-D3-A4-2D“.
Adding a Wake-on-LAN Button to Home Assistant
This section will explore how to add a Wake-on-LAN button to Home Assistant. We will be achieving this by using “helpers” and automation. Think of helpers as little snippets we can easily configure to perform actions.
For this section to work, you must have the MAC address ready for the device you want to wake.
Creating the Button Helper
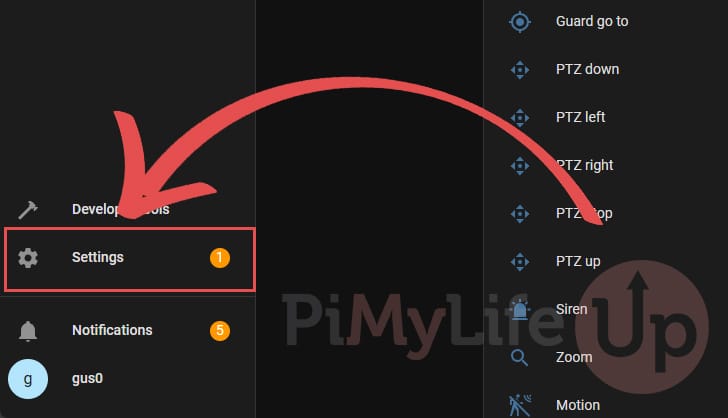
1. From your dashboard, you must change to the “settings” screen.
The easiest way to reach this screen is to click “Settings” in the sidebar.

2. Once you are in the settings screen, click the “Devices & Services” option.
This will take us to where we can create helpers within Home Assistant.

3. Now that you have opened the “Devices & Services” screen you must change to the “Helpers” tab (1.).
After swapping tabs, click the “+ CREATE HELPER” button in the bottom left corner (2.)
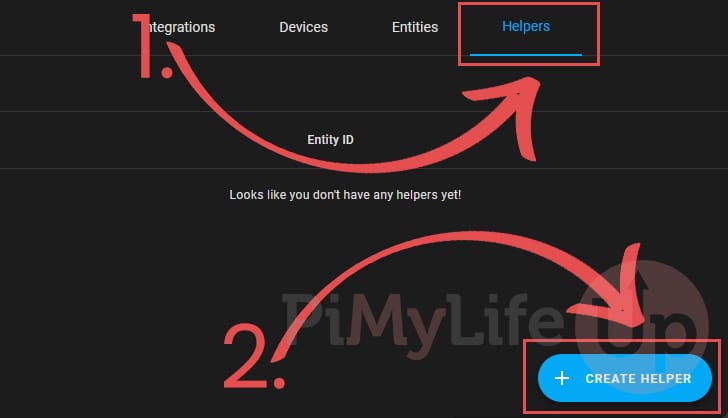
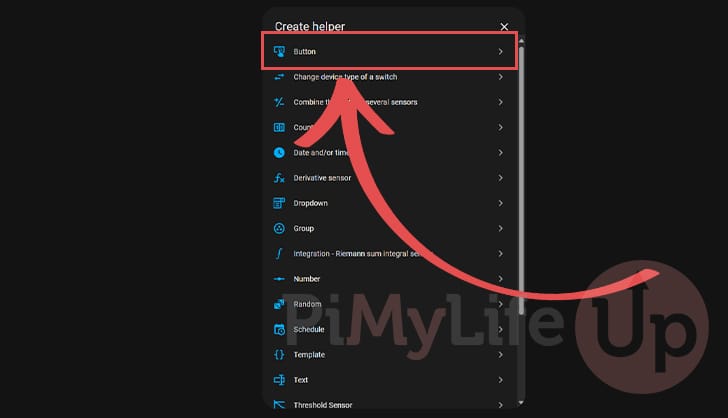
4. You will now see a list of the helpers that Home Assistant can add.
The one we are after is the “Button” helper. Find “button” in this list and click it to proceed.
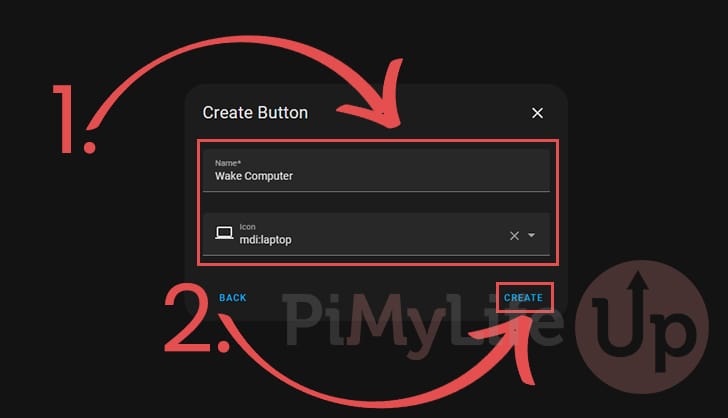
5. The next step is to give this new button a name. Try and make it clear so you understand what this button will do. In our example, we are naming our button “Wake Computer” (1.). You can also give this button an icon.
After filling out a name for the button, click the “CREATE” button (2.)
Adding Automation to the Button
6. With the button created, we must make it send the Wake-on-LAN packet from Home Assistant.
To achieve this, we will be adding automation to the button. Change back to the “Settings” menu.
7. This time, you will want to click the “Automations & scenes” option.

8. Your next step is to click the “+ CREATE AUTOMATION” button in the bottom-left corner.

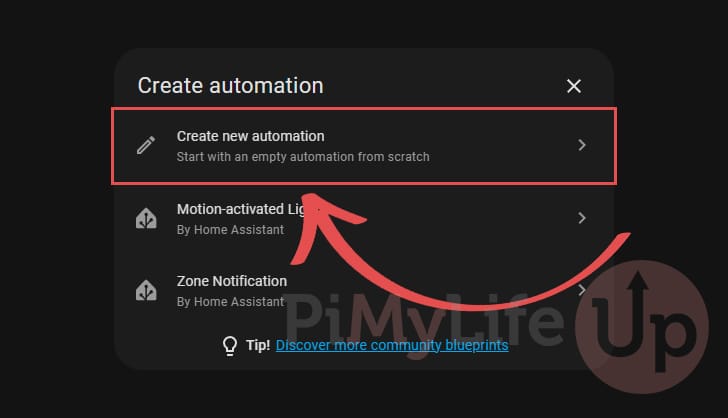
9. Home Assistant will present you with an option of selecting a pre-configured automation. We want to create one from scratch for this Wake-on-LAN button, so click the “Create new automation” option.
Setting the Trigger Event
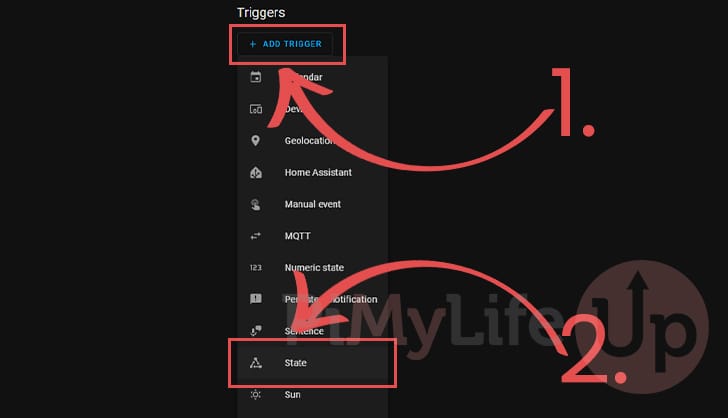
10. The first thing we must do here is add a trigger (1.).
Our trigger will be whenever the Wake-on-LAN button is clicked on our Home Assistant dashboard. For this to work, we must click the “State” option (2.).
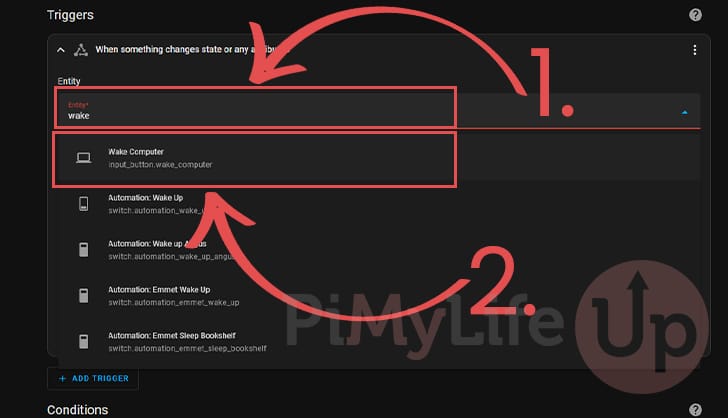
11. For the trigger, all we need to do is set the entity to the button helper we created earlier. When you press the button, this automation will be fired.
In our example, the input button was called “Wake Computer“.
Adding the Wake-on-LAN Service Call
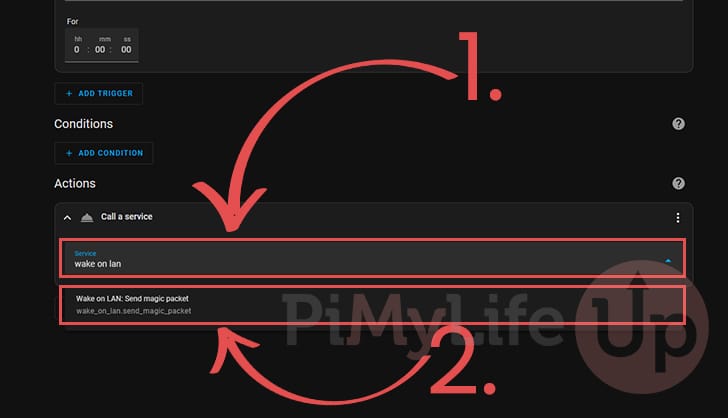
12. After adding the trigger, we must add the action (1.). Home Assistant will fire this action every time the button is clicked.
In this case, we will want to use the “Call Service” action (2.), to trigger Home Assistant to send the Wake-on-LAN magic packet to our device.

13. With the service dialog now open, use its search back to look for “wake on lan” (1.) and select the “Wake on LAN: Send magic packet” option (2.).
Setting the MAC Address and Saving
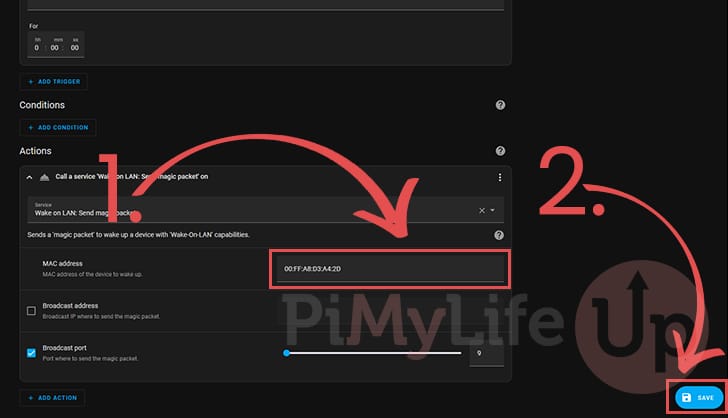
14. The only thing you must configure for the Wake-on-LAN service call on Home Assistant is the MAC Address.
Type in the MAC address of the device you want to wake up (1.). You should have gotten this address from earlier on in the guide.
After typing in the address, click the “Save” button in the bottom right corner (2.).
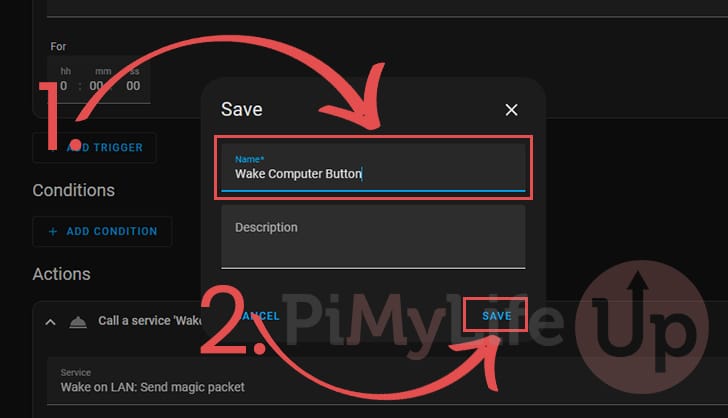
15. You will now be prompted to give this automation a name (1.). For our example, we just named it “Wake Computer Button“.
After naming your automation, click the “SAVE” button (2.).
Viewing your New Wake-on-LAN button
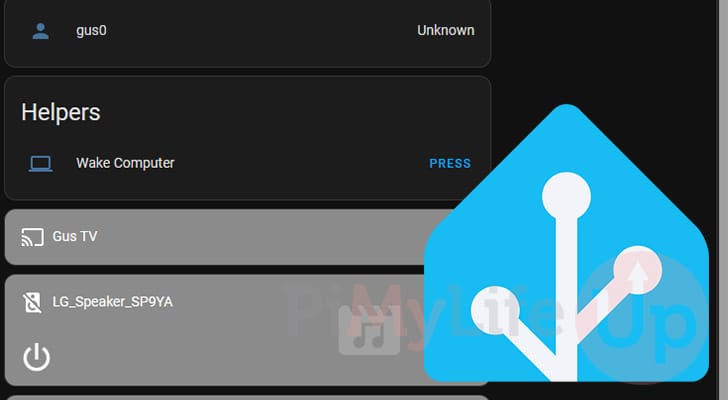
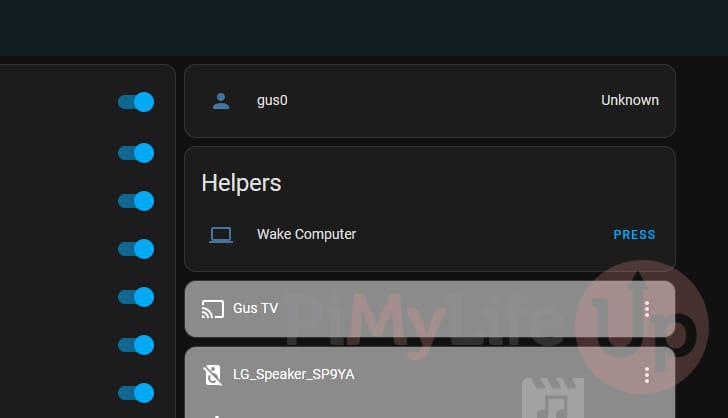
16. Now, you can return to your dashboard and add your new Wake-on-LAN button to your Home Assistant dashboard.
Our dashboard is set to add new elements automatically, so it is there already. Otherwise, use the “Edit Dashboard” button and add it using the “Button” card.
Implementing Wake-on-LAN as a Switch on Home Assistant
This section will show you how to implement Wake-on-LAN as an on and off Switch on Home Assistant.
Following this method requires you to edit the configuration file, but it isn’t any more complicated than following the button method. The advantage of using the switch is that it allows you to eventually add the ability to shut down your device using the same prompt.
Configuring the Home Assistant Wake-on-LAN Integration
1. You may continue once you know the MAC Address of the device you want Home Assistant to send the Wake-on-LAN packet to.
You must next open the Home Assistant configuration file called “configuration.yaml“. This is easy to do if you have set up the Visual Studio Code add-on.
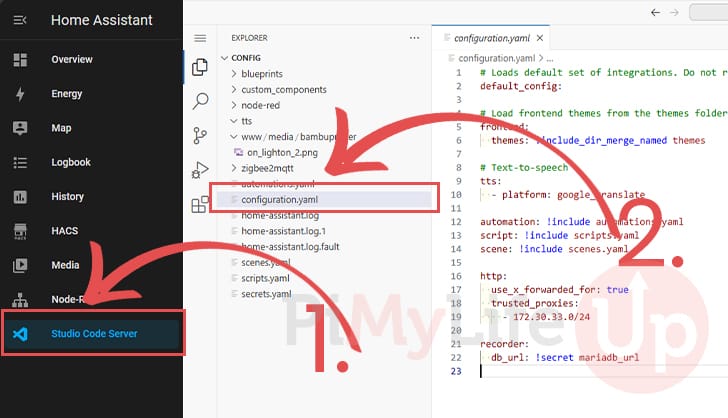
2. First, we must add this single line to the config file.
This line is what tells Home Assistant that it can enable and use the Wake-on-LAN integration
wake_on_lan:Copy3. Next, we must define a switch that you will use to send the Wake-on-LAN packets to your device. By toggling the switch on, Home Assistant will send the magic packet.
These lines define a new “switch” within Home Assistant using the Wake-on-LAN integration as its platform.
For this to work, you must type in the Mac Address of the device you want to wake. This format requires you to use colons (:) and not hyphens (-) to separate the values.
You should also give this switch a name. A good way of doing this is to name it after the device you want to wake.
switch:
  - platform: wake_on_lan
    mac: "XX:XX:XX:XX:XX:XX"
    name: "<DEVICENAME>"Copy
For example, if we wanted to wake our Desktop PC with the MAC Address “00-FF-A8-D3-A4-2D“, we would end up with the following configuration.
switch:
  - platform: wake_on_lan
    mac: "00:FF:A8:D3:A4:2D"
    name: "Wake Desktop PC"Copy
4. Home Assistant’s Wake-on-LAN integration allows you to add a “turn off” call to its switch.
We won’t be covering this in this tutorial for now. But you can see below how you would add it to the switch. Where “<SERVICETOCALL>” is the name of the service it should run when turning off.
switch:
  - platform: wake_on_lan
    mac: "XX:XX:XX:XX:XX:XX"
    name: "<DEVICENAME>"
    turn_off:
      service: <SERVICETOCALL>Copy
5. Once you have added the lines above, you can now save. If you use the Visual Studio Code integration, you can do this by pressing CTRL + S.
Reloading Configuration in Home Assistant
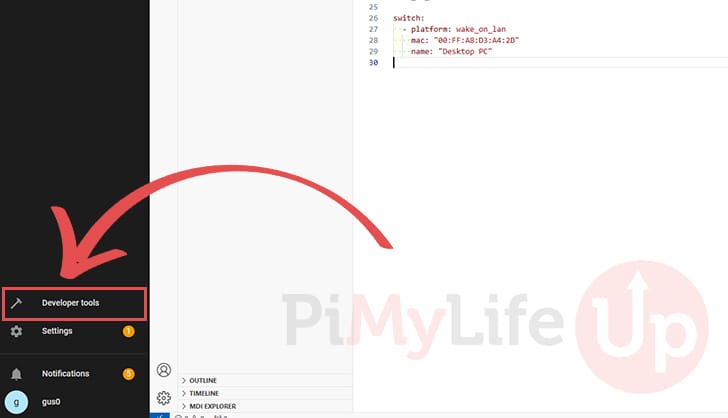
6. For Home Assistant to be aware of your new Wake-on-LAN switch, we will need to get it to reload its configuration.
You can do this by switching to the “Developer tools” screen using the sidebar.
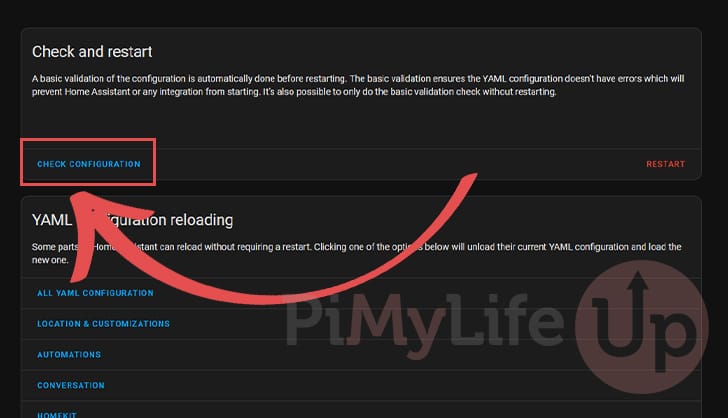
7. The first thing you want to do while in the developer tools menu is click the “CHECK CONFIGURATION” button.
This button verifies that you haven’t done anything to break Home Assistant.
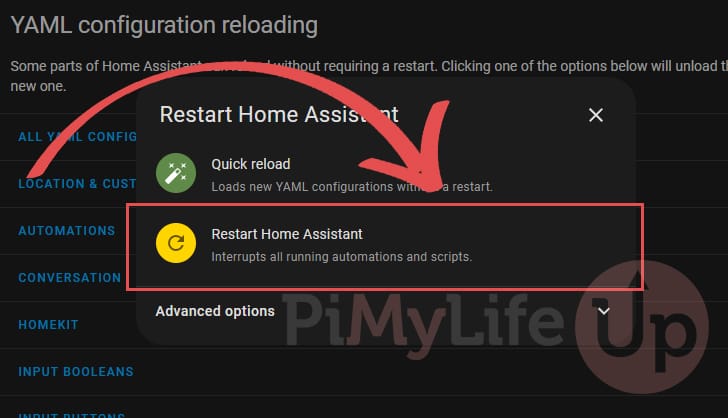
8. If you see the text “Configuration will not prevent Home Assistant from start!” (1.) you can safely click the “RESTART” button (2.).
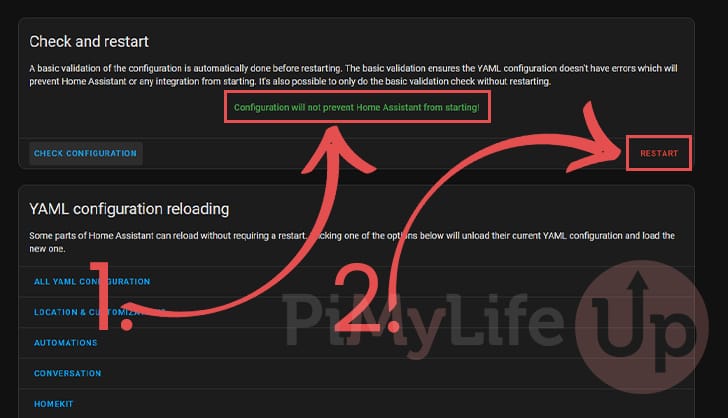
9. To ensure that Home Assistant actually reads our changes, click the “Restart Home Assistant” option.
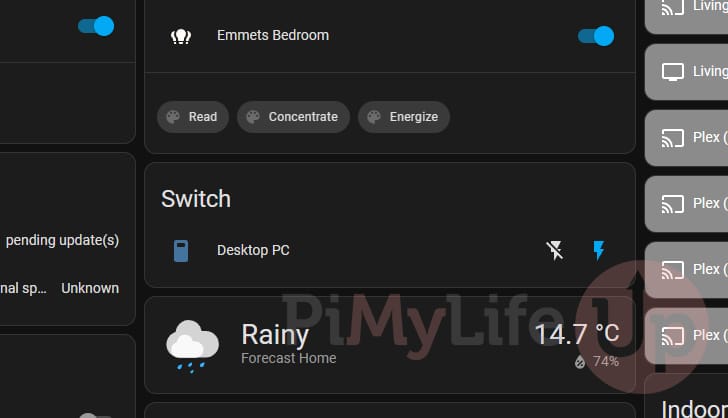
Viewing your Home Assistant Wake-on-LAN Switch
10. Once Home Assistant restarts you can add the Wake-on-LAN switch to your dashboards.
In our case, Home Assistant automatically adds new elements to our dashboard. However, to add the switch manually, open up the “Edit Dashboard” screen, and then add a new “Entity” card and use the ID you gave your Wake-on-LAN Switch.
Conclusion
Hopefully, at this stage, you will now understand how to add Wake-on-LAN functionality to your Home Assistant server.
This functionality allows you to wake supported devices on your home network by sending a magic packet to them. If you have a device that you only need to be powered on temporarily, you will find this super helpful.
Best of all, this integration is super easy to use. All you need is the MAC address of the device you want to wake.
Please feel free to comment below if you have any questions about using the Wake-on-LAN functionality.
If you found this tutorial to be helpful, we recommend checking out our many other Home Assistant guides.


This is a great guide! I managed to get it working within 10 minutes thanks to you! and I am not very tech savvy. Do you know if there is any way to see the power state of the Wake On Lan device? So if you turn on the device using this Wake On Lan entity in Home Assistant, is there a way to have the icon change state to confirm the device has powered on?
Wake-on-LAN integration itself doesn’t monitor the device’s actual power state. You could use a
binary_sensorand the ping integration to keep track of whether it is online or offline.Below is an example configuration. (I haven’t tested it).
Thank you! I had trouble understanding the documents for HA directly, but following your guide made it super easy, had my machine waking up before I knew it!