In this project, we will show you how to install and run WatchYourLAN using a Docker container.
WatchYourLAN is a project that is aimed at providing you with a super lightweight network IP scanner and an intuitive web interface.
Using this software, you can easily monitor all of the services available on your network. WatchYourLAN can even be configured to alert you when a new host has appeared on your network.
This software can be a great alternative to more heavyweight solutions such as PiAlert, especially if you want something that just works out of the box and doesn’t require a lot of configuration. You also don’t need to stress about this software consuming too much of your device’s processing power thanks to it being super lightweight, making it perfect for weak devices like the Raspberry Pi.
We are using Docker to run WatchYourLAN as it makes the whole setup process incredibly simple. All we need to do is provide the software with the network interfaces it needs to monitor, as well as a timezone, and it’s basically all ready to go.
The team provides both ARM and normal x64 releases, so WatchYourLAN should work on almost any devices that you might want to install it on.

Setting up the WatchYourLAN Docker Container
Over the following sections, we will walk you through installing and running WatchYourLAN on your device using Docker. We will even be showing you how you can install Docker, as well as how to identify your available network interfaces.
Below, you can find a video that will walk you through all the steps of setting up the WatchYourLAN Docker container. We have also included our written steps below.
Preparing your System
1. Now, to run WatchYourLAN, you will need to have the Docker runtime installed on your machine. If you haven’t yet installed this software, we highly recommend following our guide on installing Docker on Linux.
Docker is great as it makes running software incredibly easy, and you don’t have to worry about packages not being available or installing numerous different pieces of software.
https://pimylifeup.com/linux-docker-install/2. Once you have Docker installed, our next step is to create a folder where we will store the Compose file for WatchYourLAN and get it to store its database.
You can use the mkdir command and the “-p” option to create this folder by running the command below. The “-p” option is there to tell mkdir to create the whole path; otherwise, it will throw an error if “opt” or “stacks” doesn’t already exist.
sudo mkdir -p /opt/stacks/watchyourlanCopy3. After creating the folder, you will want to change into it by using the cd command. We will need to be in this folder for later on in the guide when we start up the network scanning software.
cd /opt/stacks/watchyourlanCopyGetting your Network Interface Names
4. Now, for the WatchYourLAN Docker container to work, it will need to know your device’s network interfaces that it should scan on.
If you don’t know the names of these interfaces, then don’t worry, as it is quite easy to find them. To list out the interfaces available on your Linux device, run the command below.
ip link showCopyBelow is an example of what the result of this command should look like. You can ignore the device named “lo” as it is the loopback device that allows your machine to communicate with itself if it needs to.
1: lo: <LOOPBACK,UP,LOWER_UP> mtu 65536 qdisc noqueue state UNKNOWN mode DEFAULT group default qlen 1000
    link/loopback 00:00:00:00:00:00 brd 00:00:00:00:00:00
2: eth0: <BROADCAST,MULTICAST,UP,LOWER_UP> mtu 1500 qdisc pfifo_fast state UP mode DEFAULT group default qlen 1000
    link/ether d8:3a:dd:98:ca:33 brd ff:ff:ff:ff:ff:ff
3: wlan0: <BROADCAST,MULTICAST,UP,LOWER_UP> mtu 1500 qdisc pfifo_fast state UP mode DORMANT group default qlen 1000
    link/ether d8:3a:dd:98:ca:34 brd ff:ff:ff:ff:ff:ff
5. Looking at the result above, you can see that we have two network interfaces that we can actually use WatchYourLAN to scan on. You can either just use one or both; that’s completely up to you.
Below is an example of what these two values would look like if we grabbed the names of the Ethernet and Wi-Fi network interfaces.
eth0 wlan0Writing a Docker Compose file for WatchYourLAN
6. Now that we have the network interface names, we can move on to creating a Docker Compose file that will set up and manage the WatchYourLAN software. This is also the file where we will WatchYourLAN what network interfaces it should listen on.
To write this file, we will use the Nano text editor as it is one of the easiest command-line text editors to utilize.
sudo nano compose.yamlCopy7. Now, within this file, you will want to type out the following.
While filling out this file, there are two placeholders that you must replace with your own information.
<TIMEZONE>: The first placeholder you find is the one where you specify your time zone. This ensures that the time used by the WatchYourLAN Docker container will match where you live.
The value required here needs to be a TZ Identifier. If you don’t know yours, you can find it on Wikipedia.
For example, a valid TZ identifier would look like “Australia/Hobart“.<INTERFACES>: You must replace this placeholder with the name of the network interfaces that you want the software to listen on. You would have retrieved the correct names to use here in our previous steps.
WatchYourLAN is capable of listening to multiple network interfaces; just separate each one with a single space.
If we were to use the same example values we got earlier, we would use “eth0 wlan0“.
services:
  watchyourlan:
    image: aceberg/watchyourlan
    network_mode: "host"
    restart: unless-stopped
    volumes:
    -./data:/data/WatchYourLAN
    environment:
      TZ: <TIMEZONE>
      IFACES: "<INTERFACES>"Copy
Below is an example of what this file should look like after adding your data. Of course, it would be your own information and not ours.
services:
  watchyourlan:
    image: aceberg/watchyourlan
    network_mode: "host"
    restart: unless-stopped
    volumes:
    - ./data:/data/WatchYourLAN
    environment:
      TZ: Australia/Hobart
      IFACES: "eth0 wlan0"Copy
8. Once you have finished filling out the WatchYourLAN Docker Compose file, you can save and quit by pressing CTRL + X, Y, and then ENTER.
Starting up the WatchYourLAN Monitor
9. With the Compose file now written, all we need to do to bring up the WatchYourLAN network monitor is to use the following command.
Docker will immediately download the latest available version of the WatchYourLAN Docker image and start it up using the information we provided.
By using the “-d” option, we are telling Docker to detach from the current terminal session once it has started. If you ever run into issues with starting a container this way, it can be helpful to remove this option, as it will show any errors the software may be running into.
docker compose up -dCopyAccessing the Web Interface
10. Moving on, we can finally access the WatchYourLAN web interface. To do this, you will need to know the IP address of your machine.
One of the easiest ways to grab your IP is to utilize the hostname command, as we have done below.
hostname -ICopy11. Now, in your favorite web browser, go to the following address. Ensure that you replace “<IPADDRESS>” with your IP.
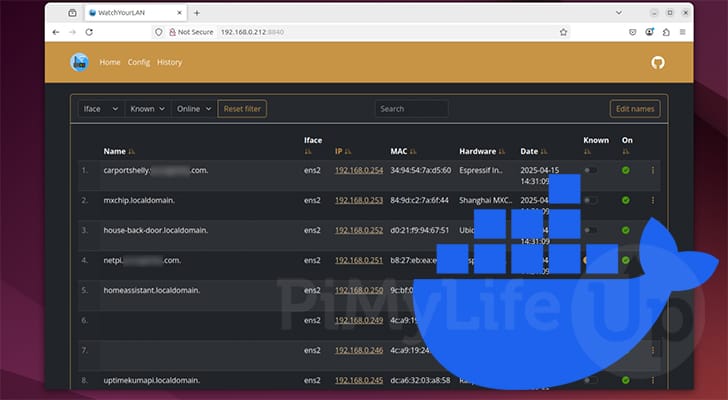
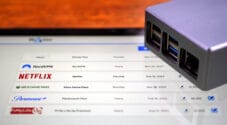
http://<IPADDRESS>:884012. You should now see the WatchYourLAN web interface on your screen. You can use this interface to keep track of all the devices on your network.
On the right side of the screen, you can mark each entry to see which are “Known” entries, as well as whether that device is currently online.
This web interface will also enable you to adjust its settings through the “Config” screen. Please note, though, that most of these options will be overwritten when your Docker container restarts.

Conclusion
If you have got to this point in the tutorial, you should now hopefully have WatchYourLAN up and running on your Linux device.
This software is a great way to keep track of what is happening on your local network. You can be alerted when new devices appear and track whether a device is online.
Please feel free to drop a comment below if you have run into any issues with getting WatchYourLAN running using Docker Compose.
If you liked this guide, we highly recommend taking some time to explore some of our many other Docker guides and projects.


Very nice. Easy to follow tutorial. WatchYourLAN is easier to use than Angry IP Scanner. I also put it on Homarr.
Is there an error in line 7 of compose.yaml ?
Should the data path match the directory created in step 3?
Also, can you explain the “stacks” subdirectory? I’ve followed a few of your Docker posts and don’t understand what “stacks” in the path is used for. I have been leaving it out and creating the data directories directly under /opt
Hi Corby,
No that line is correct. That is mapping the “./data” directory to the “/data/WatchYourLAN” folder within the container. By using “./” at the start of the “data” folder we are saying that the directory is in the current directory relative to the Compose file. So for example, if your compose file is at “/opt/stacks/watchyourlan/compose.yaml”, this would say directory should be mapped to “/opt/stacks/watchyourlan/data”.
The stacks subdirectory is just a way of sorting out the Compose stacks. It’s not necessary but is just how we personally prefer to sort our Compose files. It is also the format required for software like Dockge.
Kind regards,
Emmet
Thank you! I kept getting an error due to that line. The problem turned out to be something not happy with copy/paste. I had to copy first to a separate plaintext file the into nano to get it working. The text looked visually correct.
Hi! Thanks for the tutorial. I think you’re missing the closing quote of the IFACES value in your example yaml.
Hi Snow,
Correct! I had completely missed that, thank you for pointing that out.
Kind regards,
Emmet