In this tutorial, we will be walking you through the simple way you can run Deluge within a Docker container.
Deluge is a popular torrent client known for being super lightweight while being packed with a ton of features and an incredibly easy-to-use web interface.
It is an excellent alternative to other popular torrent clients such as qBittorrent and Transmission and is well worth trying out.
You can even set up Deluge within a Docker container, making it super easy to deploy and utilize. It is even easy to route this container through a VPN by using a tool such as Gluetun.
While, unfortunately, the Deluge team doesn’t provide a Docker container itself, the LinuxServer team does. This container is updated often and maintains parity with the current stable release of Deluge.


Setting up the Deluge Docker Container
Over the next few sections, we will walk you through installing the Deluge Docker container on Linux.
These steps are relatively easy and will work on most systems as long as they support Docker. The container we are using has builds for both x64 and ARM64 devices.
Preparing your Device
1. To run Deluge within a Docker container, you must have Docker itself installed on your system.
If you haven’t installed Docker previously, we have a quick and easy guide on installing Docker on Linux.
https://pimylifeup.com/linux-docker-install/2. Once you have installed Docker, you must create a directory where you will store the Deluge Compose file, and its basic configuration files.
You can create this directory by using the mkdir command within the terminal.
sudo mkdir -p /opt/stacks/delugeCopy3. After creating a directory to store Deluge, change to it using the cd command. The rest of this guide will expect you to be in this folder.
cd /opt/stacks/delugeCopySetting up a Docker Compose File for Deluge
4. Now that you are in the correct folder, we will want to use Nano to begin writing a Docker Compose file for the Deluge torrent client.
A Compose file defines a list of instructions for Docker to follow when starting and managing your container.
You can begin writing this new Compose file using the following command within the terminal.
sudo nano compose.yamlCopy5. Within this file, you will want to type out the following lines. These lines define the Docker image for Deluge that we will be installing, and the options Docker should use to set the software up.
<USERID>: Here you must specify the ID of the user that will own the files you are downloading. For example, if you are downloading a torrent to “/home/pimyubu/torrents“, you must set the user ID to the user that owns the directory.
Failure to do this will lead to permissions errors when you start using Deluge.
If you use the default user on your Linux system, the user ID is typically “1000“. You can get your user’s id by using the “id -u” command in the terminal.<GROUPID>: Like the user ID, this must be set to the group ID of the user you plan on utilizing.
Typically, this value will be the same as your user, but you can verify by using the “id -g” command.<TIMEZONE>: Replace this placeholder with your time zone identifier. You can find a list of these values from Wikipedia.
An example of a valid TZ identifier is “Australia/Hobart“.<PATHTODOWNLOADS>: Here, you must specify the path to where you want the Deluge container to download torrents to your system.
For example, if you want these in your home directory, you must specify a folder like “/home/pimyubu/“.
services:
  deluge:
    image: lscr.io/linuxserver/deluge:latest
    container_name: deluge
    environment:
      - PUID=<USERID>
      - PGID=<GROUPID>
      - TZ=<TIMEZONE>
      - DELUGE_LOGLEVEL=error
    volumes:
      - ./config:/config
      - <PATHTODOWNLOADS>:/downloads
    ports:
      - 8112:8112
      - 6881:6881
      - 6881:6881/udp
      - 58846:58846 #optional
    restart: unless-stoppedCopy
6. After you finish writing out the Compose file, save and quit out of Nano by pressing CTRL + X, Y, and then ENTER.
Starting up the Deluge Docker Container
7. With the Compose file written, all we need to do to start up the Deluge Docker container is to run the following command within the terminal.
We use the “-d” option, so Docker will detach from the current terminal session once the container has started.
docker compose up -dCopy8. You can verify that the Deluge container is now up and running by using the following command. This command will print out the logs output by the Docker container, allowing us to see if any errors occurred.
docker compose logsCopyIf everything has worked properly, you should see the following messages.
deluge  | Connection to 127.0.0.1 58846 port [tcp/*] succeeded!
deluge  | Connection to 127.0.0.1 8112 port [tcp/*] succeeded!
deluge  | [ls.io-init] done.
Accessing the Deluge Web Interface
9. Now that you have the Deluge Docker container up and running, you will want to access this torrent client’s web interface.
If you don’t know the IP address of your Linux device, you can use the hostname command within the terminal.
hostname -ICopy10. In your favorite web browser, you will want to go to the following address.
Ensure that you replace “<IPADDRESS>” with the IP of the device you set up Deluge on.
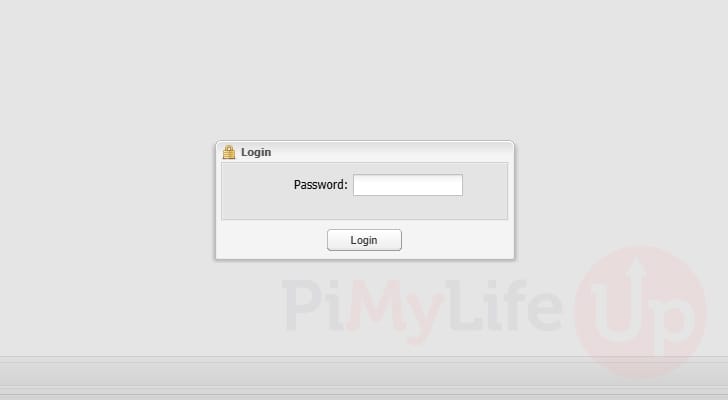
http://<IPADDRESS>:811211. When you first access the Deluge web interface, you will be asked to enter a password.
Since this is your first time running Deluge, the default password will be “deluge“.
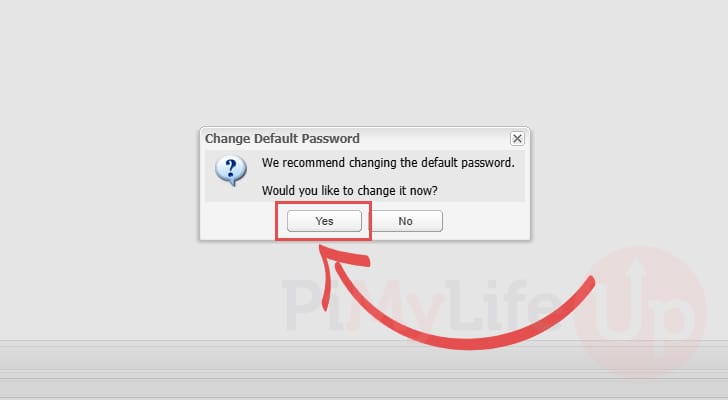
12. You will now be prompted to change away from the default password as the default is incredibly insecure.
To begin changing the password, click the “Yes” button.
13. With the preferences screen now open, change to the “Interface” tab (1.) using the sidebar.
Once you are on this screen, you need to type out the default password and then the new one (2.) you want to use to access the Deluge web interface.
After setting a new password, click the “Apply” button (3.).

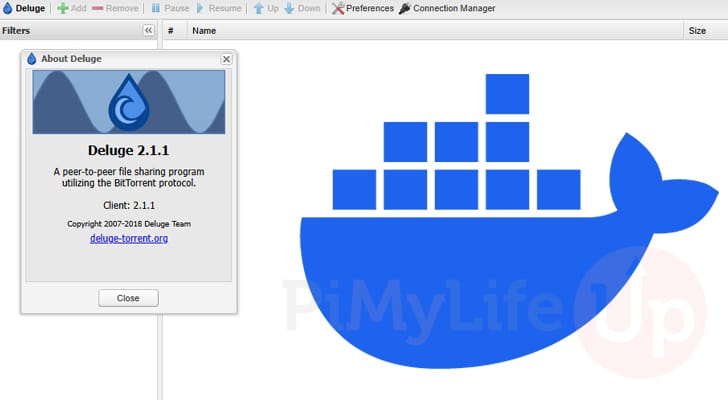
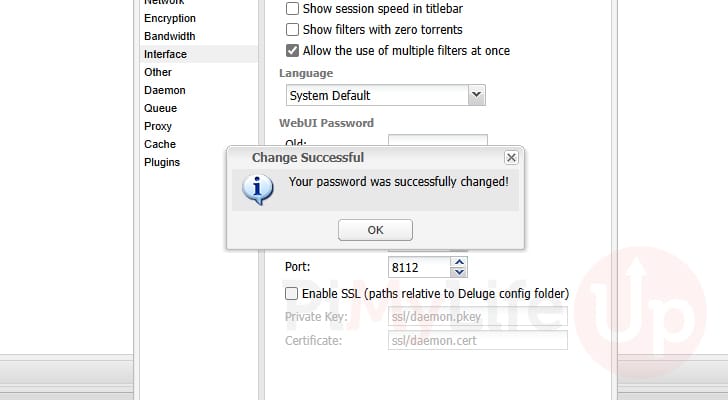
14. If you successfully updated the password, you should see the following message appear on your screen.
You can now begin to use the Deluge torrent client that is running within a Docker container
Updating to the Latest Version of the Deluge Docker Container
A key advantage of using Docker to run the Deluge torrent client is that it makes updating to the latest release a straightforward and stressless process. You don’t have to stress about the software being incompatible with your operating system as everything it needs is kept within the container.
Follow the next three steps to update your container to the latest version.
1. Before you update the Deluge Docker container, you must change to the folder where we created the “Compose” file.
Assuming you followed our tutorial, you can change to the correct directory by running the following command.
cd /opt/stacks/delugeCopy2. We can now get Docker to pull the latest version of the Deluge image to your device by using the following command within the terminal.
While this will download the latest image, it will not update your container.
docker compose pullCopy3. Since we now have a new release saved on to your system, we will want to update the running container.
As we are using Compose, we can achieve this by using the following command in the terminal. Docker will detect a new image on your system, automatically stop the old version, and restart the container on the new image.
docker compose up -dCopyConclusion
By this point in the guide, you should have successfully set up Deluge within a Docker container on your machine.
Deluge is a great lightweight torrent client with an easy-to-use web interface. Running this torrent client within a Docker container makes it easier to use.
Please feel free to post a comment below if you have had any issues with getting Deluge running on your machine.
If you liked this tutorial, we highly recommend that you explore our many other Docker tutorials to see the other software you can easily self-host.