In this tutorial, we will show you how to install Slack on the Ubuntu operating system.

Slack is a hugely popular communication platform that makes communication significantly easier for large teams. It is a key competitor to Microsoft Teams and is used by a huge number of companies.
One great thing about Slack is that it offers native support for many Linux operating systems, including Ubuntu. Thus, you can have the same Slack experience on these systems as you would expect to have on Windows.
There are two different ways to install Slack on Ubuntu. The first is to use Snap. Snap is a different way of packaging software like Slack, as it bundles all the required dependencies within one sandboxed environment. A key reason to use the Snap version of Slack is that Ubuntu will automatically update you to the latest version.
Alternatively, if you prefer not to rely on Snap, you can use the more traditional “.deb” package to install Slack on Ubuntu. This works like any normal package that you install and has no reliance on Snap,
The way you install Slack is purely a matter of personal preference. Ultimately, you will receive the same application.


How to Install Slack on Ubuntu using Snap
The first method for installing Slack on Ubuntu that we are going to cover is using Snap. As mentioned at the start of this guide, Snap is a different way of installing packages, as everything required to run the app is included within the package.
The downside is that the application ends up a little heavier, but removing and updating is fairly straightforward.
Since Ubuntu 16.04 the Snap core has been included with all releases of the operating system. You don’t need to do anything extra to install the Snap version of Slack.
1. While you could use the Snap Store application to install Slack, we personally find it significantly easier and quicker just to use the terminal.
To open the terminal quickly on Ubuntu, you can press CTRL + ALT + T on your keyboard.
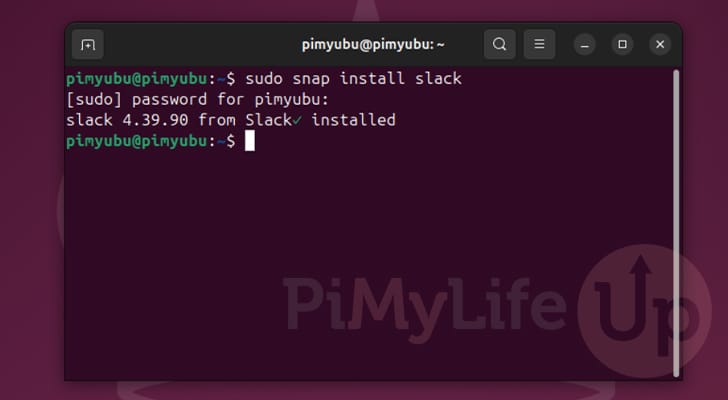
2. Once you have the terminal open, you can install Slack on your system by running the following command.
Depending on your internet speed, this process can take a few minutes as Ubuntu downloads and installs the Slack Snap.
sudo snap install slackCopyAfter Slack has been installed using Snap you should see a message with the words “slack 4.39.90 from slack installed“. For newer versions of Slack, the message will obviously differ slightly.
3. Once Ubuntu has finished setting up the Slack Snap, you can easily launch the chat program directly from the terminal by simply typing in “slack“.
You should also be able to find this app through Ubuntu’s “applications” menu.
slackCopy4. Below, you can see how we launched Slack after installing it using the Snap package.

Installing Slack to Ubuntu from a Deb File
If you prefer to install packages on Ubuntu the more traditional way, you don’t have to worry, as Slack still provides a traditional “.deb” package.
This section will walk you through the quick process of installing Slack from the official Deb package. This package will install Slack itself and set up the Slack package repository for you. This means that whenever you perform an update, Slack will also be upgraded to the latest release.
Preparing Ubuntu for Slack
1. Your first step in this installation process is to open the terminal on your machine. We will use the terminal for these steps, as they remain consistent throughout almost all versions of Ubuntu.
One of the easiest ways to do this is to use of the CTRL + ALT + T keyboard shortcut.
2. Before we install Slack to Ubuntu, we must ensure we have all the tools we need.
The first part of this step is to update the package list cache and upgrade any out-of-date packages. You can perform both tasks using the following two commands within the terminal.
sudo apt update
sudo apt upgrade -yCopy
3. Once the update completes, your next step is to ensure that the wget package is installed on your system.
This is the package we will be using to download the Slack “.deb” package to Ubuntu.
sudo apt install wgetCopyDownloading and Installing Slack on Ubuntu
4. Now that everything is in place, all we need to do to download Slack to Ubuntu is use the following command.
If you are worried about this not being the latest version, you can grab the download link from the official Slack website. However, as this package sets up its own repository, you can easily update to the newest version after installing the software.
wget https://downloads.slack-edge.com/desktop-releases/linux/x64/4.39.88/slack-desktop-4.39.88-amd64.deb -O slack-desktop.debCopy5. With the “.deb” package saved to our system, we can install it by running the command below in the terminal.
You might see a warning at the end that the download was performed unsandboxed. You can ignore this warning.
sudo apt install ./slack-desktop.debCopy6. You have now successfully installed Slack on your Ubuntu system using the “.deb” package. However, there is one problem we have to quickly deal with. That problem is Slack doesn’t immediately add its own repository. Instead, it inserts a script into the “cron.daily” folder that will be fired once a day.
Now instead of having to wait for this script to be executed on a new day, we can fire it now by simply using the following command within the terminal. This will ensure if you update your Ubuntu system before a new day, it will pull data from the official Slack repository and not an old release of Slack from the Ubuntu repository.
sudo /etc/cron.daily/slackCopyLaunching Slack from the Terminal
7. After installing Slack, you can either find and launch it from the applications menu or launch it directly from the terminal by simply typing “slack” into the terminal and pressing ENTER.
slackCopy8. Below, you can see that we have now successfully got Slack running on our Ubuntu system.

Conclusion
If you have reached this point, you should now have Slack up and running on your Ubuntu system.
Slack continues to be one of the best cloud-based team communication tools, and a huge number of teams use it.
Please drop a comment below if you have had any issues installing this tool on your machine.
If you found this tutorial to be helpful, we offer numerous other Ubuntu tutorials that may be worth exploring.