In this tutorial, we will show you how to self-host your very own Satisfactory dedicated server on Linux.

Satisfactory is a factory simulation game developed by Coffee Stain Studios. It supports multiplayer, allowing many players to work on building up one factory. It is often seen as a 3D alternative to the popular Factorio.
Hosting your own Satisfactory server on Linux allows you to have a central place for you and your friends to play this game. It is also a great way to free up resources on your own machine, as you can offload the server process to a separate machine. It also means you can host a server in a more central location using a VPS, dedicated server, or more.
A bonus of using the official dedicated server is that it has cross-play support. This means that you can join the server regardless of whether you bought the game on Steam or the Epic Games Store.
While it is possible to host a Satisfactory dedicated server without owning the game, you will need to own the game to actually configure the server. Whoever connects to the server first is the one who can claim it and set information such as the admin password.
Please note that you will need a minimum of 12GB of RAM to run this server on your machine. However, 16GB of RAM is recommended for the best experience.
Setting up a Satisfactory Dedicated Server on Linux
Over the following sections, you will learn how to set up a dedicated server for Satisfactory on Linux.
While we tested these steps on Ubuntu, they should work fine for almost all Linux distributions.
Preparing your System to run the Linux Satisfactory Server
1. Before you begin to set up the Satisfactory server, you will need to install the SteamCMD tool. This tool allows us to easily download the server and keep it updated.
If you don’t have this tool installed, be sure to follow our guide on installing SteamCMD on Linux.
https://pimylifeup.com/linux-steamcmd/Creating a User to Run the Satisfactory Dedicated Server on Linux
2. It is good practice to have your servers run under a different user. For this guide, we will use the useradd command to create a user called “satisfactory“.
We use the “-m” option to tell the command to create a home directory for this user.
sudo useradd -m satisfactoryCopy3. With the user now created, our next step is to change to it. We can swap to this user using the “sudo” command followed by the “-u” option and then the username.
sudo -u satisfactory -sCopy4. After changing to the “satisfactory” user, you will want to swap to their home directory by using the cd command followed by the tilde symbol (~).
We must swap to this user to ensure we don’t accidentally mess up file permissions.
cd ~CopyUsing SteamCMD to Install the Satisfactory Server
5. We are finally at the point where we can download and install the Satisfactory dedicated server to our Linux system.
Thanks to us using the SteamCMD tool, downloading the latest version of this server is as easy as running the command below.
/usr/games/steamcmd +@sSteamCmdForcePlatformType linux +force_install_dir /home/satisfactory/server +login anonymous +app_update 1690800 +quitCopy6. Once your system has finished downloading the game server, you can now exit and return to your normal user.
exitCopyWriting a Service to Run the Satisfactory Dedicated Server on Linux
7. We can now move on and write a service that will run and manage the Satisfactory Dedicated Server on our Linux system.
By running the following command, you can begin writing this file using the nano text editor.
sudo nano /etc/systemd/system/satisfactoryserver.service Copy8. Within this service file, you only need to enter the following lines. Satisfactory doesn’t have much you can configure through the command line, so you should be able to use this file as is.
When you start this service, it will automatically check if there are any updates for the server and download them.
[Unit]
Description=Satisfactory Dedicated Server
Wants=network-online.target
After=network-online.target

[Service]
Environment=SteamAppId=1690800
Environment=LD_LIBRARY_PATH=/home/satisfactory/server:$LD_LIBRARY_PATH
Type=simple
Restart=on-failure
RestartSec=10
User=satisfactory
Group=satisfactory
WorkingDirectory=/home/satisfactory/server
ExecStartPre=/usr/games/steamcmd +@sSteamCmdForcePlatformType linux +force_install_dir /home/satisfactory/server +login anonymous +app_update 1690800 +quit
ExecStart=/home/satisfactory/server/FactoryServer.sh \
    -unattended \
    -log \
    -BeaconPort=15000 \
    -ServerQueryPort=15777 \
    -Port=7777 \
    -multihome=0.0.0.0

[Install]
WantedBy=multi-user.targetCopy
9. Once you have written the systemd service file, you can save and quit by pressing CTRL + X, Y, and then ENTER.
Starting the Satisfactory Server on Linux
10. To get the Satisfactory Dedicated Server to start when our Linux system starts up, we will want to enable the service we just created.
You can enable the service by using the following command within the terminal.
sudo systemctl enable satisfactoryserverCopy11. Once the service has been created, you can start the Satisfactory server by using the following command within the terminal.
You should hold off starting your server if you aren’t yet prepared to connect to it with a Satisfactory game client. The first user that connects to a new server can control and configure that server.
sudo systemctl start satisfactoryserverCopyConfiguring your Linux Satisfactory Dedicated Server
12. Now that the Satisfactory Dedicated Server is running on your Linux device, you must claim it through the game client. Of course, you will need to know your machine’s IP address before continuing.
Once you open Satisfactory game client, select the “Server Manager” (1.) option in the sidebar.
After opening the “Server Manager“, click the “+ Add Server” button (2.).

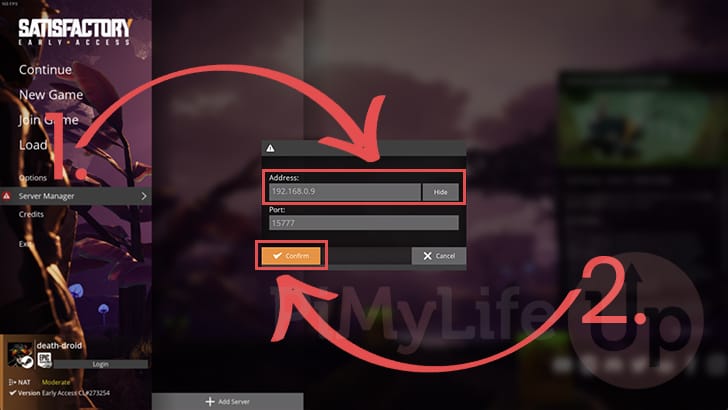
13. You will now be prompted to enter the IP address of the machine where you are hosting your Satisfactory dedicated server (1.). For our example, we are hosting ours locally and can connect using the address “192.168.0.9“.
Once you have entered the address, click the “Confirm” button (2.) to begin connecting.
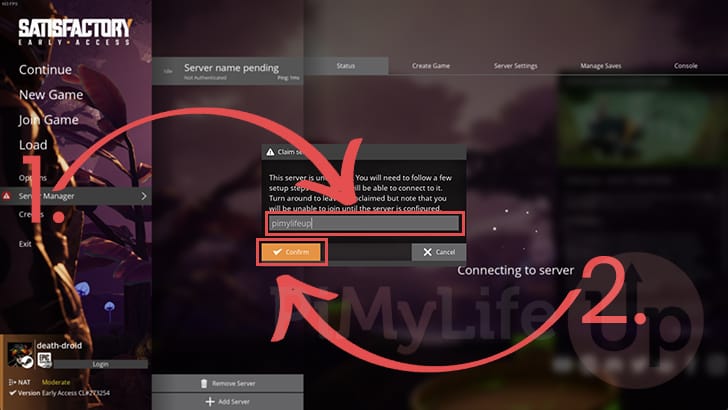
14. Since this is the first time you are connecting to your server, you will be asked to claim it. The first thing you will need to do is assign your server a name (1.).
After typing out a name for your server, click the “Confirm” button (2.).
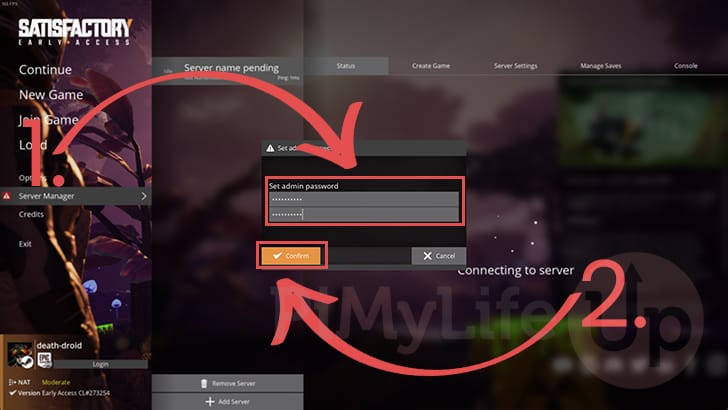
15. Next, you will be asked to set a password for the admin account (1.). You must set this password to something secure, as it will allow someone to control your game server.
Once you are happy with the password you have entered, click the “Confirm” button (2.).
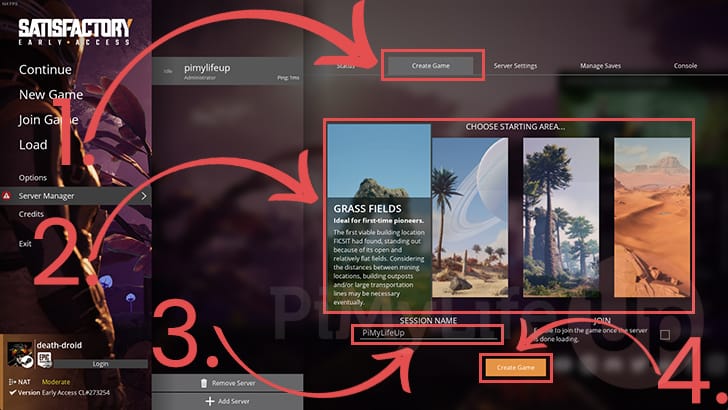
16. The Linux Satisfactory Dedicated Server doesn’t automatically create a game world. Instead, we have to use the interface to start a new session.
While still within the server manager, change to the “Create Game” tab (1.).
On this tab, you must select the starting area (2.). This is where you will start in the game world, so be careful with your choice.
Your next step is to type out a name for this session (3.). This name will be used for game saves.
Once you have finished configuring everything, click the “Create Game” button (4.) to fully start the server.
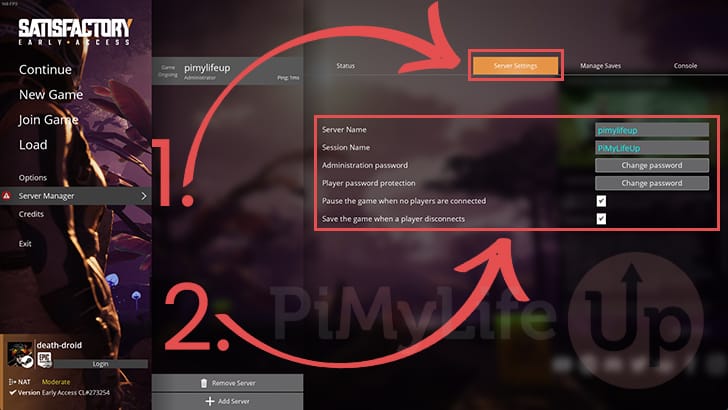
17. While you are still within the server manager, you might want to change some of the server’s settings. You can access these settings by changing to the “Server Settings” tab (1.).
On this page, you will find various options, such as password-protecting your game server (2.).
18. You can check the status of your new Linux-hosted Satisfactory server by changing to the “Status” tab (1.).
Here, you will see various information about the server, including the number of current players. If you want to join the server, click the “Join Game” button (2.).

Conclusion
Hopefully, at this stage, you will have successfully set up and run a dedicated server for Satisfactory on your Linux device.
Hosting your own server gives you an easy way to keep a server running 24/7 without keeping the game running on your machine.
Please feel free to post a comment below if you have run into any issues with trying to get this game server running on Linux.
If you liked this guide, check out our many other game server guides to see what else you can host on Linux.


Hello i’ve used the How to but i discoverd an error.
When i installed the server like u mentioned i’ve was not able to connect to the Server from the Internet, after i change some thing mentioned in the offical how to i was able to.
at point 5 i’ve used this command
/usr/games/steamcmd +force_install_dir ~/SatisfactoryDedicatedServer +login anonymous +app_update 1690800 -beta public validate +quit
and point 8 i’ve changed this varriables
-Port=7777/udp|7777/tcp|8888/tcp
I thing it is ok if you just change the Port but i will not receck it 😉
Thanks for your how to and have a greate day.
I need to change one Point in my comment Point 5 is correct in the Tutorial but die varriables in Point 8 must be changed