In this Raspberry Pi Wiimote controllers guide, we will walk you through the process of setting up a Wiimote on your Raspberry Pi and show you how to setup both cwiid and wminput.

Utilizing Wiimote controllers on the Raspberry Pi can be painful to deal with due to its handling of the Bluetooth stack. While they run over standard Bluetooth, their actual functionality is not picked up as a conventional joystick device like Xbox controllers and PlayStation controllers.
Instead to support the full functionality of Wiimote controllers in a way that most applications can support we must utilize two pieces of software.
These being cwiid and wminput. One acts as a library that interprets the Wiimotes actions into joystick actions, the other being somewhat of a driver that creates an input device that applications can utilize easily.


Equipment List
Below are all the bits and pieces that I made use of for this Raspberry Pi Wiimote controllers tutorial.
Recommended
- Raspberry Pi Amazon 2 or newer
- Micro SD Card Amazon
- Power Supply Amazon
- Wiimote Controller Amazon
- Bluetooth Adapter Amazon
Optional
- Raspberry Pi Case Amazon
Setting up a Wiimote on the Raspberry Pi
Sadly like most wireless controllers, Wiimotes do not work correctly with the Raspberry Pi straight out of the box. While Wiimote controllers use Bluetooth most of their functionality is not picked up correctly under standard interfaces.
To circumvent this, we can utilize two different pieces of software. We use these as they are widely accepted as the straightforward solution and is used by popular projects such as Retropie.
Installing any Required Packages
In this section we will be preparing your Raspberry Pi by installing all the packages we need to connect to a Wiimote.
1. Now before we start on our first method of utilizing a Wiimote with the Raspberry Pi, we must first ensure that everything is entirely up to date.
Do this by running the following commands on the Raspberry Pi.
sudo apt update
sudo apt upgrade -yCopy
2. Now that we have updated our Raspberry Pi lets go ahead and install some of the packages that we will need for this tutorial.
- Wminput – This package is an essential part of this tutorial, it acts as an event/joystick/mouse driver for the Wiimote, allowing the operating system to understand it as one of its controller devices.
Wminput helps enable it to be compatible with any program that has support for joystick devices. - autoconf, bison, gawk, flex, build-essential, libbluetooth-dev, git, python3-dev – These are all packages we need for compiling libcwiid on our Raspberry Pi.
sudo apt install wminput autoconf gawk bison flex libbluetooth-dev python3-dev gitCopyPlease note that if you are using a Raspberry Pi 2 or earlier, you may be required to install the Bluetooth packages, to do this we need to run the following command on our Raspberry Pi.
sudo apt install bluetoothCopyCompiling libcwiid for the Raspberry Pi
For all of this to work we will need to compile libcwiid on our Raspberry Pi. This library is what helps our Raspberry Pi connect to a Wiimote.
While this library is available through the package repository it is currently broken so we will need to compile it ourselves.
1. For our first step we will need to clone a repository for libcwiid that has been fixed to work with Python 3.
You can close this repository by using the following command.
git clone https://github.com/azzra/python3-wiimote.gitCopy2. Once the repository has been cloned to your Raspberry Pi change into its directory by using the command below.
cd python3-wiimoteCopy3. We can now run the following commands to configure libcwiid for compilation.
These scripts configure everything so it can compile on the Raspberry Pi. They also ensure all required packages are available.
aclocal
autoconf
./configureCopy
4. Finally, we can compile the library by using the following command.
makeCopy5. With that done, we can now install libcwiid to the Raspberry Pi by using the following command.
sudo make installCopyConfiguring UDEV To allow Raspberry Pi Wiimote Access
1. With the packages we require installed to our Raspberry Pi we need to now set up the udev rules to allow non-root users access to our uinput devices. Uinput is the interface that wminput creates our Wiimote on.
We can create these Wiimote rules by running the following nano command.
sudo nano /etc/udev/rules.d/wiimote.rulesCopy2. Type in the following line into the file. This line will be read when the system boots up.
KERNEL=="uinput", MODE="0666"3. Now let’s save the file by pressing CTRL + X, then press Y and finally press ENTER.
4. Let’s now restart the udev service, we do this so that it will load in the new rules file we wrote in the previous step. To do this, we just need to run the following command on our Raspberry Pi.
sudo service udev restartCopyEnsuring Bluetooth is Enabled
1. Now before we proceed too far, we should make sure that the Bluetooth service is up and running, to do this we can utilize the following command to check its status.
sudo systemctl status bluetoothCopyIf you see “Active: active (running)” appear in the command line then you can proceed onto step 8 of this tutorial.
If you see anything else appear you can attempt to restart the bluetooth service by running the following command, in some cases this will start it back up but in others there may be actual errors stopping it from working correctly.
sudo systemctl start bluetoothCopyConfiguring wminput on the Raspberry Pi
1. Now that we know that the bluetooth service is up and running let’s proceed to finish up our setup of wminput by creating a config file. This config file will associate all the wiimote buttons with a particular action/event in Linux.
Let’s create the config file we need by running the following command, for our guid we will by naming this “mywminput“.
sudo nano /home/$USER/mywminputCopy2. Within this file enter the following lines, this gives a basic setup for the classic controller, Wiimote and nunchuck controller.
# Classic-Controller
Classic.Dpad.X = ABS_X
Classic.Dpad.Y = ABS_Y
Classic.LStick.X = ABS_HAT0X
Classic.LStick.Y = ABS_HAT0Y
Classic.RStick.X = ABS_HAT1X
Classic.RStick.Y = ABS_HAT1Y
Classic.A = BTN_A
Classic.B = BTN_B
Classic.X = BTN_X
Classic.Y = BTN_Y
Classic.Minus = BTN_SELECT
Classic.Plus  = BTN_START
Classic.Home  = BTN_MODE
Classic.L  = BTN_TL
Classic.R  = BTN_TR
Classic.ZL = BTN_TL2
Classic.ZR = BTN_TR2

# WiiMote
Wiimote.A = BTN_A
Wiimote.B  = BTN_B
Wiimote.Dpad.X = ABS_Y
Wiimote.Dpad.Y = -ABS_X
Wiimote.Minus = BTN_SELECT
Wiimote.Plus = BTN_START
Wiimote.Home = BTN_MODE
Wiimote.1 = BTN_X
Wiimote.2 = BTN_Y

# Nunchuk
Nunchuk.C = BTN_C
Nunchuk.Z = BTN_ZCopy
3. This next step is completely optional, if you don’t want any of the Wiimote LED’s to turn on you can skip to the next step.
Also if you want to learn up how to better configure your Wiimote configuration file you can check out these two helpful documents, the first is a list of wiimote buttons and axis that you can utilize in the configuration file, you can find this list of Wiimote button and axis on their Github.
The other is a list of possible buttons and axis’s that you can assign to your Wiimote button and axis as listed in the link above, you can find this list of buttons and axis on cwiids github page.
If you want to set which LED’s will be enabled when the connection to your Wiimote has been created then you can set them by using one of these following lines. Simply add whatever one you want to the bottom of the mywminput configuration file,
Plugin.led.Led1 = 1
#Plugin.led.Led2 = 1
#Plugin.led.Led3 = 1
#Plugin.led.Led4 = 1Copy
4. Let’s now save our wminput config file by pressing CTRL + X then Y then finally pressing ENTER.
Getting the Wiimote MAC Address on the Raspberry Pi
1. Now we can proceed to grabbing all our Wiimote’s MAC addresses, we will need these to initiate the connection with our Raspberry Pi’s bluetooth device.
We can utilize the following command to search for any Bluetooth devices around.
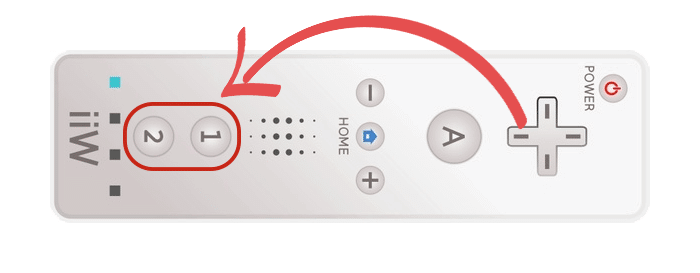
hcitool scanOnce you have started the tool press the 1 + 2 buttons at the same time on your Wiimote controller to start the discovery process.
If you are unsure what buttons we mean then check out the diagram shown below.
2. You should see something like below appear in your command line, this will be the MAC address of your Wiimote controller followed by an identifier.
Write down the MAC address of each of the controllers you intend on using.
Scanning ...
        00:24:1E:63:E0:AD       Nintendo RVL-CNT-01
Writing a Script to Connect your Wiimote
1. Now let’s proceed with setting up a script to simplify connecting the controllers to the Raspberry Pi. We will write a script so we can get it to initialize at startup.
We will explain what the bash script does section by section to give you an idea of how everything works.
To begin let’s create a file in our home directory to store this bash script by running the following command on the Raspberry Pi.
nano /home/$USER/connectwiimote.shCopy2. Now add the following lines to our connectwiimote.sh file. We will try to explain everything as we go along. Begin by entering these first three lines of code.
#!/bin/bash
sleep 1 # Wait until Bluetooth services are fully initialized
hcitool dev | grep hci >/dev/nullCopy
The top line acts as an identifier, so the operating system knows to use /bin/bash to run the file.
The second line tells the script to sleep for one second, we do this to make sure that the Bluetooth services are fully initiated before we try to use them.
The third line utilizes the hcitool to see whether there are any Bluetooth adapters available to utilize, this will stop the running of the wminput tool if there are no Bluetooth adapters to utilize.
if test $? -eq 0 ; then
	wminput -d -c  /home/pi/mywminput YOUR_MAC_ADDRESS &
elseCopy
The first line just checks to see whether our previous hcitool line has given us a result that we need to know that the Bluetooth adapter is available.
Our next line is one of the most critical parts of the file. This line initializes wminput to begin searching for your Wiimote controller.
You can have multiple of these lines just make sure you replace “YOUR_MAC_ADDRESS” in each occurrence with the MAC Address of a Wiimote controller that you want to connect.
The third line is a simple else statement that follows our final three lines of code.
	echo "Bluetooth adapter not present!"
	exit 1
fiCopy
These final three lines of code are incredibly simple. The first line just prints “Bluetooth adapter not present!” to the command line. This message occurs when the hcitool doesn’t see the Bluetooth adapter.
The second line just stops the script from executing any further.
Finally, the last line of our code just marks the end of our if, else statements.
3. Once you have finished writing in all the lines of code, you should end up with something like what we have shown below. Of course with your MAC address in place of “YOUR_MAC_ADDRESS“.
#!/bin/bash
sleep 1 # Wait until Bluetooth services are fully initialized
hcitool dev | grep hci >/dev/null
if test $? -eq 0 ; then
	wminput -d -c  /home/pi/mywminput YOUR_MAC_ADDRESS &
else
	echo "Blue-tooth adapter not present!"
	exit 1
fiCopy
We also have included an example of what the file would look like if you are trying to connect multiple different controllers. You can see that in the code block over on the next page.
#!/bin/bash
sleep 1 # Wait until Bluetooth services are fully initialized
hcitool dev | grep hci >/dev/null
if test $? -eq 0 ; then
	wminput -d -c  /home/pi/mywminput YOUR_MAC_ADDRESS &
	wminput -d -c  /home/pi/mywminput YOUR_MAC_ADDRESS &
	wminput -d -c  /home/pi/mywminput YOUR_MAC_ADDRESS &
else
	echo "Blue-tooth adapter not present!"
	exit 1
fiCopy
4. Once you are sure, the code is correct, save the file by pressing CTRL + X then Y and then finally ENTER.
5. Now with our script created let’s go ahead and make it executable by using chmod to give it 775 permissions. This line will allow the owner and group to have full read/write/execute permissions, but only grants everyone else the ability to run the script.
Let’s do this by running the following chmod line on our Raspberry Pi’s command line.
sudo chmod 775 /home/$USER/connectwiimote.shCopy6. Now, let’s move onto the testing stage of our script. First, to do this, we must first enable the uinput module.
We can do this by utilizing modprobe by running the following command on our Raspberry Pi.
sudo modprobe uinputCopy7. With the uinput module now enabled we can finally run our script to test if it’s actually working. To do this just run the following command.
/home/$USER/connectwiimote.shCopyWhile the script is running press the 1 + 2 buttons on your Wiimote controllers, this will initialize the connection. They should flash briefly before either turning off entirely or using the value you configured earlier.
Ensuring Uinput is Loaded at boot
1. Now that we know the script is working let’s proceed onto the next steps, and that is making the script and the uinput module startup at boot so your controllers can connect at any time.
We will begin by editing the /etc/modules file to load up uinput at boot up. Run the following command to start editing the file.
sudo nano /etc/modulesCopy2. To this file add the following line to the bottom of the file. This line will make sure uinput is loaded at boot up time.
uinput3. You can now save the file by pressing CTRL + X then Y and then finally pressing ENTER.
Connecting your Wiimote to the Raspberry Pi at Boot
1. Finally, let’s edit the rc.local file, we will utilize this to execute our connectwiimote.sh script at startup.
Let’s begin by editing the file by utilizing the following command.
sudo nano /etc/rc.localCopy3. Now in this file add the following line. Make sure you replace USERNAME with the name of your user.
Find
exit 0Add Above
sh /home/USERNAME/connectwiimote.sh4. You can now save the file by pressing CTRL + X then Y and then finally pressing ENTER.
5. We must now restart the Raspberry Pi to test to see whether our script is being executed correctly. To do this run the following command on your Raspberry Pi.
sudo rebootCopy28. Now if you press the 1 + 2 buttons on your Wiimote controller, it should make a successful connection automatically. If it does, you have completed the process os syncing your Wiimote to the Raspberry Pi.
Testing the Controller is Working
1. Now we should test the controller to make sure it is, in fact, working correctly we make use of the jstest tool.
To begin using this lets first install the joystick package, while this is usually included with the full installation of Raspbian, it’s not included in the lite edition.
Install it on your Raspberry Pi by running the following command on it.
sudo apt install joystickCopy2. Now lets test our new joystick device by running the following command, when in the jstest tool you should see values change upon doing certain actions on your Wiimote.
sudo jstest /dev/input/js0CopyConclusion
There are plenty of reasons why you might want to have set these controllers up on the Raspberry Pi. One of the biggest reasons is so that you can do some gaming on the Raspberry Pi, but there are plenty of regular projects you can use them as a controller.
Hopefully, by the end of this Raspberry Pi Wiimote guide, you have now got your Raspberry Pi up and running with your Wiimotes successfully connecting to it. If you have any feedback or need assistance with this tutorial feel free to drop a comment below.


Hi,
When I try to run wminput, I get this error:
ImportError: /usr/lib/python3/dist-packages/cwiid.cpython-39-arm-linux-gnueabihf.so: undefined symbol: PyVarObject_CallFunction
My dad and I tried searching how to resolve this issue, and couldn’t figure it out. Any ideas or suggestions?
Hi Bryson,
I have made adjustments to the tutorial so we now clone and compile a version of libcwiid that should work.
Please let me know if this solves the issues you are facing.
Cheers,
Emmet